
Popular categories
Looking for a yarn?


Comments / Questions (45)
![]() Egron Pascale wrote:
Egron Pascale wrote:
Bonjour, Je voudrais réaliser ce modèle mais au lieu de prendre deux fils du groupe A, je voudrais prendre un fil du groupe C, le Drops Brushed Alpaca Silk - vert mousse. Combien de pelote est-ce que je dois prendre ? Merci, bonne journée. Pascale
29.01.2026 - 13:42DROPS Design answered:
Bonjour Pascale, retrouvez ici, sous 2 fils de métrage différents par 1 fil.>comment calculer la quantité nécessaire pour votre taille. Bon tricot!
30.01.2026 - 08:15
![]() Florence wrote:
Florence wrote:
Bonjour et bonne année à toute l'équipe ! Lorsque je monte les mailles pour la bordure dois-je prendre les 2 bords ensemble de la première torsade des manches ou relever sur le dessus et le dessous de cette torsade ?
06.01.2026 - 23:46DROPS Design answered:
Bonjour Florence et désolée pour la réponse tardive, les mailles des bordures des devants sont relevées à 1 maille du bord tout le long des devants mais aussi le long des manches et de l'encolure dos. Bon tricot!
27.02.2026 - 13:49
![]() Alyssa wrote:
Alyssa wrote:
Hi, ik ben bij de meerderingen voor de v-hals, waar je iedere 6e naald 4x en elke 4e naald 3x moet meerderen. Is het de bedoeling om eerst de 6e naalden te meerderen en daarna de 4e naalden of om deze stappen tegelijk uit te voeren?
30.12.2025 - 19:09DROPS Design answered:
Dag Alyssa,
Je meerdert eerst elke 6e naald 4 keer en als je dat gedaan hebt meerder je elke 4e naald 3 keer. Dus niet tegelijkertijd, maar achter elkaar.
03.01.2026 - 16:16
![]() Ingeborg wrote:
Ingeborg wrote:
Als ik dit vest in kids silk stormblauw en alpaca 6360 maneschijnblauw zou willen breien, passen deze kleuren bij elkaar zoals deze kleuren groen bij elkaar passen?
16.12.2025 - 12:36DROPS Design answered:
Dag Ingeborg,
Voor vragen en advies over kleuren kun je het beste terecht bij je verkooppunt. Zij kunnen je wellicht verder helpen om de juiste kleur te vinden. Vaak is het mogelijk om extra bollen te bestellen en de bollen die je niet gebruikt terug te sturen binnen een bepaalde termijn. Vraag je verkooppunt naar de mogelijkheden.
16.12.2025 - 20:39
![]() Anja Franke wrote:
Anja Franke wrote:
Ich stricke Drops 215-6 in Größe M und bin mit den Raglanzunahmen in Reihe 53 fertig. Die Zunahmen für den V-Ausschnitt enden schon in Reihe 43. Wieso steht in der Anleitung, dass weiter gesrickt wird und dann erst der V-Ausschnitt beendet wird. Das verwirrt mich.
13.12.2025 - 10:18DROPS Design answered:
Liebe Frau Franke, die Zunahmen für den V-Ausschnitt sollen fertig sein, wenn die Arbeit 25 cm misst, dh wenn man die Passe aufteilen soll. Viel Spaß beim Stricken!
15.12.2025 - 11:46
![]() Natalia wrote:
Natalia wrote:
Dzien dobry, zrobilam sweter nieco dluzszy. Na jakies zasadzie mam nabierac oczka na plise? Nie wiem ile ich nabrac teraz. Zrobilam rozmiar S. Od pachy na sam dol mam 35 cm
04.11.2025 - 21:37DROPS Design answered:
Witaj Natalio, nabrałabym 18-19 oczek na każde 10 cm brzegu swetra. Ja zwykle biorę próbkę, którą wcześniej zrobiłam dla tego swetra i na jej boku nabieram oczka odpowiednimi drutami i przerabiam kilka cm ściągaczem i sprawdzam. Powodzenia!
05.11.2025 - 09:21
![]() Natalia wrote:
Natalia wrote:
Dzien dobry, zrobilam sweter nieco dluzszy. Na jakies zasadzie mam nabierac oczka na plise? Nie wiem ile ich nabrac teraz.
04.11.2025 - 21:08DROPS Design answered:
Witaj Natalio, jaki rozmiar wykonujesz i o ile dłuższy jest Twój sweter?
04.11.2025 - 21:21
![]() Thea wrote:
Thea wrote:
How much wearing ease is there in this pattern please. Also are the measurements for the cardigan in cms. What is the ply this cardigan is worked in please, I would like to knight it in 8 or 10 ply, whichever is the closest. Thank you , Thea.
02.10.2025 - 10:12DROPS Design answered:
Dear Thea, there is no recommended ease for the cardigan. The size chart shows the final measurements of the garment in cm, so you will pick the size that fits better with your measurements. The desired ease will depend on the wearer; you can check your own garments' measurements and check the ease they have to guide you into which size to pick. This garment is worked with 2 Group A yarns or 1 Group C yarn (which would be approx. 10 ply). However, you need to check that the gauge with your chosen yarn matches the gauge in the pattern; otherwise you will need to recalculate the pattern. Happy knitting!
05.10.2025 - 19:44
![]() Elwira wrote:
Elwira wrote:
W TYM SAMYM CZASIE, w 6-tym rzędzie (tj. w 3-cim rzędzie na prawej stronie robótki), zacząć dodawać oczka na dekolt-V z każdej strony – patrz powyżej, następująco: dodawać w sumie 4-5-6-7-8-9 razy co 6 rzędów i 3 razy co 4 rzędy (= dodanych 7-8-9-10-11-12 oczka z każdej strony To od ktorego rzędu dodawac oczka na dekolt? W 6 czy 3?
26.08.2025 - 15:29DROPS Design answered:
Witaj Elwiro, dodajesz oczka na dekolt od 6-tego rzędu (to jest również 3-ci rząd na prawej stronie robótki). Pozdrawiamy!
26.08.2025 - 20:30
![]() Madeleine Breedveld wrote:
Madeleine Breedveld wrote:
Ik snap de meerderingen in de pas niet. Ik kom tot 276 steken gemeerderd.\\r\\nIedere 4e naald in totaal 3 keer (= in totaal 7-8-9-10-11-12 steken) hoe kun je 10 steken meerderen wanneer je er twee per 4e naald meerdert.
25.08.2025 - 21:01
|
|||||||||||||||||||
Deep Woods#deepwoodscardigan |
|||||||||||||||||||
 |
 |
||||||||||||||||||
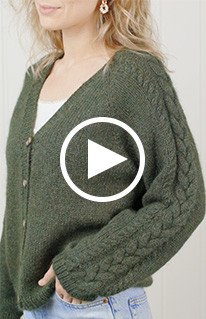
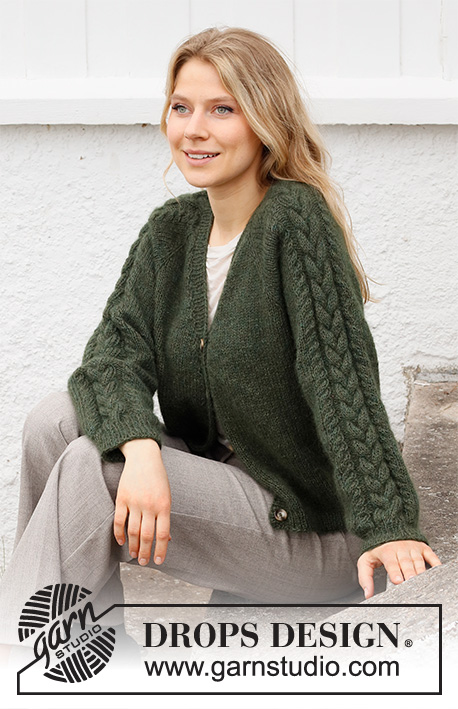
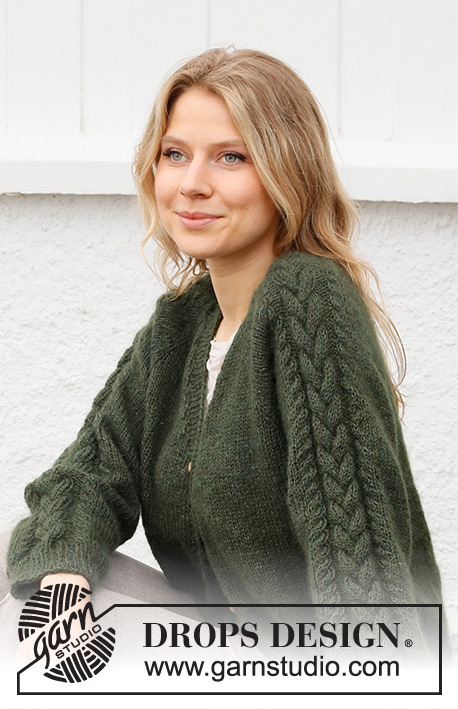
Knitted jacket in DROPS Alpaca and DROPS Kid-Silk. The piece is worked top down with raglan, cable-pattern and V-neck. Sizes S - XXXL.
DROPS 215-6 |
|||||||||||||||||||
|
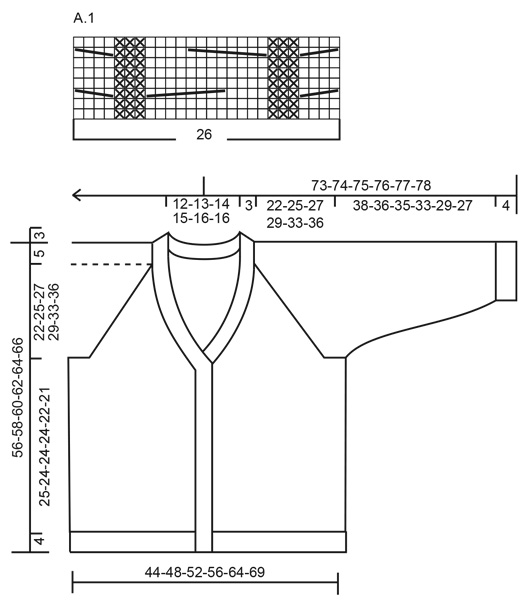
------------------------------------------------------- EXPLANATIONS FOR THE PATTERN: ------------------------------------------------------- RIDGE/GARTER STITCH (worked back and forth): Knit all rows. 1 ridge in height = Knit 2 rows. PATTERN: See diagram A.1. RAGLAN: Increase 1 stitch on each side of the stitch in stocking stitch (stitch with marker thread) in each transition between body and sleeves (= 8 stitches increased on the row). Increase 1 stitch by making 1 yarn over. On the next row purl the yarn overs twisted to avoid holes. Then work the new stitches in stocking stitch. V-NECK: All increases are worked from the right side! Make 1 yarn over on the inside of the edge stitch on each side. On the next row (wrong side) purl the yarn over twisted to avoid a hole. Then work the new stitch in stocking stitch. 2 stitches increased on each increase-row (1 stitch each side) DECREASE TIP (for sleeves): Decrease 1 stitch on either side of the marker thread as follows: Work until there are 3 stitches left before the marker thread, knit 2 together, knit 2 (marker thread sits between these 2 stitches), slip 1 stitch as if to knit, knit 1 and pass the slipped stitch over the knitted stitch. CASTING-OFF TIP: To avoid the cast-off edge being tight you can cast off with a larger size needle. If the edge is still tight, make 1 yarn over after approx. each 4th stitch at the same time as casting off; the yarn overs are cast off as normal stitches. BUTTONHOLES: Work 5 buttonholes on the right band (when the garment is worn). 1 buttonhole = knit 2 stitches together and make 1 yarn over. On the next row knit the yarn over to leave a hole. The bottom buttonhole is worked approx. 2 cm from the bottom edge and the top buttonhole where the V-neck begins. The other 4 buttonholes are worked evenly between them (with approx. 8 cm between each one). ------------------------------------------------------- START THE PIECE HERE: ------------------------------------------------------- JACKET – SHORT OVERVIEW OF THE PIECE: The yoke is worked back and forth with circular needle from mid front and top down. AT THE SAME TIME increases are made for the V-neck and raglan. The yoke is divided for body and sleeves and the body continued back and forth. The sleeves are worked in the round with short circular needle/double pointed needles, top down. The neck/bands are worked to finish. YOKE: Cast on 80-82-84-86-88-90 stitches (including 1 edge stitch on each side towards mid front) with circular needle size 5 mm and 1 strand Kid-Silk and 1 strand Alpaca (= 2 strands). Purl 1 row from the wrong side. READ THE WHOLE OF THE NEXT SECTION BEFORE CONTINUING: Insert 4 marker threads in the piece as follows (without working the stitches): Count 3 stitches (= front piece), insert 1 marker thread in the next stitch, count 26 stitches (= sleeve), insert 1 marker thread in the next stitch, count 18-20-22-24-26-28 stitches (= back piece), insert 1 marker thread in the next stitch, count 26 stitches (= sleeve), insert 1 marker thread in the next stitch, there are 3 stitches left after the last marker thread (= front piece). Continue with 1 edge stitch in garter stitch and stocking stitch over the stitches on both front pieces, stocking stitch on the back piece and A.1 (= 26 stitches) over each sleeve, AT THE SAME TIME on the first row from the right side increase to RAGLAN in each transition between body and sleeves – read description above. Continue this increase every 2nd row (i.e. each row from the right side) a total of 22-25-27-29-33-36 times on both sides of all 4 marker threads. Continue the increase 2 more times on the front and back pieces (do not increase any more on the sleeves). AT THE SAME TIME on row 6 (i.e. the 3rd row from the right side) increase for the V-NECK on each side towards mid front – read description above, as follows: Increase every 6th row a total of 4-5-6-7-8-9 times and every 4th row a total of 3 times (= a total of 7-8-9-10-11-12 stitches increased on each side towards mid front). REMEMBER THE KNITTING TENSION! After the last increase to raglan, continue working without further increases until the piece measures 22-25-27-29-33-36 cm; the increases for the V-neck should now be finished. There are 278-306-326-346-382-410 stitches on the needle. The next row is worked as follows: Work the first 35-39-42-45-50-54 stitches (= front piece), place the next 70-76-80-84-92-98 stitches on 1 thread for the sleeve and cast on 6-6-6-8-10-12 new stitches on the needle (= in side under the sleeve), work the next 68-76-82-88-98-106 stitches (= back piece), place the next 70-76-80-84-92-98 stitches on 1 thread for the sleeve and cast on 6-6-6-8-10-12 new stitches on the needle (= in side under the sleeve), work the remaining 35-39-42-45-50-54 stitches (= front piece). THE PIECE IS NOW MEASURED FROM HERE! BODY: = 150-166-178-194-218-238 stitches. Continue with stocking stitch and 1 edge stitch in garter stitch on each side. When the piece measures 25-24-24-24-22-21 cm from the division, knit 1 row from the right side where you increase 1 stitch = 151-167-179-195-219-239 stitches. Change to circular needle size 4 mm. The next row is worked as follows from the wrong side: 1 edge stitch in garter stitch, * purl 1, knit 1 *, work from *-* until there are 2 stitches left on the row, purl 1 and finish with 1 edge stitch in garter stitch. Continue this rib for 4 cm. Loosely cast off with knit over knit and purl over purl, read CASTING-OFF TIP. The jacket measures approx. 56-58-60-62-64-66 cm from the shoulder. SLEEVE: Place the 70-76-80-84-92-98 stitches from the thread on the one side of the piece on double pointed needles/short circular needle size 5 mm and knit up 1 stitch in each of the 6-6-6-8-10-12 stitches cast on under the sleeve = 76-82-86-92-102-110 stitches. Insert a marker thread in the middle of the 6-6-6-8-10-12 stitches under the sleeve. Allow the thread to follow your work onwards; it will be used when decreasing under the sleeve. Start at the marker thread and continue with stocking stitch and A.1 in the round. When the piece measures 3 cm from the division, decrease 2 stitches under the sleeve – read DECREASE TIP. Decrease like this every 3½-3-2-1½-1-1 cm a total of 10-11-13-16-19-21 times = 56-60-60-60-64-68 stitches. Continue working until the sleeve measures 38-36-34-33-29-27 cm from the division (or to desired length; shorter measurements in larger sizes due to longer yoke). Work 1 round where you decrease 12 stitches evenly over the stitches in A.1 = 44-48-48-48-52-56 stitches. Change to double pointed needles size 4 mm and work rib (= knit 1, purl 1) for 4 cm. Loosely cast off with knit over knit and purl over purl but to avoid the cast-off edge being tight, use double pointed needles size 5 mm. Work the other sleeve in the same way. BANDS/NECK: Insert 1 marker, middle-back of the neck, to help you knit up half the stitches around the jacket. The bands are knitted up inside the 1 edge stitch on the front pieces and the stitches around the neck are knitted up inside the first row worked. Start from the right side at the bottom of the right front piece – knit up approx. 119-125-131-137-143-149 stitches, up the front piece and halfway around the neck, using circular needle size 4 mm and 1 strand of each quality – leave the marker here. Knit up approx. 120-126-132-138-144-150 stitches around the other half of the neck and down the left front piece; the number of stitches should be divisible by 2 + 1 = approx. 239-251-263-275-287-299 stitches. It is important that the bands are neither too loose or too tight. The next row is worked as follows from the wrong side: 2 stitches in garter stitch, * purl 1, knit 1 *, work from *-* until there are 3 stitches left, purl 1 and finish with 2 stitches in garter stitch. Continue this rib for 1½ cm. Now work the BUTTONHOLES on the right band – read description above. Continue the rib until the bands measure 3 cm. Loosely cast off with knit over knit and purl over purl, remember the CASTING-OFF TIP ASSEMBLY: Sew the buttons onto the left band. |
|||||||||||||||||||
Diagram explanations |
|||||||||||||||||||
|
|||||||||||||||||||
 |
|||||||||||||||||||
Have you finished this pattern?Tag your pictures with #dropspattern #deepwoodscardigan or submit them to the #dropsfan gallery. Do you need help with this pattern?You'll find 31 tutorial videos, a Comments/Questions area and more by visiting the pattern on garnstudio.com. © 1982-2026 DROPS Design A/S. We reserve all rights. This document, including all its sub-sections, has copyrights. Read more about what you can do with our patterns at the bottom of each pattern on our site. |
|||||||||||||||||||


With over 40 years in knitting and crochet design, DROPS Design offers one of the most extensive collections of free patterns on the internet - translated to 17 languages. As of today we count 325 catalogues and 12298 patterns translated into English (UK/cm).
We work hard to bring you the best knitting and crochet have to offer, inspiration and advice as well as great quality yarns at incredible prices! Would you like to use our patterns for other than personal use? You can read what you are allowed to do in the Copyright text at the bottom of all our patterns. Happy crafting!
Post a comment to pattern DROPS 215-6
We would love to hear what you have to say about this pattern!
If you want to leave a question, please make sure you select the correct category in the form below, to speed up the answering process. Required fields are marked *.