
Popular categories
Looking for a yarn?


Comments / Questions (57)
![]() Heidi Lindstad wrote:
Heidi Lindstad wrote:
De 5m som skal strikkes i rillestrikk. De vil jo ikke bli riller når man strikker 2 p fra retten og så 2 p fra vrangen?
12.12.2024 - 19:00DROPS Design answered:
Hei Heidi. Husk det er en egen forklaring til RILLESTOLPENE, se øverst i oppskriften. 1.PINNE (= fra retten): Strikk rett. 2.PINNE (= fra retten): Strikk vrang. 3.PINNE (= fra vrangen): Strikk vrang. 4.PINNE (= fra vrangen): Strikk rett. mvh DROPS Design
16.12.2024 - 09:21
![]() Elisabeth Sandberg wrote:
Elisabeth Sandberg wrote:
Jeg prøver å strikke Egyptian Feathers jacket. Legger opp 155 masker. Når jeg begynner på mønster stemmer ikke det. Hva er det som er feil
05.04.2024 - 09:43DROPS Design answered:
Hej Elisabeth, 5 ret, A.1B=12x12=144, A.2B=1,5ret=155 m :)
09.04.2024 - 09:53
![]() Barbara wrote:
Barbara wrote:
Endlich, nach fast einem Jahr mit einigen Unterbrechungen, habe ich die Jacke fertig gestrickt. Allerdings war mir der Ausschnitt zu weit und zu dehnbar geworden. Um dies auszugleichen, habe ich den Rand mit zwei Runden feste Maschen umhäkelt. Nun gefällt sie mir gut, auch wenn ein paar Fehler vorhanden sind.
29.08.2023 - 13:02
![]() Carina Richard wrote:
Carina Richard wrote:
Hej ! Jag har kommit till första ökningen i diagram A1.B varv 7. har då ökat 6m hur stickar jag dom på nästa varv ? mvh Carina
28.05.2023 - 19:24DROPS Design answered:
Hei Carina Du følger bare forklaringen til diagrammet / diagramikonene. I 7.rad i diagram A.1B felles og økes det like mange masker, slik at maskeantallet blir det sammen. Når du kommer til 11. rad økes det med 4 masker hver gang diagrammet strikkes, og så her vil du se hvordan det strikkes på rad 12 ved å følge forklaringen til diagrammet / diagramikonene. mvh DROPS Design
30.05.2023 - 10:14
![]() Barbara wrote:
Barbara wrote:
Hallo, ich bin gerade beim stricken der Ärmel angekommen. Ich verstehe hier etwas nicht. In der Anleitung steht: je 1 Masche aus den 8 unter dem Arm angeschlagenen Maschen auffassen . Wann werden die restlichen 6 Maschen dazu genommen? Oder nimmt man gleich am Anfang jeweils 4 Maschen dazu? ( und nicht eine, wie in der Anleitung) Ansonsten ist die Jacke bis jetzt schön geworden.
08.11.2022 - 19:00DROPS Design answered:
Liebe Barbara, bei der Verteilung haben Sie 8 Maschen angeschlagen, wo die Maschen der Ärmel stillgelegt waren, bei den Ärmeln fassen Sie jetzt 1 Masche in jeder diese 8 Maschen auf - diese Lektion zeigt ab Bild 18b) wie man die Ärmel auffasst und weiterstrickt. Viel Spaß beim stricken!
09.11.2022 - 08:20
![]() Barbara wrote:
Barbara wrote:
Hallo, ich habe gerade bei der Passe A.1B fertig gestrickt und möchte nun mit A.1C beginnen. Mir fällt allerdings auf, dass bisher nur die Farben natur und flieder verstrickt wurden. Auf der Abbildung ist aber doch auch graublau mit dabei. Wann kommt graublau zum Einsatz? Auch in der Strickschrift A.1C wird nur natur und flieder angegeben.\r\nMit vielen Grüßen, Barbara.
21.07.2022 - 15:34DROPS Design answered:
Liebe Barbara, schauen Sie mal bei "Hinweise zur Anleitung" unter "Streifen" - dort ist beschrieben, welche Farben Sie wann benutzen - auch graublau wird dort genannt. Viel Spaß beim Stricken!
28.07.2022 - 08:16
![]() Lark Dearing Randall wrote:
Lark Dearing Randall wrote:
Pattern says to work A.1A and A.2A for neck but I don’t see a chart A.1A or A.2A
02.11.2021 - 04:21DROPS Design answered:
Hi, they are next to the schematic drawing (on the right), at the bottom. Happy knitting!
02.11.2021 - 08:20
![]() Lise Gunn wrote:
Lise Gunn wrote:
Nå er jeg en dreven strikker og har strikket A.1B i størrelse L. Når jeg går videre til A.C1 skjer det noe etter 9 omgang. Da passer ikke mønsteret lenger i slutten (eller det blir starten når skal videre i mønsteret. Har rekket opp hele A.1 C hele 7 ganger og kjenner tålmodigheten tar snart slutt. Hva skjer?
02.07.2021 - 12:02
![]() Anita Bjørke wrote:
Anita Bjørke wrote:
Hei! Jeg sliter med å skjønne diagram forklaringene. Jeg driver med M. A.1B den sorte ruten og de skrå (fellingene?). Kan noen forklare det litt bedre, eller eventuelt henvise til hvilken video som passer best? jeg klarer ikke å finne en som matcher... Skal jeg virkelig lese fra høyre på noen omganger og fra venstre på andre? Da bør jo dette stå opplyst ett sted i oppskriften. Har rekket opp flere ganger, og råd ført meg med min mor som har strikket i 40 år...
04.05.2021 - 13:53DROPS Design answered:
Hei Anita. Du kan sjekke denne videoen for å se hvordan den sorte ruten strikkes (men bare lag 1 kast), Hvordan øke 4 masker strikket med 2 farger i helpatent i 1 maske og kast Foreløpig har vi ingen video som viser de skrå fellingene (men det kommer). Når man strikker etter diagram, strikker man 1. pinne fra høyre til venstre og 2. pinne fra venstre til høyre, dersom det ikke står annet forklart i oppskriften. I denne oppskriften står det forklart med diagramikoner til høyre på diagrammene (opp ned trekant, stjerne, sirkel og sort stjerne). mvh DROPS design
10.05.2021 - 09:01
![]() Yvonne wrote:
Yvonne wrote:
Har stickat rätt många år, men klarar inte o förstå mönstret. Läst på det i två dagar nu.
30.03.2021 - 15:47
|
||||||||||||||||||||||||||||||||||||||||||||||
Egyptian Feathers Jacket#egyptianfeathersjacket |
||||||||||||||||||||||||||||||||||||||||||||||
|
|
||||||||||||||||||||||||||||||||||||||||||||||
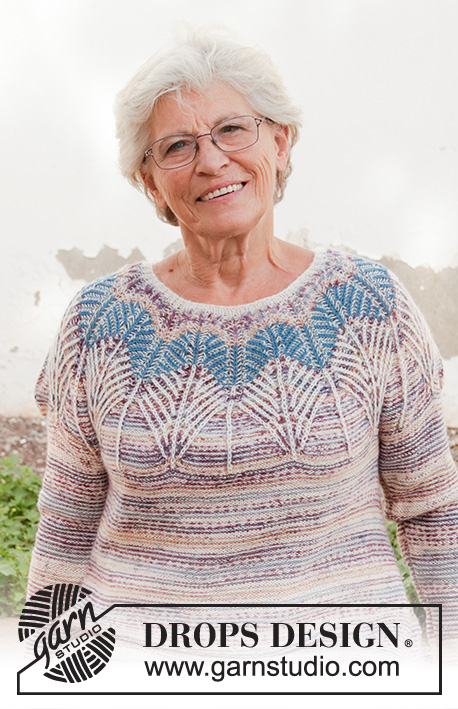
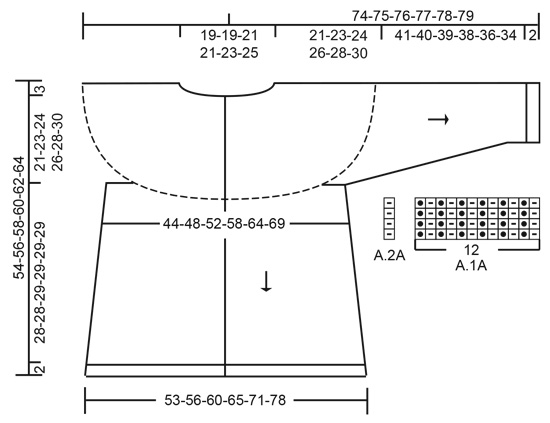
Knitted jacket with round yoke in DROPS Fabel. The piece is worked top down with 2-coloured English rib and zigzag stripes. Sizes S - XXXL.
DROPS 201-29 |
||||||||||||||||||||||||||||||||||||||||||||||
|
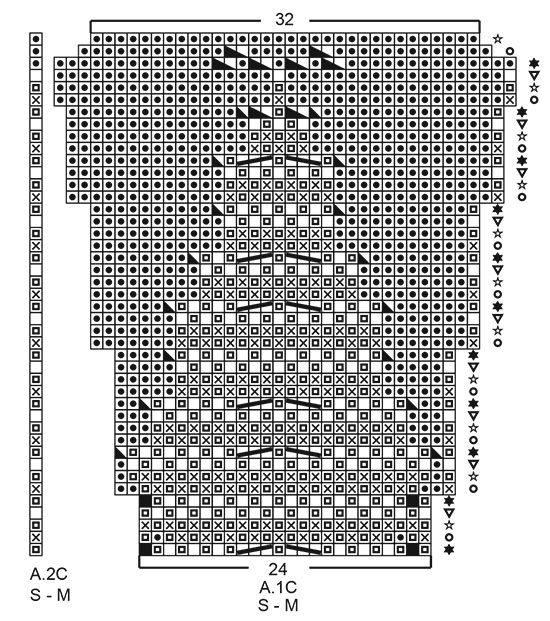
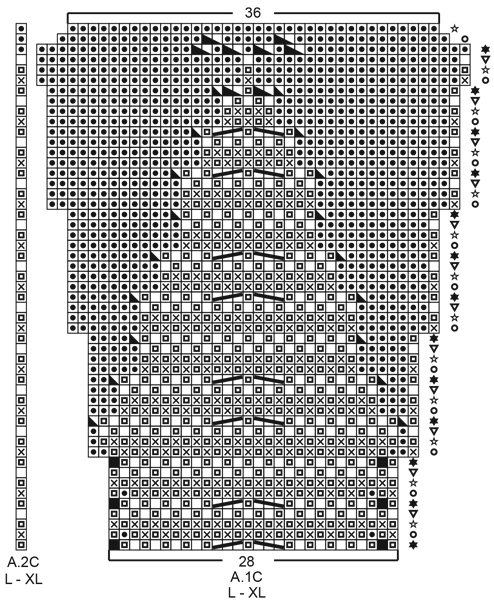
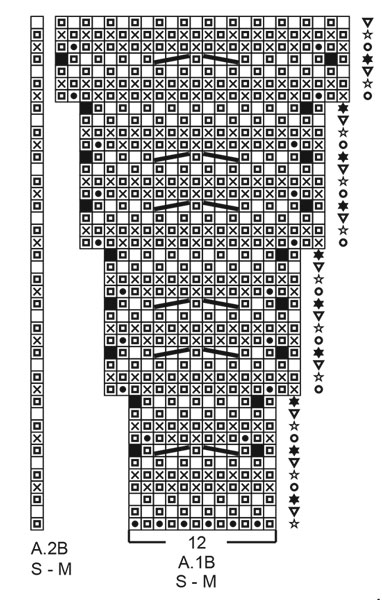
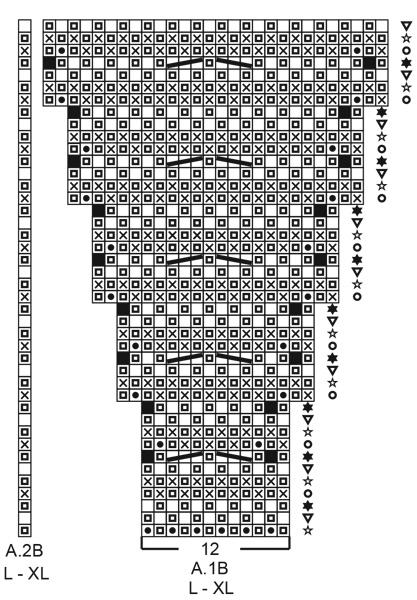
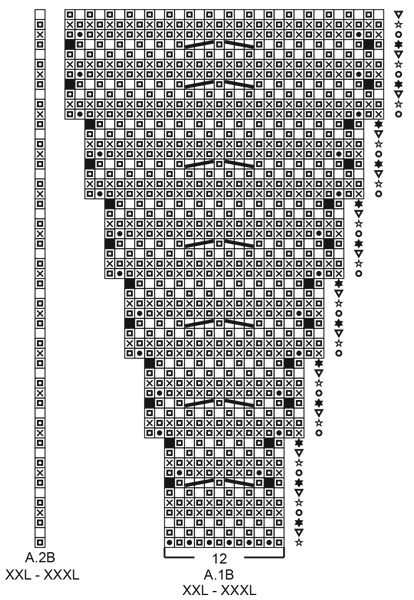
------------------------------------------------------- EXPLANATIONS FOR THE PATTERN: ------------------------------------------------------- RIDGE/GARTER STITCH (worked back and forth): Knit all rows. 1 ridge in height = Knit 2 rows. GARTER STITCH BAND (worked back and forth like this because of English rib pattern): ROW 1 (= from right side): Knit. ROW 2 (= from right side): Purl. ROW 3 (= from wrong side): Purl. ROW 4 (= from wrong side): Knit. PATTERN: See diagrams A.1 and A.2. Choose diagram for your size. First work A.1A/A.2A (= rib on neck). When A.A has been worked 1 time in height work A.1B/A.2B over A.A. When A.B has been worked 1 time in height work A.1C/A.2C over A.B. STRIPES: When working 2-coloured English rib, work back and forth with circular needle as follows: Work row 1 from the right side with colour-2, push all stitches back to the other end of the circular needle so the next row is also worked from the right side with colour-1. Then turn the piece, work 1 row from the wrong side with colour-2, push all stitches back to the other end of the circular needle so the next row is also worked from the wrong side with colour-1. So you work 2 rows from the right side with different colours and 2 rows from the wrong side with different colours. Work stripes in English rib, i.e. colour-1 = used for knitted stitch from right side and colour-2 = used for purled stitch from right side. Adjust so that each stripe finishes after 2 rows from the wrong side. STRIPE 1: Colour-1 = lavender, colour-2 = off white. Work until the piece measures 5 cm at the shortest point. STRIPE 2: Colour-1 = grey blue, colour-2 = off white. Work until the piece measures a total of 9 cm at the shortest point. STRIPE 3: Colour-1 = off white, colour-2 = lavender. Work until A.1c and A.2c have been worked 1 time in height. The last row in the diagram is worked with lavender from the right side. Then continue the stripes on yoke and body as follows (bands in garter stitch are worked as before): ROW 1: Purl with off white. ROW 2: Knit with lavender. Push all stitches to other end of circular needle so the next row is also from the wrong side. ROW 3 (= wrong side): Knit with off white. ROW 4 (= right side): Purl with lavender. Push all stitches to other end of circular needle so the next row is also from the right side. Repeat rows 1 to 4. KNITTING TIP-1: If you are in doubt about which colour to use on next row, you can see the colour used on the previous row by looking at the bands. KNITTING TIP-2: All stitch counts when working English rib are without yarn overs, because the yarn overs belong to the knitted stitches and are therefore counted as 1 stitch (unless otherwise stated). DECREASE TIP (for mid under sleeves): Decrease 1 stitch on each side of the marker thread as follows: Work until there are 3 stitches left before the marker thread, purl 2 together, purl 2 (marker thread sits between these 2 stitches), purl 2 stitches twisted together (2 stitches decreased). INCREASE TIP-1 (evenly spaced): To work out how to increase evenly, count the total number of stitches on the needle (e.g. 331 stitches) minus bands (e.g. 10 stitches) and divide the remaining stitches by the number of increases to be made (e.g. 4) = 80.25. In this example, increase by making 1 yarn over after approx. each 80th stitch. Do not increase on bands. On the next row (wrong side) work the yarn overs twisted to avoid holes. INCREASE TIP-2 (for sides of body): All increases are worked from the right side! Work until there are 2 stitches left before marker thread, 1 yarn over, purl 4 (marker thread sits in middle of these 4 stitches), 1 yarn over (= 2 stitches increased). On the next row (wrong side) knit the yarn overs twisted to avoid holes. Then purl the new stitches from the right side and knit from the wrong side. BUTTONHOLES: Work buttonholes on right band (when garment is worn). Work from the right side when there are 3 stitches left on row as follows: Make 1 yarn over, work 2 together and work the last stitch. On the next row (wrong side) work the yarn over normally to leave a hole (ie: The first buttonhole is worked when the neck measures 1½-2 cm. Then work the other 5-5-6-6-6-6 buttonholes with approx. 9-9-8-8-8½-9 cm between each one. ------------------------------------------------------- START THE PIECE HERE: ------------------------------------------------------- JACKET - SHORT OVERVIEW OF THE PIECE: Neck and yoke are worked back and forth with circular needle from mid front, top down. The yoke is worked in 2-coloured English rib with zigzag, then continue with stocking stitch with wrong side out and stripes with 1 row in each colour. The yoke is divided for body and sleeves. The body is continued back and forth from mid front. The sleeves are worked in the round with short circular needle/double pointed needles, top down. NECK: Cast on 131-143-143-155-155-167 stitches (including 5 band stitches on each side towards mid front) with circular needle size 2.5 mm and off-white. Work as follows from the wrong side: Knit 5 band stitches, purl until there are 5 stitches left and knit these 5 stitches. Then work pattern as follows: Work 5 band stitches in GARTER STITCH – read description above, work A.1A until there are 6 stitches left on row (= a total of 10-11-11-12-12-13 repeats of 12 stitches), A.2A (= 1 stitch) and finish with 5 band stitches in garter stitch– remember BUTTONHOLE – read description above. When A.1A and A.2A have been worked 1 time in height, work yoke as described below. YOKE: Change to circular needle size 3 mm and work pattern as follows (first row from the right side with off-white): Work 5 stitches in GARTER STITCH BANDS – read description above, A.1B until there are 6 stitches left on row (= a total of 10-11-11-12-12-13 repeats of 12 stitches), A.2B (= 1 stitch) and finish with 5 stitches in garter stitch bands. Push all stitches back to the other end of the circular needle so the next row can be worked with colour-1 from the right side. Read STRIPES, KNITTING TIP-1 and KNITTING TIP-2 and REMEMBER THE KNITTING TENSION! When A.1B and A.2B have been worked 1 time in height there are 251-275-319-347-395-427 stitches on the needle. The piece measures approx. 9-9-9-9-11-11 cm from the cast-on edge mid front. Now work A.1C over A.1B and A.2C over A.2B. When A.1C and A.2C have been worked 1 time in height there are 331-363-407-443-467-505 stitches on the needle. The piece measures approx. 17-17-19-19-21-21 cm from the cast-on edge mid front. Continue with knit from wrong side and purl from right side, 5 stitches in garter stitch bands on each side and with stripes as before. When the piece measures 19-19-21-21-21-21 cm from the cast-on edge increase stitches evenly spaced as follows: Increase 4-4-4-4-8-8 stitches every 2 cm a total of 1-2-1-1-2-2 times = 335-371-411-447-483-521 stitches – read INCREASE TIP-1. When the piece measures 21-23-24-26-28-30 cm from the cast-on edge (measured along the band) divide the piece for body and sleeves as follows: Work 5 stitches in garter stitch bands and work the next 49-53-58-66-72-78 stitches as before (= front piece), place the next 64-74-84-88-92-98 stitches on 1 thread for sleeve, cast on 8 new stitches on the needle (= in side under sleeve), work the next 99-107-117-129-145-159 stitches as before (= back piece), place the next 64-74-84-88-92-98 stitches on 1 thread for sleeve, cast on 8 new stitches on the needle (= in side under sleeve) and work the next 49-53-58-66-72-78 stitches as before, finishing with 5 stitches in garter stitch bands. Body and sleeves are finished separately. THE PIECE IS NOW MEASURED FROM HERE! BODY: = 223-239-259-287-315-341 stitches. Insert 1 marker thread on each side of the body, in the middle of the 8 stitches cast on under each sleeve. Allow the marker threads to follow your work onwards; they are used when increasing in the sides. Continue back and forth with stripes as before with knit from the wrong side, purl from the right side and 5 stitches in garter stitch bands on each side towards mid front. When the piece measures 2 cm from the division increase 1 stitch on each side of both marker threads – read INCREASE TIP-2 (= 4 stitches increased). Increase like this every 2½-2½-2½-3-3-2½ cm a total of 10-10-10-9-9-11 times = 263-279-299-323-351-385 stitches. Continue working until the piece measures 28-28-29-29-29-29 cm from the division (or to desired length; there is 2 cm left to finished length). Purl 1 row from the wrong side (bands worked as before), where you increase 18-20-18-18-17-19 stitches evenly spaced (not on bands) = 281-299-317-341-368-404 stitches. Change to circular needle size 2.5 mm and work rib as follows with off-white (first row from right side): 5 stitches in garter stitch *knit 1, purl 2*, work from *-* until there are 6 stitches left, knit 1 and finish with 5 band stitches in garter stitch. Work this rib for 2 cm. Loosely cast off with garter stitch over garter stitch, knit over knit and purl over purl. The jacket measures approx. 54-56-58-60-62-64 cm from the shoulder down. SLEEVE: Place the 64-74-84-88-92-98 stitches from the thread on the 1 side of the piece on short circular needle/double pointed needles size 3 mm and knit up 1 stitch in each of the 8 stitches cast on under the sleeve = 72-82-92-96-100-106 stitches. Insert 1 marker thread in the middle of the 8 stitches cast on under the sleeve. Allow the marker threads to follow your work onwards; they will be used when decreasing under the sleeve. Start the round by the marker thread and purl in the round with stripes with alternately 1 round off white and 1 round lavender. When the piece measures 2 cm from the division decrease 2 stitches mid under sleeve – read DECREASE TIP. Decrease like this every 4-2½-2-1½-1½-1½ cm a total of 9-13-17-18-19-21 times = 54-56-58-60-62-64 stitches. Continue working until the piece measures 41-40-39-38-36-34 cm from the division (or to desired length; there is 2 cm left to finished length. NOTE: Shorter measurements in larger sizes due to wider neck and longer yoke). Knit 1 round where you increase 0-1-2-0-1-2 stitches evenly spaced = 54-57-60-60-63-66 stitches. Change to double pointed needles size 2.5 mm and work rib in the round with off-white (= knit 1/ purl 2) for 2 cm. Loosely cast off with knit over knit and purl over purl. The sleeve measures approx. 44-43-42-41-39-37 cm from the division. Work the other sleeve in the same way. ASSEMBLY: Sew buttons onto left band. |
||||||||||||||||||||||||||||||||||||||||||||||
Diagram explanations |
||||||||||||||||||||||||||||||||||||||||||||||
|
||||||||||||||||||||||||||||||||||||||||||||||
|
||||||||||||||||||||||||||||||||||||||||||||||
|
||||||||||||||||||||||||||||||||||||||||||||||
|
||||||||||||||||||||||||||||||||||||||||||||||
|
||||||||||||||||||||||||||||||||||||||||||||||
|
||||||||||||||||||||||||||||||||||||||||||||||

|
||||||||||||||||||||||||||||||||||||||||||||||
|
||||||||||||||||||||||||||||||||||||||||||||||
Have you finished this pattern?Tag your pictures with #dropspattern #egyptianfeathersjacket or submit them to the #dropsfan gallery. Do you need help with this pattern?You'll find 25 tutorial videos, a Comments/Questions area and more by visiting the pattern on garnstudio.com. © 1982-2025 DROPS Design A/S. We reserve all rights. This document, including all its sub-sections, has copyrights. Read more about what you can do with our patterns at the bottom of each pattern on our site. |
||||||||||||||||||||||||||||||||||||||||||||||


With over 40 years in knitting and crochet design, DROPS Design offers one of the most extensive collections of free patterns on the internet - translated to 17 languages. As of today we count 314 catalogues and 11822 patterns translated into English (UK/cm).
We work hard to bring you the best knitting and crochet have to offer, inspiration and advice as well as great quality yarns at incredible prices! Would you like to use our patterns for other than personal use? You can read what you are allowed to do in the Copyright text at the bottom of all our patterns. Happy crafting!
Post a comment to pattern DROPS 201-29
We would love to hear what you have to say about this pattern!
If you want to leave a question, please make sure you select the correct category in the form below, to speed up the answering process. Required fields are marked *.