
Popular categories
Looking for a yarn?


Comments / Questions (16)
![]() Rosa wrote:
Rosa wrote:
Skal det vare rundepinde eller kan man bruge 2 lange pinde istedet for det er nemlig det jeg har.
11.05.2025 - 16:30DROPS Design answered:
Hej Rosa, ja det bestemmer du selv :)
12.05.2025 - 11:22
![]() Chantal wrote:
Chantal wrote:
Bonjour, si je veux faire ce modèle avec 3 couleurs , est-ce que diviser la quantité par 3 est un bon calcul ou pensez-vous que certains diagrammes prendraient plus de laine? Merci
07.04.2024 - 20:56DROPS Design answered:
Bonjour Chantal, certains des diagrammes/points fantaisie pourraient prendre plus de laine que d'autres, il peut être sage de faire un carré et de le peser pour être sûre. Bon tricot!
08.04.2024 - 08:30
![]() BRIGITTE FLEURET wrote:
BRIGITTE FLEURET wrote:
Bonjour, Excusez-moi, je ne comprends pas la légende de *. On pique dans la maille du rang précédent comme une augmentation, on tricote ,une maille endroit et on laisse tomber la maille de l'aiguille ? Merci d'avance
10.08.2023 - 09:57DROPS Design answered:
Bonjour Mme Fleuret, pensez-vous au 3ème symbole de la légende? C'est ce qu'on appelle parfois aussi une maille double, autrement dit, on va la tricoter comme on le montre dans cette vidéo. Ce n'est pas une augmentation, on tricote simplement cette maille en piquant 1 rang plus bas. Bon tricot!
10.08.2023 - 14:05
![]() Francoise wrote:
Francoise wrote:
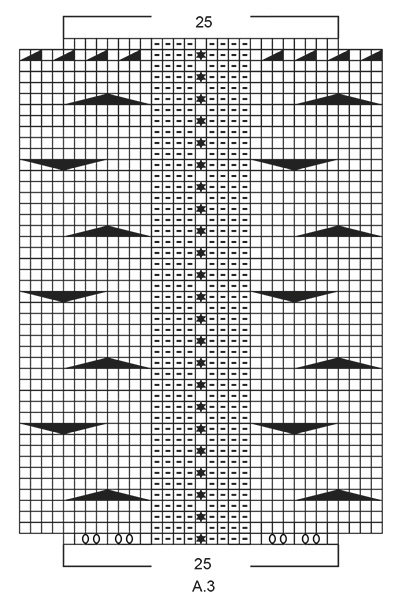
Bonjour Je ne comprends pas le diagramme A3 : c’est noté 25 mailles mais le schéma comprend 35 mailles…merci
18.01.2023 - 03:12DROPS Design answered:
Bonjour Françoise, pour conserver la bonne largeur, on doit augmenter au 1er rang de A.3 (= on augmente en faisant 8 jetés et on passe ainsi de 25 à 33 mailles au 1er rang), et diminuer à l'avant-dernier rang de A.3 (on diminue 8 mailles pour revenir à 25 mailles). Bon tricot!
18.01.2023 - 09:45
![]() Kristin Bjørnstad Fuglevik wrote:
Kristin Bjørnstad Fuglevik wrote:
Modell ai-138, pledd. trenger bedre forklaring på å lese diagramforklaringen spesielt den stjerne( tredje forklaring). skjønner ikke hvordan jeg skal slippe masken som jeg har tatt opp fra forrige omgang. Når jeg strikker frem og tilbake tar jeg alltid av første maske. Er det riktig å gjøre det her også? Da regnes ikke denne masken med i diagrammet.
16.04.2020 - 22:51DROPS Design answered:
Hei Kristin. Ta en titt på denne videoen. Ikonet i videoen er ikke lik, men teknikken er den samme. Noen tar alltid av første maske i sine strikkeprosjekter, vi bruker ikke denne teknikken i våre oppskrifter (om det ikke er forklart i selve oppskriften). mvh DROPS design
27.04.2020 - 15:34
![]() Sandra wrote:
Sandra wrote:
Könnte man diese Decke auch einfädig stricken oder stimmen dann die Maße nicht mehr?
07.01.2020 - 20:32DROPS Design answered:
Liebe Sandra, wenn Sie mit nur 1 Faden Air stricken dann wird die Maschenprobe bzw die Maße nicht mehr stimmen (hier lesen Sie mehr); wenn Sie aber ein Faden Garngruppe E stricken, dann sollten Sie die gleichen Maschenprobe haben und die Maßen stimmen (hier lesen Sie mehr). Viel Spaß beim stricken!
08.01.2020 - 08:27
![]() Charlotte wrote:
Charlotte wrote:
Hebt U soms een instructievideo voor telpatroon A.1. De uitleg voor het sterretje is me iet zo duidelijk.
29.12.2019 - 09:18DROPS Design answered:
Dag Charlotte,
In het eerste deel van deze video is te zien hoe de steek met het sterretje in A.1 wordt gebreid.
04.01.2020 - 19:29
![]() Birna Bjarnadottir wrote:
Birna Bjarnadottir wrote:
Hi. Just to mention that the explanation of sign 4 and 5 are the same and need to be corrected in accordance to sign 6. I really enjoy this pattern and Air drops is great yearn, thank you.
11.09.2019 - 11:20
![]() Yolande Bergeron wrote:
Yolande Bergeron wrote:
J'aime beaucoup les différents motifs de cette couverture. Très joli couverture pour les hivers au Québec.Mon pays ce n'est pas un pays, c'est l'hiver.(parole de Gilles Vigneault)
13.07.2019 - 23:30
![]() Angela wrote:
Angela wrote:
Hallo, ich habe sie gemacht, diese Decke. Sie hat bei mir allerdings die Größe 1,80x1,20m. Oje das war viel Arbeit und ein Projekt über mehrere Jahre. Nun ist sie fertig und ist ein echter Hingucker worden.
20.09.2018 - 16:33
|
||||||||||||||||||||||||||||||||||||||||||||||||||||
December Fields#decemberfieldsblanket |
||||||||||||||||||||||||||||||||||||||||||||||||||||
 |
 |
|||||||||||||||||||||||||||||||||||||||||||||||||||
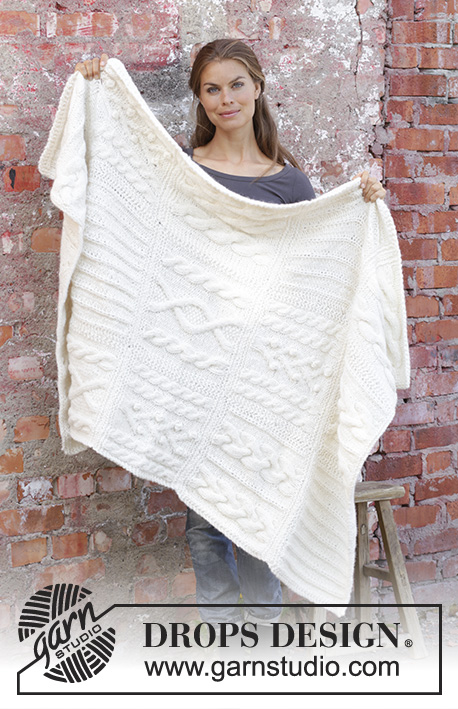
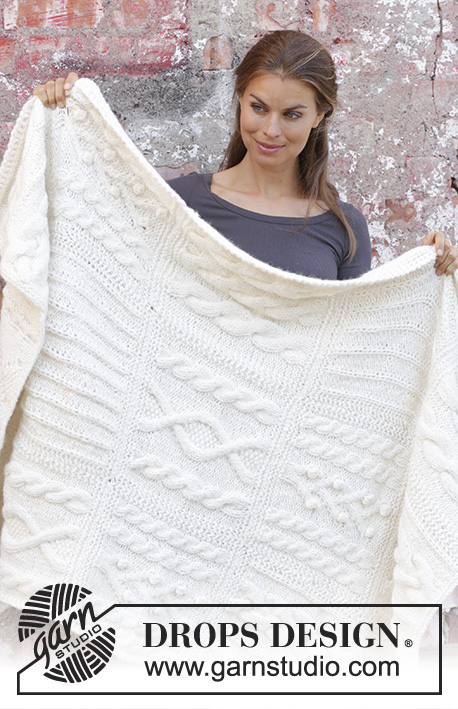
Knitted blanket in 2 strands DROPS Air. Piece is knitted back and forth with cables, false Fisherman's rib and bobbles.
DROPS 195-40 |
||||||||||||||||||||||||||||||||||||||||||||||||||||
|
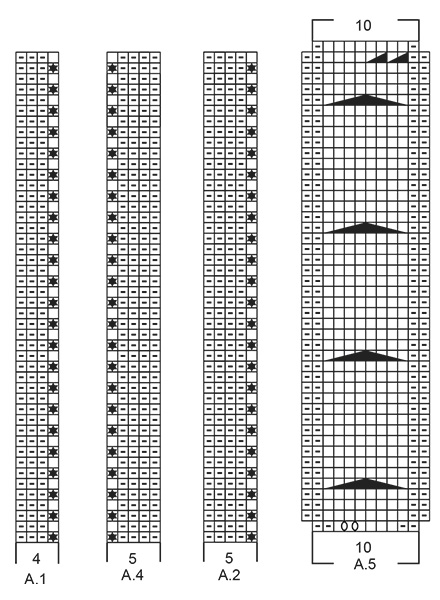
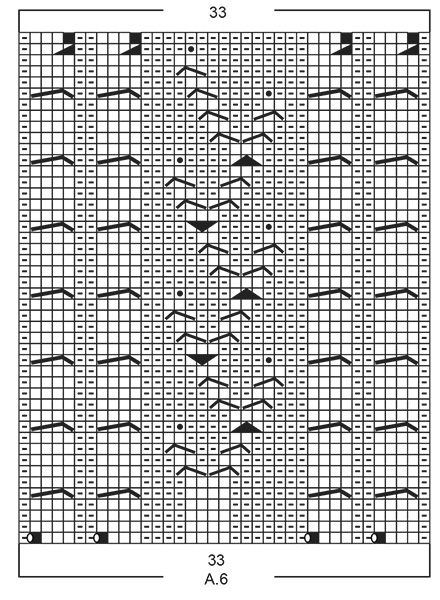
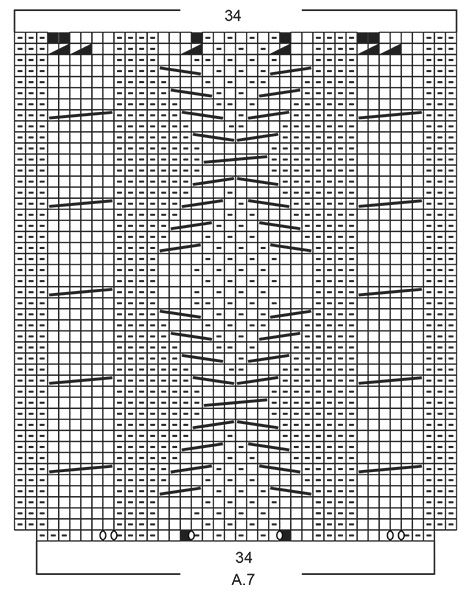
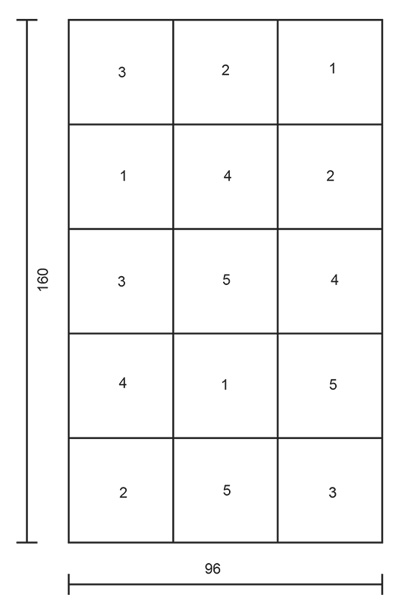
EXPLANATION FOR THE PATTERN: ---------------------------------------------------------- GARTER STITCH (back and forth): 1 ridge = knit 2 rows. PATTERN: See diagrams A.1 to A.7. Diagrams show all rows in pattern seen from the right side. INCREASE TIP: Increase 1 stitch by making 1 yarn over. On next row work yarn overs twisted to avoid holes. DECREASE TIP: Decrease 1 stitch by knitting 2 together. ---------------------------------------------------------- START THE PIECE HERE: ---------------------------------------------------------- BLANKET - SHORT OVERVIEW OF THE PIECE: Piece is worked back and forth in squares that are sewn together when finished. Knit 5 different squares and 3 of each square = 15 squares in total. SQUARE 1: Cast on 35 stitches on circular needle size 8 mm with 2 strands Air. Work 2 ridges in GARTER STITCH - read explanation above, when working last row in garter stitch increase 2 stitches - read INCREASE TIP = 37 stitches. Now work pattern as follows: Work 2 stitches in garter stitch, A.1 (= 4 stitches) until 3 stitches remain on needle, work first stitch in A.1, 2 stitches in garter stitch. REMEMBER THE KNITTING TENSION! Continue back and forth like this until entire A.1 has been worked vertically. Work 2 ridges while on first row from right side decreasing 2 stitches – read DECREASE TIP = 35 stitches. Cast off - make sure that the cast-off edge is not too tight! Square measures approx. 32 x 32 cm. Work 2 more squares = 3 squares. SQUARE 2: Cast on 35 stitches on circular needle size 8 mm with 2 strands Air. Work 2 ridges, when working last row in garter stitch increase 4 stitches = 39 stitches. Now work pattern as follows: Work 2 stitches in garter stitch, A.2 (= 5 stitches), A.3 (= 25 stitches), A.4 (= 5 stitches), 2 stitches in garter stitch. Continue back and forth like this until A.2, A.3 and A.4 have been worked vertically. There are now 39 stitches on needle. Work 2 ridges while on first row from right side decreasing 4 stitches evenly = 35 stitches. Cast off - make sure that the cast-off edge is not too tight! Square measures approx. 32 x 32 cm. Work 2 more squares = 3 squares. SQUARE 3: Cast on 35 stitches on circular needle size 8 mm with 2 strands Air. Work 2 ridges, when working last row in garter stitch increase 3 stitches evenly = 38 stitches. Now work pattern as follows: Work 2 stitches in garter stitch, purl 2, A.5 (= 10 stitches) 3 times in total in width, purl 2, 2 stitches in garter stitch. Continue like this back and forth until entire A.5 has been worked vertically. There are now 38 stitches on needle. Work 2 ridges while on first row from right side decreasing 3 stitches evenly = 35 stitches. Cast off - make sure that the cast-off edge is not too tight! Square measures approx. 32 x 32 cm. Work 2 more squares = 3 squares. SQUARE 4: Cast on 35 stitches on circular needle size 8 mm with 2 strands Air. Work 2 ridges, when working last row in garter stitch increase 2 stitches = 37 stitches. Now work pattern as follows: Work 2 stitches in garter stitch, A.6 (= 33 stitches), 2 stitches in garter stitch. Continue like this back and forth until entire A.6 has been worked vertically. There are now 37 stitches on needle. Work 2 ridges while on first row from right side decreasing 2 stitches = 35 stitches. Cast off - make sure that the cast-off edge is not too tight! Square measures approx. 32 x 32 cm. Work 2 more squares = 3 squares. SQUARE 5: Cast on 35 stitches on circular needle size 8 mm with 2 strands Air. Work 2 ridges, when working last row in garter stitch increase 3 stitches = 38 stitches. Now work pattern as follows: Work 2 stitches in garter stitch, A.7 (= 34 stitches), 2 stitches in garter stitch. Continue back and forth like this until entire A.7 has been worked vertically. Work 2 ridges while on first row from right side decreasing 3 stitches evenly = 35 stitches. Cast off - make sure that the cast-off edge is not too tight! Square measures approx. 32 x 32 cm. Work 2 more squares = 3 squares. ASSEMBLY: Place squares as shown in chart. Number on each of the squares shows the pattern on the squares. Sew squares together with 1 strand Air. Sew them together first across, then along - sew in outer loops of edge stitches to avoid a chunky seam. Fasten off. |
||||||||||||||||||||||||||||||||||||||||||||||||||||
Diagram explanations |
||||||||||||||||||||||||||||||||||||||||||||||||||||
|
||||||||||||||||||||||||||||||||||||||||||||||||||||
|
||||||||||||||||||||||||||||||||||||||||||||||||||||
|
||||||||||||||||||||||||||||||||||||||||||||||||||||
|
||||||||||||||||||||||||||||||||||||||||||||||||||||
|
||||||||||||||||||||||||||||||||||||||||||||||||||||
|
||||||||||||||||||||||||||||||||||||||||||||||||||||
Have you finished this pattern?Tag your pictures with #dropspattern #decemberfieldsblanket or submit them to the #dropsfan gallery. Do you need help with this pattern?You'll find 18 tutorial videos, a Comments/Questions area and more by visiting the pattern on garnstudio.com. © 1982-2025 DROPS Design A/S. We reserve all rights. This document, including all its sub-sections, has copyrights. Read more about what you can do with our patterns at the bottom of each pattern on our site. |
||||||||||||||||||||||||||||||||||||||||||||||||||||


With over 40 years in knitting and crochet design, DROPS Design offers one of the most extensive collections of free patterns on the internet - translated to 17 languages. As of today we count 314 catalogues and 11821 patterns translated into English (UK/cm).
We work hard to bring you the best knitting and crochet have to offer, inspiration and advice as well as great quality yarns at incredible prices! Would you like to use our patterns for other than personal use? You can read what you are allowed to do in the Copyright text at the bottom of all our patterns. Happy crafting!
Post a comment to pattern DROPS 195-40
We would love to hear what you have to say about this pattern!
If you want to leave a question, please make sure you select the correct category in the form below, to speed up the answering process. Required fields are marked *.