
Popular categories
Looking for a yarn?


Comments / Questions (30)
![]() XONDRA BARTON wrote:
XONDRA BARTON wrote:
I am about to hand write the pattern for the Ceramic Tile Blanket. Before I do I thought it best to check if there is one available.
20.06.2023 - 21:22DROPS Design answered:
Dear Mrs Barton, there is only diagram to the square, no written pattern - but there are 2 videos for this square: Rounds 1 - 6 and Round 7 - 11. Happy crocheting!
21.06.2023 - 08:06
![]() Lena wrote:
Lena wrote:
Hej, Jag vill göra en större pläd, 4X5 rutor, hur mycket garn behöver jag?. Tänkte virka i Paris bomullsgarn, nr 17, 26 och 65.
19.06.2023 - 17:54DROPS Design answered:
Hej Lena, skulle tro att du behöver ca 700 g till... :)
22.06.2023 - 14:05
![]() XONDRA BARTON wrote:
XONDRA BARTON wrote:
If I want to make more tiles for the blanket to make it bigger, what would the sequence be of the tile layout - 16 /20 or 24 tiles. Have you done a sequence with more tiles. Your help would be greatly appreciated.
18.06.2023 - 18:49DROPS Design answered:
Dear Xondra, you can mix the sequence and join them as you prefer. If you want to increase it, you should maintain it into a multiple of 4: 16, 20, 24. 24 would be for a blanket double the size. For example, to increase one more column vertically, you should add in each row the square that was missing from that row (1,2,3,4, in that order). For the next columns, you could maintain the previous sequence or just mix them up. Happy crocheting!
18.06.2023 - 19:29
![]() XONDRA BARTON wrote:
XONDRA BARTON wrote:
I have tried to watch the tutorial videos - there is no sound. How do I get sound?
30.05.2023 - 15:33DROPS Design answered:
Dear Mrs Barton, our videos do not have sound. We are a worldwide company and our videos are watched by people around the world, speaking different languages, many of whom do not understand English. You will have then to read the written pattern and look at the diagram to follow the video for the square. Happy crocheting!
30.05.2023 - 16:10
![]() Linda wrote:
Linda wrote:
Ik ben een beginner met haken. Ik ken een stokje en vaste steek Maar "Stokje om losse" Wat wil dit zeggen?
22.06.2022 - 19:07DROPS Design answered:
Dag LInda,
Als je een stokje om de losse haakt, dan steek je de haaknaald niet in de losse, maar er omheen.
26.06.2022 - 10:02
![]() Christel Golay wrote:
Christel Golay wrote:
BTW - I just love your site. I just retired and I have decided to take up crocheting again after 30 years! I have found your site very helpful and easy to find what I need. I look forward to hearing an answer to my question that I just posted before this comment. Thanks and all the best, Christel
02.08.2020 - 01:57
![]() Christel Golay wrote:
Christel Golay wrote:
Instead of a 3 x 4 = 12 tile blanket as per this pattern, I want to make a bigger 4 x 6 = 24 tile blanket. Can I just order twice the yarn specified in the pattern, or will I need more/less of the colors to account for more border? I'd appreciate all the help I can get to make sure I order enough yarn! Thanks, Christel
02.08.2020 - 01:53DROPS Design answered:
Dear Mrs Golay, we are unfortunately not able to adjust every pattern to every single request, please contact your DROPS store - even per mail or telephone - for any individual assistance. Happy crocheting!
03.08.2020 - 08:03
![]() Adela Konjarova wrote:
Adela Konjarova wrote:
Ahojky hackuji tuto deku a mám pocit že spotřeba bude větší nez je psána ada
29.07.2020 - 22:31
![]() Kasia wrote:
Kasia wrote:
Dzień dobry, próbowałam zrobić ze schematu i opisu ale bardzo dzowne rzeczy mi wychodziły. Sięgnęłam do filmu (na szczęście jest)! I okazyje się że to co podajecie w opisie Schematu nie zgadza się z tym co pokazane na filmie. Oczka ścisłe w oczko to półsłupki na filmie, półsłupek w oczko przerabiany jest jak słupek w którym przerabia się od razu 3 oczka po narzuceniu i przeciądnięciu. Czy możecie zweryfikować opis oznaczeń użytych w schemacie? Pozdrawiam, Kasia
27.02.2020 - 07:44DROPS Design answered:
Witaj Kasiu! W polskim nazewnictwie szydełkowym są 2 różne sposoby nazywania podstawowych ściegów, wiemy, że to mylące, ale dla przejrzystości musieliśmy wybrać i trzymamy się konsekwentnie jednego z nich: a mianowicie nasze oczko ścisłe jest również przez niektórych nazywane oczkiem zamykającym, nie mamy też rozróżnienia między półsłupkiem, a półsłupkiem nawijanym (jak piszesz słupek, w którym przerabia się od razu 3 oczka po narzuceniu i przeciągnięciu). W każdym naszym wzorze na dole znajdziesz filmiki video jak są przerabiane poszczególne ściegi (w kursach drops szczegółowo są opisane te techniki). Poza tym są nagrywane filmy do poszczególnych wzorów, tak aby maksymalnie ułatwić użytkowniczkom pracę. Cieszymy się, że korzystasz z naszych wzorów i serdecznie pozdrawiamy.
28.02.2020 - 08:36
![]() Henriette wrote:
Henriette wrote:
Bonjour, merci beaucoup pour votre aide, mon plaid est très beau! En revanche, 4 pelotes entières de Népal gris foncé en trop et plus d'une de naturel....
22.12.2019 - 21:10DROPS Design answered:
Bonjour Henriette! Merci de nous avoir informe. Cordialement
30.12.2019 - 11:52
|
||||||||||||||||||||||||||||||||||||||||||||||||||||
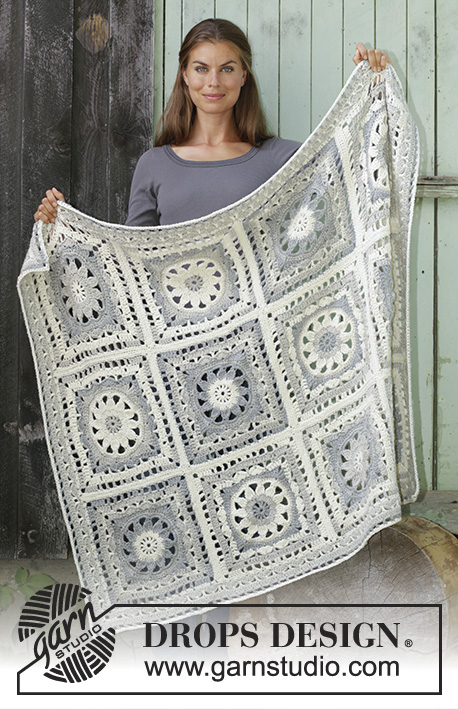
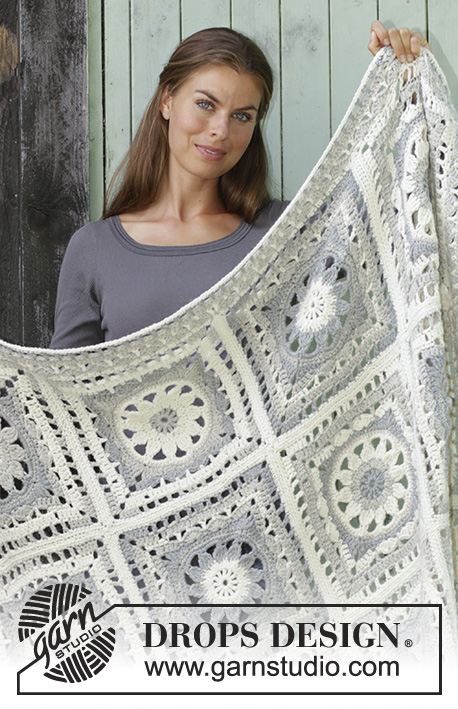
Ceramic Tiles#ceramictilesblanket |
||||||||||||||||||||||||||||||||||||||||||||||||||||
 |
 |
|||||||||||||||||||||||||||||||||||||||||||||||||||
Crochet blanket with squares in DROPS Nepal.
DROPS 195-39 |
||||||||||||||||||||||||||||||||||||||||||||||||||||
|
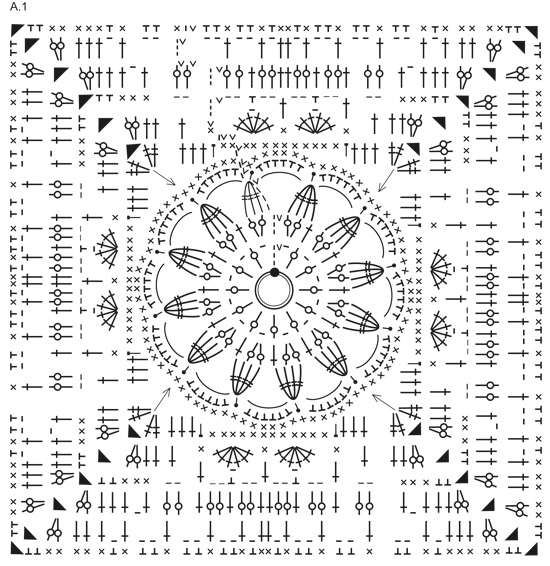
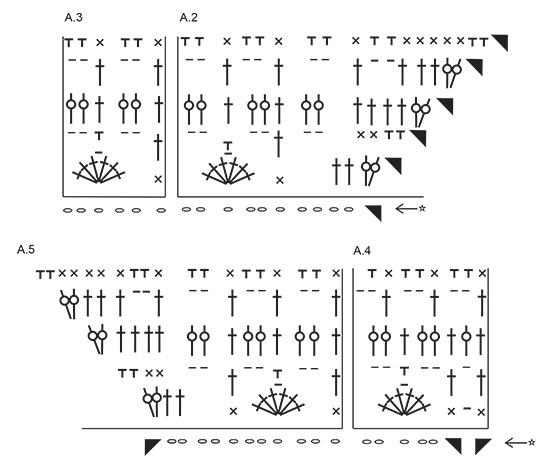
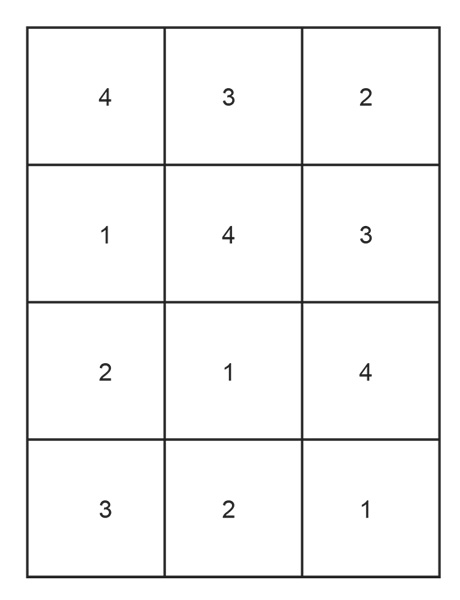
EXPLANATION FOR THE PATTERN: ---------------------------------------------------------- PATTERN: See diagrams A.1, A.2, A.3, A.4 and A.5. SQUARE COLOURS: Work 3 squares in every colour combination, at colour change work the last slip stitch on round with the colour on next round. Place the old yarn along the over side of stitches and work around this yarn a bit on next round before cutting the yarn. SQUARE 1: Round 1: grey Round 2: light grey Round 3: off white Round 4: off white Round 5: light grey Round 6: grey Round 7: off white Round 8: light grey Round 9: light grey Round 10: off white Round 11: off white SQUARE 2: Round 1: off white Round 2: light grey Round 3: light grey Round 4: grey Round 5: light grey Round 6: grey Round 7: light grey Round 8: off white Round 9: off white Round 10: light grey Round 11: off white SQUARE 3: Round 1: light grey Round 2: off white Round 3: off white Round 4: off white Round 5: light grey Round 6: light grey Round 7: grey Round 8: off white Round 9: off white Round 10: light grey Round 11: off white SQUARE 4: Round 1: off white Round 2: off white Round 3: grey Round 4: grey Round 5: light grey Round 6: grey Round 7: light grey Round 8: off white Round 9: light grey Round 10: grey Round 11: off white EDGE COLOUR: Switch colour for every round, at colour change work the last slip stitch on round with the colour on next round. Place the old yarn along the over side of stitches and work around this yarn a bit on next round before cutting the yarn. Work rounds in these colours: Round 1: light grey Round 2: off white Round 3: light grey Round 4: grey Round 5: off white CROCHET INFO (applies to diagram A.5): On 1st, 3rd and 4th round replace first symbol (3 chain stitches) with 6 chain stitches. These replace 3 chain stitches and last treble crochet on round. Therefore finish the round with 1 treble crochet less than shown in diagram A.5 and finish with 1 slip stitch in 3rd chain stitch at beginning of round. On 2nd and 5th round replace first symbol (3 chain stitches) with 4 chain stitches. These replace 3 chain stitches and last double crochet on round. Therefore finish the round with 1 double crochet less than shown in diagram A.5 and finish with 1 slip stitch in 1st chain stitch at beginning of round. ---------------------------------------------------------- START THE PIECE HERE: ---------------------------------------------------------- BLANKET - SHORT OVERVIEW OF THE PIECE: The blanket is made up of squares. Work the squares in 4 different colour combinations, when are squares are done, sew square together before crocheting an edge around the entire blanket. SQUARE: Begin with Nepal on hook size 5 mm and work SQAURE COLOURS – read explanation above and PATTERN according to diagram A.1. REMEMBER THE CROCHET TENSION! When all squares are done, there are 12 squares in total. ASSEMBLY: Place squares as shown on chart. Make sure they all lay with the right side up. Use off white and sew squares together edge to edge with one stitch in each stitch, make sure to make a flat seam. Fasten off. EDGE: Work 1 edge around the entire blanket. Work every round in different colours – read EDGE COLOURS above. Work according to diagram A.2, A.3, A.4 and A.5 as follows: Start with light grey and hook size 5 mm, begin in first corner on a short side on blanket. ** Work diagram A.2 over the first corner and the next 10 double crochets – read CROCHET INFO. Work A.3 over the next 30 double crochets (= 5 times), work A.4 in transition between squares and over the next 5 double crochets, * work A.3 over the next 36 double crochets (= 6 times), work A.4 in transition between squares and over the next 5 double crochets *, work A.3 over the next 24 double crochets (= 4 times), work A.5 over the next 11 double crochets and corner, work A.2 over the corner and the next 10 double crochets, work A.3 over the next 30 double crochets (= 5 times), work A.4 in transition between squares and over the next 5 double crochets, repeat from *-* 2 times in total, work A.3 over the next 24 double crochets (= 4 times), A.5 over the next 11 double crochets and corner **. 1 short side and 1 long side are now done. Repeat from **-** along the other 2 sides. When diagrams have been worked 1 time vertically, the edge is done. Fasten off. |
||||||||||||||||||||||||||||||||||||||||||||||||||||
Diagram explanations |
||||||||||||||||||||||||||||||||||||||||||||||||||||
|
||||||||||||||||||||||||||||||||||||||||||||||||||||
|
||||||||||||||||||||||||||||||||||||||||||||||||||||
|
||||||||||||||||||||||||||||||||||||||||||||||||||||
|
||||||||||||||||||||||||||||||||||||||||||||||||||||
Have you finished this pattern?Tag your pictures with #dropspattern #ceramictilesblanket or submit them to the #dropsfan gallery. Do you need help with this pattern?You'll find 13 tutorial videos, a Comments/Questions area and more by visiting the pattern on garnstudio.com. © 1982-2025 DROPS Design A/S. We reserve all rights. This document, including all its sub-sections, has copyrights. Read more about what you can do with our patterns at the bottom of each pattern on our site. |
||||||||||||||||||||||||||||||||||||||||||||||||||||


With over 40 years in knitting and crochet design, DROPS Design offers one of the most extensive collections of free patterns on the internet - translated to 17 languages. As of today we count 314 catalogues and 11822 patterns translated into English (UK/cm).
We work hard to bring you the best knitting and crochet have to offer, inspiration and advice as well as great quality yarns at incredible prices! Would you like to use our patterns for other than personal use? You can read what you are allowed to do in the Copyright text at the bottom of all our patterns. Happy crafting!
Post a comment to pattern DROPS 195-39
We would love to hear what you have to say about this pattern!
If you want to leave a question, please make sure you select the correct category in the form below, to speed up the answering process. Required fields are marked *.