
Looking for a yarn?


Comments / Questions (5)
![]() Andrea wrote:
Andrea wrote:
Hallo, mit 92 Luftmaschen am Anfang erhalte ich eine Breite >50cm für die Stola und nicht 36cm wie angegeben. Ich möchte nur eine Breite von 36cm haben. Was kann ich tun? Viele Grüße, Andrea
12.03.2022 - 16:10DROPS Design answered:
Liebe Andrea, oft häkelt man die Luftmaschen etwas fester als später die Maschen, um das auszugleichen, schlägt man mehr Luftmaschen an = 92 Luftmaschen, in der 1. Reihe überspringt man dann in regelmäßig Abstand 1 Lm, damit der Rand nicht zu stramm und eng wird und elastisch bleibt - und so haben Sie 73 Stäbchen am Ende der 1. Reihe und 36 cm in der Breite (mit 16 M = 10 cm). Viel Spaß beim häkeln!
14.03.2022 - 10:45
![]() Frédérique wrote:
Frédérique wrote:
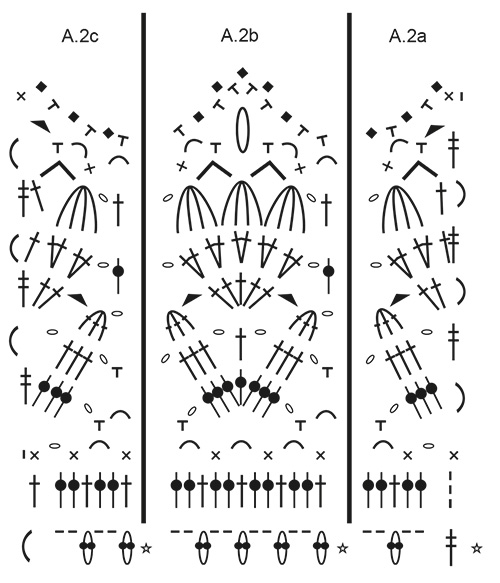
Bonjour, si je veux le faire plus large, je dois prendre quel multiple de nombre de mailles s’il-vous-plaît?
26.02.2022 - 13:08DROPS Design answered:
Bonjour Frédérique, ajoutez 12 mailles pour chaque A.2b en largeur (= 1 fleur en plus pour la bordure), vous aurez ainsi 4 motifs de A.1b en plus en largeur pour 1 fleur en plus. Bon crochet!
28.02.2022 - 09:20
![]() Maya wrote:
Maya wrote:
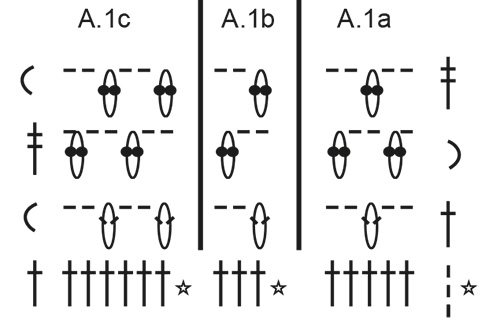
Hur slutar jag varv i A. 1a och A. 1c? Vad betyder C ? Bästa hälsningar Maya
17.12.2020 - 08:55DROPS Design answered:
Hei Maya. A.1a og A.1c avsluttes med en dobbeltstav i masken under (masken under er et ikon som en litt strekt C som igjen betyr 4 luftmasker), altså man avslutter i 4. luftmaske. mvh DROPS design
21.12.2020 - 12:56
![]() Birgitta Svaneblom wrote:
Birgitta Svaneblom wrote:
Hej. Den är läcker
08.01.2018 - 14:40
![]() Chrissie wrote:
Chrissie wrote:
Schöne Stola, tolle Borte!
04.01.2018 - 22:05
|
||||||||||||||||||||||||||||||||||||||||||||||||||||
French Lavender#frenchlavenderscarf |
||||||||||||||||||||||||||||||||||||||||||||||||||||
|
|
||||||||||||||||||||||||||||||||||||||||||||||||||||
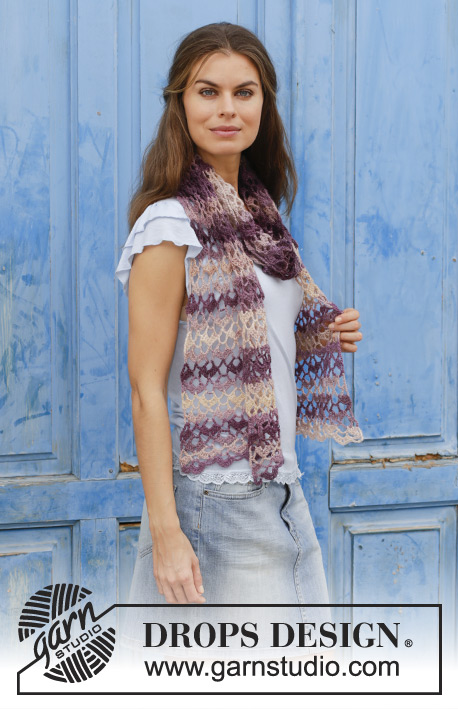
Crocheted stole with lace pattern and fans. The piece is worked in DROPS Cotton Merino.
DROPS 191-35 |
||||||||||||||||||||||||||||||||||||||||||||||||||||
|
INFORMATION FOR THE PATTERN: PATTERN: See diagrams A.1 and A.2. ---------------------------------------------------------- STOLE: The piece is worked back and forth in 2 similar pieces. You work from the middle of the stole and out to the side. FIRST HALF: Work 92 chain stitches with hook size 4.5 mm/US 7 and Cotton Merino. Turn and work 1 double crochet in the 4th chain stitch from the hook (= 2 double crochets), work 1 double crochet in each of the next 3 chain stitches, * skip 1 chain stitch, 1 double crochet in each of the next 4 chain stitches *, work from *-* a total of 17 times = 73 double crochets. Then work pattern according to the diagrams as follows (the first row starts from the wrong side): Work A.1c over the first 7 double crochets, A.1b over the next 60 double crochets (= 20 repeats) and A.1a over the last 6 double crochets. When A.1 is finished in height, repeat the last 2 rows onwards - REMEMBER THE CROCHET GAUGE! Continue like this until the piece measures approx. 70 cm / 27½" in height - adjust so that you have worked the last row in the diagram. Then work as follows: Work A.2a, A.2b a total of 5 times in width, finish with A.2c. Continue the pattern like this until A.2 has been completed in height, cut and fasten the strand. The first half measures approx. 79 cm/31". SECOND HALF: Work in the same chain stitches as the first row of double crochets at the beginning of the first half of the stole. Fasten the strand with 1 slip stitch and start on the first row in the diagram. |
||||||||||||||||||||||||||||||||||||||||||||||||||||
Diagram explanations |
||||||||||||||||||||||||||||||||||||||||||||||||||||
|
||||||||||||||||||||||||||||||||||||||||||||||||||||
|
||||||||||||||||||||||||||||||||||||||||||||||||||||
|
||||||||||||||||||||||||||||||||||||||||||||||||||||
Have you finished this pattern?Tag your pictures with #dropspattern #frenchlavenderscarf or submit them to the #dropsfan gallery. Do you need help with this pattern?You'll find 9 tutorial videos, a Comments/Questions area and more by visiting the pattern on garnstudio.com. © 1982-2025 DROPS Design A/S. We reserve all rights. This document, including all its sub-sections, has copyrights. Read more about what you can do with our patterns at the bottom of each pattern on our site. |
||||||||||||||||||||||||||||||||||||||||||||||||||||


With over 40 years in knitting and crochet design, DROPS Design offers one of the most extensive collections of free patterns on the internet - translated to 17 languages. As of today we count 314 catalogs and 11822 patterns - 11812 of which are translated into English (US/in).
We work hard to bring you the best knitting and crochet have to offer, inspiration and advice as well as great quality yarns at incredible prices! Would you like to use our patterns for other than personal use? You can read what you are allowed to do in the Copyright text at the bottom of all our patterns. Happy crafting!
Post a comment to pattern DROPS 191-35
We would love to hear what you have to say about this pattern!
If you want to leave a question, please make sure you select the correct category in the form below, to speed up the answering process. Required fields are marked *.