
Looking for a yarn?


Comments / Questions (40)
![]() Petra wrote:
Petra wrote:
Ik maak het vest in maat S. Ik heb nu t/m A4 tot A6 gehaakt en ben geëindigd met naturel en 232 stokjes. Daarna heb ik A7 en A8 gehaakt over het aangegeven aantal stokjes. Als ik A7 en A8 verder haak in patroon, heb ik bij de laatste toer veel meer stokjes dan nodig (256 volgens beschrijving). Hoe kan dat?
01.09.2024 - 12:03DROPS Design answered:
Dag Petra,
Als het goed is dan haak je het patroon A.8 4 keer op de toer. Als A.8 1 keer in de hoogte is gehaakt zijn er 6 stokjes bij gekomen, dus in totaal 24. Dit klopt met het aantal aangegeven steken.
12.09.2024 - 21:00
![]() Andrea wrote:
Andrea wrote:
I’m working on the Petite Fleur pattern. In the first A4 -A6 section of yoke, do I reverse the order of pattern sections on the wrong side? Also do I increase on wrong side as it says decrease on right side? Thank you.
07.01.2024 - 21:06DROPS Design answered:
Dear Andrea, when working on the wrong side, work : A.4 over A.4, A.5 over A.5 and A.6 over A.6. You don't need to work increases, only work the decreases indicated in the pattern, in the rows indicated. Happy crocheting!
08.01.2024 - 00:35
![]() Claire wrote:
Claire wrote:
Bonjour, J’ai besoin de votre aide. Dans le diagramme À.8, au rang 3, il y à 3 groupes de 3 brides donc 9 brides. Est-ce que je dois être du côté endroit où du côté envers de mon travail ? Merci de votre aide.
08.08.2022 - 03:09DROPS Design answered:
Bonjour Claire, le 1er rang de A.8 se fait sur l'envers, le 3ème rang sera aussi un rang sur l'envers. Bon crochet!
08.08.2022 - 07:52
![]() Claire wrote:
Claire wrote:
Je m’excuse mais je pense que ma question n’était pas assez précise. Est-ce que A4 je le fais une fois au début et une fois à la fin du rang seulement et A6 une fois à la fin du rang seulement ?
20.06.2022 - 16:08DROPS Design answered:
Bonjour Claire, tout à fait, A.4 et A.6 sont les mailles de bordure des devants, vous allez ainsi les crocheter 1 seule fois ainsi: les 7 m de A.4, puis vous répétez 12 fois 1.5 (en diminuant 1 maille au 1er rang), il reste 12 mailles, vous crochetez les 5 mailles de A.6 et les 7 mailles de A.4. Bon crochet!
21.06.2022 - 08:28
![]() Claire wrote:
Claire wrote:
Une autre question. Section A4 à A6 est-ce que je comprends bien Rang 1: A4 (7 mailles) 1 diminution une fois seulement sur le rang - 12fois A5 - terminer par A6 (5 mailles) et A4 (7 mailles). Merci de m’aider à continuer mon travail.
19.06.2022 - 23:17DROPS Design answered:
Bonjour Claire, c'est bien cela, vous devez diminuer 1 maille en répétant le 1er rang des 12 motifs de A.5, crochetez A.4 et A.6 sans diminuer. Bon crochet!
20.06.2022 - 08:06
![]() Sara wrote:
Sara wrote:
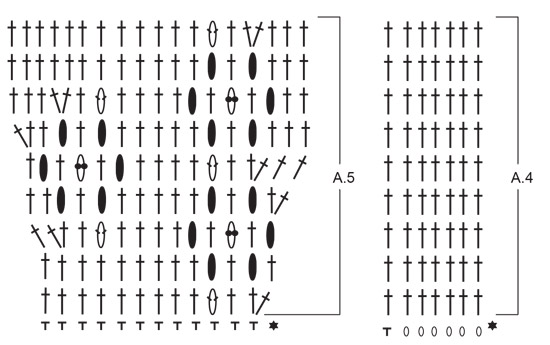
Bonjour, Dans les diagrammes 5 et 6, si je comprends bien je ne dois pas tricoter en aller retour car le rose et jaune peuvent se retrouver à l’envers alors je tricote ces rangs de droite à gauche Merci
12.06.2022 - 06:16DROPS Design answered:
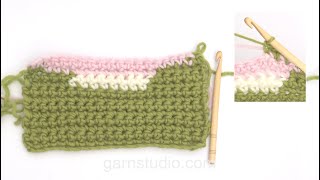
Bonjour Sara, les diagrammes se crochètent en allers et retours, alternativement sur l'endroit et sur l'envers, cette vidéo montre comment crocheter plusieurs couleurs sur un même rang, alternativement sur l'endroit et sur l'envers en faisant suivre les autres couleurs en même temps. Bon crochet!
13.06.2022 - 09:22
![]() Claire wrote:
Claire wrote:
Merci de l’info. J’aimerais savoir lorsque je tricote les 6 rangs , combien je devrais avoir de mailles après avoir crocheté le 1,e rang, le 2e rang, le 3e rang, le 4e rang, le 5e et au 6e je dois avoir 152 mailles. Merci
25.05.2022 - 22:24DROPS Design answered:
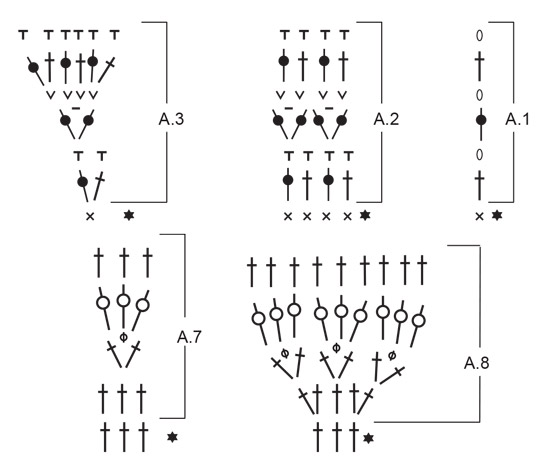
Bonjour Claire, ajoutez des marqueurs entre chaque diagramme à crocheter, vous pourrez ainsi vérifier votre nombre de mailles entre chaque marqueur, A.2 doit toujours rester à 4 mailles, mais le nombre de mailles de A.3 va changer comme le montre le diagramme, ces marqueurs vous aideront à bien vérifier à chaque fois, ainsi, vous aurez les 152 mailles à la fin des 6 rangs. Bon crochet!
27.05.2022 - 08:56
![]() Claire wrote:
Claire wrote:
Je n’ai pas 152 mailles après avoir crochèté À.1 à À.3. Dans le diagramme au dernier rang j’ai À.1 2x 6 brides = 12 brides À.2. 92 brides À.3. 4 x 6 brides = 24 brides Ce qui donne 128 brides et non 152 tel qu’indiqué dans le patron. De l’aide s’il vous plaît Merci.
24.05.2022 - 08:47DROPS Design answered:
Bonjour Claire, chaque A.3 doit être crocheté 2 fois, autrement dit, vous aurez: A.1 (= 6 m), A.2 (= 16 m) (devant), A.3 (= 12 m / raglan), A.2 (= 12 m / manche), A.3 (= 12 m/ raglan), A.2 (= 36 m/dos), A.3 (= 12 m/raglan), A.2 (= 12 m/ manche), A.3 (= 12 m/raglan), A.2 (= 16 m), A.1 (= 6 m), ainsi vous avez bien: 6+16+12+12+12+36+12+12+12+16+6=152 mailles. Bon crochet!
24.05.2022 - 13:43
![]() Yasemin wrote:
Yasemin wrote:
Hej! Har virkat oket i stl L och efter A.4 till A.6 och nu ska jag ha 271 stolpar. Så långt stämmer allt, men när jag virkar vidare enligt mönstret A.7 till A.8 blir det för stort. 295 stolpar i slutet blir det inte. Hamnar på över 400 stycken! Jag gör något fel men var? Allt stämmer enligt mönstret. Tacksam för svar.
12.09.2021 - 11:11DROPS Design answered:
Hej Yasemin. Ökningarna sker i diagram A.8. (I diagram A:7 har du lika många stolar, 3 st, när du börjar med diagrammet som när det är färdigvirkat). När A.8 är färdigvirkat så har du 9 stolpar och du började med 3. Du har alltså ökat 6 stolpar per diagram och du har 4 diagram A.8 per varv. 6x4= 24 stolpar. 271+24=295 stoplar. Mvh DROPS Design
22.09.2021 - 08:03
![]() Ah Vu wrote:
Ah Vu wrote:
Thank you very much for your taking time reply, I am grateful for your help
11.04.2021 - 14:33
|
|||||||||||||||||||||||||||||||||||||||||||
Petite Fleur Cardigan#petitefleurcardigan |
|||||||||||||||||||||||||||||||||||||||||||
 |
 |
||||||||||||||||||||||||||||||||||||||||||
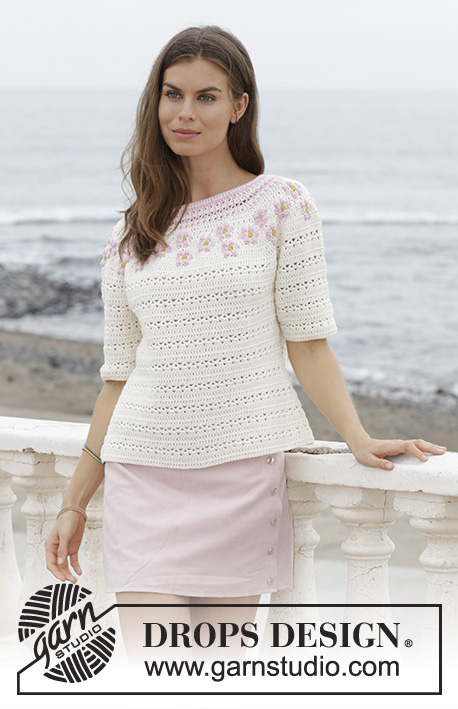
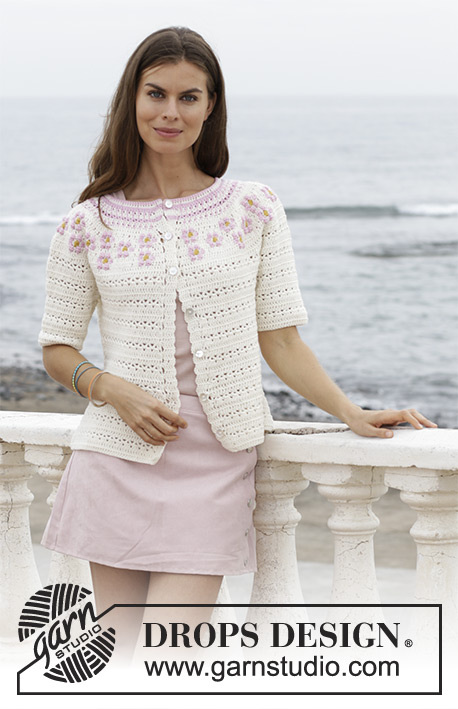
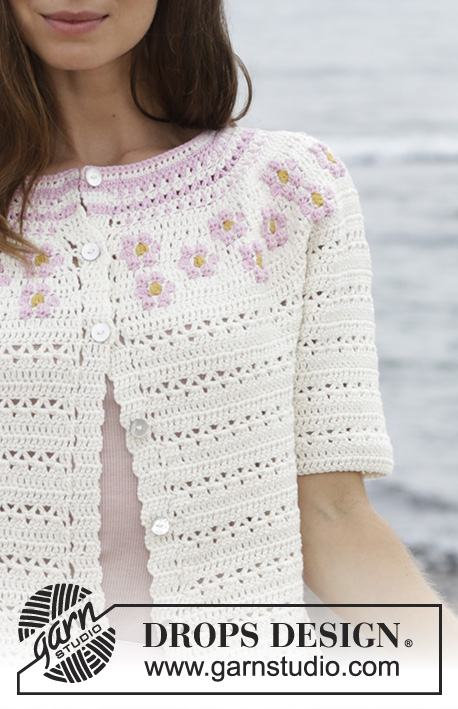
Jacket with multi-colored pattern, flowers and round yoke, crocheted top down with 3/4 long sleeves. Size: S - XXXL Piece is crocheted in DROPS Cotton Merino.
DROPS 188-7 |
|||||||||||||||||||||||||||||||||||||||||||
|
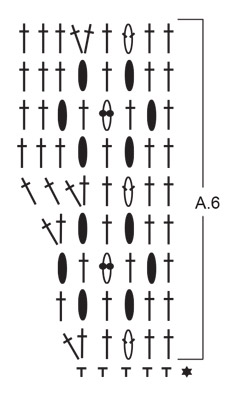
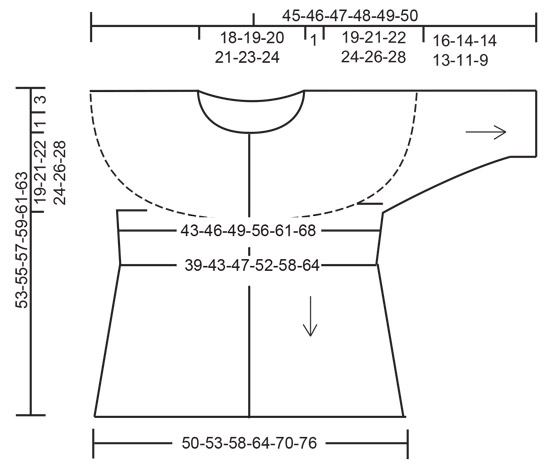
INFORMATION FOR PATTERN: PATTERN: See diagrams A.1 to A.8. CROCHET INFO: Begin every double crochet row with 3 chain stitches (replaces first double crochet). Begin every single crochet row with 1 chain stitch (does not replace first single crochet). When sleeves are worked back and forth and worked together at the end/beginning of row, begin every row with double crochets with 3 chain stitches (replaces first double crochet) and finish with 1 slip stitch in 3rd chain stitch at beginning of row, turn piece. On 2nd row in A.7 begin and end row as follows: Work 1 slip stitch in each of the first 2 stitches on previous row, 3 chain stitches (replace first double crochet), finish row with 1 slip stitch in 3rd chain stitch at beginning of row. Work both from right and wrong side. INCREASE/DECREASE TIP: To calculate how to increase/decrease evenly, use the total number of stitches (e.g. 105 stitches), minus bands (e.g. 10 stitches = 95 stitches) and divide the remaining stitches by number of increases/decreases to be done (e.g. 7) = 13.5. I.e. in this example increase by working 2 single crochets in same stitch alternately every 13th. and 14th stitch. To decrease evenly in this example work alternately every 12th and 13th and every 13th and 14th stitch together. COLOR PATTERN: When switching color at the beginning of a row, work slip stitch at the end of previous row with the new color. When changing color on row work as follows: Work last double crochet with first color but wait with last pull through, switch to next color and work last pull through, then work next stitch. When working with two colors place strand for the color not worked over stitches from previous row, work around the strand so that it is hidden and follows. When there are no more double crochets left on row to be worked in same color, the color does not need to follow onwards in piece, if it is to be used on next row, pick it up on next row, but make sure that the yarn comes on wrong side of piece. Make sure to avoid tights yarn and not to tighten yarn when picking it up from previous row. ---------------------------------------------------------- JACKET: Yoke and body are worked back and forth from mid front, top down. Work sleeves back and forth and work together at the end of every row. YOKE: Work 123-128-132-138-143-149 chain stitches (including 5 band stitches in each side of piece and 1 chain stitch to turn with) on hook size 4 mm / G/6 with powder pink. Work 1 single crochet in 2nd chain stitch from hook (= 1 single crochet) - read CROCHET INFO, 1 single crochet in each of the next 2-0-4-3-1-0 chain stitches, * skip 1 chain stitch, 1 single crochet in each of the next 6 chain stitches *, work from *-* = 105-109-113-118-122-127 single crochets. Work first row from wrong side as follows: Work 1 single crochet in every single crochet and increase 7-15-23-22-30-29 stitches evenly - read INCREASE/DECREASE TIP = 112-124-136-140-152-156 single crochets. REMEMBER THE CROCHET GAUGE! Work next row as follows from right side - read COLOR PATTERN: Work A.1 over the first 6 stitches, A.2 over 16-20-24-24-24-24 stitches (= 4-5-6-6-6-6 repetitions of 4 stitches) (= left front piece), work A.3 over 2-2-2-3-3-4 stitches (= 2-2-2-3-3-4 repetitions of 1 stitch), A.2 over 12 stitches (= 3 repetitions), A.3 over 2-2-2-3-3-4 stitches (= 2-2-2-3-3-4 repetitions) (= left sleeve), A.2 over 36-40-44-44-56-56 stitches (= 9-10-11-11-14-14 repetitions) (= back piece), A.3 over 2-2-2-3-3-4 stitches (= 2-2-2-3-3-4 repetitions), A.2 over 12 stitches (= 3 repetitions), A.3 over 2-2-2-3-3-4 stitches (= 2-2-2-3-3-4 repetitions) (= right sleeve), A.2 over 16-20-24-24-24-24 stitches (= 4-5-6-6-6-6 repetitions) and finish with A.1 over the last 6 stitches (= right front piece). When A.1 to A.3 have been worked 1 time vertically, there are 152-164-176-200-212-236 stitches on last row. Piece measures approx. 6 cm / 2⅜". Work next row as follows from right side: Work A.4 over the first 7 stitches, work A.5 until 12 stitches remain (= 11-12-13-15-16-18 repetitions of 12 stitches) AT THE SAME TIME decrease 1 double crochet, work A.6 over the next 5 stitches and finish with A.4 over the last 7 stitches. When A.4 to A.6 have been worked 1 time vertically, there are 232-251-270-308-327-365 stitches on last row (2 double crochets worked together = 1 stitch). Piece measures approx. 16 cm. Now finish piece with off white as follows: Work as follows from wrong side AT THE SAME TIME adjust number of stitches to 232-250-271-307-328-364 double crochets (i.e. increase 0-0-1-0-1-0 double crochets and decrease 0-1-0-1-0-1 double crochets): Work 1 double crochet in each of the first 5 double crochets, A.7 over 33-36-42-48-51-57 double crochets (= 11-12-14-16-17-19 repetitions of 3 stitches), A.8 over 3 double crochets, A.7 over 36-39-42-48-51-57 double crochets (= 12-13-14-16-17-19 repetitions), A.8 over 3 double crochets, A.7 over 72-78-81-93-102-114 double crochets (= 24-26-27-31-34-38 repetitions), A.8 over 3 double crochets, A.7 over 36-39-42-48-51-57 double crochets (= 12-13-14-16-17-19 repetitions), A.8 over 3 double crochets, A.7 over 33-36-42-48-51-57 double crochets (= 11-12-14-16-17-19 repetitions) and finish with 1 double crochet in each of the last 5 double crochets. Continue pattern like this. When A.7 to A.8 have been worked 1 time vertically, there are 256-274-295-331-352-388 double crochets on last row. Work 1 double crochet in each of the first 5 double crochets, work A.7 until 5 double crochets remain (= 82-88-95-107-114-126 repetitions), finish with 1 double crochet in each of the last 5 double crochets. Continue pattern like this until piece measures 19-21-22-24-26-28 cm / 7⅜"-8¼"-8⅝"-9⅜"-10¼"-11" from neck edge, adjust so that next row is a row with only double crochets. Now divide body and sleeves as follows: Work 1 double crochet in each of the first 5 double crochets, A.7 as before over the next 33-36-39-45-51-57 double crochets, work 1 double crochet in each of the next 2-1-1-1-0-0 double crochets (= front piece), skip the next 53-57-62-68-70-75 double crochets (= sleeve), work 8 chain stitches under sleeve, work 1 double crochet in 1-0-1-1-1-0 double crochet, work A.7 as before over the next 69-75-78-90-99-114 double crochets, work 1 double crochet in each of the next 0-1-2-2-0-0 double crochets (= back piece), skip the next 53-57-62-68-70-75 double crochets (= sleeve), work 8 chain stitches under sleeve, work 1 double crochet in each of the next 2-1-1-1-0-0 double crochets, A.7 as before over the next 33-36-39-45-51-57 double crochets, and finish with 1 double crochet in each of the last 5 double crochets (= front piece). BODY: = 166-176-187-211-228-254 stitches. Continue with 1 double crochet in each of the first 5 and last 5 double crochets and work pattern A.7 over the remaining stitches AT THE SAME TIME as you on first row increase 0-2-0-0-1-2 double crochets evenly (A.7 is then repeated 52-56-59-67-73-82 times in width) = 166-178-187-211-229-256 double crochets. When piece measures 3 cm / 1" from where body and sleeves where divided, decrease 3 double crochets on next row (adjust to decrease on a row with only double crochets). Decrease like this every 2½-2½-4-3-4-2½ cm 5-5-3-4-3-5 times in total = 151-163-178-199-220-241 stitches. For every decrease work 1 repetition less of A.7 in width. When piece measures 14 cm / 5½" from where body and sleeves where divided, increase 3 double crochets evenly (adjust to increase on a row with only double crochets). Increase like this every cm 13-13-14-14-14-14 times in total = 190-202-220-241-262-283 stitches. For every increase work 1 repetition more of A.7 in width. Continue until piece measures 30-30-31-31-31-31 cm / 11¾"-11¾"-12⅛"-12⅛"-12⅛"-12⅛" from where body and sleeves were divided (49-51-53-55-57-59 cm / 19¼"-20"-21"-21⅝"-22½"-23¼" from neck edge), finish after 1 row with double crochets. Fasten off. SLEEVE: Work piece back and forth (i.e. alternately from right and wrong side) and work together with 1 slip stitch on every row. Begin working in the 5th chain stitch of the 8 chain stitches worked in armhole on body with off white as follows: Work 1 slip stitch, 3 chain stitches (= 1 double crochet), 1 double crochet in each of the next 3 chain stitches, 1 double crochet in next 1-0-1-1-0-0 double crochet, A.7 over the next 51-57-60-66-69-75 double crochets (= 17-19-20-22-23-25 times in width), 1 double crochets in next 1-0-1-1-1-0 double crochet and finish with 1 double crochet in each of the last 4 chain stitches = 61-65-70-76-78-83 stitches. Insert 1 marker thread at the beginning of row. On next row with double crochets decrease 4-5-4-4-3-5 double crochets evenly = 57-60-66-72-75-78 stitches. Now repeat A.7 19-20-22-24-25-26 times in the round on row. When sleeve measures 4 cm / 1½" from where piece was divided from body, decrease 3 double crochets evenly on row (adjust to decrease on a row with only double crochets). Decrease like this every 4-4-3-2-2-1½ cm 3-3-4-4-4-4 times in total = 48-51-54-60-63-66 stitches. Every time you decrease, repeat A.7 1 time less in width. Continue until piece measures 16-14-14-13-11-9 cm / 6¼"-5½"-5½"-5⅛"-4¼"-3 ½" from where sleeve was divided from body. Fasten off. Work the other sleeve the same way. NECK EDGE: Work back and forth over chain stitch row in neck as follows: ROW 1 (= from right side with off white): Begin over band, fasten yarn to piece with 1 slip stitch in 1st band stitch, work 2 chain stitches (= 1 half double crochet), work 1 half double crochet in every single crochet the entire row = 105-109-113-118-122-127 half double crochets. ROW 2 (= from wrong side with powder pink): Work 1 single crochet in every half double crochet = 105-109-113-118-122-127 single crochets. Fasten off. ASSEMBLY: Sew the buttons on to the left front band. Fasten first button approx. 2 cm / ¾" down from neck, then fasten them approx. 7-8 cm / 2 ¾"-3⅛" apart. Button between 2nd and 3rd double crochet on right band. |
|||||||||||||||||||||||||||||||||||||||||||
Diagram explanations |
|||||||||||||||||||||||||||||||||||||||||||
|
|||||||||||||||||||||||||||||||||||||||||||
|
|||||||||||||||||||||||||||||||||||||||||||
|
|||||||||||||||||||||||||||||||||||||||||||
|
|||||||||||||||||||||||||||||||||||||||||||
|
|||||||||||||||||||||||||||||||||||||||||||
Have you finished this pattern?Tag your pictures with #dropspattern #petitefleurcardigan or submit them to the #dropsfan gallery. Do you need help with this pattern?You'll find 12 tutorial videos, a Comments/Questions area and more by visiting the pattern on garnstudio.com. © 1982-2025 DROPS Design A/S. We reserve all rights. This document, including all its sub-sections, has copyrights. Read more about what you can do with our patterns at the bottom of each pattern on our site. |
|||||||||||||||||||||||||||||||||||||||||||


With over 40 years in knitting and crochet design, DROPS Design offers one of the most extensive collections of free patterns on the internet - translated to 17 languages. As of today we count 314 catalogs and 11822 patterns - 11812 of which are translated into English (US/in).
We work hard to bring you the best knitting and crochet have to offer, inspiration and advice as well as great quality yarns at incredible prices! Would you like to use our patterns for other than personal use? You can read what you are allowed to do in the Copyright text at the bottom of all our patterns. Happy crafting!
Post a comment to pattern DROPS 188-7
We would love to hear what you have to say about this pattern!
If you want to leave a question, please make sure you select the correct category in the form below, to speed up the answering process. Required fields are marked *.