DROPS Merino Extra Fine
100% Wool
from 3.50 £ /50g
Get the yarn to make this pattern from 42.00£.

The yarn cost is calculated from the pattern’s smallest size and the yarn’s cheapest product type. Looking for an even better price? You might find it on the DROPS Deals!

DROPS SS24

Periwinkle Jacket

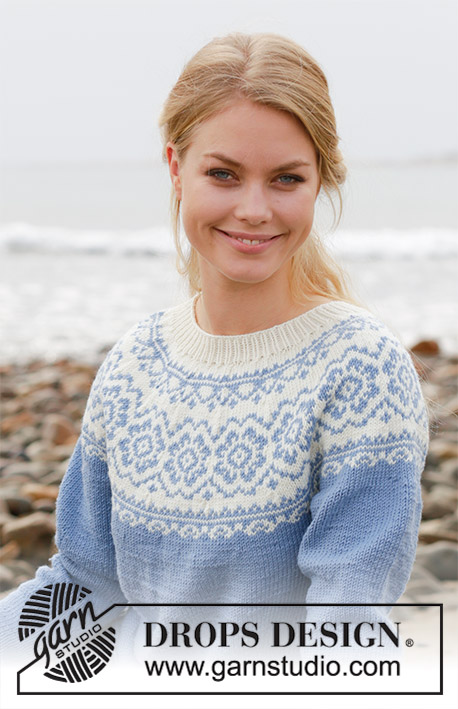
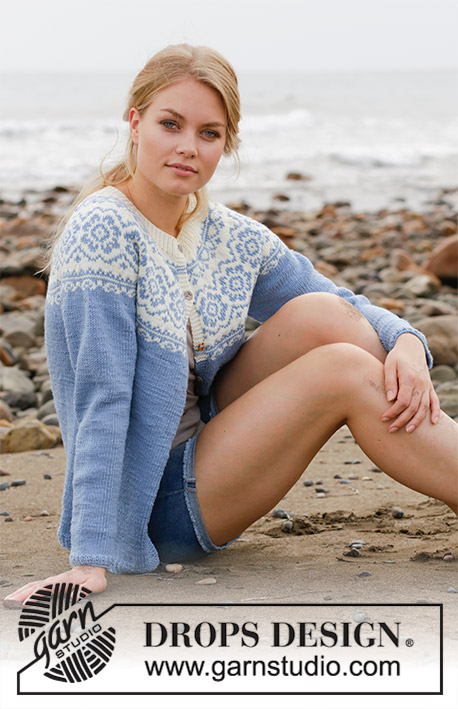
Knitted jacket with round yoke, multi-coloured Norwegian pattern and A-shape. Size: S - XXXL Piece is knitted in DROPS Merino Extra Fine.

DROPS 191-29
DROPS design: Pattern me-134
Yarn group B
----------------------------------------------------------
Size: S - M - L - XL - XXL - XXXL
Materials:
DROPS MERINO EXTRA FINE from Garnstudio (belongs to yarn group B)
500-550-600-650-700-800 g colour 19, light grey blue
100-150-150-150-150-150 g colour 01, off white

Piece can also be knitted with yarn from:
“Alternative yarn (yarn group B)” - see link below.

DROPS DOUBLE POINTED NEEDLES AND CIRCULAR NEEDLE (40 + 60 or 80 cm) SIZE 4 mm – or size needed to get 21 stitches and 28 rows in stocking stitch = width 10 cm and 10 cm vertically.

DROPS DOUBLE POINTED NEEDLES AND CIRCULAR NEEDLE (60 or 80 cm) SIZE 3 mm for rib – or size needed to get 23 stitches and 32 rows in stocking stitch = width 10 cm and 10 cm vertically.

DROPS MOTHER-OF-PEARL BUTTON ARCHED (white), NO 521: 8-8-8-8-9-9 pieces
----------------------------------------------------------

Colour combinations shown are:
A) DROPS Merino Extra Fine 30, 01.
B) DROPS Merino Extra Fine 01, 15.
-------------------------------------------------------

-------------------------------------------------------

Alternative Yarn – See how to change yarns here
Yarn Groups A to F – Use the same pattern and change the yarn here
Yarn usage using an alternative yarn – Use our yarn converter here

-------------------------------------------------------

DROPS Merino Extra Fine
100% Wool
from 3.50 £ /50g
Get the yarn to make this pattern from 42.00£.

The yarn cost is calculated from the pattern’s smallest size and the yarn’s cheapest product type. Looking for an even better price? You might find it on the DROPS Deals!

Pattern instructions

NOTE: This pattern is written in British English. All measurements in charts are in cm. For conversion from cm to inches - click here. There are different terms for crocheting in British and American English. If this pattern includes crochet, click for "crochet terms" here. For this pattern in American English, please click here.
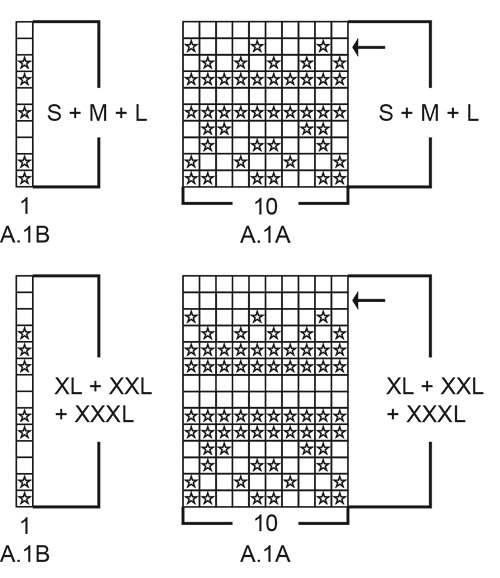
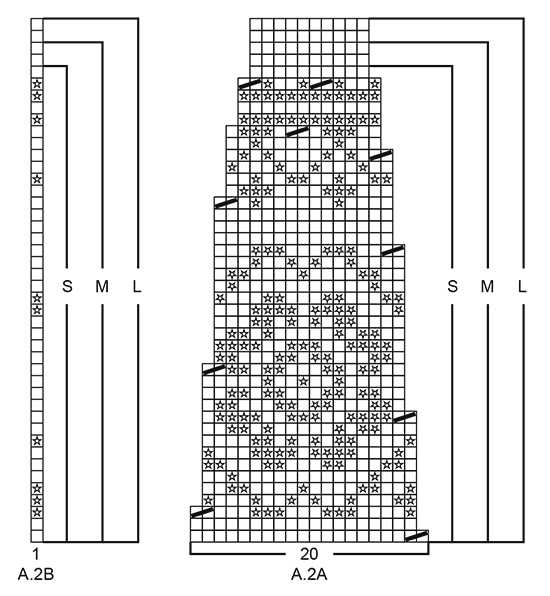
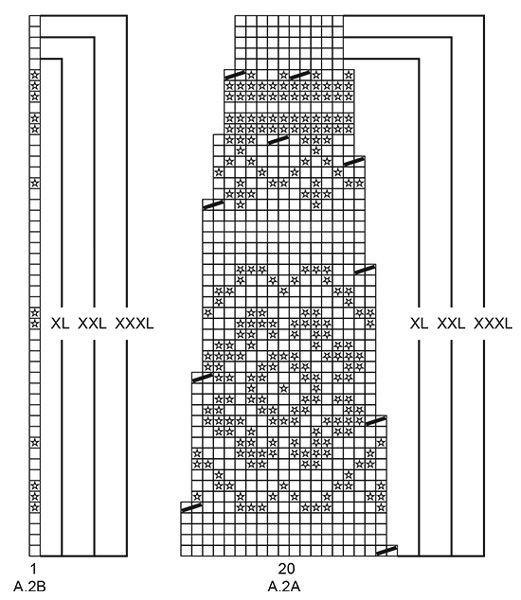
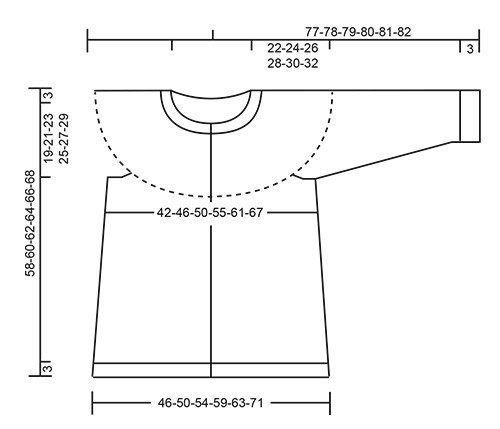
INFORMATION FOR PATTERN:

GARTER STITCH (back and forth):
1 ridge = knit 2 rows.

PATTERN:
See diagrams A.1 and A.2. Choose diagram for your size.
Diagrams show all rows in pattern seen from the right side.

DECREASE TIP-1 (evenly):
To calculate how to decrease evenly, use the total number of stitches on row (e.g. 211 stitches), minus bands (e.g. 10 stitches) and divide the remaining stitches by number of decreases to be done (e.g. 10) = 20.1.
In this example decrease by knitting approx. every 19th and 20th stitch together. Do not decrease over bands.

DECREASE TIP-2 (applies to sides of body):
All decreases are done from the right side!
Begin 5 stitches before marker thread in the side, knit 2 together, knit 6 (marker thread is in the middle of these 6 stitches), slip 1 stitch knitwise, knit 1, pass slipped stitch over stitch worked (= 2 stitches decreased).

INCREASE TIP (applies to mid under sleeve):
Begin 2 stitches before marker thread, make 1 yarn over, knit 2 (marker thread is in the middle of these 2 stitches), make 1 yarn over (= 2 stitches increased). On next round knit yarn overs twisted to avoid holes.

KNITTING TIP-1 (applies to bands):
When working pattern border with two colours on yoke, also work with base colour in pattern border over the 5 band stitches in each side.

KNITTING TIP-2:
To avoid the knitting tension to tighten when working pattern, it is important not to tighten the strands on back side of piece. Use a larger needle size when working pattern if needed.

BUTTONHOLES:
Decrease for buttonholes on right band (when garment is worn): 1 buttonhole = knit second and third stitch from edge together and make 1 yarn over. On next row (wrong side) knit the yarn over to make a hole.
Decrease for buttonholes when piece measures:
S: 3, 11, 19, 26, 34, 41, 49 and 56 cm
M: 3, 11, 19, 27, 35, 43, 51 and 58 cm
L: 3, 12, 20, 28, 36, 44, 52 and 60 cm
XL: 3, 12, 20, 29, 37, 46, 54 and 62 cm
XXL: 3, 11, 19, 26, 34, 42, 49, 57 and 64 cm.
XXXL: 3, 11, 19, 27, 35, 43, 51, 59 and 66 cm.
NOTE! Decrease the last of the 8-8-8-8-9-9 buttonholes approx. in the middle of neck edge.
----------------------------------------------------------

JACKET:
Body is worked back and forth on circular needle from mid front, bottom up. Sleeves are worked in the round on double pointed needles/a short circular needle, bottom up. Then slip body and sleeves together and work yoke back and forth on circular needle from mid front until finished measurements.
An elevation in the back of neck can be worked to get a better fit so that yoke is somewhat higher in the neck. This elevation can be skipped, to make the neck the same at the front and back - see explanation on elevation in pattern.

BODY:
Cast on 211-231-249-269-295-323 stitches (including 5 band stitches in each side towards mid front) on circular needle size 3 mm with light grey blue. Work rib as follows:
ROW 1 (= right side): Knit all stitches.
ROW 2 (= wrong side): Knit 5, * purl 1, knit 1 *, work from *-* until 6 stitches remain on row, purl 1 and finish with knit 5. Repeat 1st and 2nd row until rib measures 3 cm. Switch to circular needle size 4 mm. Knit 1 row from right side while decreasing 10-10-12-12-14-14 stitches evenly - read DECREASE TIP-1 and remember BUTTONHOLES on right band - see explanation above = 201-221-237-257-281-309 stitches. Insert 1 marker thread 53-58-62-67-73-80 stitches in from each side = 95-105-113-123-135-149 stitches between marker threads on back piece and move marker thread upwards when working.
Purl 1 row from wrong side (knit bands). Then work in stocking stitch back and forth with 5 band stitches in GARTER STITCH - see explanation above, in each side towards mid front. REMEMBER THE KNITTING TENSION!
When piece measures 8 cm, decrease 1 stitch on each side of both marker threads - read DECREASE TIP-2 (= 4 stitches decreased). Decrease like this every 8 cm 4 times in total in each side = 185-205-221-241-265-293 stitches.
Work until piece measures approx. 36 cm in all sizes. Work next row as follows from right side: Knit 45-50-53-58-63-69 (= front piece), cast off 8-8-10-10-12-14 stitches for armhole, knit 79-89-95-105-115-127 (= back piece), cast off 8-8-10-10-12-14 stitches for armhole and knit the remaining 45-50-53-58-63-69 stitches (= front piece). Put piece aside and work the sleeves.

SLEEVE:
Cast on 44-46-48-52-52-54 stitches on double pointed needles size 3 mm with light grey blue. Work rib as follows:
ROUND 1: Knit all stitches.
ROUND 2: * Knit 1, purl 1 *, repeat from *-* the entire round.
Repeat 1st and 2nd round until rib measures 3 cm. Switch to double pointed needles size 4 mm. Insert 1 marker thread at beginning of round (= mid under sleeve) and move the marker thread upwards. Work in stocking stitch in the round. When piece measures 9-7-9-7-9-7 cm, increase 2 stitches mid under sleeve - read INCREASE TIP. Increase like this every 3½-3-2-2-1½-1½ cm 11-13-16-17-19-20 times in total (switch to a short circular needle when there are enough stitches) = 66-72-80-86-90-94 stitches. Continue until sleeve measures 46-45-43-41-40-38 cm (shorter measurements in the larger sizes because of wider neck and longer yoke). Work next round as follows: Cast off 4-4-5-5-6-7 stitches, knit 58-64-70-76-78-80 stitches and cast off the remaining 4-4-5-5-6-7 stitches. Put piece aside and knit another sleeve the same way.

YOKE:
Slip sleeves on to same circular needle as body where armholes were cast off = 285-317-341-373-397-425 stitches. NOW MEASURE THE PIECE FROM HERE!
Read KNITTING TIP-1 AND KNITTING TIP-2! Continue with light grey blue and purl 1 row from wrong side but knit the bands. Knit 1 row from right side while decreasing 4-6-0-2-6-4 stitches evenly = 281-311-341-371-391-421 stitches.
Work in stocking stitch back and forth with 5 band stitches in garter stitch in each side towards mid front. When piece measures 1-2-3-3-4-6 cm from where body and sleeves were put together, work next row as follows from right side: 5 band stitches in garter stitch, work A.1A until 6 stitches remain on row (= 27-30-33-36-38-41 repetitions of 10 stitches), work A.1B (= 1 stitch) and finish with 5 band stitches in garter stitch. Continue pattern like this. AT THE SAME TIME on row marked with arrow in A.1A decrease 10-0-10-20-20-30 stitches evenly = 271-311-331-351-371-391 stitches. NOTE! In size S and L decrease in the off white sections.
Work next row as follows from right side: 5 band stitches in garter stitch, work A.2A until 6 stitches remain on row (= 13-15-16-17-18-19 repetitions of 20 stitches), work A.2B (= 1 stitch) and finish with 5 band stitches in garter stitch. Continue pattern like this and decrease as shown in A.2A. When A.2 has been worked, there are 141-161-171-181-191-201 stitches on needle.
Now work elevation in the back of neck or start to work the neck edge if you do not want an elevation.

ELEVATION IN BACK OF NECK:
Skip this paragraph if you do not want an elevation.
Insert 1 marker in the middle stitch on needle = mid back. Begin from right side with off white and knit 15-16-17-18-19-20 stitches past stitch with marker, turn, tighten yarn and purl 31-33-35-37-39-41. Turn, tighten yarn and knit 46-49-52-55-58-61, turn, tighten yarn and purl 61-65-69-73-77-81. Turn, tighten yarn and knit 76-81-86-91-96-101, turn, tighten yarn and purl the rest of row (knit band).

NECK EDGE:
Knit 1 row from right side with off white while decreasing 24-40-44-48-54-58 stitches evenly = 117-121-127-133-137-143 stitches. Purl 1 row (knit bands). Switch to circular needle size 3 mm and work rib from right side as follows: 5 band stitches in garter stitch, * knit 1, purl 1 *, work from *-* until 6 stitches remain, knit 1 and finish with 5 band stitches in garter stitch. Continue rib like this for 3 cm. Cast off stitches with knit over knit and purl over purl. Jacket measures approx. 58-60-62-64-66-68 cm from shoulder and down.

ASSEMBLY:
Sew the openings under the sleeves. Sew the buttons on to the left band.

This pattern has been corrected.

Updated online: 26.02.2018
The diagram symbols for off white and light greyblue have been corrected.
Updated online: 09.04.2018
Correction in diagram A.2A.

Diagram

symbols = knit from right side, purl from wrong side with off white
symbols = knit from right side, purl from wrong side with light grey blue
symbols = knit 2 together
symbols = decrease row
diagram
diagram
diagram
diagram

Each of our patterns has specific tutorial videos to help you.

Do you have a question? See a list of frequently asked questions (FAQ)

Knitting tension is what determines the final measurements of your work, and is usually measured per 10 x 10 cm. It is provided like so: number of stitches in width x number of rows in height - eg: 19 stitches x 26 rows = 10 x 10 cm.

The knitting tension is very individual; some people knit/crochet loosely while others work tightly. You adjust the knitting tension with the needle size, which is why the suggested needle size is only meant as a guide! You need to adjust this (up or down) to ensure that YOUR knitting tension matches the knitting tension provided in the pattern. If you work with a different knitting tension than provided you will have a different yarn consumption, and your work will have different measurements than what the pattern suggests.

The knitting tension also determines which yarns can replace each other. As long as you achieve the same knitting tension you can replace one yarn with another.

See DROPS lesson: How to measure your tension/gauge

See DROPS video: How to make a gauge tension swatch

The required amount of yarn is provided in grams, eg: 450 g. To calculate how many balls you’ll need you first need to know how many grams are in 1 ball (25g, 50g or 100g). This information is available if you click on the individual yarn quality on our pages. Divide the amount required with the amount of each ball. For example, if each ball is 50g (the most common amount), the calculation will be as follows: 450 / 50 = 9 balls.

The important thing when changing from one yarn to another is that the knitting/crochet tension remains the same. This is so that the measurements of the finished piece will be the same as on the sketch provided. It is easier to achieve the same knitting tension using yarns from the same yarn group. It is also possible to work with multiple strands of a thinner yarn to achieve the knitting tension of a thicker one. Please try our yarn converter. We recommend you to always work a test swatch.

Please NOTE: when changing yarn the garment might have a different look and feel to the garment in the photo, due to individual properties and qualities of each yarn.

See DROPS lesson: Can I use a different yarn than the one mentioned in the pattern?

All our yarns are categorised into yarn groups (from A to F) according to thickness and knitting tension – group A contains the thinnest yarns and group F the thickest. This makes it easier for you to find alternative yarns to our patterns, should you wish to switch yarn. All yarns within the same group have a similar knitting tension and can easily replace each other. However, different yarn qualities have different structures and properties which will give the finished work a unique look and feel.

Click here for an overview of the yarns in each yarn group

At the top of all our patterns you’ll find a link to our yarn calculator, which is a helpful tool should you wish to use a different yarn than suggested. By filling in the yarn quality you wish to replace, the amount (in your size) and number of strands, the calculator will present good alternative yarns with the same knitting tension. Additionally it will tell you how much you’ll require in the new qualities and whether you’ll need to work with multiple strands. Most skeins are 50g (some are 25g or 100g).

If the pattern is worked with multiple colours, every colour will have to be calculated separately. Similarly, if the pattern is worked with several strands of different yarns (for example 1 strand Alpaca and 1 strand Kid-Silk) you will have to find alternatives for each, individually.

Click here to see our yarn calculator

Since different yarns have different qualities and textures we have chosen to keep the original yarn in our patterns. However, you can easily find options among our available qualities by using our yarn calculator, or simply pick a yarn from the same yarn group.

It is possible that some retailers still have discontinued yarns in stock, or that someone has a few skeins at home that they would like to find patterns for.

The yarn calculator will provide both alternative yarn as well as required amount in the new quality.

If you think it's hard to decide what size to make, it can be a good idea to measure a garment you own already and like the size of. Then you can pick the size by comparing those measures with the ones available in the pattern's size chart.

You'll find the size chart at the bottom of the pattern.

See DROPS lesson: How to read size chart

The needle size provided in the pattern serves only as a guide, the important thing is to follow the knitting tension. And since knitting tension is very individual, you will have to adjust the needle size to ensure that YOUR tension is the same as in the pattern – maybe you’ll have to adjust 1, or even 2 needle sizes, up or down to achieve the correct tension. For this, we recommend that you work test swatches.

Should you work with a different knitting tension than the one provided, the measurements of the finished garment might deviate from the measurement sketch.

See DROPS lesson: How to measure your tension/gauge

See DROPS video: How to make a tension/gauge swatch

Working a garment top-down provides more flexibility and room for personal adjustment. For example it is easier to try the garment on while working, as well as making adjustments to length of yoke and shoulder caps.

The instructions are carefully explaining every step, in the correct order. Diagrams are adjusted to the knitting direction and are worked as usual.

The diagram depicts all rows/rounds, and every stitch seen from the right side. It is read from bottom to top, from right to left. 1 square = 1 stitch.

When working back and forth, every other row is worked from the right side and every other row is worked from the wrong side. When working from the wrong side, the diagram will have to be worked reversed: from left to right, knit stitches are purled, purl stitches are knit etc.

When working in the round every round is worked from the right side and the diagram are worked from right to left on all rounds.

See DROPS lesson: How to read knitting diagrams

The diagram depicts all rows/rounds, and every stitch seen from the right side. It is worked from bottom to top, from right to left.

When working back and forth every other row is worked from the right side: from right to left and every other row is worked from the wrong side: from left to right.

When working in the round, every row in the diagram are worked from the right side, from right to left.

When working a circular diagram you start in the middle and work your way outwards, counter clockwise, row by row.

The rows usually start with a given number of chain stitches (equivalent to the height of the following stitch), this will either be depicted in the diagram or explained in the pattern.

See DROPS lesson: How to read crochet diagrams

Instructions for working several diagrams after each other on the same row/round, will often be written like so: “work A.1, A.2, A.3 a total of 0-0-2-3-4 times". This means you work A.1 once, then A.2 is worked once, and A.3 is repeated (in width) the number of times provided for your size – in this case like so: S = 0 times, M = 0 times, L=2 times, XL= 3 times and XXL = 4 times.

The diagrams are worked as usual: begin with the first row in A.1, then work the first row in A.2 etc.

See DROPS lesson: How to read knitting diagrams

See DROPS lesson: How to read crochet diagrams

The total width of the garment (from wrist-to-wrist) will be larger in the larger sizes, despite the actual sleeves being shorter. The larger sizes have longer sleeve caps and wider shoulders, so there will be a good fit in all sizes.

The measurement sketch/schematic drawing provides information regarding the full length of the garment. If it’s a jumper or a jacket the length is measured from the highest point on the shoulder closest to the neckline, and straight down to the bottom of the garment. It is NOT measured from the tip of shoulder. Similarly, the length of yoke is measured from the highest point on the shoulder and down to where yoke is split into body and sleeves.

On a jacket measures are never taken along bands, unless specifically stated. Always measure inside band stitches when measuring the length.

See DROPS lesson: How to read a schematic drawing

Diagrams are often repeated on the round or in height. 1 repeat is the diagram the way it appears in the pattern. If it says to work 5 repeats of A.1 in the round, then you work A.1 a total of 5 times after/next to each other in the round. If it says to work 2 repeats of A.1 vertically/in height you work the entire diagram once, then begin again at the start and work the entire diagram one more time.

Chain stitches are slightly narrower than other stitches and to avoid working the cast-on edge too tight, we simply chain more stitches to begin with. The stitch count will be adjusted on the following row to fit the pattern and measurement sketch.

The rib edge is more elastic and will contract slightly compared to, for example, stocking stitch. By increasing before the rib edge, you avoid a visible difference in width between the rib edge and the rest of the body.

It’s very easy to cast off too tightly, and by making yarn overs while casting off (and simultaneously casting these off) you avoid a too tight cast off edge.

See DROPS video: How to bind off with yarn overs (yo)

To achieve an even increase (or decrease) you can increase on, for example: every 3rd and 4th row alternately, like so: work 2 rows and increase on the 3rd row, work 3 rows and increase on the 4th. Repeat this until the increase is complete.

See DROPS lesson: Increase or decrease 1 st on every 3rd and 4th row alternately

Should you prefer to work in the round instead of back and forth, you may of course adjust the pattern. You’ll need to add steeks mid-front (usually 5 stitches), and follow the instructions. When you would normally turn and work from the wrong side, simply work across the steek and continue in the round. At the end you’ll cut the piece open, pick up stitches to work bands, and cover the cut edges.

See DROPS video: How to knit steeks and cut open

Should you prefer to work back and forth instead of in the round, you may of course adjust the pattern so you work the pieces separately and then assemble them at the end. Divide the stitches for the body in 2, add 1 edge stitch in each side (for sewing) and work the front and back pieces separately.

See DROPS lesson: Can I adapt a pattern for circular needles into straight needles?

Pattern repeats can vary slightly in the different sizes, in order to get the correct proportions. If you’re not working the exact same size as the garment in the photo, yours might deviate slightly. This has been carefully developed and adjusted so that the complete impression of the garment is the same in all sizes.

Make sure to follow instructions and diagrams for your size!

If you have found a pattern you like which is available in women’s size it’s not very difficult to convert it to men’s size. The biggest difference will be the length of sleeves and body. Start working on the women size that you think would fit across the chest. The additional length will be worked right before you cast off for the armhole/sleeve cap. If the pattern is worked top-down you can add the length right after the armhole or before the first decrease on sleeve.

Regarding additional yarn amount, this will depend on how much length you add, but it is better with a skein too many than too few.

All yarns will have excess fibres (from production) that might come off as lint or shedding. Brushed yarns (ie hairier yarns) have more of these loose, excess fibres, causing more shedding.

Shedding also depends on what is worn under or over the garment, and whether this pulls at the yarn fibres. It’s therefore not possible to guarantee that there will be no shedding

Below are some tips on how to get the best result when working with hairier yarns:

1. When the garment is finished (before you wash it) shake it vigorously so the looser hairs come off. NOTE: do NOT use a lint roller, brush or any method that pulls at the yarn.

2. Place the garment in a plastic bag and put it in your freezer - the temperature will cause the fibres to become less attached to each other, and excess fibres will come off easier.

3. Leave in the freezer for a few hours before taking it out and shaking it again.

4. Wash the garment according to the instructions on the yarn label.

Pilling is a natural process that happens to even the most exclusive of fibers. It's a natural sign of wear and tear that is hard to avoid, and that is most visible in high friction areas of your garment like a sweater's arms and cuffs.

You can make your garment look as new by removing the pilling, using a fabric comb or a pill/lint remover.

Still can't find the answer you need? Then scroll down and leave your question so one of our experts can try to help you. This will be done normally within 5 to 10 working days.
In the meantime, you can read the questions and answers that others have left to this pattern or join the DROPS Workshop on Facebook to get help from fellow knitters/crocheters!

You might also like...

Post a comment to pattern DROPS 191-29

We would love to hear what you have to say about this pattern!

If you want to leave a question, please make sure you select the correct category in the form below, to speed up the answering process. Required fields are marked *.

Comments / Questions (23)

country flag Elly De Hooge wrote:

Goeden middag, kun je bv dit fair isle patroon ook op een boven naar beneden breien manier gebruiken. Dus ipv minderen de steken meereden? Vr.gr Elly

29.03.2024 - 13:15

DROPS Design answered:

Dag Elly,

Ja, dat zou kunnen, dan doe je het precies andersom. Waar je normaal moet minderen, ga je meerderen etc.

10.04.2024 - 09:39

country flag Elvia wrote:

Hello! Thank you for your lovely free patterns. I have joined the sleeves to the body. Knitting has become difficult at this point. Knitting gets tight when I reach the sleeves. Is this the expected? Do you have any suggestions that can make it easier? Thanks!!

13.11.2023 - 04:44

DROPS Design answered:

Dear Elvia, the first rows might look a bit tricky but after some rows, it will work super fine again. You can get helped continuing working the sleeves on double pointed needles or on another circular needle for the first rows. Happy knitting!

13.11.2023 - 08:36

country flag Gerd Formofetten wrote:

Jeg strikker jakken rundt med oppklippsmasker. Får ikke mønsteret til å stemme. Str xl. Skal jeg telle med a2b rundt hele omgangen?

30.12.2021 - 07:43

DROPS Design answered:

Hej Gerd. A.2B stickar du kun en gang på omgangen (rett för de sista 5 stolpemaskerna). Du har 351 m. 5 + (17xA.2A) + A.2B + 5 = 351 m. Mvh DROPS Design

04.01.2022 - 14:39

country flag Carole wrote:

Is this pattern available in kid sizes? Thank you

29.11.2021 - 14:41

DROPS Design answered:

Dear Carole, not exactly the same - find our nordic patterns of jackets for children here. Happy knitting!

29.11.2021 - 15:47

country flag Cecillia wrote:

Hi! What are the measurement (S, M, L) for the finished garment? I can't find it.

05.07.2021 - 06:56

DROPS Design answered:

Dear Cecillia, you will find all finished measurements for each size in the chart at the end of the patttern - measure a similar garment you have and like the shape to find ou the matching size - read more here. Happy knitting!

05.07.2021 - 08:35

country flag Susanne Johnsen wrote:

Hej. Er lige begyndt på mønster og kan ikke finde ud af om den ekstra maskebi mønster A1B skal sluttes af på pinden, eller man skal starte med den i næste pind. Kan ikke få mønsteret til at passe. Vh Susanne strikker str XXXL

21.04.2021 - 08:29

DROPS Design answered:

Hej Susanne, jo, det er for at få mønsteret ens i hver side mod midt foran. Når du slutter med den ene maske i venstre side, så starter du også med den når du strikker tilbage igen :)

28.04.2021 - 15:37

country flag Régine Plessis wrote:

Je réalise ce modèle en taille Médium. Je suis arrivée à une hauteur de 36cm pour les devants et le dos pour faire les emmanchures et d'après le schéma il est indiqué une hauteur de 60 cm. Est- une erreur? Que dois-faire? Je vous remercie. Régine

05.02.2021 - 17:18

DROPS Design answered:

Bonjour Regine, le gilet mesure environ 60 cm de hauteur totale depuis l'épaule. Dans la taille M vous commencez a faire les emmanchures à une hauteur de 36 cm. Comment lire le schéma des mesures vous trouverez ICI. Bon tricot!

05.02.2021 - 17:55

country flag Claire Wauthy wrote:

Bonjour, je réalise ce gilet en taille M. pouvez-vous confirmer qu’il y a 0 diminutions à fait à la fin du diagramme A1A ou bien est-ce une erreur de frappe ? Je vous remercie. Claire

30.07.2020 - 02:52

DROPS Design answered:

Bonjour Mme Wauthy, aucune faute de frappe: vous tricotez: 5 m de bordure devant, 30 fois A.1A (= 30 fois 10 m), A.1B (= 1 m) et 5 m de bordure devant = 5+30x10 +1 +5= 311 m. Bon tricot!

30.07.2020 - 09:14

country flag Sunniva wrote:

A2b fra vrangsiden... skal den strikkes først eller sist?

14.02.2020 - 08:02

DROPS Design answered:

Hej Sunniva, du strikker samme mønster men fra modsat side (altså i modsat rækkefølge) som du ser selve mønsteret i diagrammet fra retsiden. God fornøjelse!

14.02.2020 - 11:47

country flag Emma wrote:

Hej. På bilden ser det ut som att de fem framkantmaskorna på vissa ställen är blåa. Enligt vad jag förstår av mönstret skickas de fem framkantmaskorna alltid i vit färg. Har jag missat något? :)

10.07.2019 - 23:05

DROPS Design answered:

Hei Emma. Du strikker stolpene i samme farge som resten av omgangen. God fornøyelse

11.07.2019 - 12:49