
Popular categories
Looking for a yarn?


|
||||||||||||||||||||||
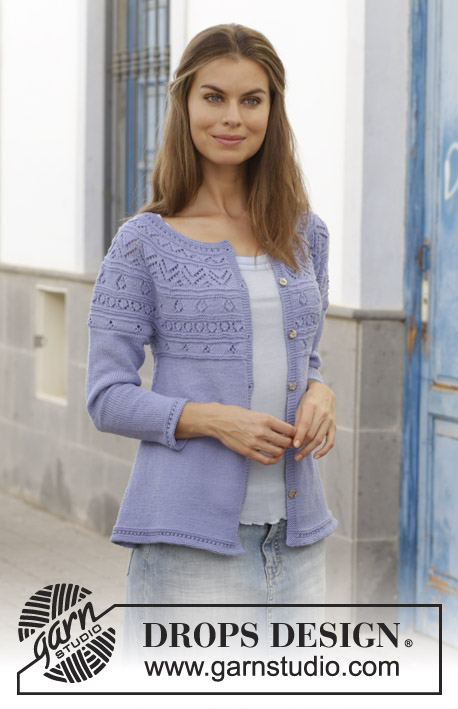
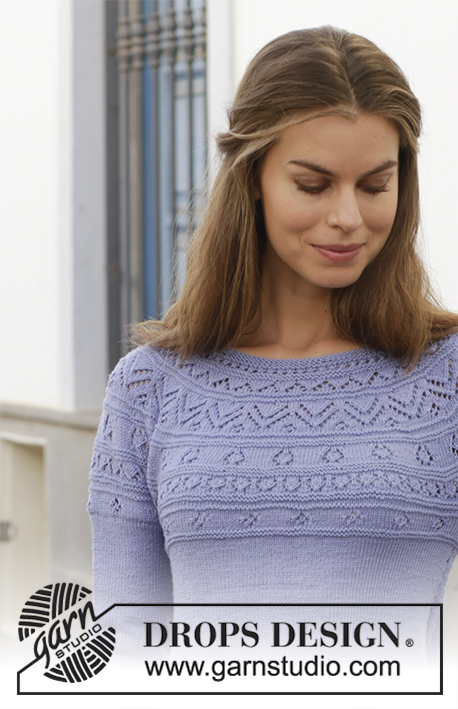
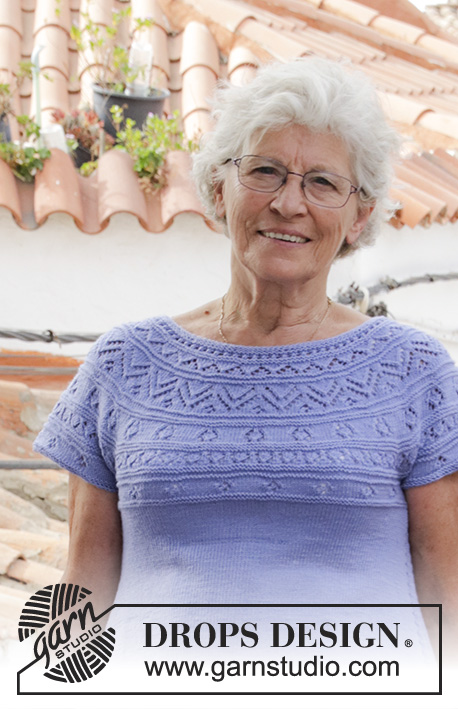
Taormina Cardi |
||||||||||||||||||||||
 |
 |
|||||||||||||||||||||
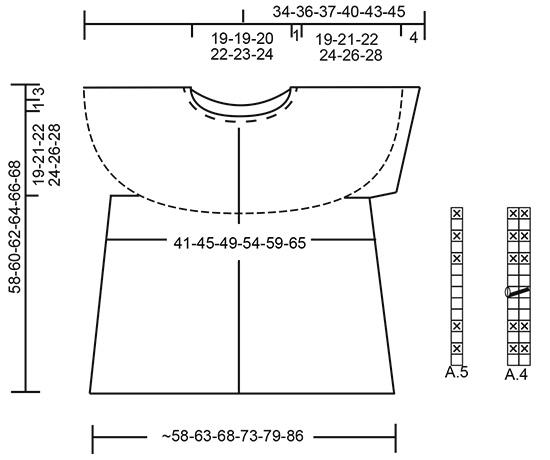
Knitted jacket with lace pattern, round yoke and short sleeves, worked top down. Sizes S - XXXL. The piece is worked in DROPS BabyMerino.
DROPS 186-28 |
||||||||||||||||||||||
|
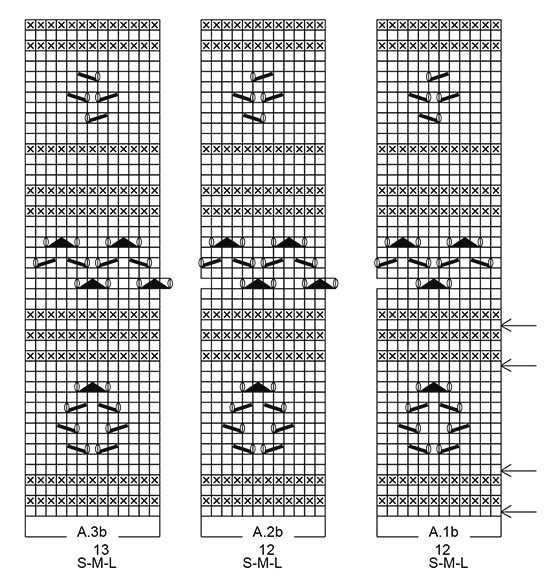
INFORMATION FOR THE PATTERN: RIDGE/GARTER STITCH (worked back and forth): 1 ridge = Knit 2 rows. RIDGE/GARTER STITCH (worked in the round): 1 ridge = 2 rounds. Knit 1 round and purl 1 round PATTERN: See diagrams A.1 to A.5. Choose diagram for your size (applies to A.1 to A.3). The diagrams show all the rows in the pattern seen from the right side. INCREASE TIP-1 (for increases on yoke): To work out how to increase evenly, count the total number of stitches on the needle (e.g. 143 stitches) minus the band stitches (e.g. 10 stitches = 133 stitches) and divide the remaining stitches by the number of increases to be made (e.g. 24) = 5.54. In this example, increase by making 1 yarn over alternately after approx. every 5th and 6th stitch. On the next row, work the yarn overs twisted into the pattern to avoid holes. INCREASE TIP-2 (for increases on body): Work until there are 2 stitches left before the marker thread, 1 yarn over, knit 4 stitches (the marker thread sits in the middle of these 4 stitches), 1 yarn over (= 2 stitches increased), increase like this at both marker threads (= a total of 4 stitches increased). The yarn overs are not worked twisted on the next row, there will be holes. BUTTONHOLES: Work buttonholes on the right band (when the garment is worn): Work from the right side until there are 3 stitches left on the row, make 1 yarn over, knit the next 2 stitches together and knit the last stitch. On the next row knit the yarn over to leave a hole. The first buttonhole is worked when the piece measures approx. 1½-2 cm. Then work the other 5-5-5-6-6-6 buttonholes with approx. 8½ cm between each. ---------------------------------------------------------- JACKET: The yoke and body are worked back and forth, top down. The short sleeves are worked in the round with double pointed needles. YOKE: Cast on 126-130-136-142-149-154 stitches (including 5 band stitches in each side towards mid front) with circular needle size 2.5 mm and BabyMerino. Work 2 RIDGES – see description above. The next row is worked as follows – from the right side: Work 5 stitches in garter stitch (= band), knit 22-23-25-26-27-29 stitches and increase 1-3-1-2-3-2 stitches evenly over these stitches – read INCREASE TIP-1, * 1 yarn over, knit 2-2-1-1-1-1 *, work from *-* over the next 14 stitches (= 7-7-14-14-14-14 stitches increased), knit 44-46-48-52-57-58 stitches and increase 1-5-1-5-8-5 stitches evenly over these stitches, * 1 yarn over, knit 2-2-1-1-1-1 *, work from *-* over the next 14 stitches (= 7-7-14-14-14-14 stitches increased), knit 22-23-25-26-27-29 stitches and increase 1-3-1-2-3-2 stitches evenly over these stitches and finish with 5 stitches in garter stitch (= band) = 143-155-167-179-191-191 stitches. Knit 1 row from the wrong side (the yarn overs are knitted twisted to avoid holes). REMEMBER THE KNITTING TENSION! Remember BUTTONHOLES – see description above. Change to circular needle size 3 mm. The next row is worked as follows from the right side: Work 5 stitches in garter stitch (= band), A.1a (= 12 stitches), work A.2a (= 12 stitches) over the next 108-120-132-144-156-156 stitches (= 9-10-11-12-13-13 times in width), A.3a (= 13 stitches) and finish with 5 stitches in garter stitch (= band). Continue the pattern like this AT THE SAME TIME as you increase evenly on each row marked with an increase arrow as follows: Each time you increase 12 stitches, work A.2 one more time in width. Each time you increase 24 stitches, work A.2 two more times in width. Each time you increase 36 stitches, work A.2 three more times in width. INCREASE 1: Increase 24-24-24-24-24-36 stitches = 167-179-191-203-215-227 stitches. INCREASE 2: Increase 24-24-24-24-24-36 stitches = 191-203-215-227-239-263 stitches. INCREASE 3: Increase 24 stitches = 215-227-239-251-263-287 stitches. INCREASE 4: Increase 24 stitches = 239-251-263-275-287-311 stitches. INCREASE 5: Increase 24 stitches = 263-275-287-299-311-335 stitches. INCREASE 6: Increase 24 stitches = 287-299-311-323-335-359 stitches. When A.1a to A.3a have been worked 1 time in height, the piece measures approx. 14 cm from the neck edge. Now work A.1b over A.1a, A.2b over A.2a and A.3b over A.3a and continue to increase as follows: INCREASE 7: Increase 12-24-24-24-24-24 stitches = 299-323-335-347-359-383 stitches. INCREASE 8: Increase 12-12-24-24-24-24 stitches = 311-335-359-371-383-407 stitches. INCREASE 9: Increase 12-12-24-24-24-24 stitches = 323-347-383-395-407-431 stitches. INCREASE 10: Increase 12-12-12-12-24-24 stitches = 335-359-395-407-431-455 stitches. The increases are now finished in sizes S, M and L, but continue in sizes XL, XXL and XXXL as follows: INCREASE 11: Increase 12-24-24 stitches = 419-455-479 stitches. INCREASE 12: Increase 12-12-24 stitches = 431-467-503 stitches. ALL SIZES: = 335-359-395-431-467-503 stitches (A.2b is now repeated 25-27-30-33-36-39 times in width). Work pattern until the piece measures 20-22-23-25-27-29 cm from the cast on edge. Now divide the body and sleeves on the next row from the right side as follows: (The stitches which do not fit into the pattern are worked in the same way as the first stitch in A.1b). Work 5 stitches in garter stitch (= band), pattern as before over the next 44-49-53-60-66-73 stitches (= front piece), place the next 74-76-86-90-96-100 stitches on a thread for sleeve, cast on 10 new stitches on the needle (= side under the sleeve), work pattern as before over the next 89-99-107-121-133-147 stitches (= back piece), place the next 74-76-86-90-96-100 stitches on a thread for sleeve, cast on 10 new stitches on the needle (= side under the sleeve) and work pattern as before over the next 44-49-53-60-66-73 stitches, finishing with 5 stitches in garter stitch (= band = front piece). Body and sleeves are finished separately. THE PIECE IS NOW MEASURED FROM HERE! BODY: = 207-227-243-271-295-323 stitches. Continue with pattern and 5 band stitches in garter stitch on each side of the piece; the stitches which do not fit into the pattern are worked in the same way as the first stitch in A.1b. When A.1b to A.3b have been worked 1 time in height, the piece measures approx. 27-27-27-30-30-30 cm. Continue with stocking stitch and 5 band stitches in garter stitch on each side of the piece. Insert 1 marker thread 54-59-63-70-76-83 stitches in from each side (= front pieces = 99-109-117-131-143-157 stitches on back piece). On the next row from the right side increase 1 stitch on each side of each marker thread – read INCREASE TIP-2! Increase like this every 4th row until the piece measures 32-32-33-33-33-33 cm from where the body was divided from the sleeves = approx. 287-311-335-359-391-423 stitches. Change to circular needle size 2.5 mm. Work the next row as follows from the right side: Work 5 stitches in garter stitch, work A.4 until there are 6 stitches left, work A.5 over the next stitch and 5 stitches in garter stitch. When A.4 and A.5 have been worked 1 time in height, the piece measures approx. 35-35-36-36-36-36 cm from where the body was divided from the sleeves and approx. 55-57-59-61-63-65 cm from the neck edge. Cast off (make sure you cast off loosely; you can use a needle 1 size larger if necessary). SLEEVE EDGES: The piece is worked in the round with double pointed needles. Place the 74-76-86-90-96-100 stitches from the thread on the one side of the piece on double pointed needles size 3 mm and knit up 1 stitch in each of the 10 stitches cast on under the sleeve = 84-86-96-100-106-110 stitches. Continue with A.2b over the stitches which fit the pattern; the stitches which do not fit the pattern mid under sleeve are knitted when the stitches are knitted and purled when the stitches are purled. When the sleeve edge measures 3 cm from where the sleeve was divided from the body (adjust so that you finish neatly in relation to the pattern) change to double pointed needles size 2.5 mm and work 2 RIDGES – see description above. Then cast off, make sure you cast off loosely; you can use a needle 1 size larger if necessary. Work the other sleeve edge in the same way. ASSEMBLY: Sew buttons onto the left band. |
||||||||||||||||||||||
Diagram explanations |
||||||||||||||||||||||
|
||||||||||||||||||||||
|
||||||||||||||||||||||

|
||||||||||||||||||||||

|
||||||||||||||||||||||

|
||||||||||||||||||||||
|
||||||||||||||||||||||
|
Have you made this or any other of our designs? Tag your pictures in social media with #dropsdesign so we can see them! Do you need help with this pattern?You'll find tutorial videos, a Comments/Questions area and more by visiting the pattern on garnstudio.com. © 1982-2024 DROPS Design A/S. We reserve all rights. This document, including all its sub-sections, has copyrights. Read more about what you can do with our patterns at the bottom of each pattern on our site. |
||||||||||||||||||||||


With over 40 years in knitting and crochet design, DROPS Design offers one of the most extensive collections of free patterns on the internet - translated to 17 languages. As of today we count 304 catalogues and 11422 patterns - 11422 of which are translated into English (UK/cm).
We work hard to bring you the best knitting and crochet have to offer, inspiration and advice as well as great quality yarns at incredible prices! Would you like to use our patterns for other than personal use? You can read what you are allowed to do in the Copyright text at the bottom of all our patterns. Happy crafting!
Comments / Questions (15)
Je ne vois pas le diagramme A4 ETA5
28.06.2021 - 14:22DROPS Design answered:
Bonjour Mme Brunet, vous les trouverez juste à droite du schéma des mesures (ils se tricotent tous les 2 sur 2 mailles). Bon tricot!
28.06.2021 - 16:08Om man tittar på fotot kan jag inte se att mönstret upprepas efter delning till fram-bak och ärm utan det ser ut som om slätstickningen börjar! Ärmen verkar sluta med 1 omgång A2b. Tacksam om jag får en förklaring!
29.04.2019 - 21:39DROPS Design answered:
Hei Brita. Diagrammene strikkes kun 1 gang i høyden, det stemmer. Etter at du er ferdig med A.1a-A.3a strikker du A.1b-A.3b. Når du deler inn til for/bakstykket og ermer, er du ikke ferdig med diagrammene, så du strikker noen omganger på bolen etter diagram. Når A.1b-A.3b er strikket 1 gang i høyden fortsettes det med glattstrikk. God fornøyelse
30.04.2019 - 14:36Jeg kan ikke printe denne opskrift, eller andre. Kan I oplyse mig hvorfor ???? mvh Maybritt
24.09.2018 - 19:49DROPS Design answered:
Hei Maybritt. Vi har nå testet det og får helt fint til å printe ut oppskriften. Kanskje det har noe å si hvordan du velger å printe den ut? Det skal fungere om du trykker du på det lille printerikonet rett under boksen med garn og priser, helt på toppen der det står instruksjoner til oppskriften. God fornøyelse.
25.09.2018 - 08:09Werden bei den Zunahmen am Rumpfteil immer 4 Machen zwischen den Umschlägen gestrickt? Oder immer 2 Maschen mehr, so dass ein Keil entsteht?
29.06.2018 - 10:22DROPS Design answered:
Liebe Frau Klug, es sind immer 4 Maschen zwischen den Zunahmen auf beiden Seiten am Rumpfteil. Viel Spaß beim stricken!
29.06.2018 - 11:45Kan det virkelig passe der står under “udtagningstips” at omslagene strikkes IKKE drejet på næste pind, de skal lave hul!!?? men det er jo i siden mellem forstykker og ryg og ikke en del af et hulmønster!! Så jeg forstår slet ikke hvorfor der skulle være et hul på hver 4. Pind ned langs siden?? Måske det er en fejl??? Håber jeg får hurtig svar, da jeg gerne vil videre. På forhånd TAK. Mvh Kate Andersen
08.03.2018 - 00:51DROPS Design answered:
Hei Kate. Det er riktig slik det står i oppskriften. Det skal lages hull i sidene (2 hull i hver side), slik at det blir et flott hullmønster samtidig som det økes fra ermhullen og ned. Hullmønstret vises dessverre ikke på bildet, men om du ser på oppskrift nr 186 / 37 Taormina Top, vil du se litt av mønstret. God Fornøyelse!
08.03.2018 - 09:40Lisäyskierroksen jälkeen, tuleeko uusi mallikerta mihin kohtaan neuletta?
23.02.2018 - 20:00DROPS Design answered:
Hei, lisäykset tehdään aina nurjilla kerroksilla (oikealta puolelta katsottuna). Tämän jälkeen työhön tulee aina enemmän piirroksen A.2 mallikertoja ja nämä mallikerrat neulotaan piirrosten A.1 ja A.3 mallikertojen sisäpuolelle kuten aiemmin. Eli toistat vain piirroksen A.2 mallikertaa yhden, kahden tai kolmen ylimääräisen kerran.
22.03.2018 - 14:32Wunderbar, dass es neben diesen ganzen abgemagerten Plastikpüppchen auch einmal eine echte Frau gibt, die die Modelle präsentiert. Da bekommt man endlich eine Vorstellung davon, wie sie in Wirklichkeit aussehen könnten. Bitte, behalten Sie diese Dame unbedingt unter Ihren Models!!!
16.02.2018 - 13:51If using different models for the photoshoots, then models of all ages should be used not only very young or granny models. Some clothing simply does no suit everyone due to bodytype and /or age
20.01.2018 - 11:42If using different models for the photoshoots, then models of all ages should be used not only very young or granny models. Some clothing simply does no suit everyone due to bodytype and /or age
20.01.2018 - 11:41I love it, please include it.
19.01.2018 - 11:16