
Categorías populares
¿Buscas un hilo?


Comentarios / Preguntas (28)
![]() Odilia escribió:
Odilia escribió:
Es ist eine sehr gute Anleitung, gut erklärt, klasse!!
02.07.2025 - 08:52
![]() Solange escribió:
Solange escribió:
Très beaux,j aimerais bien le faire. Merci
17.04.2025 - 03:51
![]() Kaitlyn Linnell escribió:
Kaitlyn Linnell escribió:
Hello I am working on pattern w-717 and i have a question from the chained circle the first row where i do 12 double crochets around the ring do i do 3 chains and turn the work around and then start the 12 double crochets around the ring?
17.08.2024 - 19:49DROPS Design respondió:
Dear Kaitlyn, you work in the round, so you don't turn the piece. You start with chain 3, to elevate the stitches for the next round and then start with 11 double crochets (the first one is substituted, as explained in CROCHET INFORMATION. Happy crochetting!
18.08.2024 - 21:14
![]() Murielle Mage escribió:
Murielle Mage escribió:
Bonjour, je fais ce sac avec le coton Paris et crochet n°3 mais le fond forme un bol. Mon nombre de mailles correspond bien .. je ne peux pas augmenter mes augmentations sans etre en décalage avec le corp du sac est-ce mon crochet qui est trop petit ??? \r\nQue dois-je faire ? \r\nMerci
11.04.2024 - 23:20DROPS Design respondió:
Bonjour Mme Mage, attention à votre tension en largeur mais aussi en hauteur, veillez à bien avoir les 20 brides et 11 rangs = 10 x 10 cm non seulement lors de l'échantillon mais également quand vous crochetez le fond. Essayez de ne pas trop tirer vos brides en hauteur si besoin. Bon crochet!
12.04.2024 - 08:24
![]() Anette escribió:
Anette escribió:
Hej Jag virkar en väska i flerfärgvirkning, virkar runt. Hur får jag ett fint avslut där varvet börjar och slutar? Tack Anette❤
07.02.2024 - 18:32DROPS Design respondió:
Hei Anette. Når du avslutter med 1 kjedemaske i 3. luftmaske drar du ut tråden og da kan du prøve å sy enden slik at den legger seg pent over 1. stav (toppen av staven) på begynnelsen av omgangen (pass på at den ikke er for løs eller for stam), og deretter festes tråden på baksiden av vesken. mvh DROPS Design
16.02.2024 - 09:38
![]() Valéria escribió:
Valéria escribió:
Azt hiszem, hogy a fonal mennyisége és száma össze lett cserélve: -17 gramm a 100 sz. törtfehér színből Köszönöm a javítást! :)
25.07.2023 - 09:06
![]() Linda escribió:
Linda escribió:
Dankjewel voor dit prachtig patroon
27.09.2021 - 15:07
![]() Nathalie escribió:
Nathalie escribió:
Bonjour, Merci pour ce modèle. Je le trouve très agréable à faire. Cependant, je suis arrivée au rang ajouré et je ne trouve pas les explications. Peut-être ai-je mal vu mais je trouve pas les explications pour ce rang. Pouvez-vous m'aider ?
12.07.2021 - 23:16DROPS Design respondió:
Bonjour Nathalie, le rang ajouré se crochète ainsi: *1 bride dans chacune des 3 premières brides/des 3 brides suivantes, 1 maille en l'air, sautez 1 bride*, et répétez de *-* tout le tour, ainsi vous sautez chaque 4ème bride que vous remplacez par 1 maille en l'air. Bon crochet!
13.07.2021 - 07:58
![]() Chiara escribió:
Chiara escribió:
I cannot find the diagram. Could you please help me?
15.03.2021 - 22:12DROPS Design respondió:
Hi Chiara, Drops are having temporary problems loading images, but will be up and running again soon. The diagrams will then be at the bottom of the pattern. Happy crafting!
16.03.2021 - 08:03
![]() Angi escribió:
Angi escribió:
Hallo ich verstehe das nicht was bei runde 5-8 gemeint ist wie soll ich da Zunähmen
10.04.2020 - 13:22DROPS Design respondió:
Liebe Angi, genauso wie zuvor, dh bei der 5. Runde häkeln Sie: * je 1 Stäbchen in die ersten 3 Stäbchen, 2 Stäbchen in das nächste Stäbchen *, bei der 6. Runde * je 1 Stäbchen in die ersten 4 Stäbchen, 2 Stäbchen in das nächste Stäbchen *, und so weiter, dh es ist immer 1 Stäbchen mehr zwischen 2 Stäbchen in das nächste Stäbchen. Viel Spaß beim häkeln!
14.04.2020 - 10:30
|
|||||||||||||
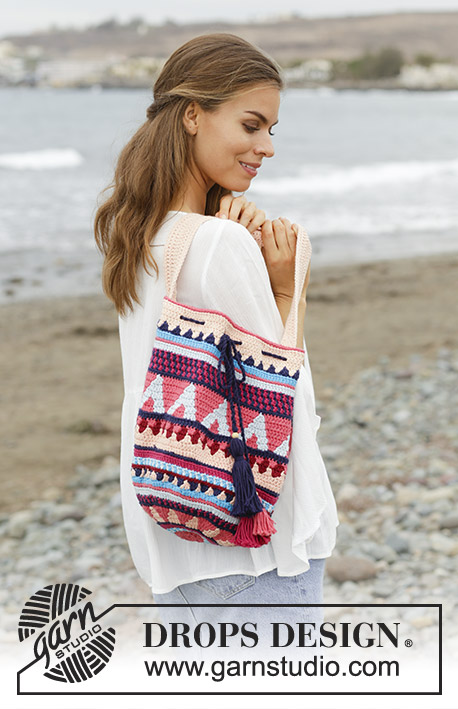
Hush Hush#hushhushbag |
|||||||||||||
 |
 |
||||||||||||
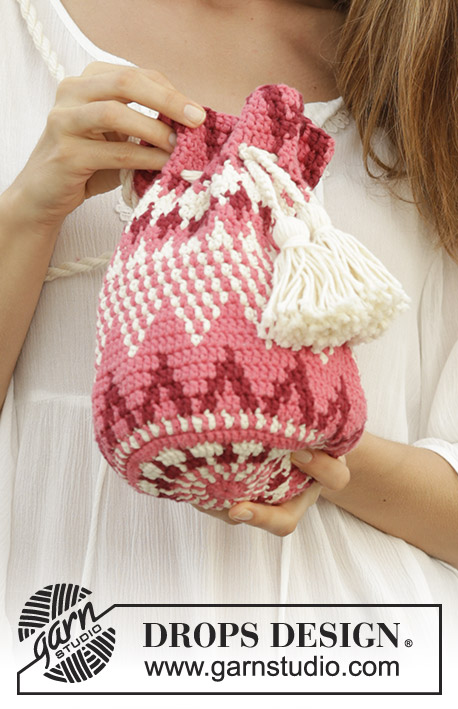
Bolso a ganchillo con patrón de jacquard y borlas, trabajado en redondo a partir del centro del fondo del bolso para arriba. La pieza está elaborada en DROPS Paris.
DROPS 186-3 |
|||||||||||||
|
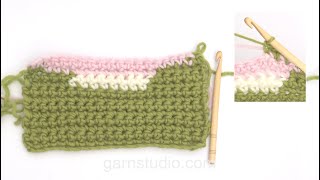
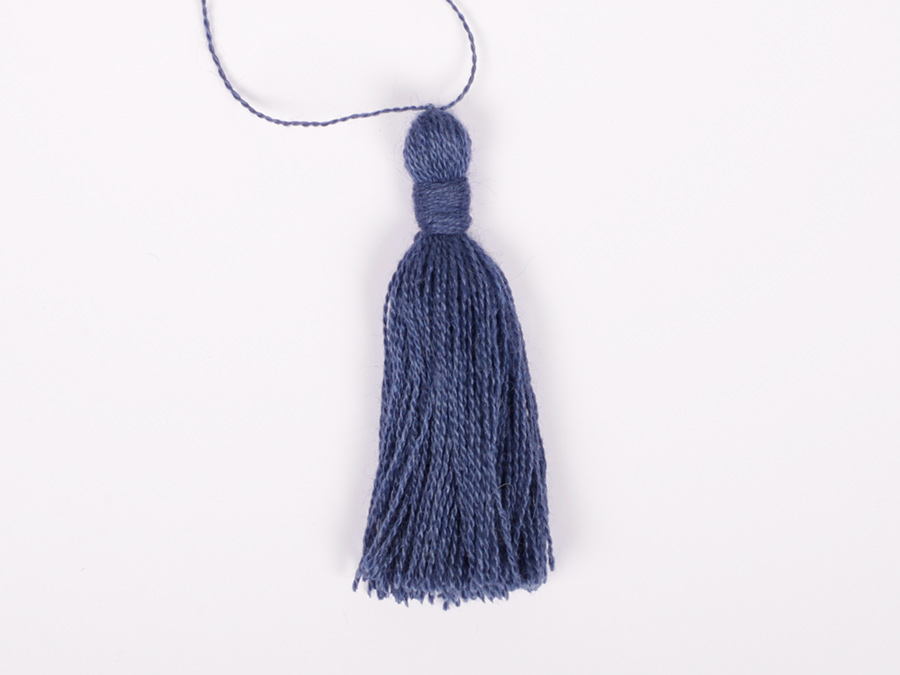
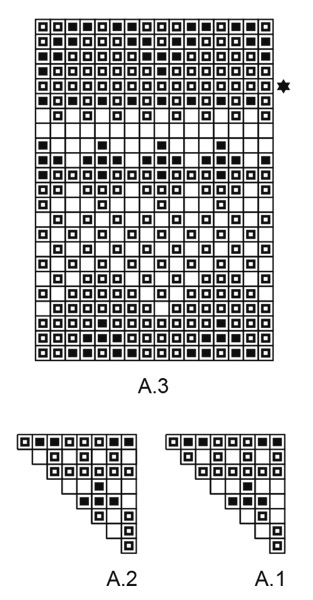
INFORMACIÓN PARA REALIZAR EL PATRÓN: INFORMACIÓN PARA REALIZAR EL TRABAJO: Al principio de cada vuelta de puntos altos, sustituir el primer punto alto con 3 puntos de cadena. La vuelta termina con 1 punto bajísimo en el 3er punto de cadena al principio de la vuelta. PATRÓN DE JACQUARD: Cuando se cambia de color al principio de una vuelta, trabajar el punto bajísimo al final de la vuelta anterior con el nuevo color. Cuando se trabaja con varios colores en una vuelta de puntos altos, trabajar de la manera siguiente: Trabajar el último punto alto con el primer color, pero no hacer la última lazada, cambiar al color siguiente y trabajar la última lazada con este nuevo color, después trabajar el punto alto siguiente. Cuando se trabaja con 2 colores, colocar el hilo del color que no está en uso sobre los puntos de la vuelta anterior y trabajar alrededor del hilo de modo que quede escondido en los puntos; el hilo sigue de esta manera la vuelta. PATRÓN: Ver diagramas A.1 a A.3. 1 cuadrado = 1 punto alto. ----------------------------------------------------- BOLSO: La pieza se trabaja en redondo a partir del centro del fondo del bolso para arriba. Trabajar 5 puntos de cadena con aguja de ganchillo tamaño 3 mm y frambuesa y formar un anillo con 1 punto bajísimo en el primer punto de cadena trabajado. Después trabajar puntos altos y el patrón en redondo de la manera siguiente: * A.1, A.2 *, trabajar de *a* 6 veces en la vuelta – leer PATRÓN DE JACQUARD e INFORMACIÓN PARA REALIZAR EL TRABAJO: VUELTA 1: Trabajar 12 puntos altos alrededor del anillo. VUELTA 2: Trabajar 2 puntos altos en cada punto alto = 24 puntos altos. VUELTA 3: Trabajar * 1 punto alto en el primer punto alto, 2 puntos altos en el punto alto siguiente *, trabajar de *a* hasta el fin de la vuelta = 36 puntos altos. VUELTA 4: Trabajar * 1 punto alto en cada uno de los primeros 2 puntos altos, 2 puntos altos en el punto alto siguiente *, trabajar de *a* hasta el fin de la vuelta = 48 puntos altos. ¡RECORDARSE DE MANTENER LA MISMA TENSIÓN DE LA MUESTRA! VUELTAS 5-8: Continuar a aumentar y trabajar el patrón como antes, es decir, en cada vuelta trabajar 1 punto alto más entre los aumentos que los que se hicieron en la vuelta anterior = 96 puntos altos. VUELTA 9: Continuar a trabajar en redondo, pero sin aumentos y trabajar de acuerdo a A.3 (= 6 repeticiones en la vuelta). En la vuelta con la estrella, trabajar una hilera de agujeros de la manera siguiente: * 1 punto alto en cada uno de los primeros/siguientes 3 puntos altos, 1 punto de cadena, saltar 1 punto alto *, trabajar de *a* hasta el fin de la vuelta. Continuar hasta haber completado A.3. Cortar y asegurar el hilo. CORDÓN RETORCIDO Y BORLAS: 1 cordón retorcido = cortar 6 hilos blanco hueso de aprox 280 cm. Retorcerlos juntos hasta que ofrezcan resistencia, doblar el cordón en dos para que se retuerza nuevamente. Atar un nudo en cada extremo. Pasar el cordón de adentro hacia afuera en la hilera de agujeros del bolso y terminar atando los 2 extremos juntos en un nudo grande. Hacer 2 borlas grandes decorativas con blanco hueso de la manera siguiente: 1 borla = cortar 50 hilos blanco hueso de 14 cm. Cortar otro hilo de 20 cm, atar un nudo alrededor de los 50 hilos. Doblar en 2 a nivel del nudo, enrollar un hilo 4 veces alrededor de la borla, a aprox 1.5 cm hacia abajo del doblez y atar un nudo. Cortar los hilos de modo que la borla quede pareja abajo. Hacer otra borla de la misma manera. Ahora trabajar las borlas juntamente con 2 hilos blanco hueso de la manera siguiente: fijar el hilo con un punto bajísimo alrededor del hilo en la parte de arriba de una de las borlas, trabajar 24 puntos de cadena, trabajar 1 punto bajísimo alrededor del hilo en la parte de arriba de la otra borla. Asegurar los hilos en cada una de las borlas. Dividir el cordón retorcido en 2 de modo que se pueda insertar una de las borlas. Las borlas ahora se mantienen fijas debido a que los puntos de cadena entre las borlas están “pinchados” en el cordón retorcido. |
|||||||||||||
Explicaciones del diagrama |
|||||||||||||
|
|||||||||||||
|
|||||||||||||
¿Terminaste este patrón?Entonces, etiqueta tus fotos con #dropspattern #hushhushbag o envíalas a la galería #dropsfan. ¿Necesitas ayuda con este patrón?Encontrarás 12 videos tutoriales, un espacio para comentarios/preguntas y más visitando la página del patrón en garnstudio.com © 1982-2025 DROPS Design A/S. Todos los derechos reservados. Este documento, incluyendo todas sus sub-secciones, está protegido por los derechos de autor (copyright). Lee más acerca de lo que puedes hacer con nuestros patrones en la parte de abajo de cada patrón de nuestro sitio. |
|||||||||||||


Con más de 40 años en el diseño de modelos de punto y de ganchillo, DROPS Design ofrece una de las más vastas colecciones de patrones gratuitos en el internet - traducidos en 17 idiomas. Al día de hoy, contamos con 314 catálogos y 11821 patrones - de los cuales 11157 están traducidos en español.
Nosotros trabajamos con mucho esmero para brindarte lo mejor que las labores de punto y ganchillo tienen para ofrecer,inspiración y consejos, así como hilos de magnífica calidad a precios increíbles! Te gustaría usar nuestros patrones para otro fin además del uso personal? Puedes leer acerca de lo que estás permitida a hacer en el texto de Copyright en la parte de abajo de todos nuestros patrones. Felices labores!
Escribe un comentario sobre DROPS 186-3
¡Nos encantaría saber qué piensas acerca de este patrón!
Si quieres escribir una pregunta referente al patrón, por favor asegúrate de elegir la categoría correcta en el formulario debajo, para acelerar el proceso de respuesta. Los campos obligatorios están marcados con un *.