DROPS Paris
DROPS Paris
100% Cotton
from 6.00 RON /50g
Get the yarn to make this pattern from 30.00RON.

The yarn cost is calculated from the pattern’s smallest size and the yarn’s cheapest product type. Looking for an even better price? You might find it on the DROPS Deals!

DROPS SS24

Hush Hush

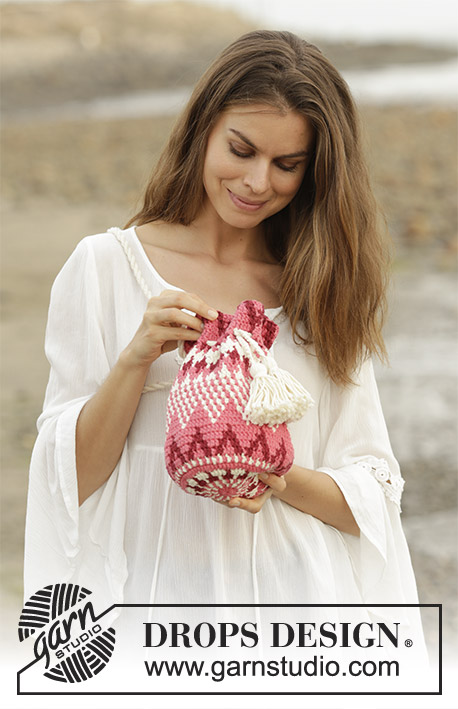
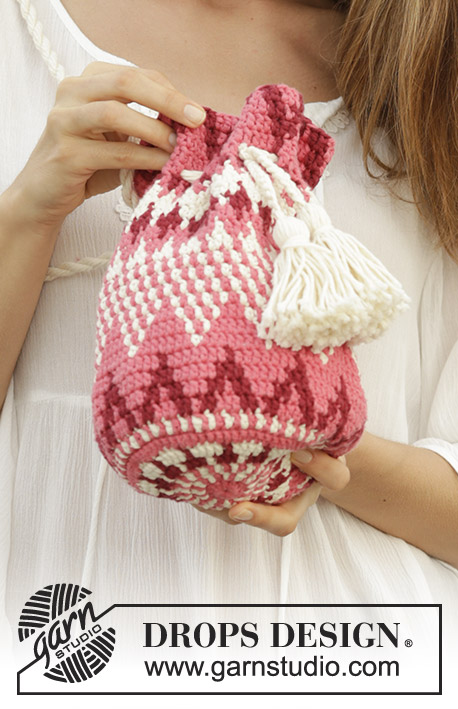
Crochet bag with coloured pattern and tassels, worked in the round from the middle of the bottom of the bag and upwards. The piece is worked in DROPS Paris.

DROPS 186-3
DROPS Design: Pattern no w-717
Yarn group C or A + A
-----------------------------------------------------------
Measurements: Circumference: 48 cm. Height: 28 cm.
Materials:
DROPS PARIS from Garnstudio (belongs to yarn group C)
100 g colour 17, off white
100 g colour 38, raspberry
50 g colour 37, rusty red

The piece can also be crocheted with yarn from:
"Alternative yarn (Yarn group C)" – see link below.

DROPS CROCHET HOOK SIZE 3 MM – or the size needed to get 20 treble crochets and 11 rows on 10 cm in width and 10 cm in height.
----------------------------------------------------------

-------------------------------------------------------

Alternative Yarn – See how to change yarns here
Yarn Groups A to F – Use the same pattern and change the yarn here
Yarn usage using an alternative yarn – Use our yarn converter here

-------------------------------------------------------

DROPS Paris
DROPS Paris
100% Cotton
from 6.00 RON /50g
Get the yarn to make this pattern from 30.00RON.

The yarn cost is calculated from the pattern’s smallest size and the yarn’s cheapest product type. Looking for an even better price? You might find it on the DROPS Deals!

Pattern instructions

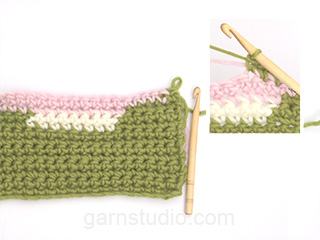
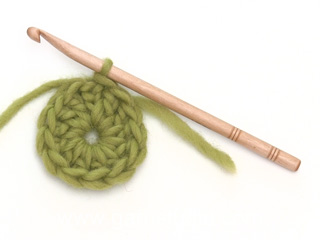
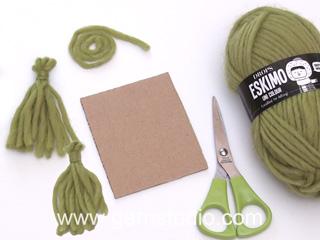
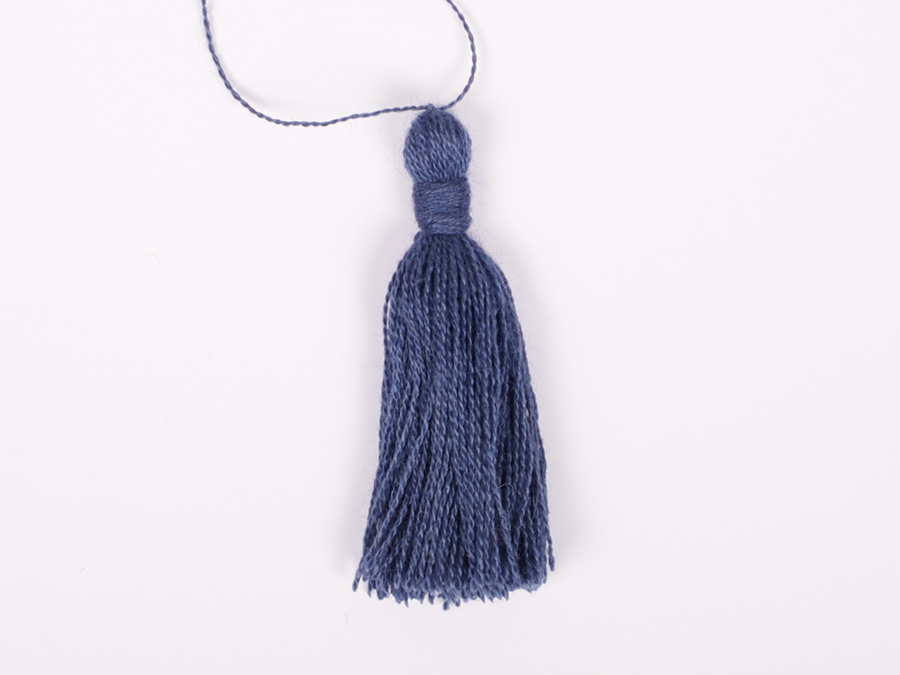
INFORMATION FOR THE PATTERN:

CROCHET INFORMATION:
At the beginning of each round of treble crochets, replace the first treble crochet with 3 chain stitches. The round finishes with 1 slip stitch in the 3rd chain stitch at beginning of round.

COLOUR PATTERN:
When changing colour at the start of a round, work the slip stitch at the end of the previous round with the new colour.
When working with several colours on a round of treble crochets, work as follows: Work the last treble crochet with the first colour, but wait with the last pull through, change to the next colour and work the last pull through with this new colour, then work the next treble crochet. 
When working with 2 colours, lay the strand of the colour you are not working with over the stitches from the previous round and work around the strand so that it is hidden in the stitches; the strand is also brought forward in this way.

PATTERN:
See diagrams A.1 to A.3. 1 square = 1 treble crochet.
----------------------------------------------------------

BAG:
The piece is worked in the round from the middle of the bottom of the bag and upwards.

Work 5 chain stitches with hook size 3 mm and raspberry and form them into a ring with 1 slip stitch in the first chain stitch worked. Then work treble crochets and pattern in the round as follows: * A.1, A.2 *, work from *-* 6 times on the round - read COLOUR PATTERN and CROCHET INFORMATION:
ROUND 1: Work 12 treble crochets around the ring.
ROUND 2: Work 2 treble crochets in each treble crochet = 24 treble crochets.
ROUND 3: Work * 1 treble crochet in the first treble crochet, 2 treble crochets in the next treble crochet *, work from *-* to end of round = 36 treble crochets.
ROUND 4: Work * 1 treble crochet in each of the first 2 treble crochets, 2 treble crochets in the next treble crochet *, work from *-* to end of round = 48 treble crochets. REMEMBER THE CROCHET TENSION!
ROUNDS 5-8: Continue to increase and work pattern as before, i.e. on each round work 1 treble crochet more between increases than on the previous round = 96 treble crochets.
ROUND 9: Continue to work in the round, but without increases and work according to A.3 (= 6 repeats on the round). On the round with the star, work a row of holes as follows: * 1 treble crochet in each of the first/next 3 treble crochets, 1 chain stitch, skip 1 treble crochet *, work from *-* to end of round. Continue until A.3 has been completed. Cut and fasten the strand. 

TWISTED CORD AND TASSELS:
1 twisted cord = cut 6 strands off white of approx. 280 cm.
Twist them together until they begin to resist, fold the cord double and it will continue to twist. Tie a knot in each end. Thread the cord in and out of the row of holes on the bag and finish by tying the 2 ends together in a large knot.

Make 2 large decorative tassels with off white as follows:
1 tassel = cut 50 strands off white of 14 cm. Cut another strand of 20 cm, tie a knot around the 50 strands. Fold in 2 by the knot, wind a strand 4 times around the tassel, approx. 1.5 cm down from the fold and tie a knot. Cut the strands so that the tassel is even at the bottom. Make another tassel in the same way.

Now crochet the tassels together with 2 strands off white as follows: fasten the strand with a slip stitch around the strand at the top of one of the tassels work 24 chain stitches, work 1 slip stitch around the strand at the top of the other tassel. Fasten the strands in each of the tassels. Divide the twisted cord in 2 so that one of the tassels can be inserted through. The tassels are now held in place because the chain stitches between the tassels are pinched in the twisted cord.

Diagram

symbols = rusty red
symbols = raspberry
symbols = off white
symbols = on this round work a row of holes to thread the cord through - see description in the text
diagram
Do you have a question? See a list of frequently asked questions (FAQ)

Knitting tension is what determines the final measurements of your work, and is usually measured per 10 x 10 cm. It is provided like so: number of stitches in width x number of rows in height - eg: 19 stitches x 26 rows = 10 x 10 cm.

The knitting tension is very individual; some people knit/crochet loosely while others work tightly. You adjust the knitting tension with the needle size, which is why the suggested needle size is only meant as a guide! You need to adjust this (up or down) to ensure that YOUR knitting tension matches the knitting tension provided in the pattern. If you work with a different knitting tension than provided you will have a different yarn consumption, and your work will have different measurements than what the pattern suggests.

The knitting tension also determines which yarns can replace each other. As long as you achieve the same knitting tension you can replace one yarn with another.

See DROPS lesson: How to measure your tension/gauge

See DROPS video: How to make a gauge tension swatch

The required amount of yarn is provided in grams, eg: 450 g. To calculate how many balls you’ll need you first need to know how many grams are in 1 ball (25g, 50g or 100g). This information is available if you click on the individual yarn quality on our pages. Divide the amount required with the amount of each ball. For example, if each ball is 50g (the most common amount), the calculation will be as follows: 450 / 50 = 9 balls.

The important thing when changing from one yarn to another is that the knitting/crochet tension remains the same. This is so that the measurements of the finished piece will be the same as on the sketch provided. It is easier to achieve the same knitting tension using yarns from the same yarn group. It is also possible to work with multiple strands of a thinner yarn to achieve the knitting tension of a thicker one. Please try our yarn converter. We recommend you to always work a test swatch.

Please NOTE: when changing yarn the garment might have a different look and feel to the garment in the photo, due to individual properties and qualities of each yarn.

See DROPS lesson: Can I use a different yarn than the one mentioned in the pattern?

All our yarns are categorised into yarn groups (from A to F) according to thickness and knitting tension – group A contains the thinnest yarns and group F the thickest. This makes it easier for you to find alternative yarns to our patterns, should you wish to switch yarn. All yarns within the same group have a similar knitting tension and can easily replace each other. However, different yarn qualities have different structures and properties which will give the finished work a unique look and feel.

Click here for an overview of the yarns in each yarn group

At the top of all our patterns you’ll find a link to our yarn calculator, which is a helpful tool should you wish to use a different yarn than suggested. By filling in the yarn quality you wish to replace, the amount (in your size) and number of strands, the calculator will present good alternative yarns with the same knitting tension. Additionally it will tell you how much you’ll require in the new qualities and whether you’ll need to work with multiple strands. Most skeins are 50g (some are 25g or 100g).

If the pattern is worked with multiple colours, every colour will have to be calculated separately. Similarly, if the pattern is worked with several strands of different yarns (for example 1 strand Alpaca and 1 strand Kid-Silk) you will have to find alternatives for each, individually.

Click here to see our yarn calculator

Since different yarns have different qualities and textures we have chosen to keep the original yarn in our patterns. However, you can easily find options among our available qualities by using our yarn calculator, or simply pick a yarn from the same yarn group.

It is possible that some retailers still have discontinued yarns in stock, or that someone has a few skeins at home that they would like to find patterns for.

The yarn calculator will provide both alternative yarn as well as required amount in the new quality.

If you think it's hard to decide what size to make, it can be a good idea to measure a garment you own already and like the size of. Then you can pick the size by comparing those measures with the ones available in the pattern's size chart.

You'll find the size chart at the bottom of the pattern.

See DROPS lesson: How to read size chart

The needle size provided in the pattern serves only as a guide, the important thing is to follow the knitting tension. And since knitting tension is very individual, you will have to adjust the needle size to ensure that YOUR tension is the same as in the pattern – maybe you’ll have to adjust 1, or even 2 needle sizes, up or down to achieve the correct tension. For this, we recommend that you work test swatches.

Should you work with a different knitting tension than the one provided, the measurements of the finished garment might deviate from the measurement sketch.

See DROPS lesson: How to measure your tension/gauge

See DROPS video: How to make a tension/gauge swatch

Working a garment top-down provides more flexibility and room for personal adjustment. For example it is easier to try the garment on while working, as well as making adjustments to length of yoke and shoulder caps.

The instructions are carefully explaining every step, in the correct order. Diagrams are adjusted to the knitting direction and are worked as usual.

The diagram depicts all rows/rounds, and every stitch seen from the right side. It is read from bottom to top, from right to left. 1 square = 1 stitch.

When working back and forth, every other row is worked from the right side and every other row is worked from the wrong side. When working from the wrong side, the diagram will have to be worked reversed: from left to right, knit stitches are purled, purl stitches are knit etc.

When working in the round every round is worked from the right side and the diagram are worked from right to left on all rounds.

See DROPS lesson: How to read knitting diagrams

The diagram depicts all rows/rounds, and every stitch seen from the right side. It is worked from bottom to top, from right to left.

When working back and forth every other row is worked from the right side: from right to left and every other row is worked from the wrong side: from left to right.

When working in the round, every row in the diagram are worked from the right side, from right to left.

When working a circular diagram you start in the middle and work your way outwards, counter clockwise, row by row.

The rows usually start with a given number of chain stitches (equivalent to the height of the following stitch), this will either be depicted in the diagram or explained in the pattern.

See DROPS lesson: How to read crochet diagrams

Instructions for working several diagrams after each other on the same row/round, will often be written like so: “work A.1, A.2, A.3 a total of 0-0-2-3-4 times". This means you work A.1 once, then A.2 is worked once, and A.3 is repeated (in width) the number of times provided for your size – in this case like so: S = 0 times, M = 0 times, L=2 times, XL= 3 times and XXL = 4 times.

The diagrams are worked as usual: begin with the first row in A.1, then work the first row in A.2 etc.

See DROPS lesson: How to read knitting diagrams

See DROPS lesson: How to read crochet diagrams

The total width of the garment (from wrist-to-wrist) will be larger in the larger sizes, despite the actual sleeves being shorter. The larger sizes have longer sleeve caps and wider shoulders, so there will be a good fit in all sizes.

The measurement sketch/schematic drawing provides information regarding the full length of the garment. If it’s a jumper or a jacket the length is measured from the highest point on the shoulder closest to the neckline, and straight down to the bottom of the garment. It is NOT measured from the tip of shoulder. Similarly, the length of yoke is measured from the highest point on the shoulder and down to where yoke is split into body and sleeves.

On a jacket measures are never taken along bands, unless specifically stated. Always measure inside band stitches when measuring the length.

See DROPS lesson: How to read a schematic drawing

Diagrams are often repeated on the round or in height. 1 repeat is the diagram the way it appears in the pattern. If it says to work 5 repeats of A.1 in the round, then you work A.1 a total of 5 times after/next to each other in the round. If it says to work 2 repeats of A.1 vertically/in height you work the entire diagram once, then begin again at the start and work the entire diagram one more time.

Chain stitches are slightly narrower than other stitches and to avoid working the cast-on edge too tight, we simply chain more stitches to begin with. The stitch count will be adjusted on the following row to fit the pattern and measurement sketch.

The rib edge is more elastic and will contract slightly compared to, for example, stocking stitch. By increasing before the rib edge, you avoid a visible difference in width between the rib edge and the rest of the body.

It’s very easy to cast off too tightly, and by making yarn overs while casting off (and simultaneously casting these off) you avoid a too tight cast off edge.

See DROPS video: How to bind off with yarn overs (yo)

To achieve an even increase (or decrease) you can increase on, for example: every 3rd and 4th row alternately, like so: work 2 rows and increase on the 3rd row, work 3 rows and increase on the 4th. Repeat this until the increase is complete.

See DROPS lesson: Increase or decrease 1 st on every 3rd and 4th row alternately

Should you prefer to work in the round instead of back and forth, you may of course adjust the pattern. You’ll need to add steeks mid-front (usually 5 stitches), and follow the instructions. When you would normally turn and work from the wrong side, simply work across the steek and continue in the round. At the end you’ll cut the piece open, pick up stitches to work bands, and cover the cut edges.

See DROPS video: How to knit steeks and cut open

Should you prefer to work back and forth instead of in the round, you may of course adjust the pattern so you work the pieces separately and then assemble them at the end. Divide the stitches for the body in 2, add 1 edge stitch in each side (for sewing) and work the front and back pieces separately.

See DROPS lesson: Can I adapt a pattern for circular needles into straight needles?

Pattern repeats can vary slightly in the different sizes, in order to get the correct proportions. If you’re not working the exact same size as the garment in the photo, yours might deviate slightly. This has been carefully developed and adjusted so that the complete impression of the garment is the same in all sizes.

Make sure to follow instructions and diagrams for your size!

If you have found a pattern you like which is available in women’s size it’s not very difficult to convert it to men’s size. The biggest difference will be the length of sleeves and body. Start working on the women size that you think would fit across the chest. The additional length will be worked right before you cast off for the armhole/sleeve cap. If the pattern is worked top-down you can add the length right after the armhole or before the first decrease on sleeve.

Regarding additional yarn amount, this will depend on how much length you add, but it is better with a skein too many than too few.

All yarns will have excess fibres (from production) that might come off as lint or shedding. Brushed yarns (ie hairier yarns) have more of these loose, excess fibres, causing more shedding.

Shedding also depends on what is worn under or over the garment, and whether this pulls at the yarn fibres. It’s therefore not possible to guarantee that there will be no shedding

Below are some tips on how to get the best result when working with hairier yarns:

1. When the garment is finished (before you wash it) shake it vigorously so the looser hairs come off. NOTE: do NOT use a lint roller, brush or any method that pulls at the yarn.

2. Place the garment in a plastic bag and put it in your freezer - the temperature will cause the fibres to become less attached to each other, and excess fibres will come off easier.

3. Leave in the freezer for a few hours before taking it out and shaking it again.

4. Wash the garment according to the instructions on the yarn label.

Pilling is a natural process that happens to even the most exclusive of fibers. It's a natural sign of wear and tear that is hard to avoid, and that is most visible in high friction areas of your garment like a sweater's arms and cuffs.

You can make your garment look as new by removing the pilling, using a fabric comb or a pill/lint remover.

Still can't find the answer you need? Then scroll down and leave your question so one of our experts can try to help you. This will be done normally within 5 to 10 working days.
In the meantime, you can read the questions and answers that others have left to this pattern or join the DROPS Workshop on Facebook to get help from fellow knitters/crocheters!

You might also like...

Post a comment to pattern DROPS 186-3

We would love to hear what you have to say about this pattern!

If you want to leave a question, please make sure you select the correct category in the form below, to speed up the answering process. Required fields are marked *.

Comments / Questions (25)

country flag Murielle Mage wrote:

Bonjour, je fais ce sac avec le coton Paris et crochet n°3 mais le fond forme un bol. Mon nombre de mailles correspond bien .. je ne peux pas augmenter mes augmentations sans etre en décalage avec le corp du sac est-ce mon crochet qui est trop petit ??? \r\nQue dois-je faire ? \r\nMerci

11.04.2024 - 23:20

DROPS Design answered:

Bonjour Mme Mage, attention à votre tension en largeur mais aussi en hauteur, veillez à bien avoir les 20 brides et 11 rangs = 10 x 10 cm non seulement lors de l'échantillon mais également quand vous crochetez le fond. Essayez de ne pas trop tirer vos brides en hauteur si besoin. Bon crochet!

12.04.2024 - 08:24

country flag Anette wrote:

Hej Jag virkar en väska i flerfärgvirkning, virkar runt. Hur får jag ett fint avslut där varvet börjar och slutar? Tack Anette❤

07.02.2024 - 18:32

DROPS Design answered:

Hei Anette. Når du avslutter med 1 kjedemaske i 3. luftmaske drar du ut tråden og da kan du prøve å sy enden slik at den legger seg pent over 1. stav (toppen av staven) på begynnelsen av omgangen (pass på at den ikke er for løs eller for stam), og deretter festes tråden på baksiden av vesken. mvh DROPS Design

16.02.2024 - 09:38

country flag Valéria wrote:

Azt hiszem, hogy a fonal mennyisége és száma össze lett cserélve: -17 gramm a 100 sz. törtfehér színből Köszönöm a javítást! :)

25.07.2023 - 09:06

country flag Linda wrote:

Dankjewel voor dit prachtig patroon

27.09.2021 - 15:07

country flag Nathalie wrote:

Bonjour, Merci pour ce modèle. Je le trouve très agréable à faire. Cependant, je suis arrivée au rang ajouré et je ne trouve pas les explications. Peut-être ai-je mal vu mais je trouve pas les explications pour ce rang. Pouvez-vous m'aider ?

12.07.2021 - 23:16

DROPS Design answered:

Bonjour Nathalie, le rang ajouré se crochète ainsi: *1 bride dans chacune des 3 premières brides/des 3 brides suivantes, 1 maille en l'air, sautez 1 bride*, et répétez de *-* tout le tour, ainsi vous sautez chaque 4ème bride que vous remplacez par 1 maille en l'air. Bon crochet!

13.07.2021 - 07:58

country flag Chiara wrote:

I cannot find the diagram. Could you please help me?

15.03.2021 - 22:12

DROPS Design answered:

Hi Chiara, Drops are having temporary problems loading images, but will be up and running again soon. The diagrams will then be at the bottom of the pattern. Happy crafting!

16.03.2021 - 08:03

country flag Angi wrote:

Hallo ich verstehe das nicht was bei runde 5-8 gemeint ist wie soll ich da Zunähmen

10.04.2020 - 13:22

DROPS Design answered:

Liebe Angi, genauso wie zuvor, dh bei der 5. Runde häkeln Sie: * je 1 Stäbchen in die ersten 3 Stäbchen, 2 Stäbchen in das nächste Stäbchen *, bei der 6. Runde * je 1 Stäbchen in die ersten 4 Stäbchen, 2 Stäbchen in das nächste Stäbchen *, und so weiter, dh es ist immer 1 Stäbchen mehr zwischen 2 Stäbchen in das nächste Stäbchen. Viel Spaß beim häkeln!

14.04.2020 - 10:30

country flag Louise wrote:

I dont understand A1 and A2, wich one of them are the pattern being used ? Drops pattern explainatons are very very difficult, you explain just half of everything

17.02.2020 - 15:42

DROPS Design answered:

Dear Louise, both diagrams are worked, ie you repeat all the round: (A.1, A.2) - Read more about crochet diagrams here. Happy knitting!

17.02.2020 - 16:00

country flag رحاب wrote:

اهلا عاوزة اتعلم

08.12.2019 - 10:33

DROPS Design answered:

Hi, if you need some help, scroll down to the bottom of the page (after diagram to the bag), you will find some relevant videos to that pattern as well as some links that could be helpful. Please contact your yarn Store for any further individual assistance. Happy crocheting!

09.12.2019 - 09:12

country flag Sadiah wrote:

Hi genau, das was ich gesucht habe von der grösse her. Hättest du auch dieselbe Anleitung ohne Muster? also unifarben? die musteranleitung verwirrt mich ein bisschen:) danke für die rückmeldung.

04.10.2018 - 02:05

DROPS Design answered:

Liebe Sadiah, für eine unifarbige Tasche häkeln Sie von dem Boden einfach wie in der schriflichen Anleitung (also mit der Zunahmen bis es 96 Stb gibt), dann ab 9 Runde weiter ohne Zunahmen häkeln: die 23 Reihen in A.3 (die Reihe mit den Löchern aber nicht vergessen). Viel Spaß beim häkeln!

04.10.2018 - 10:21