
Looking for a yarn?


Comments / Questions (18)
![]() Lora wrote:
Lora wrote:
Is there anyway these instructions could be written out? I do not understand how to read the diagram patterns. These are so beautiful and I would love to make them. Thank you!
14.02.2025 - 02:33DROPS Design answered:
Dear Lora, we don't make custom patterns. You can follow this video, which shows step-by-step how to work the heart. Happy crochetting!
16.02.2025 - 23:38
![]() Susan Farrell wrote:
Susan Farrell wrote:
Is this available in English? Thank you!
11.02.2024 - 12:39
![]() Susan wrote:
Susan wrote:
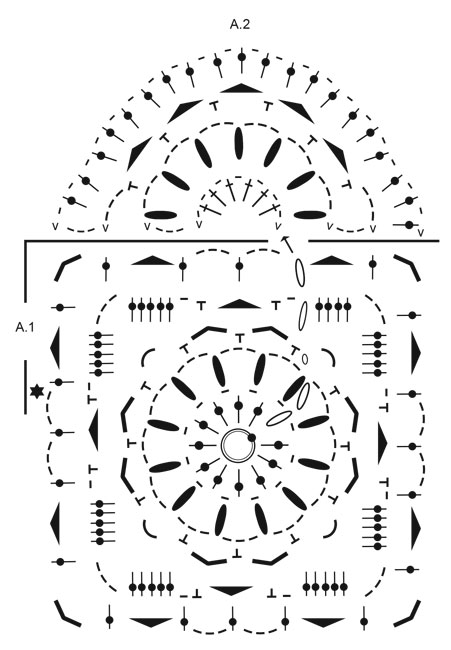
In the picture of the red heart shown finished, on the left semi-circle there are seven 4 treble crochets together, and on the right side there are only six. Is this intentional?
04.02.2024 - 08:21DROPS Design answered:
Dear Susan, it should be 7 (4 treble crochets together) in each semi-circle; there was a mistake in the photo. Please follow the instructions in the written pattern and only use the photo as a visual general guide. Happy crochetting!
04.02.2024 - 23:22
![]() Sofie wrote:
Sofie wrote:
To spørgsmål 1. Kan det passe at den første Hjertebue a2, kommer til at vende vrang i forhold til a1? 2. A2 viser 7 dobbeltstgm, men jeres viste hjerte har 6 på den ene side og 7 på den anden? Mvh Sofie
10.06.2022 - 19:53DROPS Design answered:
Hei Sofie. Når du hekler den første hjertebuen vil 1. og 3. rad hekles fra "retten", mens 2. og 4. rad hekles fra "vrangen". Det samme gjelder også når 2. hjertebue skal hekles. Se gjerne hjelpevideoen til dette hjertet. Det skal være 7 dobbeltstgm, som du ser på diagrammet, på begge hjertebuene. mvh DROPS Design
13.06.2022 - 09:27
![]() Arachna wrote:
Arachna wrote:
Part 3: R3: 3ch, sl in dc, 3ch, turn, * st in 3ch sp, 5ch * 5x st, 3ch, sl in dc, R4: 3ch, sl in 4ch sp, turn, ch, dc,ch,dc,ch in 3ch sp, *dc,ch,dc,ch,dc* 6x in every ch (both 3 and 5 ch) sp, sl in 4ch sp Please feel free to correct if I made mistake. Hope it helps, best regards! Arachna
23.02.2022 - 21:21
![]() Arachna wrote:
Arachna wrote:
Part 2: R4: 3ch, *ch, st in 4ch sp, 5ch, st in 4ch sp, ch, 5dc in 6 ch sp, 3ch, 5dc in the same 6 ch sp*4x end w sl to first 3ch R5: 3ch, * 3ch, dc in 5ch sp, 3ch, dc in 1ch sp, 5ch, dc in 3ch sp, 4ch, dc in the same 3ch sp, 5ch above 5 dcs, dc in 1ch sp *4x end w last dc as sl into the first 3ch A2 Back and forth R1: sl in ch sp, *ch, dc in st*6x ch, sl in 3ch sp, turn R2: 3ch, sl in 5ch sp, *4trtog, 3ch*5x, 4trtog, sl in 5ch sp
23.02.2022 - 21:20
![]() Arachna wrote:
Arachna wrote:
Hello Dear Crocheters, I tried to write down the instructions first part: Start: 4 chain stitches, form them to a ring with 1 slip stitch in first chain stitch R1: 3ch, *ch, dc* 12x end w ch into 3ch R2: 3ch, *4trtog in ch sp, 3ch* end w sl in first 3ch R3:sl into ch sp, ch, *st in ch sp, 4ch, st in ch sp, 4ch, st in ch sp,6ch* 4x (12st, 8x4ch, 4x6ch) end w sl to first ch
23.02.2022 - 21:19
![]() Lennel Davenport wrote:
Lennel Davenport wrote:
On the heart pattern I got through the A1 part but it was like totally confusing trying to go to A2. The video didn't help at all, you couldn't even tell where she was crocheting. All you could see was the needle & the stitch being made. I need to know where to go to start A2 & what the instructions mean. The written instructions were terrible.
24.05.2020 - 03:53DROPS Design answered:
Dear Mrs Davenport, A.2 is worked the first time just after A.1 (see arrow for beg of row in A.2 and time code 13:47 in the video). You work A.2 after the last sl st on last row in A.1 and continue back and forth joining each row in the last row of A.1 - when first A.2 is worked, cut the yarn and work 2nd A.2 starting where there is a black star on last row in A.1. Hope this helps. Happy crocheting!
25.05.2020 - 09:31
![]() Oddrun Hovsengen wrote:
Oddrun Hovsengen wrote:
Har hekla denne, med små justeringer (picoter rundt + bakstykke=korg). Tenkte å legge inn bilder her, men får det ikkje til. Kan eg leggje inn på FB, men kva for gruppe?
10.03.2020 - 13:03DROPS Design answered:
Hej Oddrun, Den vil vi glæde os til at se. Du kan lægge den ind på DROPS Workshop på Facebook. Og på Instagram #dropsfan - tusind tak :)
10.03.2020 - 13:17
![]() Marie wrote:
Marie wrote:
Bonjour, Est-ce possible d'utiliser ce modèle pour fabriquer des décorations de Noël vendues par une association ? Il s'agit d'une association à but non lucratif qui organise des cours d'éveil artistique pour les jeunes en milieu rural avec des professionnels qualifiés et des bénévoles, ainsi qu'une galerie d'exposition pour soutenir les artistes locaux et animer le village, avec une boutique éphémère pour les fêtes. Merci d'avance pour votre réponse !
15.11.2019 - 09:32DROPS Design answered:
Bonjour Marie, vous trouverez toutes les conditions d'utilisation de nos modèles sous la mention copyright en bas de page de chacun de nos modèles. Bon crochet!
15.11.2019 - 11:31
|
||||||||||||||||||||||||||||||||||||||||||||||
Home Is Where...#dropshomeiswhere |
||||||||||||||||||||||||||||||||||||||||||||||
 |
 |
|||||||||||||||||||||||||||||||||||||||||||||
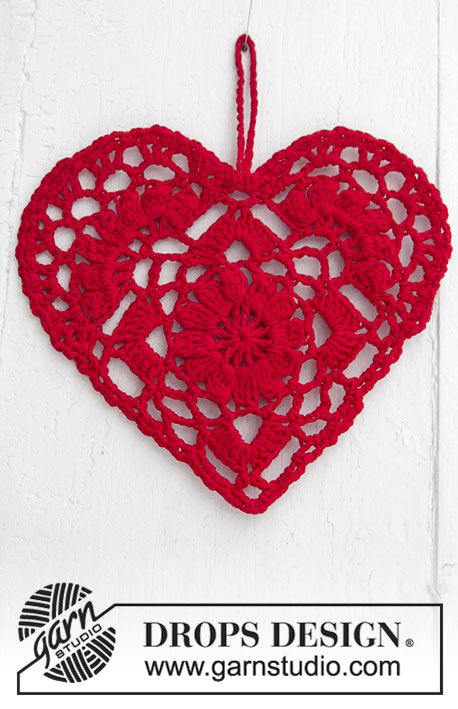
Crocheted heart for Christmas. The piece is worked in DROPS Safran.
DROPS Extra 0-1400 |
||||||||||||||||||||||||||||||||||||||||||||||
|
INFORMATION FOR THE PATTERN: PATTERN: See diagrams A.1 and A.2. ---------------------------------------------------------- HEART: You first work a square in the round, starting from the middle of the square. Then you work a semi-circle back and forth along one side of the square. Then another semi-circle along the other side of the square, i.e. beside the first semi-circle. Work 4 chain stitches with hook size 3 mm / C and Safran and form them to a ring with 1 slip stitch in first chain stitch (= middle of square). Continue in the round according to diagram A.1 - REMEMBER THE CROCHET GAUGE! When A.1 has been completed (do not cut strand) work a semi-circle back and forth according to diagram A.2 along the first side of A.1. When A.2 has been completed, cut and fasten strand. Then work a semi-circle according to A.2 in the same way along the next side of A.1 - see star in diagram (start from right side). When A.2 has been completed, you have finished in the middle of the 2 semi-circles - do not cut strand! Now work an edge around the whole heart as follows: Work 1 single crochet around first chain stitch, * 2 chain stitches, 1 single crochet around next chain stitch *, work from *-* along the whole semi-circle, then along the side of the square as follows: Work 1 single crochet around corner-space, 2 chain stitches, * 1 single crochet around next chain-space, 2 chain stitches, 1 single crochet around same chain-space, 2 chain stitches *, work from *-* along both sides of square, then work along the other semi-circle as follows: Work 1 single crochet around first chain stitch, * 2 chain stitches, 1 single crochet around next chain stitch *, repeat from *-* along the whole semi-circle, finish with 30 chain stitches (= loop) and fasten with 1 slip stitch in first single crochet at beginning of round. Cut and fasten strand. So the heart hangs nicely and is a bit stiff, you can dip it in sugared water or colorless fizzy drink and lay flat to dry. |
||||||||||||||||||||||||||||||||||||||||||||||
Diagram explanations |
||||||||||||||||||||||||||||||||||||||||||||||
|
||||||||||||||||||||||||||||||||||||||||||||||
|
||||||||||||||||||||||||||||||||||||||||||||||
Have you finished this pattern?Tag your pictures with #dropspattern #dropshomeiswhere or submit them to the #dropsfan gallery. Do you need help with this pattern?You'll find 11 tutorial videos, a Comments/Questions area and more by visiting the pattern on garnstudio.com. © 1982-2025 DROPS Design A/S. We reserve all rights. This document, including all its sub-sections, has copyrights. Read more about what you can do with our patterns at the bottom of each pattern on our site. |
||||||||||||||||||||||||||||||||||||||||||||||


With over 40 years in knitting and crochet design, DROPS Design offers one of the most extensive collections of free patterns on the internet - translated to 17 languages. As of today we count 314 catalogs and 11822 patterns - 11812 of which are translated into English (US/in).
We work hard to bring you the best knitting and crochet have to offer, inspiration and advice as well as great quality yarns at incredible prices! Would you like to use our patterns for other than personal use? You can read what you are allowed to do in the Copyright text at the bottom of all our patterns. Happy crafting!
Post a comment to pattern DROPS Extra 0-1400
We would love to hear what you have to say about this pattern!
If you want to leave a question, please make sure you select the correct category in the form below, to speed up the answering process. Required fields are marked *.