
Popular categories
Looking for a yarn?


Comments / Questions (15)
![]() Stefania wrote:
Stefania wrote:
Ciao, ho un problema con A8 a-b-c: come gestire ad esempio il secondo ferro sul dritto del lavoro, quando dopo diritto-gettato-diritto c'è un'accavallata doppia tra A8/a e A8/b? Ad esempio dovendo fare più ripetizioni di A8/b mi trovo a finire A8/b a metà di "2insieme a dir ritorto" e a ricominciarlo a metà di un'accavallata doppia... e non so come fare. grazie
10.08.2024 - 22:32DROPS Design answered:
Buongiorno Stefania, in quel caso invece dell'ultima diminuzione può lavorare l'accavallata all'inizio di A.2b. Buon lavoro!
11.08.2024 - 10:02
![]() Estefania wrote:
Estefania wrote:
Ciao! Mi sembra che il modello in italiano abbia un errore. Nella spiegazione delle asole dice che sulle ultime 3 maglie bisogna lavorare 1 gettato, 2 insieme a diritto, e 1 gettato. Quest'ultima maglia invece è da lavorare a diritto. Potete controllare? Grazie
22.07.2024 - 02:02DROPS Design answered:
Buongiorno Estefania, grazie per la segnalazione: abbiamo corretto il testo. Buon lavoro!
29.07.2024 - 15:58
![]() Myriam wrote:
Myriam wrote:
Moeten dr knoopsgaten niet in het begin van de goede kant gebreid worden?
28.06.2024 - 17:00DROPS Design answered:
Dag Myriam,
Als je het werk van boven naar beneden breit en je maakt de knoopsgaten aan het eind van de naald, dan zit je ook op de goede kant.
30.06.2024 - 20:44
![]() Anna wrote:
Anna wrote:
Hej. En liten fundering. Man ska göra mönster A13 över a9, a10, a11 som är 63 m bakstycke eftersom jag stickar på medium och på framstycket 32 m. Men mönster A13 är 6 m totalt och de är varken delbart med 63 m som är bakstyckets mönster eller 32 m som är framstyckernas mönster. Hur är det tänkt att man ska göra där? För att få det att gå ihop? Tack på förskott för svar 🙂 Mvh Anna
14.06.2019 - 13:18DROPS Design answered:
Hej Anna, jo men det ser samme mønster som du har strikket hele tiden, så det skal stemme over hinanden. De masker i hver side som ikke stemmer, skal bare strikkes i slätstickat. God fornøjelse!
09.07.2019 - 12:18
![]() Anna wrote:
Anna wrote:
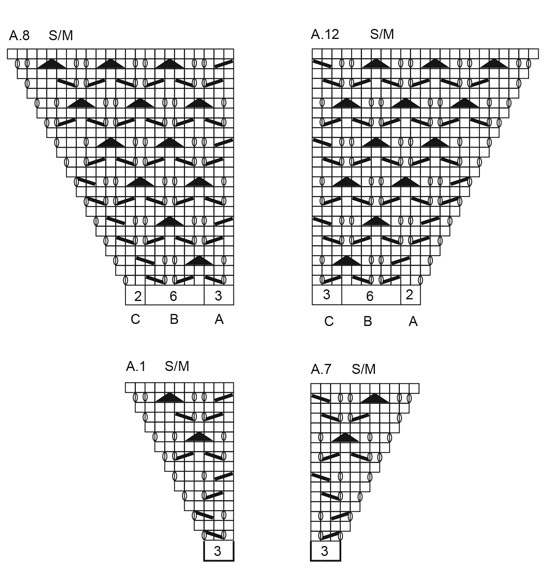
Hej. Jag har kommit till att sticka mer rapporter på mönster A8-b och A12-b. Men på A 8 så på andra varvet med mönster så kommer det en trekant mellan a och b så hur ska jag kunna repetera bara b igen då? Samma gäller A12 så kommer det att man ska ta två ihop mellan a och b och samma där hur ska man kunna göra fler rapporter av endast b då? Som har 6 m. Hur löser jag det? Tacksam för svar 🙂 Mvh Anna
07.06.2019 - 08:24DROPS Design answered:
Hei Anna. Nå vet ikke jeg hvilke størrelse du strikker, men si at du strikker L/XL: fellingen på slutten av A.8b (= 2 masker vridd rett sammen) vil bli slått sammen med fellingen av den første masken, slik at du isteden strikker = " ta 1 maske løs av pinnen som om den skal strikkes rett, 2 masker rett sammen, løft den løse masken over maskene som ble strikket sammen " over de 2 siste + den førset masken i rapportene av A.8b. Dette kan du også se på rad 11: der er den sorte trekanten tegnet inn over de 2 siste maskene i A.8b + første maske av A.8c. Der A.8b gjentas strikkes denne fellingen i overgangen mellom rapportene. God fornøyelse
07.06.2019 - 09:16
![]() Tiziana Gorini wrote:
Tiziana Gorini wrote:
Come faccio per sapere cosa corrisponde la taglia l o xl in cm?
19.05.2019 - 18:28DROPS Design answered:
Buongiorno Tiziana. Alla fine delle spiegazioni, trova un grafico con le misure espresse in cm. Confrontando queste misure con quelle di un capo simile, riesce a capire a quale taglia lavorare. Buon lavoro!
19.05.2019 - 18:36
![]() Phan wrote:
Phan wrote:
Hello , Could You teach me to add 6 stitches in the A.8 , A.12 . A.10 and A.9 ( ( How to insert stitches in the patterns ? Increase many stitch a row ? Thank very much.
05.01.2019 - 21:51DROPS Design answered:
Dear Phan, I'm not sure to understand your question properly. The increases in this diagram are already shown in diagram (as in A.4-A.6 worked before). Happy knitting!
07.01.2019 - 11:00
![]() Sonja Helgesen Ofte wrote:
Sonja Helgesen Ofte wrote:
Hei, kjempefin jakke. Jeg har fått ros for den av tilfeldige forbispasserende! Det sier sitt! mvh Sonja
16.09.2018 - 13:40
![]() Kate wrote:
Kate wrote:
Hej igen Undskyld, jeg har fundet ud af det. Det var en tanketorsk vedr læsning af diagram så alt passer nu.
21.08.2018 - 08:06
![]() Kate wrote:
Kate wrote:
Hej Jeg kan simpelt hen ikke få målene til st passe efter endt udtagning. Strikker str L og ender ud med ca 30-31 cm i bærestykke. Strikkefastheden passer så hvad gør jeg forkert? Mvh Kate
18.08.2018 - 12:03DROPS Design answered:
Hej Kate, det lyder til at dine pinde fylder en anelse mere i højden, du kan prøve med ½ nummer mindre, eller så må du vælge en mindre størrelse, men følge længde målene som passer dig. God fornøjelse!
20.08.2018 - 09:38
|
||||||||||||||||||||||||||||
Winter Grace Jacket#wintergracejacket |
||||||||||||||||||||||||||||
 |
 |
|||||||||||||||||||||||||||
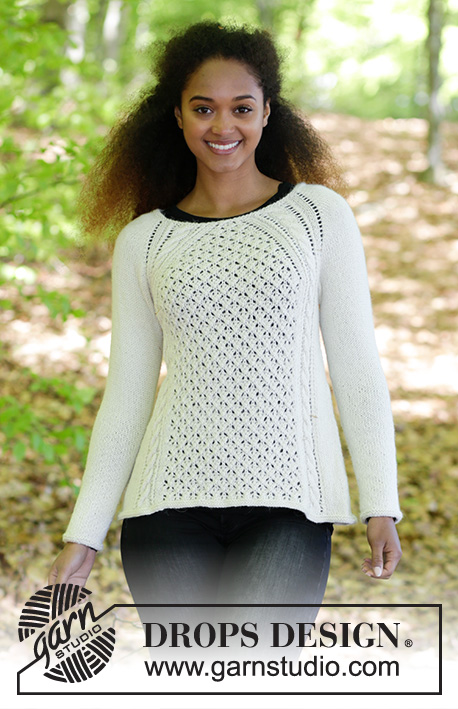
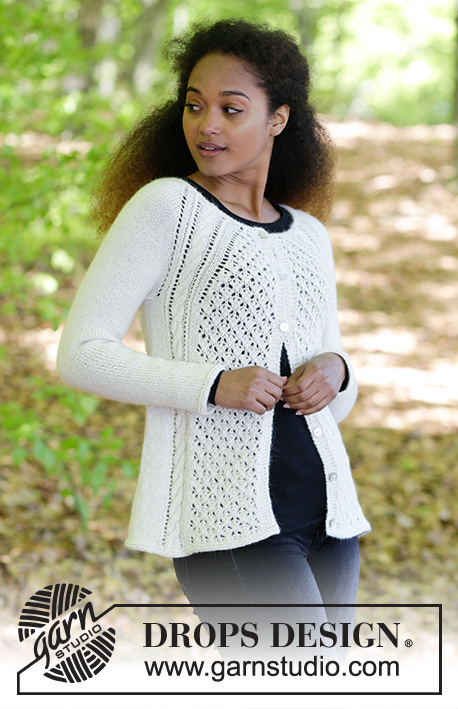
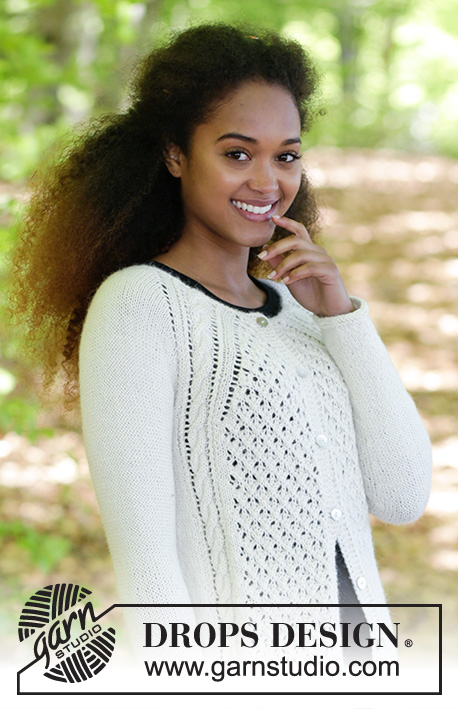
Jacket with cables, lace pattern and raglan, knitted top down. Size: S - XXXL Piece is knitted in DROPS Puna.
DROPS 183-10 |
||||||||||||||||||||||||||||
|
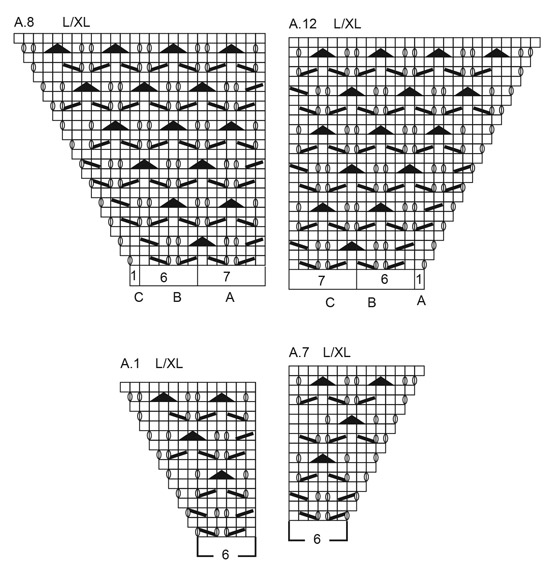
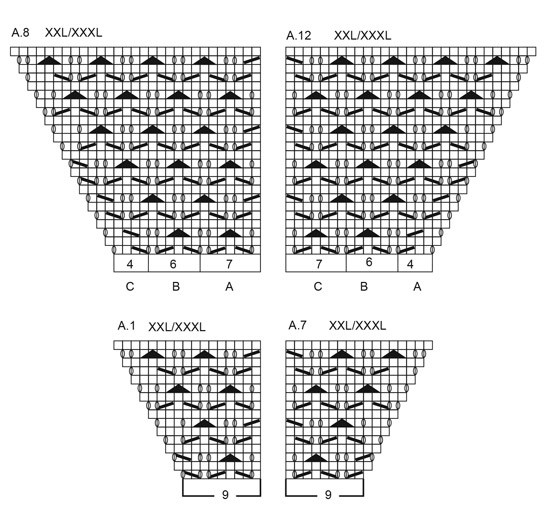
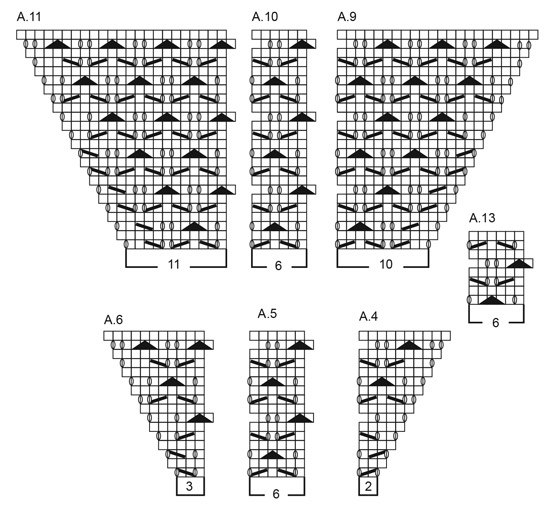
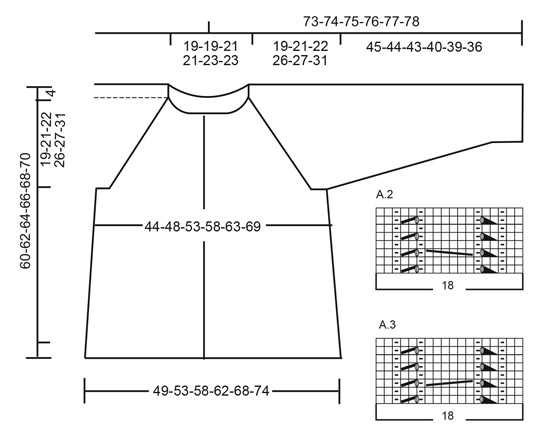
INFORMATION FOR PATTERN: GARTER STITCH (worked in the round): 1 ridge = 2 rounds. Knit 1 round and purl 1 round. GARTER STITCH (back and forth): 1 ridge = knit 2 rows. PATTERN: See diagrams A.1 to A.13. Diagrams show all rows in pattern seen from the right side. See diagram for your size in A.1, A.7, A.8 and A.12. DECREASE TIP: Decrease under sleeve as follows: Begin 3 stitches before marker thread, knit 2 together, knit 2 (marker thread is in the middle of these stitches), slip 1 stitch knitwise, knit 1, pass slipped stitch over stitch worked (= 2 stitches decreased). INCREASE TIP (applies to increase in the sides of body): Begin 1 stitch before marker, 1 yarn over, knit 2 (marker is in the middle of these 2 stitches), 1 yarn over (= 2 stitches increased). On next round work yarn overs twisted to avoid holes. BUTTONHOLES: Decrease first buttonhole after the 2 ridges in the neck, then decrease the next 6-6-6-6-7-7 approx. 8 cm apart. Decrease for buttonholes on right band as follows: Work until 3 stitches remain on needle (seen from right side), make 1 yarn over, knit 2 together and knit 1. On next row knit yarn over to make holes. ---------------------------------------------------------- JACKET: Work back and forth on circular needle from mid front, work top down. YOKE: Cast on 97-97-105-105-113-113 stitches on circular needle size 4 mm with Puna. Work 2 ridges in GARTER STITCH - see explanation above. On to last row in ridge increase 20-20-24-24-28-28 stitches evenly = 117-117-129-129-141-141 stitches. REMEMBER THE KNITTING TENSION! Work next row as follows from right side: 5 stitches in garter stitch (= band), A.1 (= 3-3-6-6-9-9 stitches), A.2 (= 18 stitches), 1 yarn over, 12 stitches in stocking stitch (= sleeve), 1 yarn over, A.3 (= 18 stitches), A.4 (= 2 stitches), A.5 0-0-1-1-2-2 times (= 0-0-6-6-12-12 stitches), A.6 (= 3 stitches), A.2, 1 yarn over, 12 stitches in stocking stitch (= sleeve), 1 yarn over, A.3, A.7 (= 3-3-6-6-9-9 stitches), 5 stitches in garter stitch (= band). Decrease for BUTTONHOLES - see explanation above. Continue this pattern and upwards, increase as shown in A.1, A.4, A.6 and A.7. On sleeves increase on each side of the 12 stitches in stocking stitch, increase every other row with 1 yarn over as explained above. On next row purl yarn over to make hole. Work the increased stitches in stocking stitch. When A.1 to A.7 has been worked 1 time vertically, there are 181-181-193-193-205-205 stitches on needle. Work next row as follows from right side: 5 stitches in garter stitch, A.8 A (= 3-3-7-7-7-7 stitches) A.8 B (= 6 stitches), A.8 C (= 2-2-1-1-4-4 stitches), A.2 as before, 28 stitches in garter stitch (= sleeve), A.3 as before, A.9 (= 10 stitches), A.10 0-0-1-1-2-2 times (= 0-0-6-6-12-12 stitches), A.11 (11 = stitches), A.2 as before, 28 stitches in stocking stitch (= sleeve), A.3 as before, A.12 A (= 2-2-1-1-4-4 stitches), A.12 B (= 6 stitches), A.12 C (= 3-3-7-7-7-7 stitches), 5 stitches in garter stitch. Continue this pattern upwards, and continue increases on sleeves. Every time A.8/A.12 is worked 1 time vertically work 2 repetitions more of A.8/A.12 B between A.8/A.12 A and A.8/A.12 C. Every time A.9, A.10 and A.11 have been worked 1 time vertically, work 4 repetitions more of A.10 between A.9 and A.11. Continue pattern until 25-29-30-35-37-43 increases have been done in total = 317-349-369-409-437-485 stitches. Work next row as follows from wrong side: Work first 51-55-59-64-69-75 stitches (= right front piece), slip the next 62-70-72-82-86-98 stitches on a stitch holder for sleeve, cast on 8-8-10-10-12-12 new stitches under sleeve, work the next 91-99-107-117-127-139 stitches (= back piece), slip the next 62-70-72-82-86-98 stitches on a stitch holder for sleeve, cast on 8-8-10-10-12-12 new stitches, work the last 51-55-59-64-69-75 stitches on round (= left front piece). Piece measures approx. 19-21-22-26-28-31 cm from cast-on edge. NOW MEASURE THE PIECE FROM HERE! BODY: = 209-225-245-265-289-313 stitches. Insert 1 marker thread in each side, in the middle of the new stitches. Continue in garter stitch, A.2 and A.3. Over stitches in A.8, A.9, A.10, A.11 and A.12 (= 55-63-71-81-91-103 stitches on back piece and 28-32-36-41-46-52 stitches on each front piece) work pattern according to A.13. Begin on the row in A.13 that makes the pattern fits on last pattern row in A.8 to A.12 - work the stitches that do not fit the pattern in the sides in stocking stitch. REMEMBER BUTTONHOLES! When piece measures 4 cm, increase 1 stitch on each side of marker threads (= 4 stitches increased). Increase every 6 cm 5 times in total = 229-245-265-285-309-333 stitches. When piece measures 36-35-37-35-36-34 cm, decrease 3 stitch over each cable in A.2 and A.3 = 217-233-253-273-297-321 stitches. Work 2 ridges over all stitches, then cast off. Jacket measures approx. 60-62-64-66-68-70 cm from shoulder. SLEEVE: Worked in the round on a short circular needle, switch to double pointed needles when needed. Slip stitches from sleeve on a short circular needle size 4 mm, pick up 1 stitch in each of the 8-8-10-10-12-12 stitches cast on under sleeve = 70-78-82-92-98-110 stitches. Insert 1 marker thread in the middle of the new stitches under sleeve – NOW MEASURE PIECE FROM HERE. Work in stocking stitch in the round. When piece measures 3 cm, decrease 1 stitch on each side of marker - READ DECREASE TIP. Decrease every 2½-2-2-1½-1½-1 cm 14-17-18-22-24-29 times in total. After all decreases are done, 42-44-46-48-50-52 stitches remain on round. When piece measures 44-43-42-39-38-35 cm (shorter measurements in the larger sizes because of longer yoke), work 2 ridges in GARTER STITCH - see explanation above. Then loosely cast off by knitting. Work the other sleeve the same way. ASSEMBLY: Sew the buttons on to the left band. |
||||||||||||||||||||||||||||
Diagram explanations |
||||||||||||||||||||||||||||
|
||||||||||||||||||||||||||||
|
||||||||||||||||||||||||||||
|
||||||||||||||||||||||||||||
|
||||||||||||||||||||||||||||
|
||||||||||||||||||||||||||||
|
||||||||||||||||||||||||||||
Have you finished this pattern?Tag your pictures with #dropspattern #wintergracejacket or submit them to the #dropsfan gallery. Do you need help with this pattern?You'll find 29 tutorial videos, a Comments/Questions area and more by visiting the pattern on garnstudio.com. © 1982-2025 DROPS Design A/S. We reserve all rights. This document, including all its sub-sections, has copyrights. Read more about what you can do with our patterns at the bottom of each pattern on our site. |
||||||||||||||||||||||||||||


With over 40 years in knitting and crochet design, DROPS Design offers one of the most extensive collections of free patterns on the internet - translated to 17 languages. As of today we count 314 catalogues and 11822 patterns translated into English (UK/cm).
We work hard to bring you the best knitting and crochet have to offer, inspiration and advice as well as great quality yarns at incredible prices! Would you like to use our patterns for other than personal use? You can read what you are allowed to do in the Copyright text at the bottom of all our patterns. Happy crafting!
Post a comment to pattern DROPS 183-10
We would love to hear what you have to say about this pattern!
If you want to leave a question, please make sure you select the correct category in the form below, to speed up the answering process. Required fields are marked *.