
Popular categories
Looking for a yarn?


Comments / Questions (21)
![]() Johanna wrote:
Johanna wrote:
In welcher Farbe wird die Erhöhung gestrickt? In der deutschen Anleitung steht dunkelrosa. In der Englischen nur rosa. Was ist mit "Faden anziehen" gemeint? Sollen verkürzte Reihen gestrickt werden? Danke!
30.05.2019 - 22:59DROPS Design answered:
Liebe Johanna, die Erhöhung wird mit rosa gestrickt - deutsche Anleitung wird angepasst - dieses Video zeigt wie man eine Erhöhung strickt, und wie man den Faden etwas anziehen wird. Viel Spaß beim stricken!
31.05.2019 - 09:50
![]() RICHARD Hélène wrote:
RICHARD Hélène wrote:
Je ne suis pas sure d'arriver à faire ce modèle, si j'ai des difficultés, pourrais-je vous appeler ?
07.09.2018 - 13:02DROPS Design answered:
Bonjour Mme Richard, vous trouverez 30 vidéos pour vous aider à la réalisation de ce modèle, si besoin, vous pouvez poser votre question ici, ou bien sûr appeler votre magasin DROPS pour toute assistance personnalisée. Bon tricot!
07.09.2018 - 13:54
![]() Alexandra Gallo wrote:
Alexandra Gallo wrote:
Die Zunahme für das rumpfteil muss ich dann bei der Zweiten Zunahme muss ich dann ein Umschlag 22maschen rechts und wieder einen Umschlag stricken
14.04.2018 - 22:44DROPS Design answered:
Liebe Frau Gallo, die Zunahmen für das Rumpfteil werden immer auf beiden Seiten der 20 Maschen gestrickt, dh bei der 2. Zunahmen stricken Sie Bis 10 M vor der Markierer, dann 1 Umschlag, 20 M re, 1 Umschlag. Viel Spaß beim stricken!
16.04.2018 - 09:16
![]() Ayne wrote:
Ayne wrote:
Hei. Jeg strikker tunika i str 3 år. Kom på A2 og pilen 3 står i rad med mønster. Hvordan skal jeg øke uten å ødelegge mønsteret?
21.03.2018 - 16:16DROPS Design answered:
Hej Ayne, ja det stemmer, sådan her beskriver vi hvordan du gør: Strikk omgangen slik diagrammet viser og øk SAMTIDIG 10 masker jevnt fordelt på denne omgangen (øk med bunnfargen i mønsterstripen) = 206-218-230-234-246-258 masker.
26.04.2018 - 11:54Jinky wrote:
Thanks so much for the help, I've already cast on, and just to point out on the instruction when increase, it says I should do a yarn over, which would create a hole, I think you the pattern means to do M1 right? it's rather confusing when saying do a yarn over when increasing...
15.12.2017 - 09:47DROPS Design answered:
Dear Jinky, the video below shows how to increase with a yarn over. A small hole can appear but should be fixed when blocking/washing; feel free to use any other increase technique if you prefer. Happy knitting!
15.12.2017 - 10:15Jinky wrote:
Thanks, now I understand, another question since this is my first time to follow your pattern in knitting I'm a bit confuse on the Elevation instruction. Is this suppose to be a Wrap and Turn? if not I don't think I know what you meant when you say "Begin from right side with rose and knit as before until 6-6-7-7-8-8 stitches have been worked past marker, turn, tighten yarn" Hope you can explain this a bit a further? Thanks so much for the help.
14.12.2017 - 04:39DROPS Design answered:
Dear Jinky, the video below shows how we work the elevation on back piece (ie short rows without wrap & turn, but feel free to work them if you rather). Happy knitting!
14.12.2017 - 08:53Jinky wrote:
I did, and didn't find the chest size on the schematics, hence my question which I think is pretty direct, also the link that you direct me to is for the adult size, do you have the size conversion like age and chest size according to Drops standard which btw I have read prior to sending my queries I did measure the tunic that I think best fit my daughter and that's what I came up with the size, I would hate to find out that I knitted the wrong size. Thanks so much for your help.
12.12.2017 - 13:23DROPS Design answered:
Dear Jinky, you can check from number of sts in pattern and gauge, ie with 23 sts = 4 inch, in the first size you should get 128 sts for body = approx. 22 inch, and in 2nd size with 136 sts you should get approx. 23.6 inch. Compare other measurements and ajdust if necessary. Remember to check and keep the gauge. Happy knitting!
12.12.2017 - 15:22Jinky wrote:
Just wanted to know which size I can knit for my daughter that has a chest size of 21" but would love to have at least 2" positive ease? I've already bought the yarn and just wanted to be sure before the start knitting. Thank you so much for the help.
12.12.2017 - 10:39DROPS Design answered:
Dear Jinky, look at the measurement chart, you will find all measurements for each size taken flat (in cm) from side to side. Compare these to a similar garment she has to find out the matching size. Read more about sizing and convert into inches here. Happy knitting!
12.12.2017 - 13:14
![]() Liv Endahl wrote:
Liv Endahl wrote:
Strikker denne i størrelse 7/8, er kommet til tredje økningen på diagram A2. Som jeg forstår skal det økes hver 15de maske i denne omgangen. Forstår ikke at det er mulig å øke midt i mønstret, eller har jeg misforstått ?
17.11.2017 - 16:51DROPS Design answered:
Hei Liv, Du skal bare øke på omgangene markert med pil, som er 2 omganger med bare en farge hvor økningene ikke synes, God fornøyelse!
18.11.2017 - 07:20
![]() Veronica wrote:
Veronica wrote:
Hei... plutselig var mønster a.3 og a.6 borte fra siden....
27.10.2017 - 09:31
|
|||||||||||||||||||
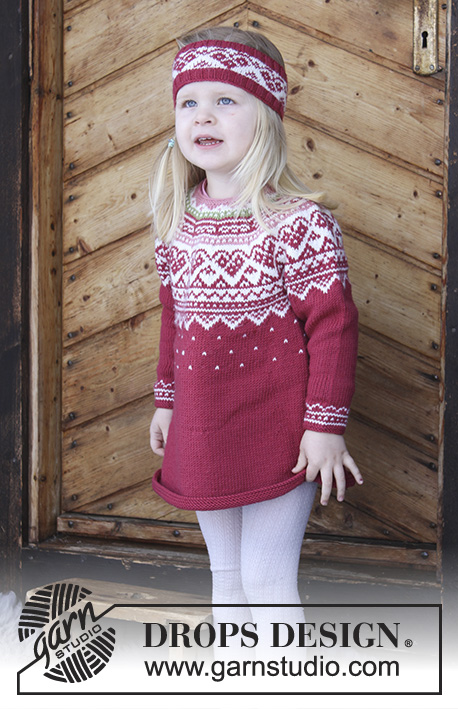
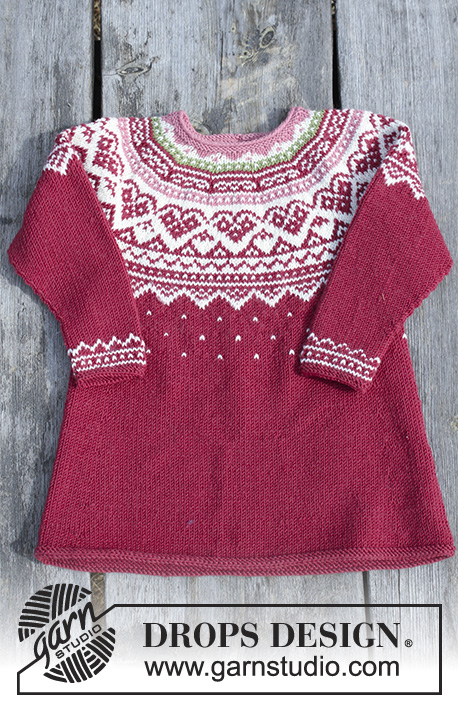
Visby Tunic#visbytunic |
|||||||||||||||||||
 |
 |
||||||||||||||||||
Set consists of: Tunic for kids with round yoke, multi-coloured Norwegian pattern and A-shape, knitted top down. Head band with multi-coloured Norwegian pattern. Size 2 - 12 years Set is knitted in DROPS Merino Extra Fine.
DROPS Children 30-11 |
|||||||||||||||||||
|
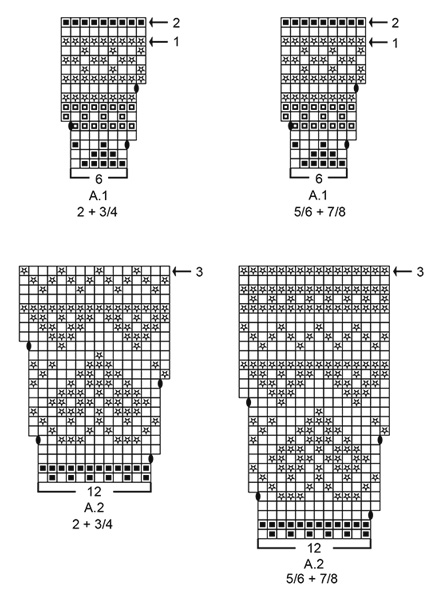
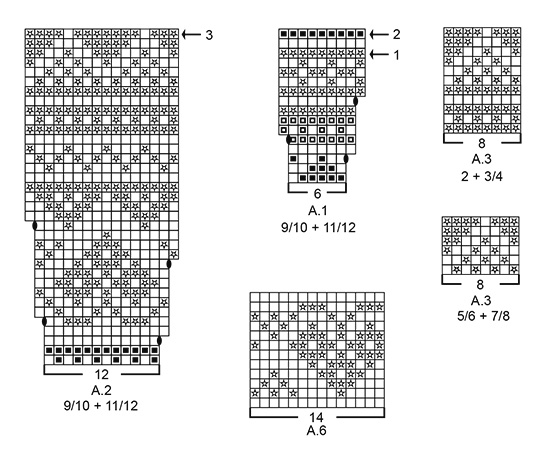
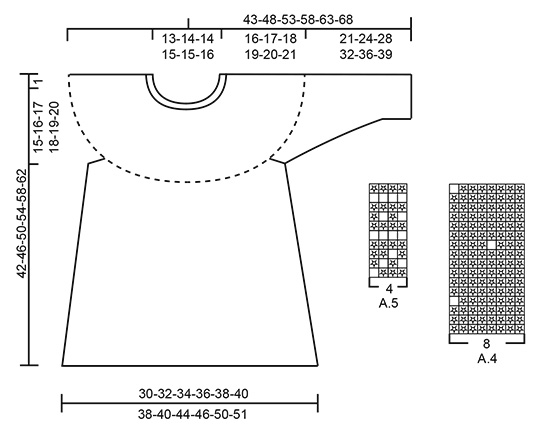
INFORMATION FOR PATTERN: GARTER STITCH (worked in the round): 1 ridge = 2 rounds. Knit 1 round and purl 1 round. PATTERN: Tunic: See diagrams A.1 to A.5. Choose diagram for your size. Head band: See diagram A.6. Work the entire pattern in stocking stitch. INCREASE/DECREASE TIP: To calculate how to increase/decrease evenly, use the total number of stitches on round (e.g. 76 stitches) and divide stitches by number of increases/decreases to be done (e.g. 8) = 9.5. In this example increase after alternately approx. every 9th and 10th stitch by making 1 yarn over. On next round knit yarn overs twisted to avoid holes. If decreasing knit alternately approx. every 8th and 9th stitch and every 9th and 10th stitch together. ELEVATION: Insert 1 marker at beginning of round = mid back. Begin from right side with rose and knit as before until 6-6-7-7-8-8 stitches have been worked past marker, turn, tighten yarn and purl 12-12-14-14-16-16. Turn, tighten yarn and knit 18-18-21-21-24-24, turn, tighten yarn and purl 24-24-28-28-32-32. Turn, tighten yarn and knit 30-30-35-35-40-40, turn, tighten yarn and purl 36-36-42-42-48-48. Turn piece, tighten yarn and knit until mid back. KNITTING TIP-1: To avoid the knitting tension to tighten when working pattern, it is important not to tighten the strands on back side of piece. Switch to a higher needle number when working pattern if the pattern is somewhat tight. KNITTING TIP-2 (applies to yoke on tunic): If knitting tension is incorrect in height and there are more rows vertically on 10 cm than stated in pattern the round yoke will be too short and the armholes too small. To avoid this work 1 extra round in stocking stitch evenly in the unicoloured sections on yoke. KNITTING TIP-3: Tunic can be worked to desired length. If you want it longer, continue increase in each side the same way as before until desired measurements. INCREASE TIP (applies to sides of body): Increase 1 stitch on each side of marker thread in each side as follows: Begin 10 stitches before marker thread, make 1 yarn over, knit 20 (marker thread is in the middle of these 20 stitches), make 1 yarn over (= 2 stitches increased). On next round knit yarn overs twisted to avoid holes. DECREASE TIP (applies to mid under sleeve): Begin 2 stitches before marker thread and knit 2 together, marker thread, slip 1 stitch knitwise, knit 1, pass slipped stitch over stitch worked (= 2 stitches decreased). ---------------------------------------------------------- TUNIC: Worked in the round on circular needle, top down. Work sleeves in the round on double pointed needles. Rounds begin mid back. NECK EDGE: Cast on 76-78-80-82-84-86 stitches on a short circular needle size 4 mm with rose. Switch to circular needle size 3 mm and work 2 ridges in GARTER STITCH - see explanation above. Then knit 2 round while AT THE SAME TIME increasing 8-6-10-8-12-10 stitches evenly - read INCREASE/DECREASE TIP = 84-84-90-90-96-96 stitches. Then work yoke as explained below. YOKE: Switch back to circular needle size 4 mm and work ELEVATION at the back of neck - see explanation above. When elevation has been worked, finish by knitting 0-2-0-2-0-2 rounds with rose. Read KNITTING TIP-1 AND KNITTING TIP-2! Then work A.1 in the round (= 14-14-15-15-16-16 repetitions of 6 stitches). Continue pattern and increase as shown in diagram. REMEMBER THE KNITTING TENSION! On round marked with arrow-1 in A.1 there are 126-126-135-135-144-144 stitches on needle. Work round as shown in diagram and increase AT THE SAME TIME 10-16-18-18-20-26 stitches evenly on this round = 136-142-153-153-164-170 stitches. Continue A.1 and increase AT THE SAME TIME 8-14-15-15-16-22 stitches on round marked with arrow-2 in A.1 = 144-156-168-168-180-192 stitches. After A.1 work A.2 in the round (= 12-13-14-14-15-16 repetitions of 12 stitches). Continue pattern and increase as shown in diagram. On round marked with arrow-3 (last round in A.2) there are 192-208-224-224-240-256 stitches on needle. Work round as shown in diagram and increase AT THE SAME TIME 14-10-6-10-6-2 stitches evenly on this round (increasing base colour in pattern stripe) = 206-218-230-234-246-258 stitches. Piece measures now approx. 16-17-18-19-20-21 cm from cast-on edge mid front. On next round work as explained below: SIZE 2 and 3/4 YEARS: Work with off white as follows: 29-31 stitches in stocking stitch (= ½ back piece), slip the next 45-47 stitches on 1 stitch holder for sleeve, cast on 6-6 new stitches on needle (= in the side under sleeve), work 58-62 stitches in stocking stitch (= front piece), slip the next 45-47 stitches on 1 stitch holder for sleeve, cast on 6-6 new stitches on needle (= in the side under sleeve) and work the remaining 29-31 stitches in stocking stitch (= ½ back piece). SIZE 5/6, 7/8, 9/10 and 11/12 YEARS: Work with dark rose as follows: 33-34-36-38 stitches in stocking stitch (= ½ back piece), slip the next 49-49-51-53 stitches on 1 stitch holder for sleeve, cast on 6-8-8-8 new stitches on needle (= in the side under sleeve), work 66-68-72-76 stitches in stocking stitch (= front piece), slip the next 49-49-51-53 stitches on 1 stitch holder for sleeve, cast on 6-8-8-8 new stitches on needle (= in the side under sleeve) and work the remaining 33-34-36-38 stitches in stocking stitch (= ½ back piece). ALL SIZES: Cut the strand. Finish body and sleeves separately. NOW MEASURE PIECE FROM HERE! BODY: = 128-136-144-152-160-168 stitches. Insert 1 marker thread in the middle of the 6-6-6-8-8-8 stitches that were cast on under sleeve in each side. Begin round at one marker and read the rest of body before continuing! SIZE 2, 3/4, 5/6 and 7/8 years: Work A.3 in the round (= 16-17-18-19 repetitions of 8 stitches). When A.3 has been worked, work A.4 in the round. When A.4 has been worked, work in stocking stitch with dark rose until finished measurements. SIZE 9/10 and 11/12 years: Work A.4 in the round (= 20-21 repetitions of 8 stitches). When A.4 has been worked, work in stocking stitch with dark rose until finished measurements. ALL SIZES: AT THE SAME TIME when piece measures 4-4-4-4-3-3 cm, increase 2 stitches in each side - read INCREASE TIP (= 4 stitches increased). Increase like this every 8th-9th-8th-9th-8th-9th round (approx. every 3 cm) 8-8-10-10-12-12 times in total in each side = 160-168-184-192-208-216 stitches. NOTE! Work the increased stitches in dark rose, i.e. when increasing, there will be more stitches in dark rose between dots in A.4. When piece measures approx. 25-28-31-34-37-40 cm from division - read KNITTING TIP-3, work 2 ridges. Then loosely cast off. Tunic measures approx. 42-46-50-54-58-62 cm from shoulder and down. SLEEVE: Slip the 45-47-49-49-51-53 stitches from stitch holder in one side of piece on double pointed needles size 4 mm and pick in addition up 1 new stitch in each of the 6-6-6-8-8-8 stitches cast on under sleeve = 51-53-55-57-59-61 stitches on needle. Insert a marker thread in the middle of the 6-6-6-8-8-8 stitches under sleeve and 1 marker thread in the middle stitch on round (= mid on top of sleeve. Read the rest of sleeve before continuing! SIZE 2, 3/4, 5/6 and 7/8 years: Begin at marker thread mid under sleeve and work A.3 in the round but note that the pattern will not fit an entire repetition mid under sleeve. Begin with 3rd-2nd-1st-8th stitch in A.3 and repeat A.3 in the round as long as you can. Pattern will be symmetrical mid under sleeve and stitch with marker thread mid on top of sleeve should now fit 4th stitch in A.3. After A.3 work in stocking stitch with dark rose. SIZE 9/10 and 11/12 years: Begin at marker thread mid under sleeve and work in stocking stitch with dark rose. ALL SIZES: AT THE SAME TIME when piece measures 3-3-2-2-2-2 cm from division, decrease 2 stitches mid under sleeve - read DECREASE TIP. Decrease like this every 2-2-2½-3½-3½-3½ cm 7-8-9-8-9-10 times in total = 37-37-37-41-41-41 stitches. When piece measures 16-19-23-27-31-34 cm from division (decreases should be done), knit 1 round while decreasing 1 stitch in all sizes = 36-36-36-40-40-40 stitches. Work A.5 in the round (= 9-9-9-10-10-10 repetitions of 4 stitches). After A.5 switch to double pointed needles size 3 mm. Work 2 ridges in the round with dark rose, switch back to double pointed needles size 4 mm and cast off. Sleeve measures approx. 21-24-28-32-36-39 cm from division. Work the other sleeve the same way. ---------------------------------------------------------- HEAD BAND: Worked in the round on circular needle. Cast on 108-124 stitches on circular needle size 2.5 mm with dark rose. Knit 1 round. Then work rib in the round (= knit 2/purl 2) for 2 cm. Switch to circular needle size 3 mm and off white. Knit 1 round while at the same time decrease 10-12 stitches evenly - read INCREASE/DECREASE TIP = 98-112 stitches. Work A.6 in the round (= 7-8 repetitions of 14 stitches). REMEMBER THE KNITTING TENSION! When A.6 has been worked, continue with dark rose. Knit 1 round while increasing 10-12 stitches evenly = 108-124 stitches. Switch to circular needle size 2.5 mm and work rib in the round = knit 2/purl 2 for 2 cm. Switch back to circular needle size 3 mm and cast off with knit over knit and purl over purl. |
|||||||||||||||||||
Diagram explanations |
|||||||||||||||||||
|
|||||||||||||||||||
|
|||||||||||||||||||
|
|||||||||||||||||||
|
|||||||||||||||||||
Have you finished this pattern?Tag your pictures with #dropspattern #visbytunic or submit them to the #dropsfan gallery. Do you need help with this pattern?You'll find 30 tutorial videos, a Comments/Questions area and more by visiting the pattern on garnstudio.com. © 1982-2025 DROPS Design A/S. We reserve all rights. This document, including all its sub-sections, has copyrights. Read more about what you can do with our patterns at the bottom of each pattern on our site. |
|||||||||||||||||||


With over 40 years in knitting and crochet design, DROPS Design offers one of the most extensive collections of free patterns on the internet - translated to 17 languages. As of today we count 314 catalogues and 11822 patterns translated into English (UK/cm).
We work hard to bring you the best knitting and crochet have to offer, inspiration and advice as well as great quality yarns at incredible prices! Would you like to use our patterns for other than personal use? You can read what you are allowed to do in the Copyright text at the bottom of all our patterns. Happy crafting!
Post a comment to pattern DROPS Children 30-11
We would love to hear what you have to say about this pattern!
If you want to leave a question, please make sure you select the correct category in the form below, to speed up the answering process. Required fields are marked *.