
Popular categories
Looking for a yarn?


Comments / Questions (13)
![]() Edith wrote:
Edith wrote:
Joli modèle, dommage qu’il soit à réajuster en taille et en motif, pour obtenir un beau résultat . Pourriez-vous refaire des photos zoomées sur le détail des points fantaisies pour les patrons en général, cela aiderait à comprendre quand les explications manquent de clarté ? Merci
04.10.2024 - 14:12
![]() Jutta Pinnerød wrote:
Jutta Pinnerød wrote:
Jeg forstår ikke hvor jeg skal øke masker?
23.01.2022 - 13:47DROPS Design answered:
Hej Jutta. Du ökar maskor enligt diagram A.1. Mvh DROPS Design
24.01.2022 - 07:27
![]() Anne wrote:
Anne wrote:
Bonjour, En effet, je remarque aussi tout comme Marion, que le motif est répété 3 fois dans l'explication, alors que sur la photo, il semble être répété 2 fois ; ou alors le 3e motif est sous le bras (ce qui semble étrange) ? Merci d'avance.
25.01.2021 - 14:31DROPS Design answered:
Bonjour Anne, la fin du 3ème motif en hauteur se trouve tout à la fin de l'emmanchure et légèrement sous la manche - on peut le deviner sur la 1ère photo. Bon tricot!
25.01.2021 - 16:11
![]() Marion wrote:
Marion wrote:
Deuxième question : quel type d'augmentation faut-il faire ? Simple jeté, maille tricotée deux fois où augmentation intercalaire ? Il n'y a pas de précision dans les explications. Merci par avance pour votre réponse.
20.12.2020 - 09:41
![]() Marion wrote:
Marion wrote:
Bonjour, je m'apprête à commencer ce modèle et plusieurs choses me paraissent bizarres entre le patron et la photo. Le col sur le patron me paraît plus serré que celui de la photo. J\'ai fait un produit en croix par rapport à l\'échantillon et j\'obtiens 41cm pour le col en taille M or ma tête ne passe pas dans ce cas. De plus sur la photo on voit le motif de dentelle répété deux fois alors que dans le patron on le répète 3 fois. Bref je suis perdue. A l\'aide !
19.12.2020 - 22:44DROPS Design answered:
Bonjour Marion, désolée pour le retard de la réponse. Montez vos mailles bien souplement pour que le montage ne soit pas trop serré. Le motif du raglan se tricote bien 3 fois en hauteur, on peut le deviner sur la 1ère photo où on voit le début de la feuille (l'emmanchure est ici un peu serrée car le modèle resserre le bras, mais c"'est bien juste ainsi). Bon tricot!
25.01.2021 - 16:14
![]() Marie wrote:
Marie wrote:
Danke für die rasche Antwort. Das macht die Sache klarer. Nach wie vor unklar ist, ob die geraden Reihen so gearbeitet werden müssen wie im Diagramm gezeichnet oder genau umgekehrt. In der Legende heißt es bei der Erklärung der kleinen schwarzen Ellipse\r\n\"= 1 Umschlag zwischen 2 Maschen, in der nächsten Runde den Umschlag rechts verschränkt stricken\". Im Diagramm eingezeichnet ist in der nächsten Runde an der Stelle aber eine linke Masche, keine rechte
16.08.2019 - 11:14DROPS Design answered:
Liebe Marie, also bei der 3. Reihe wird dieser Umschlag rechts verschränkt gestrickt, aber es sieht so aus, daß die anderen immer links verschränkt gestrickt werden, unser Design Team wird das noch mal prüfen, danke für den Hinweis. Viel Spaß beim stricken!
16.08.2019 - 12:33
![]() Marie wrote:
Marie wrote:
Hallo! Zeigt das Diagramm alle Runden an, also auch die links gestrickten? Wieso sollen diese Runden dann von links nach rechts gelesen werden? Man kommt in der Runde doch immer von rechts. Oder ist das Diagramm so angelegt, dass man es mit Hin-Und Rückreisen Stricken muss und für die Runde muss man entsprechend verkehrt herum denken (und rechte Maschen wären dann in der Runde linke und andersherum)? Ich bin verwirrt.
15.08.2019 - 21:34DROPS Design answered:
Liebe Marie, die Diagramme zeigen alle Reihen, wenn Sie in der Runde gestrickt sind, sollen alle Reihen von rechts nach links gelesen werden. Deutsche Anleitung wird angepasst, danke für den Hinweis. Viel Spaß beim stricken!
16.08.2019 - 09:02
![]() Michaela wrote:
Michaela wrote:
Hej. Bladmønstret på min cardigan bølger en del eller stikker ud fra retstrikken. Kan jeg presse min cardigan på bladmønstret så det kommer mere i plan med den retstrikkede baggrund? Hvordan presser jeg bedst retstrik? På forhånd tak
24.04.2019 - 15:27DROPS Design answered:
Hei Michaela. Du kan forsøke å dampe plagget lett, men det er litt ulikt hvor kraftig strykejern er så vi anbefaler at du strikker en prøvelapp og damper den først. God fornøyelse
26.04.2019 - 14:10
![]() Angela wrote:
Angela wrote:
Nel punto in cui finisce il giro a diritto ed inizia il giro a rovescio per ottenere la maglia a legaccio, quindi nel mezzo dietro, si forma una riga evidente perpendicolarmente al lavoro. E' corretto o si può ovviare in qualche modo? grazie
16.09.2017 - 19:27DROPS Design answered:
Buongiorno Angela. Purtroppo nel punto a legaccio lo scalino rimane. Può provare a tringere un po' la seconda maglia del giro; può eventualmente provare a inizio giro, a sollevare il filo tra le maglie e lavorarla con la prima maglia del giro. Ma in entrambi i casi, un po' il passaggio continua a vedersi. Buon lavoro!
17.09.2017 - 12:26
![]() Marina Romano wrote:
Marina Romano wrote:
Liebes Drops Team Habe den Pullover mit Blattmuster (Drops 179-30) angefangen zu stricken, in Größe L. Nun weiß ich nicht, welches Diagramm ich nehmen muss. Verstehe ich irgendwie nicht. Können sie mir weiterhelfen? Liebe Grüße und vielen Dank
09.08.2017 - 15:27DROPS Design answered:
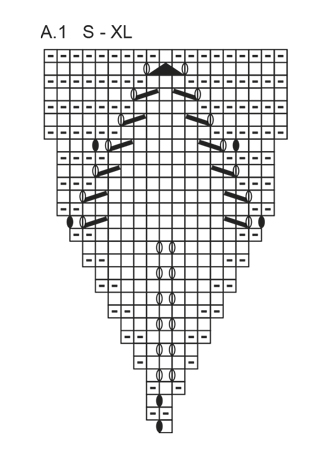
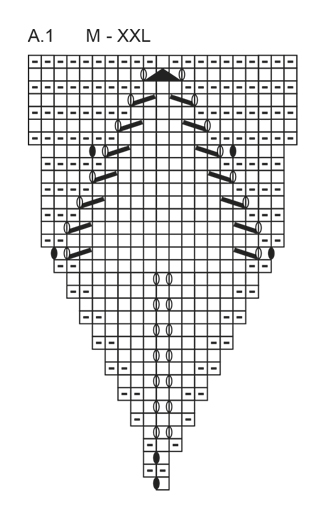
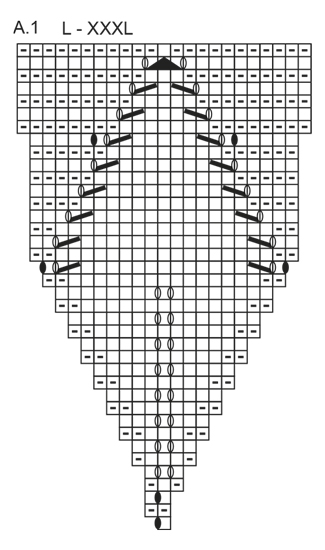
Liebe Frau Romano, in der Größe L stricken Sie Diagram "A.1 L-XXXL", ganz unten (= 3. von oben). Viel Spaß beim stricken!
09.08.2017 - 17:07
|
||||||||||||||||||||||
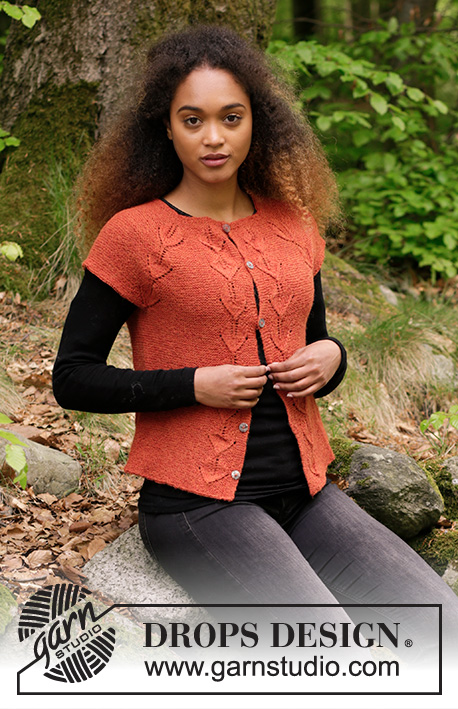
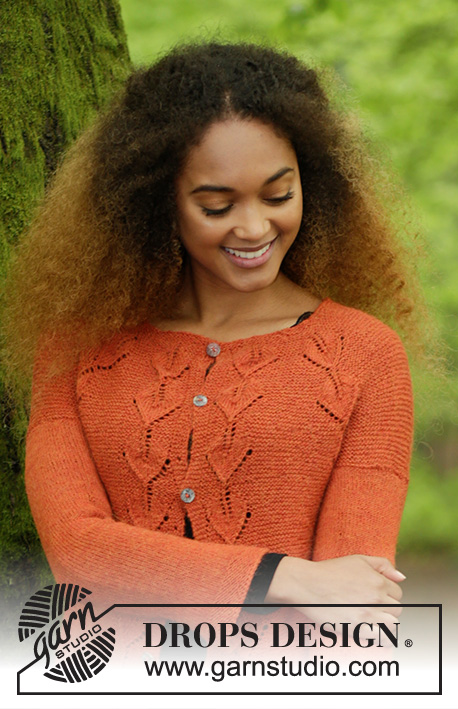
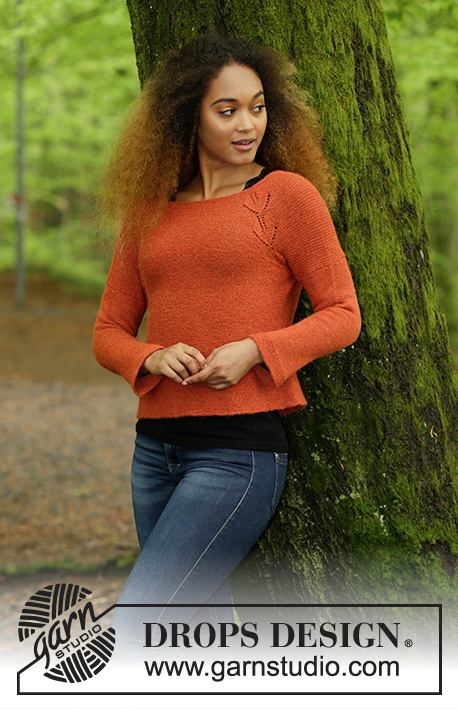
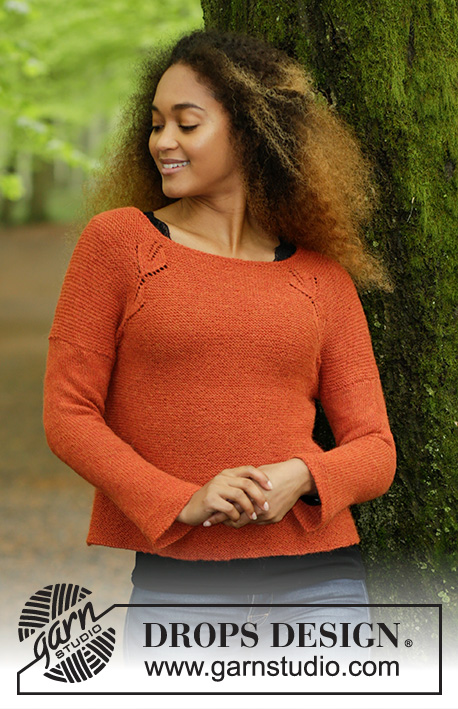
Autumn Vines#autumnvinessweater |
||||||||||||||||||||||
 |
 |
|||||||||||||||||||||
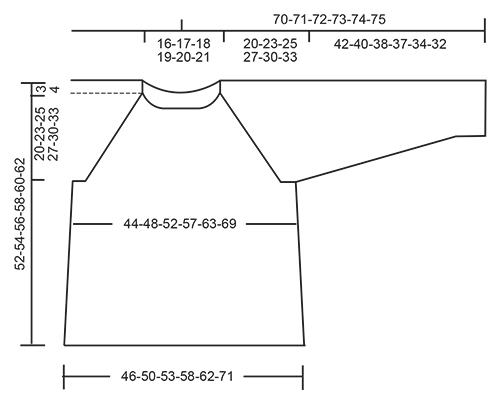
Jumper with leaf pattern and raglan, knitted top down. Size: S - XXXL Piece is knitted in DROPS Alpaca.
DROPS 179-30 |
||||||||||||||||||||||
|
INFORMATION FOR PATTERN: GARTER STITCH (worked in the round): 1 ridge = 2 rounds. Knit 1 round and purl 1 round. PATTERN: See diagram A.1. Diagrams show all rows in pattern seen from the right side. Choose diagram for your size. CAST-OFF TIP: Make 1 yarn over after approx. every 5th stitch while casting off (cast off yarn over as stitch) to make the cast-off edge more elastic. ---------------------------------------------------------- Worked in the round on circular needle from mid back, top down. JUMPER: Cast on 96-100-106-112-118-124 stitches on circular needle size 3 mm with Alpaca. Work 3 ridges in GARTER STITCH - see explanation above. Knit 1 round while increasing 12-24-22-24-22-12 stitches evenly = 108-124-128-136-140-136 stitches. Purl 1 round. Work next round as follows: 20-22-22-25-28-30 stitches in garter stitch (= half back piece), A.1 (= 1 stitch), work 12-16-18-16-12-6 stitches in garter stitch (= sleeve), A.1, work 40-44-44-50-56-60 stitches in garter stitch (= front piece), A.1, work 12-16-18-16-12-6 stitches in garter stitch (= sleeve), A.1, work 20-22-22-25-28-30 stitches in garter stitch (= half back piece). Continue in garter stitch and A.1. REMEMBER THE KNITTING TENSION! Work A.1 3-3-3-4-4-4 times in total vertically, make sure that first stitch in A.1 is directly above middle stitch in previous repetition = 324-364-392-424-460-488 stitches on needle and piece measures approx. 20-23-25-27-30-33 cm from cast-on edge. Work next round as follows: Work 48-53-56-62-69-75 stitches (= half back piece), slip the next 66-76-84-88-92-94 stitches on 1 stitch holder (= sleeve), cast on 10-10-12-12-14-16 new stitches on needle (= under sleeve), work 96-106-112-124-138-150 stitches (= front piece), slip the next 66-76-84-88-92-94 stitches on 1 stitch holder (= sleeve), cast on 10-10-12-12-14-16 new stitches on needle (= under sleeve) and work the remaining 48-53-56-62-69-75 stitches (= half back piece). BODY: = 212-232-248-272-304-332 stitches. Continue in garter stitch. Insert 1 marker thread in each side, in the middle of the new stitches cast on (= 106-116-124-136-152-166 stitches on front piece and on back piece) – Now measure piece from here! When piece measures 10 and 20 cm, increase 1 stitch on each side of marker threads in the sides = 4 stitches increased every time = 220-240-256-280-312-340 stitches. When piece measures 28-27-27-27-26-25 cm, cast off loosely - READ CAST-OFF TIP. Jumper measures approx. 52-54-56-58-60-62 cm from shoulder. SLEEVE: Work sleeve in the round on a short circular needle/double pointed needles. Slip the 66-76-84-88-92-94 stitches from stitch holder in one side of piece on circular needle/double pointed needles size 3 mm and cast in addition on 10-10-12-12-14-16 new stitch mid under sleeve = 76-86-96-100-106-110 stitches – Now measure piece from here! Continue sleeve in stocking stitch. When piece measures 3 cm, decrease 2 stitches mid under sleeve. Decrease every 2½-1½-1½-1-1-1 cm 13-17-20-21-23-24 times in total = 50-52-56-58-60-62 stitches. When piece measures 38-36-34-33-30-28 cm (shorter measurements in the larger sizes because of longer yoke), work in GARTER STITCH over all stitches - see explanation above. When sleeve measures 42-40-38-37-34-32 cm, cast off LOOSELY - READ CAST-OFF TIP. ASSEMBLY: Sew the openings under the sleeves. |
||||||||||||||||||||||
Diagram explanations |
||||||||||||||||||||||
|
||||||||||||||||||||||
|
||||||||||||||||||||||
|
||||||||||||||||||||||
|
||||||||||||||||||||||
|
||||||||||||||||||||||
Have you finished this pattern?Tag your pictures with #dropspattern #autumnvinessweater or submit them to the #dropsfan gallery. Do you need help with this pattern?You'll find 27 tutorial videos, a Comments/Questions area and more by visiting the pattern on garnstudio.com. © 1982-2025 DROPS Design A/S. We reserve all rights. This document, including all its sub-sections, has copyrights. Read more about what you can do with our patterns at the bottom of each pattern on our site. |
||||||||||||||||||||||


With over 40 years in knitting and crochet design, DROPS Design offers one of the most extensive collections of free patterns on the internet - translated to 17 languages. As of today we count 314 catalogues and 11821 patterns translated into English (UK/cm).
We work hard to bring you the best knitting and crochet have to offer, inspiration and advice as well as great quality yarns at incredible prices! Would you like to use our patterns for other than personal use? You can read what you are allowed to do in the Copyright text at the bottom of all our patterns. Happy crafting!
Post a comment to pattern DROPS 179-30
We would love to hear what you have to say about this pattern!
If you want to leave a question, please make sure you select the correct category in the form below, to speed up the answering process. Required fields are marked *.