
Popular categories
Looking for a yarn?


Comments / Questions (6)
![]() Kathy wrote:
Kathy wrote:
Photo of back please?
27.03.2025 - 23:49
![]() Nadja Brolin wrote:
Nadja Brolin wrote:
Hej Försöker göra detta mönster men jag tror ni har missat något i beskrivningen. När man syr ihop rutorna blir inte den vita randen så bred som enligt bilden. Har ni virkat runt rutorna med fasta maskor med vitt garn och sedan sytt i hop dem? I så fall borde ni uppdatera beskrivningen så att man förstår det. Det står nämligen ingenting om det. Förstår inte annars hur ni får den vita randen så bred bara med sömnad, inte ens om man följer er video.
17.07.2021 - 09:38DROPS Design answered:
Hei Nadja. Ja, her ser det ut som at det mangler en forklaring på den siste omgangen. Vi skal ta en titt på den igjen og evnt komme med en rettelse. mvh DROPS design
09.08.2021 - 13:18
![]() Kawsar wrote:
Kawsar wrote:
Hi, I am still awaiting a response for my question below. Thank you.
28.10.2020 - 13:25DROPS Design answered:
Dear Mrs Kawsar, your question has been forwarded to our design team - thanks for your patience.
28.10.2020 - 15:32
![]() Kawsar wrote:
Kawsar wrote:
Thank you for your speedy response. I’ve followed the instructions in the video you mentioned but I do not get the defined white edge between the 2 squares. I am using the drops Safran off white but when sewed together in that way, the squares are too close together. Am I meant to make an off white edge around each square before sewing them together? And if so will it be a single or double crochet edge? (US crochet terms please) thank you for your help.
24.10.2020 - 02:35
![]() Kawsar wrote:
Kawsar wrote:
Hi, could you please explain how to sew the squares together? Instructions not very clear. Thank you.
22.10.2020 - 00:49DROPS Design answered:
Dear Mrs Kawsar, you sew the squares together (see video so that you will get a triangle (see picture) - and sew 2nd cup the same way but place the colours so that they are mirrored (= symetrical). Hope this will help. Happy crocheting!
22.10.2020 - 10:27
![]() Tiziana wrote:
Tiziana wrote:
Buongiorno volevo sapere se le coppe sono cucite insieme sul davanti o sono separate perche dalla spiegazione del bordo inferiore non riesco a capire bene . grazie
21.07.2017 - 14:36DROPS Design answered:
Buongiorno Tiziana, la confezione delle coppe è spiegata nella sezione bordi: dopo aver fatto i due triangoli, viene lavorato un bordo con il bianco e i triangoli vengono uniti; poi verrà fatto il cordino che si allaccerà sul davanti. Buon lavoro!
21.07.2017 - 15:35
|
|||||||||||||||||||||||||||||||||||||
Vanina#vaninabikini |
|||||||||||||||||||||||||||||||||||||
 |
 |
||||||||||||||||||||||||||||||||||||
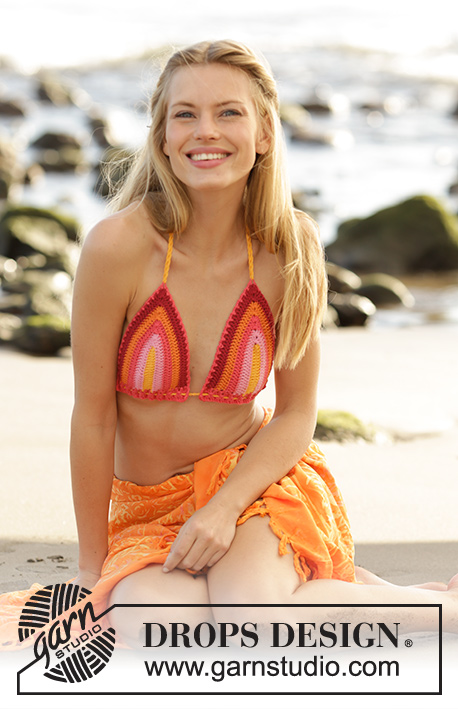
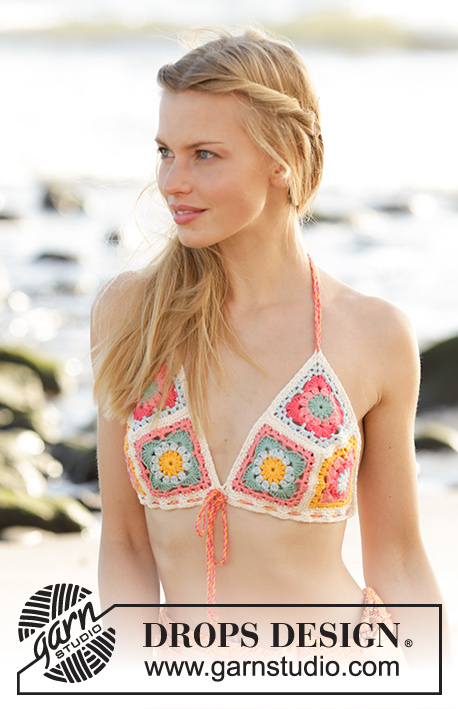
Bikini top with crocheted squares. The piece is crocheted in DROPS Safran. Sizes S/M – XL/XXL.
DROPS 178-72 |
|||||||||||||||||||||||||||||||||||||
|
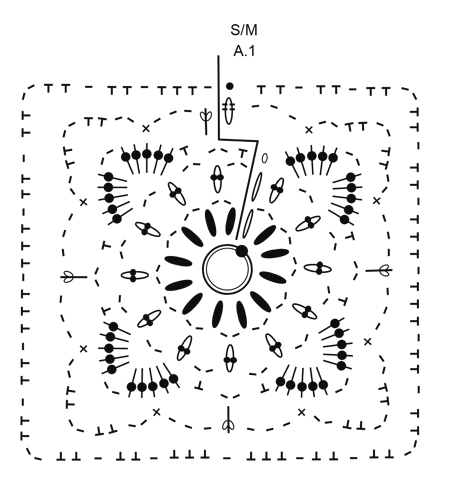
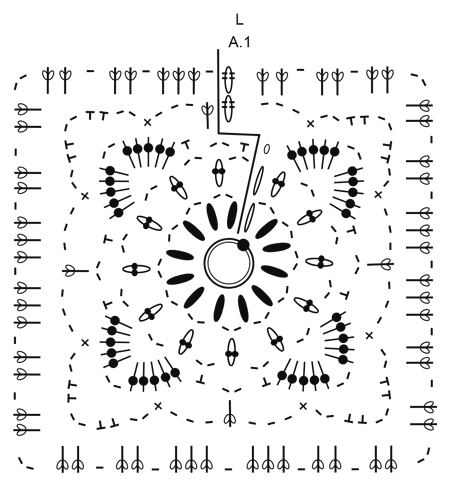
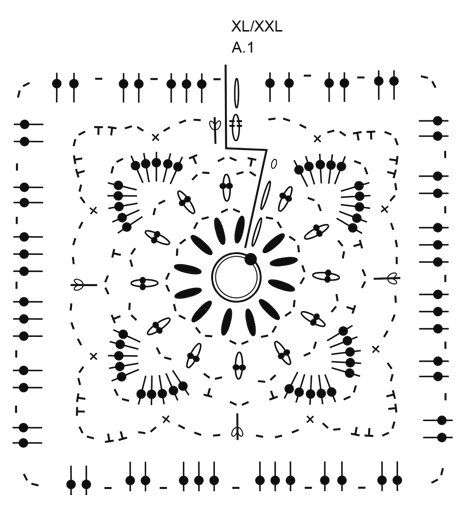
INFORMATION FOR THE PATTERN: PATTERN: See diagram A.1. Choose the diagram for your size. COLOURS: COLOUR 1: Cast on + ROUND 1: green ROUND 2: peach ROUND 3: raspberry ROUNDS 4-5: light ice blue COLOUR 2: Cast on + ROUND 1: light ice blue ROUND 2: raspberry ROUND 3: peach ROUNDS 4-5: strong yellow COLOUR 3: Cast on + ROUND 1: strong yellow ROUND 2: light ice blue ROUND 3: green ROUNDS 4-5: peach COLOUR CHANGE: To get the neatest transition when changing colours, work the last stitch (= slip stitch) on the round as follows: Insert the hook into the chain stitch from the beginning of the round, make a yarn over with the new colour and pull the strand through the stitch on the hook. ---------------------------------------------------------- BIKINI TOP: You first work 6 crochet squares which are sewn together to make two cups. Then you work an edge around each cup before they are worked together. CROCHET SQUARE: Start with hook size 2.5 mm and work according to diagram A.1 and COLOURS – read PATTERN and COLOURS above. Read COLOUR CHANGE to get a neat transition between colours. REMEMBER THE CROCHET TENSION! 1 crochet square measures 7½-8-8½ cm in width and height. Work a total of 6 crochet squares: 2 crochet squares with each colour combination (i.e. COLOUR 1, COLOUR 2 and COLOUR 3). When A.1 is finish, work 1 round of double crochet with off white in each stitch, in the corners work 1 double crochet, 2 chain stitches, 1 double crochet. At the beginning of the round, work 1 chain stitch, the round finish with 1 slip stitch in the first stitch on round. ASSEMBLY: The assembly is done with off white. Sew 1 crochet square in each colour combination (= 3 crochet squares) together, edge to edge so that they form a triangle. Sew one stitch in each stitch. Sew the 3 other crochet squares together in the same way, but reversed, so that the two triangles of the bikini top are symmetrical. EDGES: The edges are worked in off white. Fasten the strand with 1 double crochet in the corner of one of the triangles. Work 1 double crochet in each stitch/around each chain stitch around the whole triangle, but around the chain-space in the corners work (1 double crochet, 3 chain stitches, 1 double crochet). Cut the strand. Repeat around the other triangle. Now work the two triangles together along the bottom edge as follows: Fasten the strand with a double crochet around the chain-space in one corner of the triangle. Work 1 double crochet around the same chain-space, * 2 chain stitches, skip 2 stitches, 1 double crochet in each of the next 2 stitches *, repeat from *-* 4 more times. Work 2 chain stitches, skip 1 stitch, 2 double crochets around the chain-space in the corner. Work 2 double crochets around the chain-space in the corner of the second triangle. Then work in the same way along the bottom edge of this triangle (i.e. work from *-* 4 more times and finish with 2 chain stitches and 2 double crochets around the last chain-space). Turn and work back with 1 double crochet in each stitch/around each chain stitch. Cut and fasten the strand. TWISTED CORD: Cut 1 strand of strong yellow, 1 strand of peach and 1 strand of raspberry (= 3 strands) each of 3 metres. Twist them together until they begin to resist. Fold the cord double and it will continue to twist by itself. Tie a knot in each end and even the ends. Start mid front of the bikini top and thread the cord up and down in the row of holes. The cord is tied mid front of the bikini top. Cut 1 strand of strong yellow, 1 strand of peach and 1 strand of raspberry (= 3 strands) each of 1.5 metres. Twist them together until they begin to resist. Fold the cord double and it will continue to twist by itself. Tie a knot in each end and even the ends. Fasten the cord in the corner at the top of the bikini top. Make another cord and fasten in the same way. The cords are tied at the back of the neck. |
|||||||||||||||||||||||||||||||||||||
Diagram explanations |
|||||||||||||||||||||||||||||||||||||
|
|||||||||||||||||||||||||||||||||||||
|
|||||||||||||||||||||||||||||||||||||
|
|||||||||||||||||||||||||||||||||||||
|
|||||||||||||||||||||||||||||||||||||
Have you finished this pattern?Tag your pictures with #dropspattern #vaninabikini or submit them to the #dropsfan gallery. Do you need help with this pattern?You'll find 16 tutorial videos, a Comments/Questions area and more by visiting the pattern on garnstudio.com. © 1982-2025 DROPS Design A/S. We reserve all rights. This document, including all its sub-sections, has copyrights. Read more about what you can do with our patterns at the bottom of each pattern on our site. |
|||||||||||||||||||||||||||||||||||||


With over 40 years in knitting and crochet design, DROPS Design offers one of the most extensive collections of free patterns on the internet - translated to 17 languages. As of today we count 314 catalogues and 11822 patterns translated into English (UK/cm).
We work hard to bring you the best knitting and crochet have to offer, inspiration and advice as well as great quality yarns at incredible prices! Would you like to use our patterns for other than personal use? You can read what you are allowed to do in the Copyright text at the bottom of all our patterns. Happy crafting!
Post a comment to pattern DROPS 178-72
We would love to hear what you have to say about this pattern!
If you want to leave a question, please make sure you select the correct category in the form below, to speed up the answering process. Required fields are marked *.