


Komentáře / Otázky (6)
![]() Kathy napsala:
Kathy napsala:
Photo of back please?
27.03.2025 - 23:49
![]() Nadja Brolin napsala:
Nadja Brolin napsala:
Hej Försöker göra detta mönster men jag tror ni har missat något i beskrivningen. När man syr ihop rutorna blir inte den vita randen så bred som enligt bilden. Har ni virkat runt rutorna med fasta maskor med vitt garn och sedan sytt i hop dem? I så fall borde ni uppdatera beskrivningen så att man förstår det. Det står nämligen ingenting om det. Förstår inte annars hur ni får den vita randen så bred bara med sömnad, inte ens om man följer er video.
17.07.2021 - 09:38Odpověď DROPS Design :
Hei Nadja. Ja, her ser det ut som at det mangler en forklaring på den siste omgangen. Vi skal ta en titt på den igjen og evnt komme med en rettelse. mvh DROPS design
09.08.2021 - 13:18
![]() Kawsar napsala:
Kawsar napsala:
Hi, I am still awaiting a response for my question below. Thank you.
28.10.2020 - 13:25Odpověď DROPS Design :
Dear Mrs Kawsar, your question has been forwarded to our design team - thanks for your patience.
28.10.2020 - 15:32
![]() Kawsar napsala:
Kawsar napsala:
Thank you for your speedy response. I’ve followed the instructions in the video you mentioned but I do not get the defined white edge between the 2 squares. I am using the drops Safran off white but when sewed together in that way, the squares are too close together. Am I meant to make an off white edge around each square before sewing them together? And if so will it be a single or double crochet edge? (US crochet terms please) thank you for your help.
24.10.2020 - 02:35
![]() Kawsar napsala:
Kawsar napsala:
Hi, could you please explain how to sew the squares together? Instructions not very clear. Thank you.
22.10.2020 - 00:49Odpověď DROPS Design :
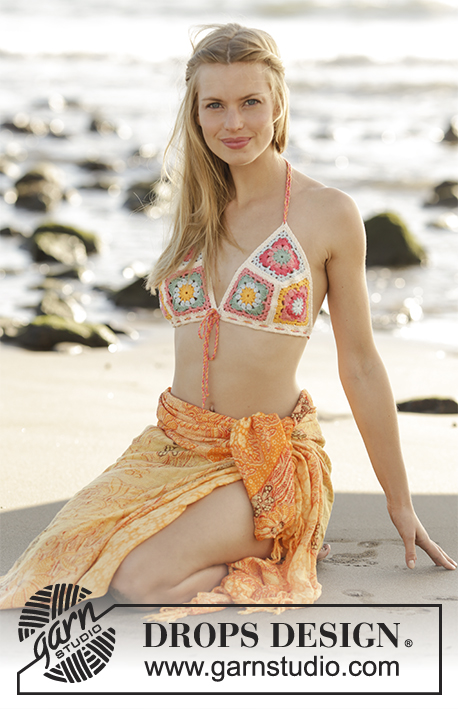
Dear Mrs Kawsar, you sew the squares together (see video so that you will get a triangle (see picture) - and sew 2nd cup the same way but place the colours so that they are mirrored (= symetrical). Hope this will help. Happy crocheting!
22.10.2020 - 10:27
![]() Tiziana napsala:
Tiziana napsala:
Buongiorno volevo sapere se le coppe sono cucite insieme sul davanti o sono separate perche dalla spiegazione del bordo inferiore non riesco a capire bene . grazie
21.07.2017 - 14:36Odpověď DROPS Design :
Buongiorno Tiziana, la confezione delle coppe è spiegata nella sezione bordi: dopo aver fatto i due triangoli, viene lavorato un bordo con il bianco e i triangoli vengono uniti; poi verrà fatto il cordino che si allaccerà sul davanti. Buon lavoro!
21.07.2017 - 15:35
|
|||||||||||||||||||||||||||||||||||||
Vanina#vaninabikini |
|||||||||||||||||||||||||||||||||||||
 |
 |
||||||||||||||||||||||||||||||||||||
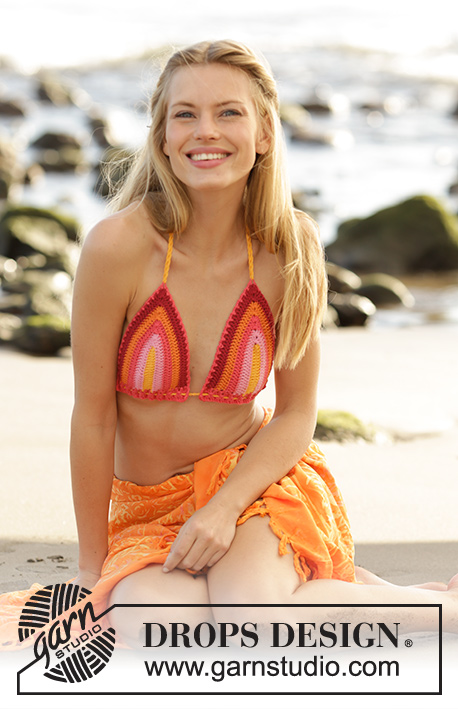
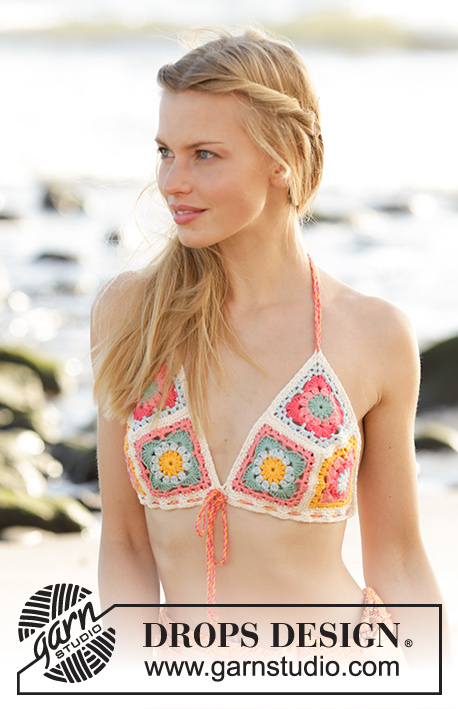
Bikiny top – podprsenka z háčkovaných čtverců z příze DROPS Safran. Velikost S/M – XL/XXL.
DROPS 178-72 |
|||||||||||||||||||||||||||||||||||||
|
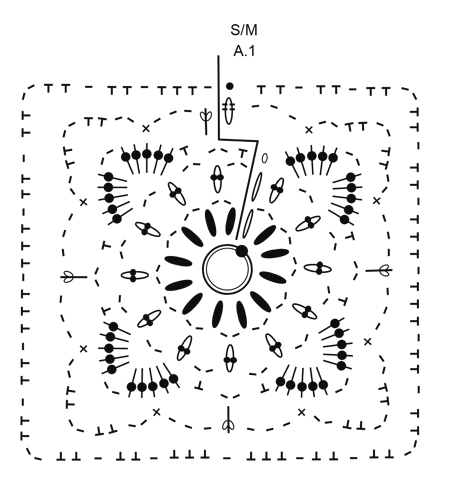
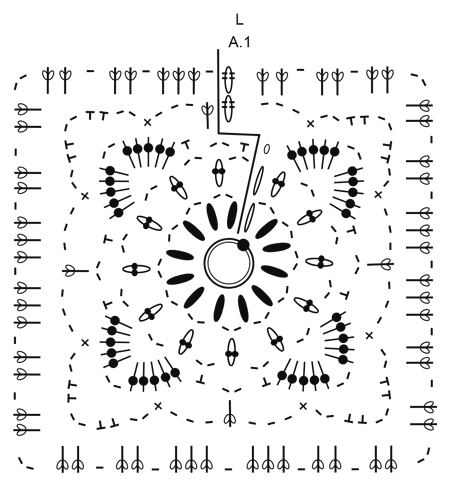
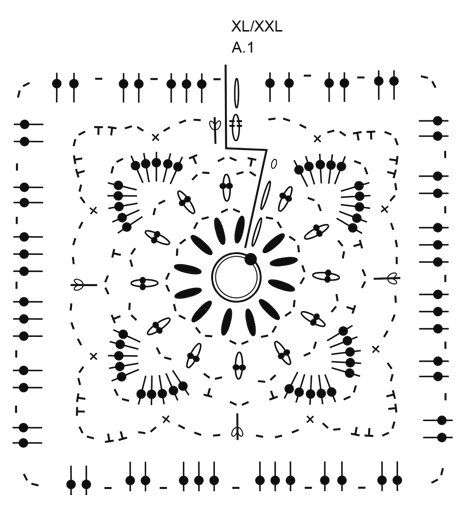
VZOR: Viz schéma A.1. Zvolte si schéma pro požadovanou velikost. BAREVNÉ KOMBINACE: BARVA 1: ZAČÁTEK + 1. KRUHOVÁ ŘADA: zelená 2. KRUHOVÁ ŘADA: broskvová 3. KRUHOVÁ ŘADA: korálová 4.-5. KRUHOVÁ ŘADA: ledová modrá BARVA 2: ZAČÁTEK + 1. KRUHOVÁ ŘADA: ledová modrá 2. KRUHOVÁ ŘADA: korálová 3. KRUHOVÁ ŘADA: broskvová 4.-5. KRUHOVÁ ŘADA: žlutá BARVA 3: ZAČÁTEK + 1. KRUHOVÁ ŘADA: žlutá 2. KRUHOVÁ ŘADA: ledová modrá 3. KRUHOVÁ ŘADA: zelená 4.-5. KRUHOVÁ ŘADA: broskvová ZMĚNA BARVY: Abychom dosáhli plynulých a úhledných přechodů barev, háčkujeme poslední pevné oko v kruhové řadě přízí v barvě řady následující – háček vpíchneme do řetízkového oka ze začátku kruhové řady, nabereme přízi nové barvy a protáhneme ji okem na háčku. ---------------------------------------------------------- TOP - podprsenka: Nejprve uháčkujeme 6 čtverců, které pak sešijeme a vytvoříme tak 2 košíčky. Každý košíček pak obháčkujeme a nakonec je spojíme dohromady. ČTVEREC: Háčkujeme háčkem č.2,5 dle schématu A.1, barvy střídáme dle BAREVNÝCH KOMBINACÍ – viz výše. Viz též ZMĚNA BARVY. Hotový čtverec má stěnu dlouhou 7,5-8-8,5 cm. Uháčkujeme celkem 6 čtverců: 2 v každé barevné kombinaci (tj. BARVA 1, BARVA 2 a BARVA 3). DOKONČENÍ: Čtverce sešijeme smetanovou přízí. Sešijeme dohromady 3 čtverce - po 1 v každé barevné kombinaci – tak, aby vytvořily trojúhelník. Stejným způsobem sešijeme i další 3 čtverce, jen zrcadlově převrátíme sestavení barevných kombinací – trojúhelníkové košíčky mají být symetrické. LEMY: Háčkujeme smetanovou přízí. Pomocí krátkého sloupku vpíchnutého do rohu jednoho z trojúhelníků připojíme přízi. Háčkujeme po 1 krátkém sloupku do každého oka/kolem každého řetízkového oka po celém obvodu trojúhelníku, jen kolem obloučků z řetízkových ok v rozích (vrcholcích) háčkujeme (1 krátký sloupek, 3 řetízková oka, 1 krátký sloupek). Přízi odstřihneme. Postup zopakujeme po obvodu druhého trojúhelníku. Nyní oba trojúhelníky spojíme podél dolního okraje, takto: pomocí krátkého sloupku vpíchnutého kolem obloučku z řetízkových ok v rohu jednoho z trojúhelníků připojíme přízi, uháčkujeme 1 krátký sloupek kolem téhož obloučku z řerízkových ok, pak *2 řetízková oka, 2 oka vynecháme, po 1 krátkém sloupku do každého z následujících 2 ok*, *-* opakujeme ještě 4x. Následují 2 řetízková oka, 1 oko vynecháme, 2 krátké sloupky kolem obloučku z řetízkových ok v rohu, 2 krátké sloupky kolem obloučku z řetízkových ok v rohu druhého trojúhelníku, potom postupujeme stejným způsobem podél dolního okraje tohoto druhého trojúhelníku (tj. *-* opakujeme ještě 4x a končíme 2 řetízkovými oky a 2 krátkými sloupky kolem posledního obloučku z řetízkových ok). Práci otočíme a háčkujeme po 1 krátkém sloupku do každého oka/kolem každého řetízkového oka. Přízi odstřihneme a zapošijeme. VÁZAČKA – KROUCENÁ ŠŇŮRKA: Ustřihneme si 1 vlákno žluté, 1 vlákno broskvové a 1 vlákno korálové příze (= 3 vlákna celkem), každé o délce 3 metry. Vlákna stáčíme pevně dohromady - jakmile se začnou samovolně kroutit, přeložíme je napolovic a necháme zkroutit znovu. Na každém konci uvážeme uzel a konce zastřihneme. Šňůru pak protáhneme dírkovou řadou - začínáme uprostřed přední strany podprsenky. Vázačku zavazujeme vepředu, uprostřed hrudníku. Ustřihneme si 1 vlákno žluté, 1 vlákno broskvové a 1 vlákno korálové příze (= 3 vlákna celkem), každé o délce 1,5 metru. Vlákna stáčíme pevně dohromady - jakmile se začnou samovolně kroutit, přeložíme je napolovic a necháme zkroutit znovu. Na každém konci uvážeme uzel a konce zastřihneme. Šňůru pak protáhneme vrcholkem jednoho košíčku. Stejným způsobem vyrobíme druhou vázačku a připevníme ji ke druhému košíčku – zavazujeme za krkem. |
|||||||||||||||||||||||||||||||||||||
Vysvětlivky ke schématu |
|||||||||||||||||||||||||||||||||||||
|
|||||||||||||||||||||||||||||||||||||
|
|||||||||||||||||||||||||||||||||||||
|
|||||||||||||||||||||||||||||||||||||
|
|||||||||||||||||||||||||||||||||||||
Dokončili jste tento model?Pak označte své fotky tagem #dropspattern #vaninabikini nebo je pošlete do galerie #dropsfan. Potřebujete s tímto návodem poradit?Otevřete-li si návod na stránce garnstudio.com, najdete tam 15 výukových video-ukázek, Komentáře/Dotazy a další užitečné informace. © 1982-2025 DROPS Design A/S. Vyhrazujeme si veškerá práva. Tento dokument, včetně všech jeho dílčích částí, podléhá autorským právům. Podrobnější komentář k možnostem užití našich návodů najdete dole pod každým návodem na našich stránkách. |
|||||||||||||||||||||||||||||||||||||


V oblasti pletené a háčkované módy působí DROPS Design více než 40 let. Díky tomu vám můžeme nabídnout jednu z nejrozsáhlejších kolekcí modelů s bezplatnými návody dostupnými na internetu - navíc v 17 jazycích. K dnešnímu dni máme na 314 katalogů a 11822 návodů celkem - z nich je už 7048 dostupných v [češtině].
Přidejte komentář k návodu DROPS 178-72
Rádi bychom věděli, co si o tomto modelu myslíte!
Pokud se chcete na něco zeptat, dbejte prosím na to, abyste ve formuláři níže vybrali správnou kategorii - díky tomu se dříve dozvíte, co potřebujete vědět. Povinná pole jsou označena *.