
Popular categories
Looking for a yarn?


Comments / Questions (93)
![]() Randi Langeland Haigan wrote:
Randi Langeland Haigan wrote:
Hei Finnes det et sted hvor det står/vises på norsk hvordan tyde mønsteret ? Jeg er ferdig med bærestykket😊men sliter med å komme videre
28.06.2025 - 09:05DROPS Design answered:
Hei Randi. Oppskriften / diagrammet er på norsk. Om du forklarer mer nøyaktig hva du har problemer med, skal vi hjelpe så godt vi kan. Under TIPS & HJELP - DROPS Leksjoner - Hvordan lese heklediagram, kan du lese mer om hvordan man leser et DROPS hekle diagram. Du kan også gå inn på: Tips & Hjelp - Instruksjonsvideoer - Oppskriftsvideoer - Hekle - Dame. Og velge en video der du ser et lignende heklediagram og se hvordan det hekles. mvh DROPS Design
30.06.2025 - 15:31
![]() Randi Langeland Haugan wrote:
Randi Langeland Haugan wrote:
Er det et sted hvor det vises en video hvordan hekle selve viftemønsteret
28.06.2025 - 08:53DROPS Design answered:
Hei Randi. Vi har dessverre ingen video som viser akkurat dette viftemønstret. mvh DROPS Design
30.06.2025 - 15:25
![]() Randi Langeland Haugan wrote:
Randi Langeland Haugan wrote:
Jeg har heklet ferdig bærestykket, men klarer ikke å forstå selve viftemønsteret som skal gjentas på dåpskjolen
28.06.2025 - 08:51
![]() Mette wrote:
Mette wrote:
Jeg har problemer med huen. Der står at jeg skal ha 81 masker. Der var en kommentar om at man skal hækle 1 fm, 3 lm, spring over 2 fm og ende med 1fm, men så er der 2 masker tilbage. Skal jeg så ikke ha 82 masker?
28.06.2025 - 06:34
![]() Joy wrote:
Joy wrote:
Kysen: Hvis hæklefastheden er 24 x 19,5 halvstangmasker til 10x10cm, hvordan kan jeg få 22 stangmasker til 11x11 rude? Har jeg gjort noget forkært?
27.06.2025 - 02:52DROPS Design answered:
Hei Joy. Det skal være 22 halvstangmaske, ikke 22 stangmaske. mvh DROPS Design
30.06.2025 - 14:22
![]() Nina wrote:
Nina wrote:
Holder på med viftekanten på lue, men sliter med å forstå. 1. Spiller det noen rolle hvor det økes fra 80 til 81 m? 2. Skal viftekanten (A4) hekles fram og tilbake, eller rundt hele luen? Hvis frem og tilbake - jeg får det ikke til å gå opp med med 81 m. Er maskeantallet feil, eller er det jeg som tenker feil? Gjerne forklar det for meg.
13.05.2025 - 17:51DROPS Design answered:
Hej Nina, nej det spiller ingen rolle. Jo viftekanten hækles frem og tilbage. Du starter med 1 fm, 3 lm, hopper over 2 fm osv, så får du 27 luftmaskebuer og du hækler 1 vifte i hver 2. lm-bue :)
20.05.2025 - 14:40
![]() Misty wrote:
Misty wrote:
Hello....for hat, I''m struggling with the :4 chain stitches, bend the double crochet group forwards and allow the chain-space to lie behind the double crochet group = 4 chain stitches, bend the double crochet group forwards and allow the chain-space to lie behind the double crochet group
23.04.2025 - 19:11DROPS Design answered:
Dear Misty, on this round you have to crochet behind the double crochet group so that the chain space will be placed behind this double crochet group, so you bend it forwards (towards you, ie right side from right side) to make easily to work in the stitches. Happy crocheting!
24.04.2025 - 08:38
![]() Misty Nyman wrote:
Misty Nyman wrote:
Thanks for your response. So I did this dress 4 years ago and she wanted to make it longer for her new baby girl for baptism. I had help and now don’t have that contact. I agree I should be able to finish but I had a mentor help me and I don’t really understand how to make it longer. Sorry for the bother No worries if you can’t help. I’ll try to find someone local. Thanks.
27.02.2025 - 02:20
![]() Misty Nyman wrote:
Misty Nyman wrote:
Thank you for your response. But I had help finishing it. I just don’t understand the directions. Was hoping someone could write out for me. Thanks. Misty
24.02.2025 - 20:07DROPS Design answered:
Hi, Misty; So sorry but we really don't understand why you don't understand ;) You have been repeating the same rows 2-5 so many times, and it's the same rows 2-5 you have to continue until you get your measurements. The Pattern says: When rounds 1-5 have been completed once, repeat rounds 2-5 onwards until the piece measures approx. 23-28-32 (37) cm from the shoulder, if you are making the dress of normal length or until the piece measures approx. 35-40-44 (49) cm from the shoulder if you are making the long dress. Please write what exactly you don't understand, then we will try to help you :)
25.02.2025 - 10:33
![]() Mistt wrote:
Mistt wrote:
Hello. I need help. Made this beautiful dress for my granddaughter and now want to make it 4 inches longer for another granddaughter. Anyway could someone please write the instructions out for me. Cannot figure it out. For the “long dress “. Thank you.
24.02.2025 - 02:35DROPS Design answered:
Dear Mistt, to make the dress longer, you just have to repeat the rows 2-5 in A.2A and A.2B as you done before until the desired length: 3 times A.2 in height for the classical length and 8 times A.2 in height for the long dress. Happy crocheting!
24.02.2025 - 09:36
|
|||||||||||||||||||||||||||||||||||||||||||||||||||||||||||||||||||||||||||||||||||||
So Charming#socharmingchristeninggown |
|||||||||||||||||||||||||||||||||||||||||||||||||||||||||||||||||||||||||||||||||||||
 |
 |
||||||||||||||||||||||||||||||||||||||||||||||||||||||||||||||||||||||||||||||||||||
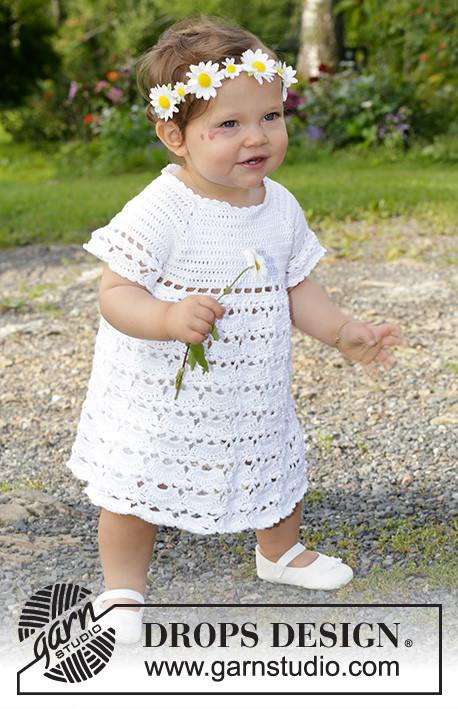
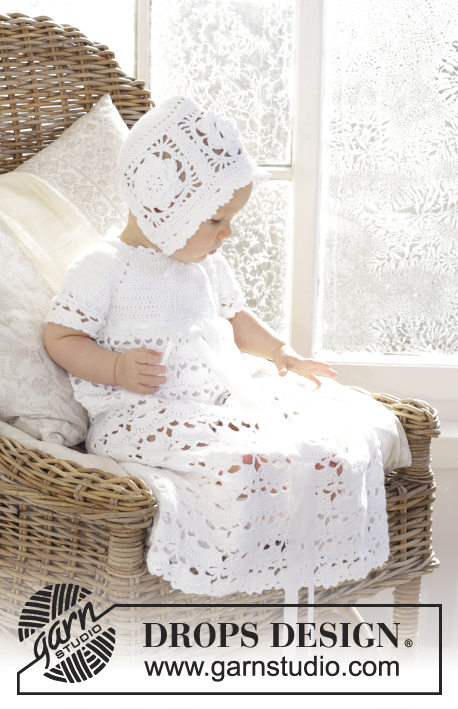
The baby set is made up of: Dress for Christening or special occasions, worked top down with raglan and open fan pattern in DROPS Safran. Crochet hat with flower squares and fan edge in DROPS Safran. Sizes 0 - 2 years.
DROPS Baby 29-3 |
|||||||||||||||||||||||||||||||||||||||||||||||||||||||||||||||||||||||||||||||||||||
|
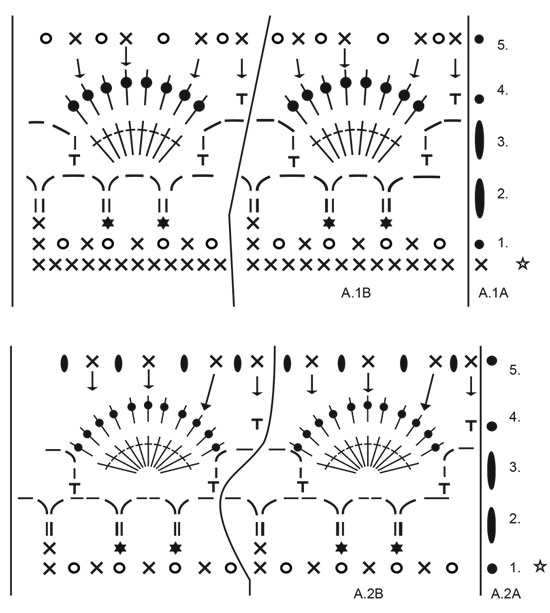
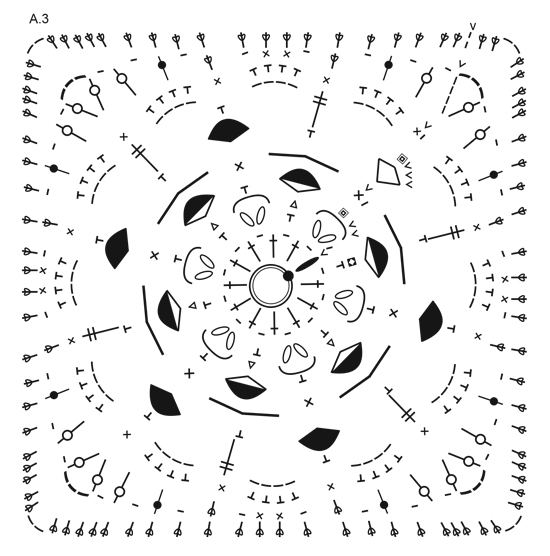
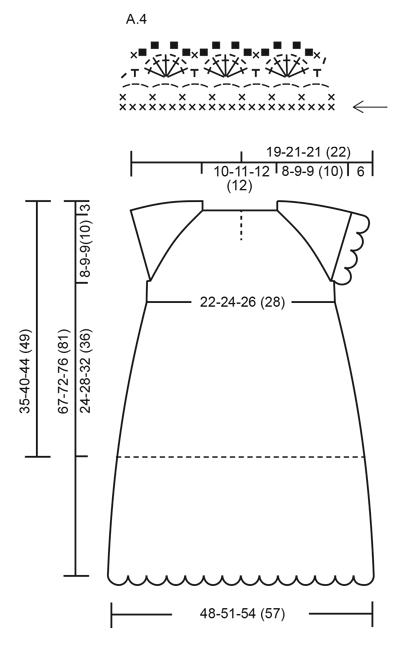
DRESS: CROCHET INFO: At the beginning of each round/row of double crochets, replace the first double crochet with 1 chain stitch. When working in the round, finish with 1 slip stitch in the chain stitch at the beginning of the round. When working back and forth, finish the row with 1 double crochet in the 3rd chain stitch from the beginning of the previous row of treble crochets. At the beginning of each round/row of treble crochets, replace the first treble crochet with 3 chain stitches. When working in the round, finish with 1 slip stitch in the 3rd chain stitch from the beginning of the round. When working back and forth finish the row with 1 treble crochet in the chain stitch from the beginning of the previous row of double crochets. TEXTURED ROWS * 1 row/round double crochets, 1 row/round treble crochets *, repeat from *-* (1 row/round double crochets + 1 row/round treble crochets = 1 textured row). INCREASE TIP-1: Increase 1 double crochet/treble crochet by working 2 double crochets/treble crochets in the same stitch. INCREASE TIP-2: To work out how often you should increase on the round, count the total number of stitches on the round (e.g. 136 stitches) and divide by the number of increases to be made (e.g. 57) = 2.4. In this example, you increase approx. alternately every 2nd and 3rd stitch. PATTERN: See diagrams A.1 and A.2. ---------------------------------------------------------- DRESS: The piece is worked top down. It is worked back and forth from mid back until after the split mid back, then the piece is continued in the round to desired length (normal dress length or long dress) – see description in text. YOKE: Work 94-99-104 (104) chain stitches (including 1 stitch to turn) with hook size 3.5 mm and Safran. The first row is worked as follows: 1 double crochet in the 2nd chain stitch from the hook, * 1 double crochet in each of the next 3 chain stitches, skip 1 chain stitch *, repeat from *-* until there are 0-1-2-2 chain stitches left and finish with 1 double crochet in each of the 0-1-2-2 last chain stitches = 70-74-78 (78) double crochets on the row. Now insert 4 marker threads in the piece to raglan as follows (start mid back – NOTE: Do NOT work while inserting the marker threads): Skip 10-11-12 (12) double crochets (= right back piece when the garment is worn), insert 1 marker thread in the next double crochet, skip 13 double crochets (= sleeve), insert 1 marker thread in the next double crochet, skip 20-22-24 (24) double crochets (= front piece), insert 1 marker thread in the next double crochet, skip 13 double crochets (= sleeve) and insert the last marker thread in the next double crochet (there are now 10-11-12 (12) double crochets on the left back piece after the last marker thread. READ THE WHOLE OF THE NEXT SECTION BEFORE CONTINUING! READ CROCHET INFO and work the next row from the right side as follows: Work 1 treble crochet in each double crochet, but in each double crochet with a marker thread work 2 treble crochets + 2 chain stitches + 2 treble crochets = 82-86-90 (90) treble crochets on the row. Continue by working TEXTURED ROWS – see description above (work back and forth with 1 double crochet/treble crochet in each stitch from the previous row, but on every row with double crochet from the wrong side work 2 chain stitches over the 2 chain stitches from the previous row in the raglan lines). AT THE SAME TIME on the first row from the right side (i.e. row of treble crochets) increase to raglan as follows: Work 2 treble crochets + 2 chain stitches + 2 treble crochets around each chain-space in each raglan line (= 16 treble crochets increased on the row – NOTE: Work around both chain-spaces). Repeat the increase on each row from the right side, a total of 4-5-5 (6) times = 146-166-170 (186) stitches on the row. REMEMBER THE CROCHET TENSION! After the last increase to raglan work 1 row with double crochets from the wrong side as before (with 2 chain stitches over the 2 chain stitches from the previous row). The next row is worked as follows from the right side: Work 1 treble crochet in each of the first 20-23-24 (26) treble crochets (= right back piece), skip the next 33-37-37 (41) double crochets (= sleeve), work 8-6-10 (10) LOOSE chain stitches, work 1 treble crochet in each of the next 40-46-48 (52) double crochets (= front piece), skip the next 33-37-37 (41) double crochets (= sleeve), work 8-6-10 (10) LOOSE chain stitches and work 1 treble crochet in each of the last 20-23-24 (26) double crochets (= left back piece). The yoke is now finished and the piece is continued in the round. BODY: THE PIECE IS NOW MEASURED FROM HERE! Start mid back with the right side out (beginning of the round = mid back) and work 1 round of double crochets (work 1 double crochet in each treble crochet from the previous round and 1 double crochet in each chain stitch under each sleeve – remember CROCHET INFO) = 96-104-116 (124) double crochets on the round. Now work as follows: ROUND 1: Work 1 treble crochet in each double crochet, but increase 6-4-4 (8) treble crochets evenly along the round – READ INCREASE TIP-1 and 2 = 102-108-120 (132) treble crochets. ROUND 2: Work 1 double crochet in each treble crochet. ROUND 3 (= row of holes for the silk ribbon): * 1 treble crochet in the first/next double crochet, 2 chain stitches, skip 2 double crochets *, repeat from *-* the whole round = 34-36-40 (44) treble crochets with 2 chain stitches between each. ROUND 4: Work 1 double crochet in each treble crochet and 3 double crochets around each chain-space = 136-144-160 (176) double crochets. ROUND 5: Work double crochet and increase 57-61-57 (53) double crochets evenly along the round = 193-205-217 (229) double crochets. Continue by working pattern according to A.1, i.e. work A.1A over the first stitch, then work 16-17-18 (19) repeats of A.1B. When rounds 1-5 have been completed once, repeat rounds 2-5 onwards until the piece measures approx. 23-28-32 (37) cm from the shoulder, if you are making the dress of normal length or until the piece measures approx. 35-40-44 (49) cm from the shoulder if you are making the long dress – NOTE: Adjust so that you finish after a complete repeat in height. Continue working as follows (follow the description for the dress of normal length or the long dress): DRESS OF NORMAL LENGTH: Now repeat rounds 2-5 in A.2A and A.2B in the same way until you have worked a total of 3 repeats in height of A.2 (or to desired length). Cut and fasten the strand. The dress measures approx. 35-40-44 (49) cm from the shoulder down. LONG DRESS: Now repeat rounds 2-5 in A.2A and A.2B in the same way until you have worked a total of 8 repeats in height of A.2 (or to desired length). Cut and fasten the strand. The long dress measures approx. 67-72-76 (81) cm from the shoulder down. BOTH DRESSES: SHAPING THE NECKLINE: For a better fit you can work a small elevation at the back of the neck. Insert 1 marker thread in the stitch in each “corner” of the neck, i.e. at the start of each raglan line and insert 1 marker mid front. Work with hook size 3.5 mm and Safran as follows: Start mid back and work 1 double crochet in each stitch until there is 1 stitch left before the stitch with the marker thread, work 1 half treble crochet in the next stitch, 1 treble crochet in the stitch with the marker thread and 1 half treble crochet in the next stitch, continue by working 1 double crochet in each stitch until there is 1 stitch left before the stitch with the marker thread, 1 half treble crochet in the next stitch, 1 treble crochet in the stitch with the marker thread and 1 half treble crochet in the next stitch, continue by working 1 double crochet in each stitch until there are 4-5-5 (5) stitches left before the marker mid front. Turn the piece and work 1 double crochet in each double crochet back to mid back, but by each marker thread work 3 double crochets together, i.e. work 1 double crochet in the half treble crochet, but wait with the last yarn over and pull through, work 1 double crochet in the treble crochet stitch with the marker thread, but wait with the last yarn over and pull through, work 1 double crochet in the next half treble crochet, but now pull the last yarn over through all 4 stitches on the hook (= 2 double crochets decreased). Cut the strand and repeat from mid back to mid front and back again to mid back in the other side. BUTTON BANDS AT THE BACK: Work along the left opening mid back as follows: 1 double crochet around each double crochet row and 2 double crochet around each treble crochet row. Work a total of 4 rows of double crochets back and forth, cut and fasten the strand. Along the right opening mid back work buttonholes as follows (start from the right side by the neckline): Work 3 double crochets (1 double crochet around the double crochet row and 2 double crochets around the treble crochet row), 4 chain stitches (= 1 buttonhole), skip approx. 1 cm, work double crochets to approx. the middle of the band, 4 chain stitches, skip approx. 1 cm, work double crochets until there is 1 cm left on the band, 4 chain stitches and fasten with 1 double crochet in the last stitch. Cut and fasten the strand. Fasten the buttons to the band on the left side. PICOT EDGE AROUND NECK: Work around the neck as follows: 1 double crochet in the first stitch, * 3 chain stitches, 1 treble crochet in the first chain stitch worked, skip 2 stitches, 1 double crochet in the next stitch*, repeat from *-* the whole row, cut and fasten the strand. FAN EDGE AROUND THE SLEEVE: Work around the sleeve opening as follows: 1 double crochet in each of the 8-6-10 (10) stitches mid under the sleeve and 1 double crochet in each of the 33-37-37 (41) double crochets over the sleeve = 41-43-47 (51) double crochets on the round. Continue by working as follows: ROUND 1: Work 1 treble crochet in each double crochet, but increase 1-5-1 (0) treble crochets evenly along the round = 42-48-48 (51) treble crochets. ROUND 2: Work 1 double crochet in each treble crochet. ROUND 3 (= row of holes for the silk ribbon): * 1 treble crochet in the first/next double crochet, 2 chain stitches, skip 2 double crochets *, repeat from *-* to the end of the round = 14-16-16 (17) treble crochets with 2 chain stitches between each. ROUND 4: Work 1 double crochet in each treble crochet and 3 double crochets around each chain-space, but 7-3-3 (7) times on the round, work only 2 double crochets around the chain-space = 49-61-61 (61) double crochets. Continue working pattern in the round according to diagrams A.1A and A.1B in the same way as on the body = 4-5-5 (5) fans on the round. When rounds 1-5 have been completed once, cut and fasten the strand. Repeat around the other sleeve. SILK RIBBON: Thread the silk ribbon up and down through the row of holes under the yoke – start and finish mid front and tie a bow mid front. ---------------------------------------------------------- HAT: CROCHET INFO: At the beginning of each round of half treble crochets, replace the first half treble crochet with 2 chain stitches, the round finishes with 1 slip stitch in the 2nd chain stitch at the beginning of the round. At the beginning of each round of treble crochets, replace the first treble crochet with 3 chain stitches, the round finishes with 1 slip stitch in the 3rd chain stitch at the beginning of the round. PATTERN: See diagrams A.3 and A.4. DECREASE TIP: Decrease 1 double crochet by working 2 double crochets together as follows: Work 1 double crochet but wait with the last yarn over and pull through (= 2 loops on the hook), then work the next double crochet, but when you make the last pull through, pull the strand through all the loops on the hook – you have now decreased 1 double crochet. INCREASE TIP: Increase 1 half treble crochet by working 2 half treble crochets in the same stitch. ---------------------------------------------------------- HAT: The hat is made up of 3 flower squares which are sewn together in a row. Then you work a circle which becomes the back of the hat and which is sewn to the hat itself. Then you work an edge at the bottom of the hat before working a fan edge at the front. FLOWER SQUARE: Work 4 chain stitches with hook size 3 mm and Safran and form them to a ring with 1 slip stitch in the first chain stitch. Continue working in the round according to diagram A.3 – READ CROCHET INFO AND REMEMBER THE CROCHET TENSION! When A.3 has been completed there are 22 half treble crochets on each of the sides and 2 chain stitches in each corner. The square measures approx. 11 x 11 cm and is finished now in sizes 0/6 + 6/12 + 12/18 months. Cut and fasten the strand in these sizes. In size 2 years work one more round as described below. SIZE (2) YEARS: Work 2 chain stitches (equivalent to 1 half treble crochet), continue by working 1 half treble crochet in each half treble crochet from the previous round (around the chain-space in the corner work 2 half treble crochets + 2 chain stitches + 2 half treble crochets), finish the round with 1 slip stitch in the 2nd chain stitch at the beginning of the round. There are now 26 half treble crochets along each side and 2 chain stitches in each corner. The square now measures approx.12 x 12 cm. Cut and fasten the strand. Work 2 more flower squares for all sizes. Place the 3 squares in a row and sew them together, two and two with small neat stitches – sew with a stitch in each stitch. CIRCLE AT THE BACK OF THE HAT (this part will be sewn onto the squares): Work 4 chain stitches and form them to a ring with 1 slip stitch in the first chain stitch. Continue as follows – READ CROCHET INFO and INCREASE TIP: ROUND 1: 9 half treble crochet around the ring. ROUND 2: 2 half treble crochets in each stitch = 18 half treble crochets. ROUND 3: * 1 half treble crochet in the first/next stitch, 2 half treble crochets in the next stitch *, repeat from *-* to the end of the round = 27 half treble crochets. ROUND 4: * 1 half treble crochet in each of the first/next 2 stitches, 2 half treble crochets in the next stitch *, repeat from *-* to the end of the round = 36 half treble crochets. ROUND 5: * 1 half treble crochet in the first/next stitch, 2 chain stitches, skip 1 stitch *, repeat from *-* to the end of the round = 18 half treble crochets with 2 chain stitches between each. ROUND 6: * 2 half treble crochets around the first/next chain-space, 1 half treble crochet in the next stitch *, repeat from *-* to the end of the round = 54 half treble crochets. ROUND 7: * 1 half treble crochet in each of the first/next 5 stitches, 2 half treble crochets in the next stitch *, repeat from *-* to the end of the round = 63 half treble crochets. ROUND 8: * 1 half treble crochet in each of the first/next 6 stitches, 2 half treble crochets in the next stitch *, repeat from *-* to the end of the round = 72 half treble crochets. ROUND 9: * 1 half treble crochet in each of the first/next 7 stitches, 2 half treble crochets in the next stitch *, repeat from *-* to the end of the round = 81 half treble crochets. Size 0/6 months finishes here (the piece measures approx. 10 cm in diameter). ROUND 10: * 1 half treble crochet in each of the first/next 8 stitches, 2 half treble crochets in the next stitch *, repeat from *-* to the end of the round = 90 half treble crochets. ROUND 11: * 1 half treble crochet in each of the first/next stitch, 2 chain stitches, skip 1 stitch *, repeat from *-* to the end of the round = 45 half treble crochets with 2 chain stitches between each. ROUND 12: Work 2 half treble crochets around each chain-space = 90 half treble crochets. Sizes 6/12 + 12/18 months finish here (the piece measures approx. 12 cm in diameter). SIZE (2) YEARS: ROUND 13: * 1 half treble crochet in each of the first/next 9 stitches, 1 half treble crochet in the next stitch *, repeat from *-* to the end of the round = 99 half treble crochets. Size (2) years finishes here (the piece measures approx. 13 cm in diameter). ASSEMBLY: Sew the one long side of the row of squares to the circle, with 1 stitch in each stitch – make sure the seam is not tight. There will be an opening at the bottom of the hat of 9-18-18 (15) stitch. EDGE AT THE BOTTOM OF THE HAT: Start from the right side with 1 slip stitch in the outermost corner of the row of squares and then work along the whole of the bottom edge of the hat with 1 double crochet in each stitch = 57-66-66 (71) double crochets, turn the piece. Continue working 0-0-1 (2) rows of 1 half treble crochet in each stitch AT THE SAME TIME as you increase 0-0-0 (1) half treble crochet evenly spaced = 57-66-66 (72) half treble crochets. Work 1 row of treble crochets (work 1 treble crochet in each stitch). Finally work 0-0-1 (2) rows of half treble crochets and 1 row of double crochet. Cut and fasten the strand. FAN EDGE IN THE FRONT OF THE HAT: Start from the wrong side in the bottom corner at the front of the hat and work as follows – remember CROCHET INFO: ROW 1 (= wrong side): 1 slip stitch in the outermost stitch, 3 chain stitches (equivalent to 1 treble crochet), continue by working 1 treble crochet in each stitch/row/row of half treble crochets, 2 treble crochets around each treble crochet row at the bottom of the hat and 1 treble crochet around each chain-space in the corners of the squares = approx. 80-80-84 (100) stitches, turn the piece. ROW 2 (= right side): Work a row of double crochets where the number of stitches is adjusted to 81-81-81 (99) stitches (divisible by 6 + 3) – READ DECREASE TIP/INCREASE TIP. Then work fan edge according to A.4. When A.4 has been completed, cut the strand and fasten it. Thread the silk ribbon up and down through the row of treble crochets at the bottom of the hat and all the way to the fan edge. If you would like further decoration, you can thread silk ribbon up and down through the treble crochet row at the front of the hat as well. This silk ribbon is not tied, so the ends need to be folded in and fastened on the wrong side of the piece. |
|||||||||||||||||||||||||||||||||||||||||||||||||||||||||||||||||||||||||||||||||||||
Diagram explanations |
|||||||||||||||||||||||||||||||||||||||||||||||||||||||||||||||||||||||||||||||||||||
|
|||||||||||||||||||||||||||||||||||||||||||||||||||||||||||||||||||||||||||||||||||||
|
|||||||||||||||||||||||||||||||||||||||||||||||||||||||||||||||||||||||||||||||||||||
|
|||||||||||||||||||||||||||||||||||||||||||||||||||||||||||||||||||||||||||||||||||||
|
|||||||||||||||||||||||||||||||||||||||||||||||||||||||||||||||||||||||||||||||||||||
Have you finished this pattern?Tag your pictures with #dropspattern #socharmingchristeninggown or submit them to the #dropsfan gallery. Do you need help with this pattern?You'll find 19 tutorial videos, a Comments/Questions area and more by visiting the pattern on garnstudio.com. © 1982-2025 DROPS Design A/S. We reserve all rights. This document, including all its sub-sections, has copyrights. Read more about what you can do with our patterns at the bottom of each pattern on our site. |
|||||||||||||||||||||||||||||||||||||||||||||||||||||||||||||||||||||||||||||||||||||


With over 40 years in knitting and crochet design, DROPS Design offers one of the most extensive collections of free patterns on the internet - translated to 17 languages. As of today we count 314 catalogues and 11822 patterns translated into English (UK/cm).
We work hard to bring you the best knitting and crochet have to offer, inspiration and advice as well as great quality yarns at incredible prices! Would you like to use our patterns for other than personal use? You can read what you are allowed to do in the Copyright text at the bottom of all our patterns. Happy crafting!
Post a comment to pattern DROPS Baby 29-3
We would love to hear what you have to say about this pattern!
If you want to leave a question, please make sure you select the correct category in the form below, to speed up the answering process. Required fields are marked *.