DROPS Karisma
DROPS Karisma
100% Wool
from 2.30 £ /50g
Get the yarn to make this pattern from 32.20£.

The yarn cost is calculated from the pattern’s smallest size and the yarn’s cheapest product type. Looking for an even better price? You might find it on the DROPS Deals!

DROPS SS24

Josephine

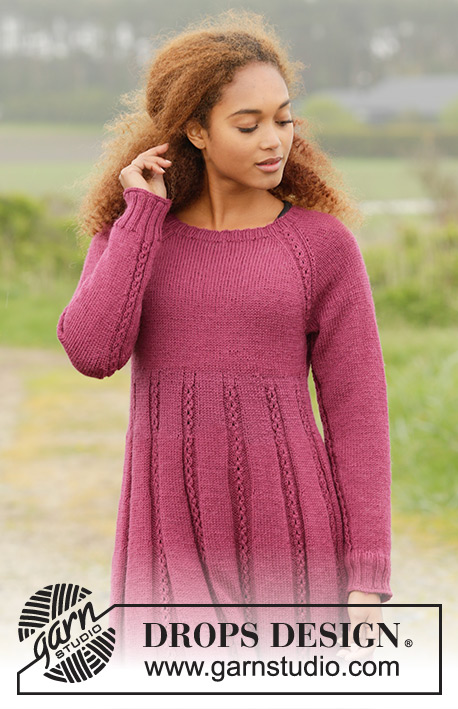
Knitted DROPS dress with raglan and cables, worked top down in ”Karisma”. Size S-XXXL.

DROPS 172-14
DROPS design: Pattern no u-792
Yarn group B
----------------------------------------------------------
Size: S - M - L - XL - XXL – XXXL
Materials:
DROPS KARISMA from Garnstudio
700-800-850-950-1050-1150 g colour no 39, dark old rose

DROPS DOUBLE POINTED NEEDLES AND CIRCULAR NEEDLE (60 and 80 cm) SIZE 4 mm - or size needed to get 21 sts x 28 rows in stocking st = 10 x 10 cm.
DROPS DOUBLE POINTED NEEDLES AND CIRCULAR NEEDLE (60 cm) SIZE 3.5 mm for rib - or size needed to get 22 sts x 30 rows in stocking st = 10 x 10 cm.

-------------------------------------------------------

Alternative Yarn – See how to change yarns here
Yarn Groups A to F – Use the same pattern and change the yarn here
Yarn usage using an alternative yarn – Use our yarn converter here

-------------------------------------------------------

DROPS Karisma
DROPS Karisma
100% Wool
from 2.30 £ /50g
Get the yarn to make this pattern from 32.20£.

The yarn cost is calculated from the pattern’s smallest size and the yarn’s cheapest product type. Looking for an even better price? You might find it on the DROPS Deals!

Pattern instructions

NOTE: This pattern is written in British English. All measurements in charts are in cm. For conversion from cm to inches - click here. There are different terms for crocheting in British and American English. If this pattern includes crochet, click for "crochet terms" here. For this pattern in American English, please click here.
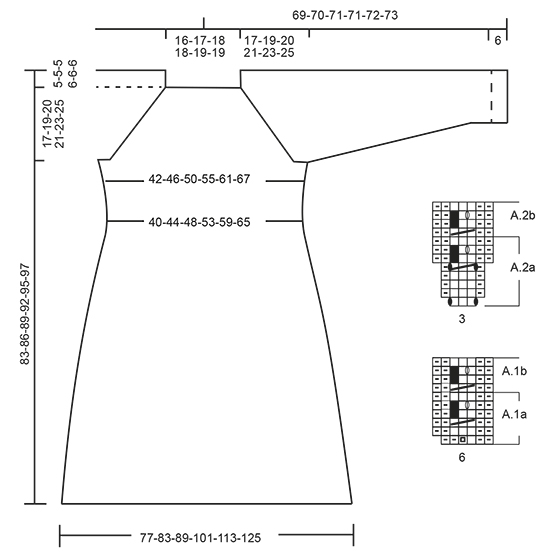
PATTERN:
See diagrams A.1 and A.2.

RAGLAN:
Inc as follows before A.1a: Work until 1 sts remain before A.1a, 1 YO, K 1.
Inc as follows after A.1a: K 1, 1 YO.
On next round K YOs twisted to avoid holes.

INCREASE TIP-1:
Inc 1 st K by making 1 YO. On next round K YO twisted to avoid holes.

INCREASE TIP-2:
Inc 1 st P by making a YO. On next round P YO twisted to avoid holes.

DECREASE TIP (sleeve):
Dec as follows before A.1b: Work until 3 sts remain before A.1b, K 2 tog, K 1.
Dec as follows after A.1b: K 1, slip 1 st as if to K, K 1, psso

DECREASE TIP (body):
Dec as follows before marker: Work until 6 sts remain before marker, K 2 tog, K 4.
Dec as follows after marker: K 4, slip 1 st as if to K, K 1, psso

CAST-OFF TIP:
To avoid a tight cast-off edge, you may use a needle ½ size larger.
----------------------------------------------------------

DRESS:
Worked in the round, top down. Rounds start mid back.

YOKE:
Cast on 124-124-132-140-148-148 sts on circular needle size 3.5 mm with Karisma. K 1 round. Then work 6 rounds rib = K 2/P 2. Switch to circular needle size 4 mm. On first round work as follows: K the first 16-16-18-18-20-20 and inc 1-2-2-2-2-2 sts evenly (= half back piece), work A.1a (= 6 sts on first round), K the next 18-18-18-22-22-22 and inc 2-2-2-2-4-4 sts evenly (= right sleeve), work A.1a over the next 6 sts, K the next 32-32-36-36-40-40 and inc 2-4-4-4-4-4 sts evenly (= front piece), work A.1a over the next 6 sts, K the next 18-18-18-22-22-22 and inc 2-2-2-2-4-4 sts evenly (= left sleeve), work A.1a over the next 6 sts, K the remaining 16-16-18-18-20-20 and inc 1-2-2-2-2-2 sts evenly (= half back piece) = 132-136-144-152-164-164 sts (+ 1 st that will be inc in each report of A.1a on round = 4 sts on round). REMEMBER THE KNITTING TENSION On next round work pattern and inc for raglan as follows: READ WHOLE SECTION BEFORE CONTINUING.

Continue in stocking st and A.1a in every transition between body and sleeves. When A.1a has been worked vertically, repeat A.1b over A.1a - NOTE: On last repeat of A.1b in height on yoke do not inc with YO (i.e. there are 6 sts in every repetition of A.1b when inc for raglan is done). AT THE SAME TIME on 2nd round in A.1a start inc for RAGLAN - see explanation above, on each side of A.1a/A.1b. NOTE: Inc differently on body and sleeves.
RAGLAN BODY:
Inc like this on every round 0-0-0-7-9-12 times, every other round 19-22-23-23-24-26 times and on every 4th round 1-1-1-0-0-0 times (= 20-23-24-30-33-38 times in total).
RAGLAN SLEEVES:
Inc like this every other round 13-18-23-22-20-18 times and every 4th round 4-3-1-2-4-7 times (= 17-21-24-24-24-25 times in total).

When all inc are done there are 280-312-336-368-392-416 sts on round. Work next round as follows: Work 40-44-47-53-58-63 sts (= half back piece), slip the next 60-68-74-78-80-82 sts on a stitch holder (= sleeve), cast on 8-8-10-10-12-14 sts under sleeve, work the next 80-88-94-106-116-126 sts (= front piece), slip the next 60-68-74-78-80-82 sts on a stitch holder (= sleeve), cast on 8-8-10-10-12-14 sts under sleeve, work the last 40-44-47-53-58-63 sts (= half back piece).

BODY:
There are now 176-192-208-232-256-280 sts for body. Continue in stocking st. Insert a marker in each side, in the middle of the 8-8-10-10-12-14 sts that were cast on under sleeves. NOW MEASURE PIECE FROM HERE! When piece measures 4 cm, dec 1 st on each side of markers (= 4 sts dec) - READ DECREASE TIP (body)! Dec like this every 6th round 2 times in total = 168-184-200-224-248-272 sts. When piece measures 7 cm, dec 25-30-35-37-39-41 sts evenly = 143-154-165-187-209-231 sts. NOTE: This is done to compensate for the 26-28-30-34-38-42 sts inc on 1st round in pattern A.2a. Work 1 round more that finishes when 2 sts remain on round. This is now beg of round. This is done to get a symmetrical pattern. Now work pattern as follows: * A.2a (= 3 sts on 1st round), K 8 * repeat from *-* 12-13-14-16-18-20 more times on round (= 13-14-15-17-19-21 repetitions) = 169-182-195-221-247-273 sts. Continue with pattern in the round like this. When entire A.2a has been worked vertically, there is 195-210-225-255-285-315 sts on round. Then work A.2b over A.2a until finished measurements AT THE SAME TIME inc in the sections with P and the sections in stocking st as follows:
INC IN SECTIONS IN STOCKING ST:
When piece measures 14 cm, inc 2 sts in every repetition in stocking st by making a YO inside 1 st K in each side of repetition – READ INCREASE TIP-1 (= 26-28-30-34-38-42 sts inc on round). Inc like this every 8 cm 3 times in total.
INC IN SECTIONS WITH P:
When piece measures 20 cm, inc 1 P st in every section with P - READ INCREASE TIP-2 (= 26-28-30-34-38-42 sts inc on round). Inc like this every 8 cm 3 times in total.

When all inc are done there are 351-378-405-459-513-567 sts on round. Continue until piece measures 83-86-89-92-95-97 cm measured from shoulder – adjust so that last round is 2nd round in A.2b. Cast off with K over K and P over P - READ CAST-OFF TIP.

SLEEVE:
Worked in the round on double pointed needles. Slip sts from stitch holder back on double pointed needles size 4 mm and pick up 1 st in each of the 8-8-10-10-12-14 new sts cast on under sleeve = 68-76-84-88-92-96 sts. Insert a marker in the middle of the new sts under the sleeve. NOW MEASURE THE PIECE FROM HERE. Now continue in stocking st and A.1a mid under sleeve (i.e. 3 sts in A.1a on each side of marker). When A.1a has been worked vertically, continue with A.1b over A.1a. When piece measures 4 cm, dec 1 st on each side of A.1b under sleeve - READ DECREASE TIP (sleeve). Dec like this every 8th-6th-5th-4th-4th-4th round 12-15-18-19-20-21 times in total = 44-46-48-50-52-54 sts. When sleeve measures 38-37-36-35-34-33 cm (shorter measurements in the larger sizes because wider shoulders) - adjust so that next round is 2nd round in A.2b, inc 8-6-8-6-8-6 sts evenly over sts in stocking st = 52-52-56-56-60-60 sts. Switch to double pointed needles size 3.5 mm. Now work rib (K 2/P 2) – adjust to work K over K and P over P over the 6 sts over A.2b. When rib measures 6 cm, cast off with K over K and P over P. Work the other sleeve the same way.

This pattern has been corrected.

Updated online: 18.09.2017
SLEEVE:...
When sleeve measures 38-37-36-35-34-33 cm (shorter measurements in the larger sizes because wider shoulders) - adjust so that next round is 2nd round in A.2b, inc 8-6-8-6-8-6 sts evenly over sts in stocking st = 52-52-56-56-60-60 sts...

Diagram

symbols = K
symbols = P
symbols = 1 YO between 2 sts On next round K the YO to make hole.


symbols = 1 YO between 2 sts On next round P YO twisted to avoid holes.
symbols = K 2 sts in 1 st I.e. work in front and back loop of st.
symbols = K 3, pass first st worked over the other 2 so that this st is around the last 2 sts on right needle (= 1 st dec)
symbols = this st has been dec
diagram

Each of our patterns has specific tutorial videos to help you.

Do you have a question? See a list of frequently asked questions (FAQ)

Knitting tension is what determines the final measurements of your work, and is usually measured per 10 x 10 cm. It is provided like so: number of stitches in width x number of rows in height - eg: 19 stitches x 26 rows = 10 x 10 cm.

The knitting tension is very individual; some people knit/crochet loosely while others work tightly. You adjust the knitting tension with the needle size, which is why the suggested needle size is only meant as a guide! You need to adjust this (up or down) to ensure that YOUR knitting tension matches the knitting tension provided in the pattern. If you work with a different knitting tension than provided you will have a different yarn consumption, and your work will have different measurements than what the pattern suggests.

The knitting tension also determines which yarns can replace each other. As long as you achieve the same knitting tension you can replace one yarn with another.

See DROPS lesson: How to measure your tension/gauge

See DROPS video: How to make a gauge tension swatch

The required amount of yarn is provided in grams, eg: 450 g. To calculate how many balls you’ll need you first need to know how many grams are in 1 ball (25g, 50g or 100g). This information is available if you click on the individual yarn quality on our pages. Divide the amount required with the amount of each ball. For example, if each ball is 50g (the most common amount), the calculation will be as follows: 450 / 50 = 9 balls.

The important thing when changing from one yarn to another is that the knitting/crochet tension remains the same. This is so that the measurements of the finished piece will be the same as on the sketch provided. It is easier to achieve the same knitting tension using yarns from the same yarn group. It is also possible to work with multiple strands of a thinner yarn to achieve the knitting tension of a thicker one. Please try our yarn converter. We recommend you to always work a test swatch.

Please NOTE: when changing yarn the garment might have a different look and feel to the garment in the photo, due to individual properties and qualities of each yarn.

See DROPS lesson: Can I use a different yarn than the one mentioned in the pattern?

All our yarns are categorised into yarn groups (from A to F) according to thickness and knitting tension – group A contains the thinnest yarns and group F the thickest. This makes it easier for you to find alternative yarns to our patterns, should you wish to switch yarn. All yarns within the same group have a similar knitting tension and can easily replace each other. However, different yarn qualities have different structures and properties which will give the finished work a unique look and feel.

Click here for an overview of the yarns in each yarn group

At the top of all our patterns you’ll find a link to our yarn calculator, which is a helpful tool should you wish to use a different yarn than suggested. By filling in the yarn quality you wish to replace, the amount (in your size) and number of strands, the calculator will present good alternative yarns with the same knitting tension. Additionally it will tell you how much you’ll require in the new qualities and whether you’ll need to work with multiple strands. Most skeins are 50g (some are 25g or 100g).

If the pattern is worked with multiple colours, every colour will have to be calculated separately. Similarly, if the pattern is worked with several strands of different yarns (for example 1 strand Alpaca and 1 strand Kid-Silk) you will have to find alternatives for each, individually.

Click here to see our yarn calculator

Since different yarns have different qualities and textures we have chosen to keep the original yarn in our patterns. However, you can easily find options among our available qualities by using our yarn calculator, or simply pick a yarn from the same yarn group.

It is possible that some retailers still have discontinued yarns in stock, or that someone has a few skeins at home that they would like to find patterns for.

The yarn calculator will provide both alternative yarn as well as required amount in the new quality.

If you think it's hard to decide what size to make, it can be a good idea to measure a garment you own already and like the size of. Then you can pick the size by comparing those measures with the ones available in the pattern's size chart.

You'll find the size chart at the bottom of the pattern.

See DROPS lesson: How to read size chart

The needle size provided in the pattern serves only as a guide, the important thing is to follow the knitting tension. And since knitting tension is very individual, you will have to adjust the needle size to ensure that YOUR tension is the same as in the pattern – maybe you’ll have to adjust 1, or even 2 needle sizes, up or down to achieve the correct tension. For this, we recommend that you work test swatches.

Should you work with a different knitting tension than the one provided, the measurements of the finished garment might deviate from the measurement sketch.

See DROPS lesson: How to measure your tension/gauge

See DROPS video: How to make a tension/gauge swatch

Working a garment top-down provides more flexibility and room for personal adjustment. For example it is easier to try the garment on while working, as well as making adjustments to length of yoke and shoulder caps.

The instructions are carefully explaining every step, in the correct order. Diagrams are adjusted to the knitting direction and are worked as usual.

The diagram depicts all rows/rounds, and every stitch seen from the right side. It is read from bottom to top, from right to left. 1 square = 1 stitch.

When working back and forth, every other row is worked from the right side and every other row is worked from the wrong side. When working from the wrong side, the diagram will have to be worked reversed: from left to right, knit stitches are purled, purl stitches are knit etc.

When working in the round every round is worked from the right side and the diagram are worked from right to left on all rounds.

See DROPS lesson: How to read knitting diagrams

The diagram depicts all rows/rounds, and every stitch seen from the right side. It is worked from bottom to top, from right to left.

When working back and forth every other row is worked from the right side: from right to left and every other row is worked from the wrong side: from left to right.

When working in the round, every row in the diagram are worked from the right side, from right to left.

When working a circular diagram you start in the middle and work your way outwards, counter clockwise, row by row.

The rows usually start with a given number of chain stitches (equivalent to the height of the following stitch), this will either be depicted in the diagram or explained in the pattern.

See DROPS lesson: How to read crochet diagrams

Instructions for working several diagrams after each other on the same row/round, will often be written like so: “work A.1, A.2, A.3 a total of 0-0-2-3-4 times". This means you work A.1 once, then A.2 is worked once, and A.3 is repeated (in width) the number of times provided for your size – in this case like so: S = 0 times, M = 0 times, L=2 times, XL= 3 times and XXL = 4 times.

The diagrams are worked as usual: begin with the first row in A.1, then work the first row in A.2 etc.

See DROPS lesson: How to read knitting diagrams

See DROPS lesson: How to read crochet diagrams

The total width of the garment (from wrist-to-wrist) will be larger in the larger sizes, despite the actual sleeves being shorter. The larger sizes have longer sleeve caps and wider shoulders, so there will be a good fit in all sizes.

The measurement sketch/schematic drawing provides information regarding the full length of the garment. If it’s a jumper or a jacket the length is measured from the highest point on the shoulder closest to the neckline, and straight down to the bottom of the garment. It is NOT measured from the tip of shoulder. Similarly, the length of yoke is measured from the highest point on the shoulder and down to where yoke is split into body and sleeves.

On a jacket measures are never taken along bands, unless specifically stated. Always measure inside band stitches when measuring the length.

See DROPS lesson: How to read a schematic drawing

Diagrams are often repeated on the round or in height. 1 repeat is the diagram the way it appears in the pattern. If it says to work 5 repeats of A.1 in the round, then you work A.1 a total of 5 times after/next to each other in the round. If it says to work 2 repeats of A.1 vertically/in height you work the entire diagram once, then begin again at the start and work the entire diagram one more time.

Chain stitches are slightly narrower than other stitches and to avoid working the cast-on edge too tight, we simply chain more stitches to begin with. The stitch count will be adjusted on the following row to fit the pattern and measurement sketch.

The rib edge is more elastic and will contract slightly compared to, for example, stocking stitch. By increasing before the rib edge, you avoid a visible difference in width between the rib edge and the rest of the body.

It’s very easy to cast off too tightly, and by making yarn overs while casting off (and simultaneously casting these off) you avoid a too tight cast off edge.

See DROPS video: How to bind off with yarn overs (yo)

To achieve an even increase (or decrease) you can increase on, for example: every 3rd and 4th row alternately, like so: work 2 rows and increase on the 3rd row, work 3 rows and increase on the 4th. Repeat this until the increase is complete.

See DROPS lesson: Increase or decrease 1 st on every 3rd and 4th row alternately

Should you prefer to work in the round instead of back and forth, you may of course adjust the pattern. You’ll need to add steeks mid-front (usually 5 stitches), and follow the instructions. When you would normally turn and work from the wrong side, simply work across the steek and continue in the round. At the end you’ll cut the piece open, pick up stitches to work bands, and cover the cut edges.

See DROPS video: How to knit steeks and cut open

Should you prefer to work back and forth instead of in the round, you may of course adjust the pattern so you work the pieces separately and then assemble them at the end. Divide the stitches for the body in 2, add 1 edge stitch in each side (for sewing) and work the front and back pieces separately.

See DROPS lesson: Can I adapt a pattern for circular needles into straight needles?

Pattern repeats can vary slightly in the different sizes, in order to get the correct proportions. If you’re not working the exact same size as the garment in the photo, yours might deviate slightly. This has been carefully developed and adjusted so that the complete impression of the garment is the same in all sizes.

Make sure to follow instructions and diagrams for your size!

If you have found a pattern you like which is available in women’s size it’s not very difficult to convert it to men’s size. The biggest difference will be the length of sleeves and body. Start working on the women size that you think would fit across the chest. The additional length will be worked right before you cast off for the armhole/sleeve cap. If the pattern is worked top-down you can add the length right after the armhole or before the first decrease on sleeve.

Regarding additional yarn amount, this will depend on how much length you add, but it is better with a skein too many than too few.

All yarns will have excess fibres (from production) that might come off as lint or shedding. Brushed yarns (ie hairier yarns) have more of these loose, excess fibres, causing more shedding.

Shedding also depends on what is worn under or over the garment, and whether this pulls at the yarn fibres. It’s therefore not possible to guarantee that there will be no shedding

Below are some tips on how to get the best result when working with hairier yarns:

1. When the garment is finished (before you wash it) shake it vigorously so the looser hairs come off. NOTE: do NOT use a lint roller, brush or any method that pulls at the yarn.

2. Place the garment in a plastic bag and put it in your freezer - the temperature will cause the fibres to become less attached to each other, and excess fibres will come off easier.

3. Leave in the freezer for a few hours before taking it out and shaking it again.

4. Wash the garment according to the instructions on the yarn label.

Pilling is a natural process that happens to even the most exclusive of fibers. It's a natural sign of wear and tear that is hard to avoid, and that is most visible in high friction areas of your garment like a sweater's arms and cuffs.

You can make your garment look as new by removing the pilling, using a fabric comb or a pill/lint remover.

Still can't find the answer you need? Then scroll down and leave your question so one of our experts can try to help you. This will be done normally within 5 to 10 working days.
In the meantime, you can read the questions and answers that others have left to this pattern or join the DROPS Workshop on Facebook to get help from fellow knitters/crocheters!

You might also like...

Post a comment to pattern DROPS 172-14

We would love to hear what you have to say about this pattern!

If you want to leave a question, please make sure you select the correct category in the form below, to speed up the answering process. Required fields are marked *.

Comments / Questions (103)

country flag Sandra Pinto wrote:

Good afternoon! I would like to make this model for a 3 years child. Is it possible to have the explanations? Thank You. Sandra

22.10.2019 - 17:34

DROPS Design answered:

Dear Mrs Pinto, we are unfortunately not able to adjust every pattern to every single request, you may find any other pattern or inspiration with our dresses for children or babies. Happy knitting!

22.10.2019 - 18:22

country flag Louise wrote:

Ik brei kleinste maat. Had 132 steken na eerste meerdering zoals staat in beschrijving. Na 20x meerderen. Heb ik 292 steken inplaats 280, dus 12 steken teveel. Snappen niet hoe dat komt , volgens mij is 132 plus 20x8 meerderingen 292 en geen 280.....

16.09.2019 - 21:36

DROPS Design answered:

Dag Louise,

Op het lijf minder je 20 keer en op de mouwen minder je 17 keer in totaal. Dus in totaal 37 x 4 = 148 steken. Met de 132 steken kom je dan op 280 steken in totaal.

17.09.2019 - 08:00

country flag Siham Christensen wrote:

Hej. Når i skriver "Når A.1a er strikket færdig i højden repeteres A.1b over A.1a" betyder det at man kun repetere A.1b eller både A.1a og A.1b? Når man skal tage ud i hver omgang, skal man samtidigt strikke omslaget fra tidligere omgang drejet ret? På forhånd tak. Vh. Siham

24.07.2019 - 18:07

DROPS Design answered:

Hej Siham, Ja du fortsætter med kun A.1b i højden. Ja du strikker omslaget med ring i diagrammet ret (så der bliver hul) og det andet omslag drejet (så der ikke bliver hul) . God fornøjelse!

02.08.2019 - 11:52

country flag Rachael wrote:

Is this pattern - or something similar - available for using 4 ply wool?

20.07.2019 - 21:09

country flag SELLIER CAZEEL MICHELE wrote:

Bonjour à toute l'équipe de Drops. Je viens de commencer le modèle 172-14 taille S. Je ne comprends pas vos explications concernant les augmentations de l'empiècement. A quel endroit du rang faut-il augmenter pour le dos et le devant? Les augmentations se rajoutent-elles à celles du raglan des manches? Pourriez-vous me détailler pour un rang où les placer? 16m A1 18m A1 32m A1 18m A1 16m. Je vous remercie de bien vouloir me venir en aide. Bien cordialement, Michèle

08.05.2019 - 19:07

DROPS Design answered:

Bonjour Mme Sellier Cazeel, les tours commencent au milieu dos, tricotez ainsi en S: 16 m + 1 augm (= 17 m) = demi-dos, tricotez A.1a (raglan), tricotez 18 m + 2 augm (= 20 m) = manche droite, A.1a (raglan), tricotez 32 m + 2 augm (= 34 m) = devant, A.1a, tricotez 18 m + 2 augm (= 20 m) = manche gauche, A.1a, et tricotez les 16 dernières m + 1 augm (= 17m). = vous avez 17 m pour chaque demi-dos, 34 m pour le devant, et 20 m pour chaque manche = 6 m dans chaque A.1 = 132 m. (+ 1 augm faite au 1er rang de chaque A.1 soit 136 m sur l'aiguille). Bon tricot!

09.05.2019 - 10:27

country flag Gabi wrote:

Hallo. Ich habe eine Frage zu den Zunahmen. Da steht z. B beim Rumpf und den Ärmeln 9 x... Aber was ist 9x? Je eine Masche zunehmen? Würde mich sehr freuen wenn Sie mir da helfen könnten. LG Gabi

23.04.2019 - 18:47

DROPS Design answered:

Liebe Gabi, die Zunahmen werden am Rumpfteil und an den Ärmel in unterschiedlichem Rythmus gearbeitet, dh beim Rumpfteil (= am Anfang Vorder- bzw Rückenteil) nehmen Sie je 1 M 9x in jeder Runde und 24 x in jeder 2. Runde (= 33 Zunahmenrunde für die Grösse XXL) - gleichzeitig nehmen Sie an den Ärmeln (am Anfang und Ende jeder Ärmel): 20 x in jeder 2. Runde und 4 x in jeder 4. Runde (= 24 Zunahmenrunde). Viel Spaß beim stricken!

24.04.2019 - 08:46

country flag Lene wrote:

Hei! Når jeg har kommet til der armene skal på egen tråd, skal mønsteret på begge sider av armen være med på den tråden? Er litt usikker på om jeg har økt riktig... I str XL har jeg nå 86 masker mellom hvert mønster på ermene.

11.02.2019 - 23:40

DROPS Design answered:

hei Lene. Det står hvor mange masker som skal settes på en tråd til ermer, i XL er dette 78. Før du begynte med øking til raglan hadde du 24 masker på hvert erme. Du har økt 1 maske i hver side av ermet til raglan totalt 24 ganger (= 48 masker per erme). 24 + 48 = 72 masker på ermet, mellom hver rapport av A.1. Når arbeidet skal deles, blir det delt midt i hver rapport av A.1. Du strikker først 53 masker på bakstykket (20 masker fra starten + 30 maskene økt til raglan + 3 masker A.1) videre setter du 78 masker på en tråd (3 masker A.1, 72 masker på ermet og 3 masker A.1). gjenta over forstykket og det andre ermet. God fornøyelse

13.02.2019 - 13:19

country flag Marcha wrote:

Welke raglans horen bij lijf en welke bij mouw? Er zijn er 4 en ik tel vanaf de eerste naald na de boord.

31.01.2019 - 14:58

DROPS Design answered:

Dag Marcha

De raglanlijnen zitten tussen het voor-/achterpand en de mouw en deze raglanlijnen worden in A.1 gebreid. De eerste raglanlijn is tussen het achterpand en de linker mouw, de tweede tussen de linker mouw en het voorpand, en zo verder. Als je bij de eerste raglan bent zit je dus, ben je vóór A.1 dus op het achterpand en na A.1 op de mouw.

03.02.2019 - 11:58

country flag Siri Tørstad wrote:

Har et spørsmål vedr øking raglan bol og erme. Her står det at det skal økes hver 2.omgang og så skal det økes hver 4.omg . Hvordan får jeg til å øke både 2.omg og 4.omg når jeg skal øke hver 2.omg 18 ganger og samtidig øke hver 4.omg 3 ganger. For å få dette til så mener jeg at jeg må øke hver 3.omg 3 ganger. Så slipper jeg å kolidere de to økningene. Ble dette forståelig???

17.01.2019 - 17:42

DROPS Design answered:

Hei Siri. Du øker ikke hver 2 og 4 omgang samtidig. Du skal øke hver 2 omgang 18 ganger, når du er ferdig med det går du over til å øke hver 4 omgang, og gjør dette 3 ganger. Du har da økt totalt 21 ganger. God fornøyelse.

23.01.2019 - 15:07

country flag Sabine wrote:

Ich würde das Kleid gern in einem feineren Garn stricken. Wie viel Gramm Wolle empfehlen Sie bei Größe S in Drops Lace?

02.11.2018 - 17:19

DROPS Design answered:

Liebe Sabine, dieses Kleid wird mit einer Maschenprobe von 21 M x 21 R glatt rechts gestrickt = 10 x 10 cm. Sollten Sie ein dünneres Garn benutzen, dann sollten Sie die ganze Anleitung neu kalkulieren. Hier finden Sie alle unsere Kleider mit einem Garngruppe A (= dünner als für dieses Modell) gestrickt/gehäkelt wurden. Viel Spaß beim stricken!

05.11.2018 - 08:09