
Looking for a yarn?


Comments / Questions (13)
![]() Iben wrote:
Iben wrote:
Hei. Kjempefin oppskrift. Jeg sliter litt med å forstå rekkefølgen på diagrammet. Størrelse M. Skal det altså strikkes først diagram A2. Deretter tilsvarende rad på A1. Og tilslutt A3. Og motsatt på tilbakeveien?
05.06.2020 - 08:34DROPS Design answered:
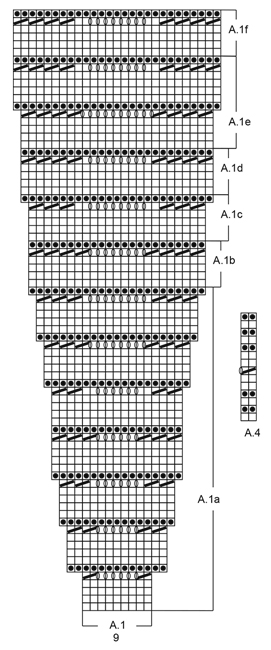
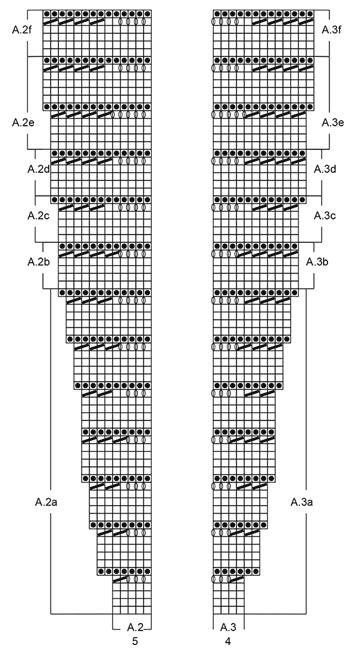
Hei Iben. Ja, det stemmer. A.2 og A.3 er hver sin front på jakken og A.1 strikkes mellom A.1 og A.3 som gjentas flere ganger i bredden. A.3 har 1 maske mindre enn A.2, men etter A.3 er strikket, skal det strikkes 1 maske som 1.maske i diagram A.2 før det avslutes med de 5 stolpe-maskene. God Fornøyelse!
08.06.2020 - 08:48
![]() Linda Kristiansen wrote:
Linda Kristiansen wrote:
Ah, på den måde! Nu tror jeg, jeg forstår - tak! /hilsen Linda
09.05.2018 - 17:58DROPS Design answered:
God fornøjelse Linda :)
15.05.2018 - 16:00
![]() Linda Kristiansen wrote:
Linda Kristiansen wrote:
Tak for svar - men jeg forstår desværre stadig ikke rigtig, hvad der menes med "i højden"? Modellen strikkes oppefra og ned, og man læser diagrammet nedefra og op - som altid. Hvad er "i højden"? På forhånd tak, /Linda
08.05.2018 - 10:05DROPS Design answered:
Hej Linda, Du ser at alle diagrammerne består af: a=42 pinde i højden, b=6 pinde i højden osv
09.05.2018 - 13:30
![]() Linda Kristiansen wrote:
Linda Kristiansen wrote:
Hvad menes der med: Repeter A.1b til A.3b osv. - det er jo forskellige diagrammer? Strikker man A.1b's masker og derefter A.3b's masker? Altså: A.1b/A.3b/A.1b/A.3b osv. pinden ud? På forhånd tak /hilsen Linda.
01.05.2018 - 12:04DROPS Design answered:
Hej Linda, Du strikker mønsteret hele vejen rundt som vi beskriver i starten af opskriften og så gentager du B i højden det antal gange der står for din størrelse. God fornøjelse!
04.05.2018 - 12:09
![]() Soraya wrote:
Soraya wrote:
Mi scuso, ho visto solo ora che i gettati sottostanti sono numericamente di più rispetto alle maglie prese insieme!!!
08.02.2018 - 19:57
![]() Soraya wrote:
Soraya wrote:
In A.1.a, dopo i primi 5 ferri, si lavora 1 ferro a diritto (nel lato rovescio del lavoro) con 2 aumenti per lato di ciascuno "spicchio". In pratica, come devono essere aumentati questi 4 punti? Tutti tra gli spicchi o in ordine sparso tra le 9 maglie sottostanti? si deve ottenere un aumento con buco visibile o no? la medesima tecnica poi si applica ogni volta che sono previsti aumenti? grazie!
08.02.2018 - 19:53DROPS Design answered:
Buonasera Soraya. Gli aumenti avvengono nella riga 5: in questa riga diminuisce due maglie ma ne aumenta 6 con i gettati. Quindi al ferro successivo ha 6 - 2 = 4 maglie in più. Lavora il ferro 6 a diritto sul rovescio del lavoro e si formerà un buco. Buon lavoro!
08.02.2018 - 22:31
![]() Chollet wrote:
Chollet wrote:
Bonjour, Où est ce que je peux trouver le guide des tailles afin de faire la bonne taille pour réussir mon modèle. Merci et salutations Martine Chollet
02.05.2017 - 13:43DROPS Design answered:
Bonjour Mme Chollet, vous trouverez en bas de page un schéma avec toutes les mesures pour chaque taille, prises d'un côté à l'autre. Comparez ces mesures avec un vêtement similaire dont vous aimez la forme pour trouver la taille idéale. Plus d'infos ici. Bon tricot!
02.05.2017 - 15:16
![]() Els Elhorst wrote:
Els Elhorst wrote:
Hallo, In de breibeschrijving staat dat je in de mauw patroon A.2 moet breien. moet dat daar niet patroon A.4 worden gebreid.
13.11.2016 - 15:46DROPS Design answered:
Hoi Els. Je hebt gelijk. Dat is een klein typfoutje. Ik zal het aanpassen. Bedankt voor het melden.
14.11.2016 - 14:33
![]() Nelly Mammone wrote:
Nelly Mammone wrote:
Bonjour, j'ai commencé ce modèle mais après avoir tricoté la première partie du point fantaisie A2a, A1a et A3a, je ne comprends pas les explications pour continuer le point fantaisie. Je ne comprends comment on peut passer de A1b à A3b car, ainsi, le dessin n'est pas bon. Merci de me donner des explications
21.05.2016 - 18:20DROPS Design answered:
Bonjour Mme Mammone, après avoir tricoté A.2a, A.1a et A.3a, tricotez A.2b, A.1b et A.3b: au dernier rang de A.1a vous augmentez 2 m (= 6 dim mais 8 jetés), au dernier rang de A.2a et A.3a vous augmentez 1 m (= 3 dim mais 4 jetés). On a ainsi 1 m en plus dans A.2a et A.3a et 2 m en plus dans chaque A.1a pour tricoter le b. Bon tricot!
23.05.2016 - 08:56
![]() Gunda Poll wrote:
Gunda Poll wrote:
Einfach fantastisch, diese Kollektion, wo soll ich nur anfangen, eins schöner als das andere, herrlich, danke, tausendmal danke!!!
10.02.2016 - 09:19
|
|||||||||||||
Dune Cardigan#dunecardigan |
|||||||||||||
 |
 |
||||||||||||
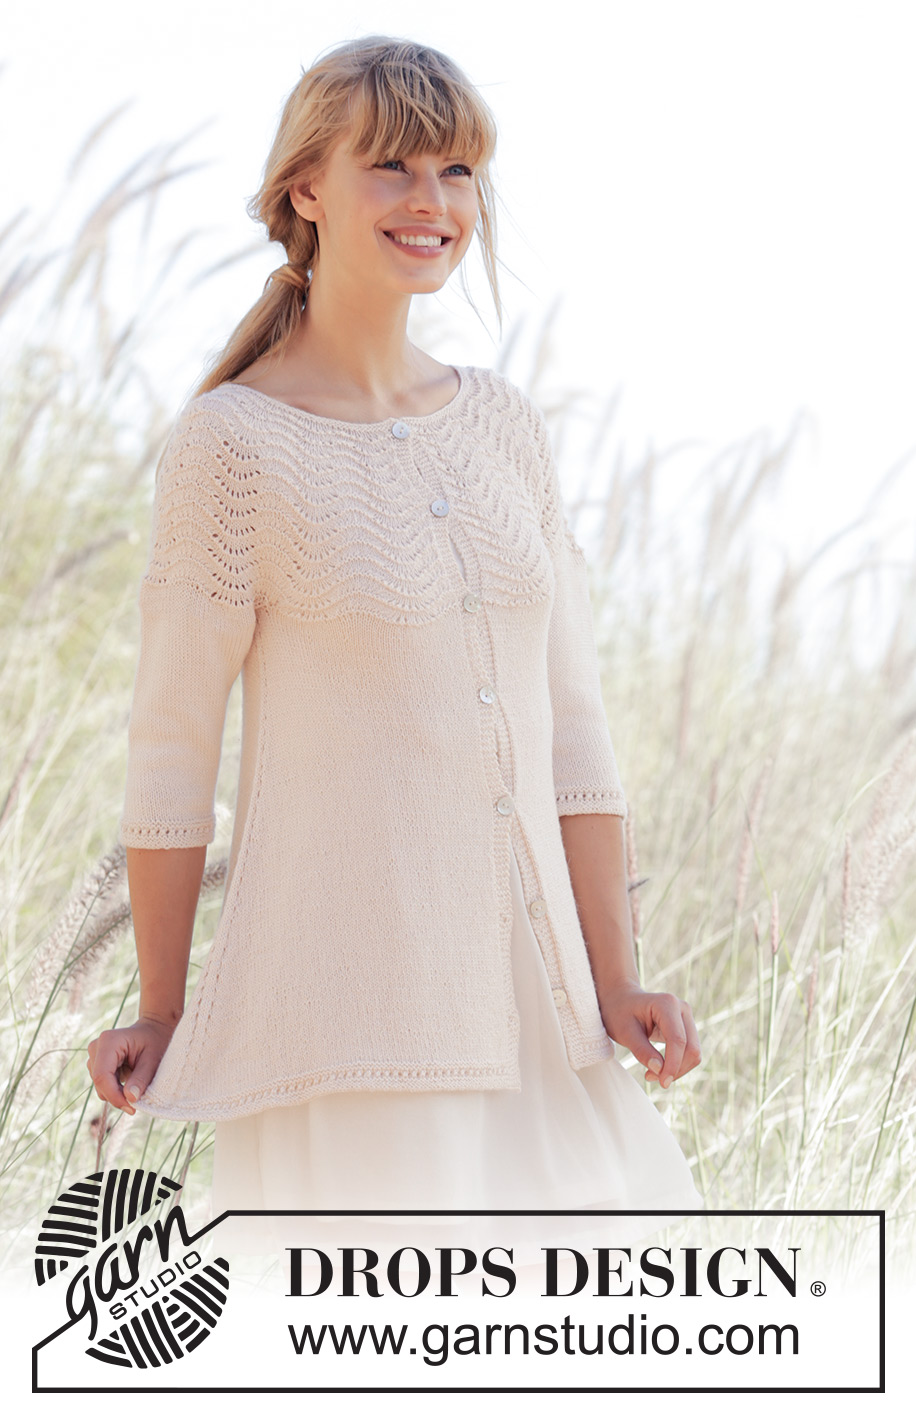
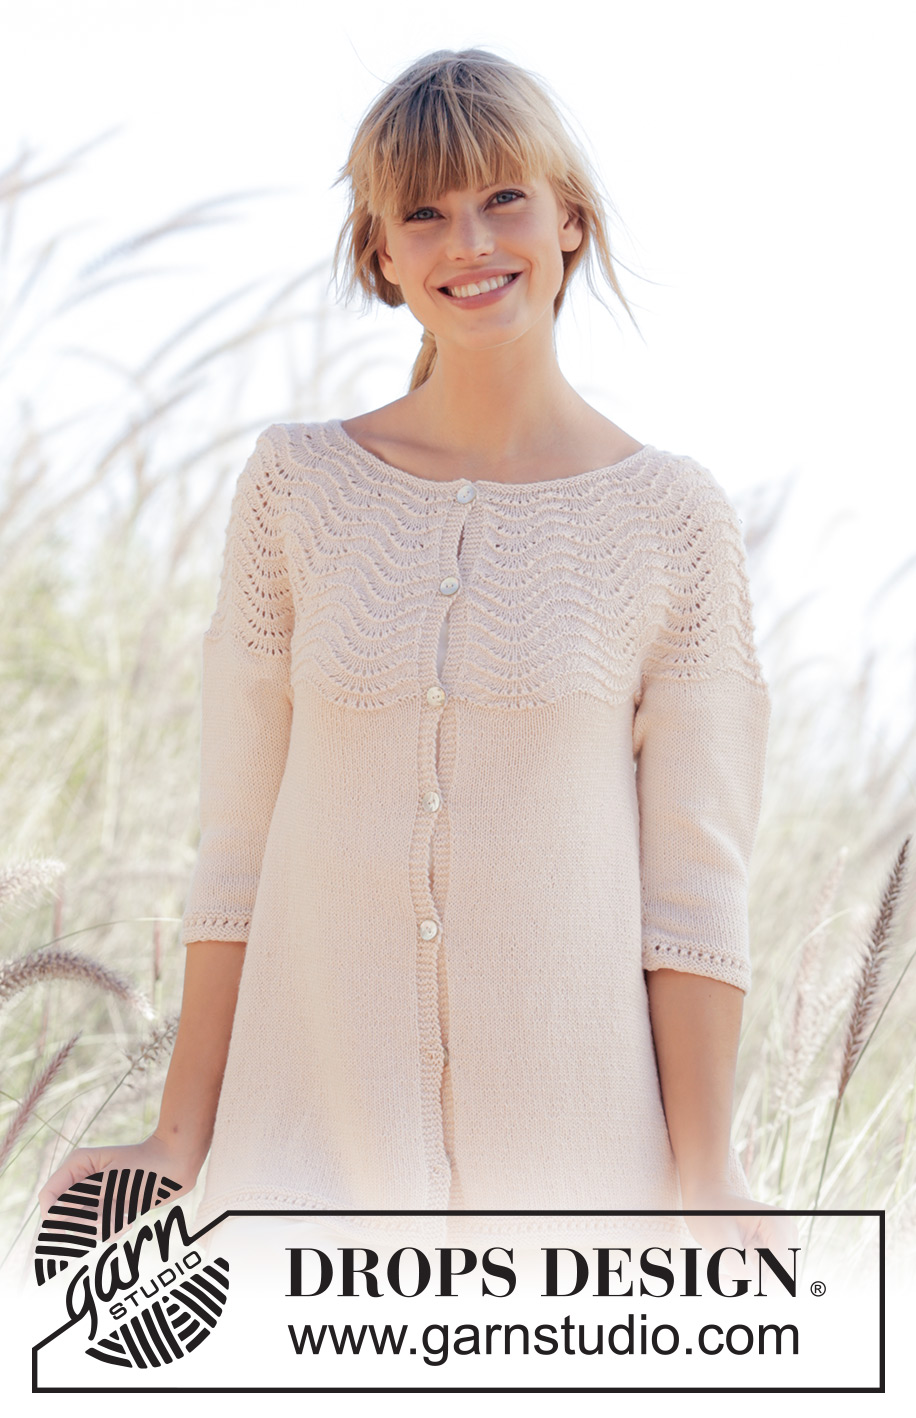
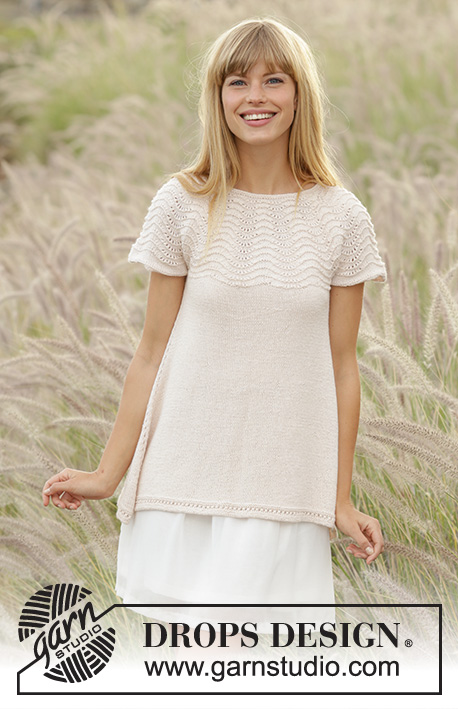
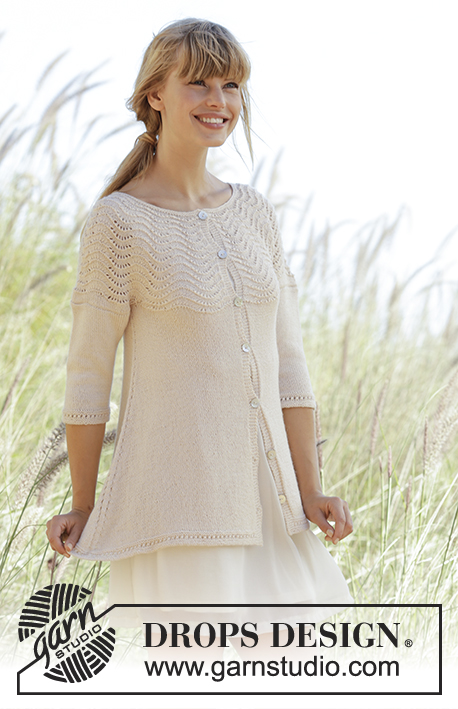
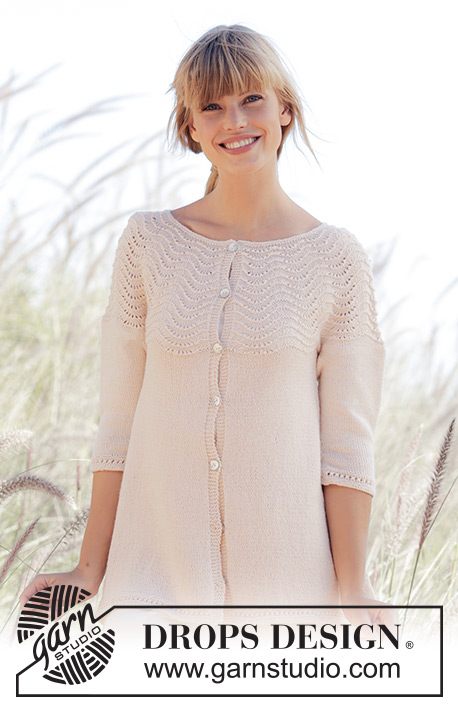
Knitted DROPS jacket with round yoke and wave pattern in ”BabyAlpaca Silk”. Worked top down. Size: S - XXXL.
DROPS 169-17 |
|||||||||||||
|
GARTER ST (back and forth): K all rows. 1 ridge = K2 rows. PATTERN: See diagrams A.1 to A.4. The diagrams show the pattern seen from RS. PATTERN: When working A.1a to A.1f, A.2a to A.2f and A.3a to A.3f in height, work A.1a to A.1f over diagram A.1, A.2a to A.2f over diagram A.2 and A.3a to A.3f over diagram A.3. I.e. In size S and XL use only diagram A.1a to A.1f. INCREASE TIP-1: Inc 1 st by making 1 YO. On next row P YO twisted to avoid holes. INCREASE TIP-2: Always inc from RS. Work until 1 st remains before marker, 1 YO, K 3 (marker is in the middle of these sts), 1 YO (= 2 sts inc), work until 2 sts remain before next marker, 1 YO, K 3, 1 YO (= 4 sts inc in total on row). Do not work YOs twisted on next row, they should make holes. DECREASE TIP: Work until 3 sts remain before marker, K the next 2 sts tog, K 2 (marker is in the middle of these sts), slip 1 st as if to K, K 1, psso (= 2 sts dec). BUTTONHOLES: Dec for buttonholes on right band. 1 buttonhole = K tog third and fourth st from edge and make 1 YO. Dec for buttonholes when piece measures: SIZE S: 2, 10, 18, 26, 34, 42 and 50 cm SIZE M: 2, 11, 20, 29, 34, 43 and 52 cm SIZE L: 2, 10, 18, 26, 35, 44 and 53 cm SIZE XL: 2, 9, 16, 24, 32, 40, 48 and 56 cm SIZE XXL: 2, 10, 18, 26, 34, 42, 50 and 58 cm SIZE XXXL: 2, 10, 18, 26, 34, 43, 52 and 61 cm ---------------------------------------------------------- YOKE: Worked back and forth, top down. Cast on 136-140-148-148-158-166 sts (includes 5 band sts in each side of piece) on circular needle size 2.5 mm / US 1.5 with BabyAlpaca Silk. Work 2 ridges in GARTER ST - see explanation above, AT THE SAME TIME inc 0-6-16-24-24-34 sts evenly on last row from RS - READ INCREASE TIP-1 = 136-146-164-172-182-200 sts. Switch to circular needle size 3 mm / US 2.5. Work as follows from RS: 5 band sts in garter st, A.2 (= 5 sts) over the next 0-5-5-0-5-5 sts (= 0-1-1-0-1-1 time in total), repeat A.1 (= 9 sts) over the next 126-126-144-162-162-180 sts (= 14-14-16-18-18-20 times in width), A.3 (= 4 sts) over the next 0-4-4-0-4-4 sts (= 0-1-1-0-1-1 time in total), work 0-1-1-0-1-1 sts as first st in diagram A.2, finish with 5 band sts in garter st. Work band in garter st until finished measurements. Remember BUTTONHOLES - see explanation above. REMEMBER THE KNITTING GAUGE When A.1a has been worked 1 time vertically, there are 332-356-402-424-448-494 sts on needle. Then work pattern vertically - READ PATTERN as follows: Repeat A.1b to A.3b 1-1-1-1-2-2 times in total, then repeat A.1c to A.3c 1 time in total, repeat A.1d to A.3d 1-1-1-2-2-2 times in total, repeat A.1e to A.3e 1 time in total, repeat A.1f to A.3f 0-0-1-1-1-2 times in total = 388-416-470-496-524-578 sts on needle. Piece measures approx. 18-18-20-21-23-24 cm / 7"-7"-8"-8 1/4"-9"-9½" vertically. Then work as follows on next row from RS: Work 5 band sts in garter st, stockinette st over the next 51-57-67-71-76-86 sts AT THE SAME TIME dec 7-7-10-10-9-12 sts evenly (= left front piece), slip the next 87-89-96-101-104-111 sts on a stitch holder (= sleeve), cast on 10 sts under sleeve, insert 1 marker in the middle of the new sts, stockinette st over the next 102-113-133-142-153-173 sts AT THE SAME TIME dec 14-13-19-20-19-25 sts evenly (= back piece), slip the next 87-89-96-101-104-111 sts on a stitch holder (= sleeve), cast on 10 sts under sleeve, insert 1 marker in the middle of the new sts, stockinette st over the next 51-58-68-71-77-87 sts AT THE SAME TIME dec 7-8-11-10-10-13 sts evenly, finish with 5 band sts in garter st (= right front piece) = 206-230-258-274-298-326 sts (= 98-110-124-132-144-158 sts between markers on back piece). BODY: Insert 1 marker in piece, NOW MEASURE PIECE FROM HERE. Work in stockinette st. When 3 row in stockinette st have been worked, inc 1 st on each side of each marker - READ INCREASE TIP-2. Repeat inc every 4th row until piece measures 37-39-39-40-40-41 cm / 14½"-15 1/4"-15 1/4"-15 3/4"-15 3/4"-16" from marker = approx. 322-355-383-402-427-459 sts in total (= approx. 156-172-186-196-208-224 sts on back piece), adjust so that next row is from RS. Switch to circular needle size 2.5 mm / US 1.5. Work 5 band sts in garter st, repeat A.4 until 5 sts remain, finish with 5 band sts in garter st. Bind off. Piece measures approx. 58-60-62-64-66-68 cm / 22¾''-23 5/8''-24 3/8''-25¼''-26''-26¾'' in total. SLEEVE: Worked in the round on double pointed needles. Slip the 87-89-96-101-104-111 sts from stitch holder in one side of piece back on double pointed needles size 3 mm / US 2.5 and cast in addition on 10 new sts mid under sleeve = 97-99-106-111-114-121 sts. Insert 1 marker in the middle of the new sts. Work stockinette st and on first round dec 15-13-14-15-14-15 sts evenly = 82-86-92-96-100-106 sts. When piece measures 3 cm / 1'', dec 1 st on each side of marker - READ DECREASE TIP, repeat dec every 1½ cm / ½'' 10-11-13-12-12-12 more times = 60-62-64-70-74-80 sts. When piece measures 26-26-25-25-24-23 cm / 10 1/4"-10 1/4"-9 3/4"-9 3/4"-9½"-9" (NOTE: Shorter measurements in the larger sizes because of longer yoke) switch to double pointed needles size 2.5 mm / US 1.5. Work A.4 over all sts. Bind off. Piece measures 29-29-28-28-27-26 cm / 11½"-11½"-11"-11"-10½"-10 1/4" in total. Work the other sleeve the same way. ASSEMBLY: Sew the opening under the sleeves. Sew the buttons on to left front piece. |
|||||||||||||
Diagram explanations |
|||||||||||||
|
|||||||||||||
|
|||||||||||||
|
|||||||||||||

|
|||||||||||||
Have you finished this pattern?Tag your pictures with #dropspattern #dunecardigan or submit them to the #dropsfan gallery. Do you need help with this pattern?You'll find 23 tutorial videos, a Comments/Questions area and more by visiting the pattern on garnstudio.com. © 1982-2025 DROPS Design A/S. We reserve all rights. This document, including all its sub-sections, has copyrights. Read more about what you can do with our patterns at the bottom of each pattern on our site. |
|||||||||||||


With over 40 years in knitting and crochet design, DROPS Design offers one of the most extensive collections of free patterns on the internet - translated to 17 languages. As of today we count 314 catalogs and 11822 patterns - 11812 of which are translated into English (US/in).
We work hard to bring you the best knitting and crochet have to offer, inspiration and advice as well as great quality yarns at incredible prices! Would you like to use our patterns for other than personal use? You can read what you are allowed to do in the Copyright text at the bottom of all our patterns. Happy crafting!
Post a comment to pattern DROPS 169-17
We would love to hear what you have to say about this pattern!
If you want to leave a question, please make sure you select the correct category in the form below, to speed up the answering process. Required fields are marked *.