
Popular categories
Looking for a yarn?


 Decrease: 1 sts – DROPS Extra 0-1145" loading="lazy"/>


Comments / Questions (10)
![]() Jan wrote:
Jan wrote:
I have just finished this pattern in your Alpaca Puma wool. I am disappointed in the way the neckline is. It comes over my shoulders. It wasn’t noticeable until I’d finished. I checked tension and used correct size needles. so that’s not it. Is there anything I can do now to the neck to narrow it by adding extra to it. Any help would be appreciated. Love the wool x
12.04.2024 - 16:08DROPS Design answered:
Dear Jan, Puna and alpaca yarns in general are much softer than merino yarns, like Merino Extra Fine, the yarn used and recommended in this pattern. Therefore, it will retain the shaping much worse than the Merino Extra Fine tighter thread, so it's not recommended to use for this pattern. That's why the neck looks looser than the one in the photo. You could add a thin elastic band around the neck to help it maintain its shaping. Happy knitting!
14.04.2024 - 22:33
![]() Gabriela Huitrón Luja wrote:
Gabriela Huitrón Luja wrote:
En Mexico donde puedo comprar estas lanas MARCA DEOPS
01.09.2019 - 17:37DROPS Design answered:
Hola Gabriela. Puedes consultar las tiendas que venden para Mexico aquí: https://www.garnstudio.com/findastore.php?s=w&cid=23. De momento no hay tiendas físicas en México.
17.10.2019 - 19:20
![]() Caussieu wrote:
Caussieu wrote:
Bonjour , dans le modèle me-083 , je ne comprends pas l'explication de la double diminution , les 2 dernières lignes, comment passer la maille auxiliaire par dessus la m de l'aiguille gauche ... merci de me dépanner ...
29.01.2019 - 08:25DROPS Design answered:
Bonjour Mme Caussieu, cette vidéo montre comment réaliser cette double diminution. Bon tricot!
29.01.2019 - 09:25
![]() Odile wrote:
Odile wrote:
Autre chose : lorsque je fais des augmentations , j ai toujours un petit trou , y a t il un moyen d eviter ça ? Merci
04.11.2018 - 13:25DROPS Design answered:
Bonjour Odile, vous pouvez utiliser différentes techniques pour augmenter: avec le fil du rang précédent ou avec une augmentation intercalaire. Bon tricot!
05.11.2018 - 09:37
![]() Odile wrote:
Odile wrote:
Bonjour , Je debute et je ne comprends pas comment on met des mailles en arrêt pour partager le devant et le dos.j ai mis les mailles du fond sur un fil d aiguille circulaire , mais je ne sais pas comment retirer le 1 fil qui comprend aussi le reste des mailles Du coup je suis coincee ,pouvez vous m'aider ?
02.11.2018 - 21:02DROPS Design answered:
Bonjour Odile, Cette vidéo montre comment glisser des mailles sur un fil - dans ce cas, ne glissez que le nombre de mailles indiqué sur le fil, gardez les autres sur votre aiguille et terminez cette partie. Reprenez ensuite les mailles en attente ainsi et tricotez la 2ème partie. Bon tricot!
05.11.2018 - 08:26
![]() Anna Paola Majer wrote:
Anna Paola Majer wrote:
Buonasera, non ho capito bene come fare le diminuzioni nel berretto. Ho ripetuto per due volte lo schema A.1e inizio ora lo schema A.2 (= 12 m sul 1° giro) . E' implicito che debba fare le diminuzioni seguendo il disegno, fino a ridurre i numero delle maglie a 24? Grazie!
01.11.2018 - 16:36DROPS Design answered:
Buongiorno Anna Paola. Sì è corretto. Quando avrà completato il diagramma A.2, sui ferri ci saranno 24 maglie. Buon lavoro!
01.11.2018 - 16:47
![]() Giada wrote:
Giada wrote:
Buinasera, non riesco a capire come dividere il dietro è il davanti. Finito il giro a costa legaccio ho (avendo fatto la taglia L/XL) 75 m e 5 a legaccio, poi le 160 da dividere e via di seguito. Ho letto anche la risposta data a Gabriella ma non capisco cosa si intenda per “finire il giro “. Ho provato a lavorare le prime 75 + le 5 e poi mettere le 160 in sospeso, ma per continuare “spezzando “ i fianchi devo tagliare il filo e riprendere? Grazie in anticipo per la risposta
07.12.2017 - 23:32DROPS Design answered:
Buongiorno Giada. Deve lavorare le prime 75 m a maglia rasata e le successive 5 m a legaccio, e qui ha un segnapunti; poi lavora le altre 5 m a legaccio , le 150 m successive a maglia rasata e le 5 m successive a legaccio (quindi fino al secondo segnapunti) e le trasferisce su un ferro ausiliario (queste m sono il davanti ), e finisce con le altre 5 m a legaccio e le rimanenti 75 m a maglia rasata. Le m che sono sui ferri sono quelle del dietro e prosegue su queste avanti e indietro. Non è necessario tagliare il filo. Buon lavoro!
08.12.2017 - 14:48
![]() Gabriella wrote:
Gabriella wrote:
Grazie per la precedente risposta. nuova domanda : dividendo il lavoro per lavorare separatamente il davanti ed il dietro, dopo aver passato su un ferro ausiliare le 139 maglie del davanti ( 5 legaccio, 129 rasata, 5 legaccio) sul ferro mi trovo per il dietro con 65 m.rasata, 5 legaccio, 5 legaccio e 64 rasata. Non mi è chiaro come lavorare il dietro. devo forse tornare indietro con le 5 maglie a legaccio e le 65 a maglia rasata? in questo modo però queste avrebbero un giro in più. Grazie
18.11.2015 - 07:52DROPS Design answered:
Buongiorno Gabriella, deve finire il giro prima di mettere la maglie in sospeso: le 10 m a m legaccio costituiranno l'apertura sulle braccia, per cui sono ai lati. Il davanti e il dietro sono uguali, 5 m a m legaccio ai lati e 129 m a m rasata in mezzo. Da questo punto in poi lavorerà avanti e indietro su queste m. Ci riscriva se qualcosa non le è chiaro. Buon lavoro!
19.11.2015 - 11:04
![]() Gabriella wrote:
Gabriella wrote:
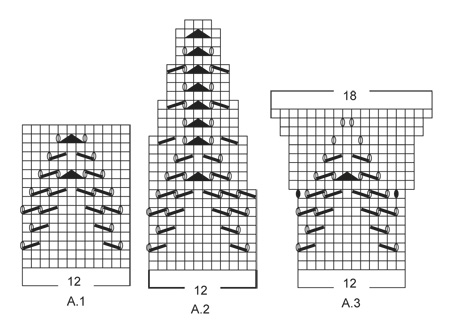
Le istruzioni prevedono che ci siano 234 maglie dopo aver ripetuto due volte lo schema A1 e una volta lo schema A3, cioè aumenti di due maglie per ognuno dei 13 A1 e A3, ma dal disegno non trovo dove e come aumentare the instructions state that there are 234 p after repeating twice the pattern A1 and once the scheme A3, with increases of two links for each of the 13 A1 and A3, but thin the scheme design i can not find where and how to increase
15.10.2015 - 22:13DROPS Design answered:
Dear Gabriella, after you have worked A.1 in height, work A.3 in height, A.3 starts with 12 sts and ends with 18 sts, so that you will increase 6 sts in each repeat of A.3. Happy knitting!
16.10.2015 - 09:26
![]() Gabriella wrote:
Gabriella wrote:
Le istruzioni prevedono che ci siano 234 maglie dopo aver ripetuto due volte lo schema A1 e una volta lo schema A3, cioè aumenti di due maglie per ognuno dei 13 A1 e A3, ma dal disegno non trovo dove e come aumentare the instructions state that there are 234 p. after repeating twice the pattern A1 and once the scheme A3, increases of two p for each of the 13 A1 and A3, but in the scheme design can not find where and how to increase
15.10.2015 - 22:04DROPS Design answered:
Buongiorno Gabriella. Nelle righe 9, 15 e 17 del diagramma A.3 vengono aumentate 2 m facendo delle m gettate. In queste modo, vengono aumentate in tutto 6 m in ogni ripetizione del diagramma. Buon lavoro!
16.10.2015 - 13:18
|
||||||||||||||||||||||
Winter Waves |
||||||||||||||||||||||
 |
 |
|||||||||||||||||||||
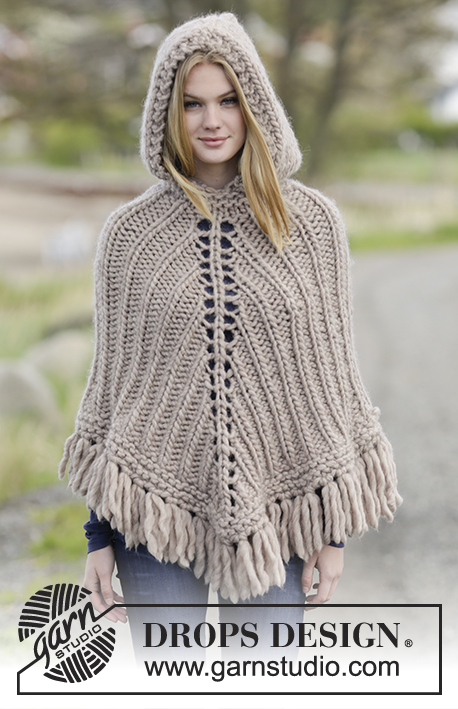
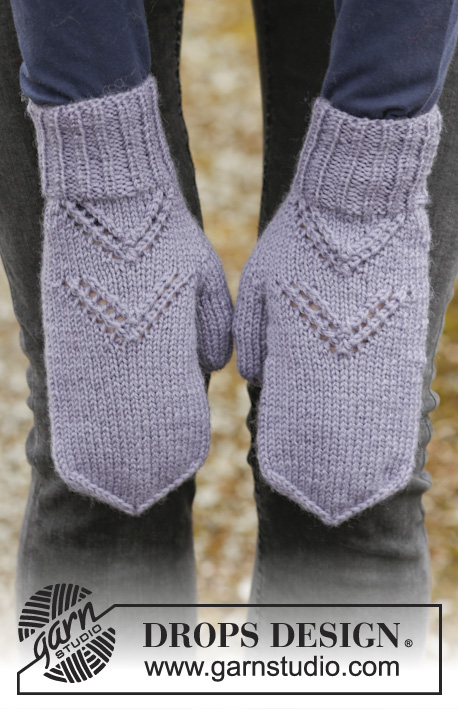
Set consists of: Knitted DROPS hat, poncho and mittens with lace pattern and rib in ”Merino Extra Fine”.
DROPS Extra 0-1145 |
||||||||||||||||||||||
|
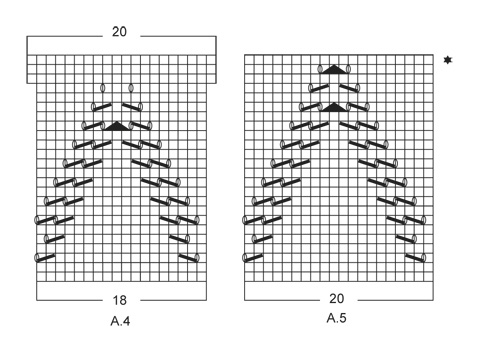
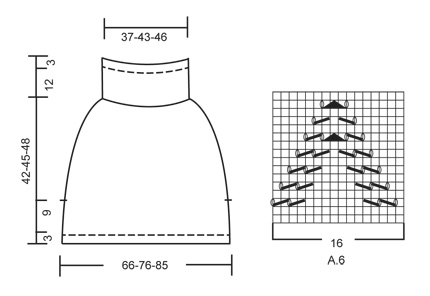
GARTER ST (back and forth): K all rows. 1 ridge = 2 rows K. PATTERN: See diagrams A.1 to A.6. DECREASE TIP: Dec on each side of st with marker as follows: Dec as follows before st with marker: K 2 tog. Dec as follows after st with marker: Slip 1 st as if to K, K 1, psso ---------------------------------------------------------- HAT: Worked in the round on circular needle, switch to double pointed needles when needed. Cast on 105 sts on circular needle size 3.5 mm with Merino Extra Fine. Work rib = K 1/P 2 for 3 cm. Switch to circular needle size 4 mm and work 1 round in stocking st while AT THE SAME TIME dec 9 sts evenly = 96 sts. Then work pattern A.1 (= 12 sts) 8 times in width. REMEMBER THE KNITTING TENSION When A.1 has been worked 2 times vertically, work A.2 (= 12 sts on first round) over every repetition of A.1. When entire A.2 has been worked vertically, 24 sts remain. K 1 round all sts 2 and 2 tog = 12 sts. Cut the yarn and pull it through the remaining sts, tighten tog and fasten. The hat measures approx. 25 cm vertically. ---------------------------------------------------------- PONCHO: Work in the round, top down to vent, then work piece back and forth in 2 parts. Rounds start mid back. Cast on 168-195-210 sts on circular needle size 3.5 mm with Merino Extra Fine. Work rib = K 1/P 2 for 3 cm. Switch to circular needle size 4 mm. Work 1 round in stocking st while AT THE SAME TIME dec 12-15-18 sts evenly = 156-180-192 sts. Now work pattern A.1 (= 12 sts) over all sts = 13-15-16 repetitions in width. REMEMBER THE KNITTING TENSION When A.1 has been worked 2 times vertically, continue with A.3 1 time vertically = 234-270-288 sts. Now work A.4 (= 18 sts) over every repetition of A.3. When A.4 has been worked vertically, there are 260-300-320 sts on round. Now work A.5 (= 20 sts) over every repetition of A.4. On last round in A.5, inc 18-20-38 sts evenly = 278-320-358 sts. Continue in stocking st until piece measures 45-48-51 cm. Now work as follows: Work in stocking st over the first 65-75-85 sts, continue in GARTER ST - see explanation above, over the next 10 sts (insert a marker in the middle of these 10 sts in garter st), then work in stocking st over the next 129-150-169 sts, garter st over the next 10 sts, (insert a marker in the middle of these 10 sts in garter st), work the remaining 64-75-84 sts. Markers shows sides of poncho. Continue like this until 2 ridges have been work over the 10 sts in each side. Now divide piece for front and back piece by slipping the middle 139-160-179 sts on round (i.e. Sts between the 2 markers) on a stitch holder (= front piece). There are now 139-160-179 sts on needle (= back piece). BACK PIECE: Now work back and forth in stocking st with 5 sts in garter st in each side until piece measures 54-57-60 cm from cast-on edge. On next row from RS work as follows: 5 sts in garter st, stocking st until 5 sts remain, AT THE SAME TIME inc 7-7-6 sts evenly, 5 sts in garter st = 146-167-185 sts. Switch to circular needle size 3.5 mm and work rib as follows: 5 st in garter st, * K 1, P 2 *, repeat from *-* until 6 sts remain, K 1, 5 st in garter st. When rib measures 4 cm, cast off with K over K and P over P. FRONT PIECE: Slip sts from stitch holder back on circular needle size 4 mm = 139-160-179 sts. Work as on back piece. ---------------------------------------------------------- RIGHT MITTEN: Worked in the round on double pointed needles. Cast on 39-42-45 sts on double pointed needles size 3 mm with Merino Extra Fine. Work rib = K 1/P 2 for 6 cm. Switch to double pointed needles size 3.5 mm and work 1 round in stocking st while AT THE SAME TIME adjusting no of sts to 38-42-46. Now work pattern as follows: 1-2-3 sts in stocking st, A.6 (= 16 sts), 2-3-4 sts in stocking st (= on top of hand), 2 sts in stocking st, AT THE SAME TIME insert a marker in the last of these 2 sts (= thumb st), stocking st over the remaining 17-19-21 sts. Continue pattern like this. REMEMBER THE KNITTING TENSION When piece measures 8 cm in total, beg inc for thumb by making 1 YO on each side of thumb st, on next round work the YOs twisted to avoid holes. Repeat inc for thumb every other round 5-6-7 more times (inc on each side of all thumb sts, i.e. there are 2 sts more between YOs for every inc) = 13-15-17 thumb sts and 50-56-62 sts in total. When piece measures 12-13-14 cm in total, slip the 13-15-17 thumb sts on 1 stitch holder and cast on 1 new st over sts on stitch holder = 38-42-46 sts on needle. Continue until A.6 have been worked 2 times vertically in total. Then continue in stocking st until finished measurements. When piece measures 22-23-24 cm in total, insert 1 marker in the 19th-21st-23rd st and 38th-42nd-46th st. On next round dec 1 st on each side of every st with marker - SEE DECREASE TIP. Repeat dec every round 7-8-9 more times = 6 sts remain. Cut the yarn and pull it through the remaining sts, tighten tog and fasten. Mitten measures approx. 25-26-27 cm. THUMB: Slip the sts over thumb gusset on the needles and knit in addition up 3 sts along the edge behind the thumb sts = 16-18-20 sts. Work stocking st in the round until thumb measures approx. 6 cm. On next round K all sts tog 2 by 2. Cut the yarn and pull it through the remaining sts, tighten tog and fasten. LEFT MITTEN: Work as right mitten but reversed. I.e. work pattern as follows: Work 2-3-4 sts in stocking st, A.6, 1-2-3 sts in stocking st (= on top of mitten), stocking st over the remaining 19-21-23 sts, insert a marker in the next to last st on round (= thumb st). |
||||||||||||||||||||||
Diagram explanations |
||||||||||||||||||||||
|
||||||||||||||||||||||
|
||||||||||||||||||||||
|
||||||||||||||||||||||
|
||||||||||||||||||||||
Have you finished this pattern?Tag your pictures with #dropspattern or submit them to the #dropsfan gallery. Do you need help with this pattern?You'll find 31 tutorial videos, a Comments/Questions area and more by visiting the pattern on garnstudio.com. © 1982-2025 DROPS Design A/S. We reserve all rights. This document, including all its sub-sections, has copyrights. Read more about what you can do with our patterns at the bottom of each pattern on our site. |
||||||||||||||||||||||


With over 40 years in knitting and crochet design, DROPS Design offers one of the most extensive collections of free patterns on the internet - translated to 17 languages. As of today we count 314 catalogues and 11822 patterns translated into English (UK/cm).
We work hard to bring you the best knitting and crochet have to offer, inspiration and advice as well as great quality yarns at incredible prices! Would you like to use our patterns for other than personal use? You can read what you are allowed to do in the Copyright text at the bottom of all our patterns. Happy crafting!
Post a comment to pattern DROPS Extra 0-1145
We would love to hear what you have to say about this pattern!
If you want to leave a question, please make sure you select the correct category in the form below, to speed up the answering process. Required fields are marked *.