
Popular categories
Looking for a yarn?


Comments / Questions (118)
![]() Yvonne Keller wrote:
Yvonne Keller wrote:
Guten Tag, kann man diese Mütze nicht in Runden mit Rundnadeln stricken? Müsste ich etwasSpezielles beachten? Weshalb hin und her? Vielen Dank!
23.05.2025 - 21:57DROPS Design answered:
Liebe Frau Keller, Sorry für die Spätantwort, Ihre Frage haben wir leider verpasst. Wahrscheinlich können Sie diese Mütze auch gerne in der Runde stricken, das Muster sollen Sie nur einfach anpassen - da in der Erklärung für Hin-und Rückreihen erklärt wird. Viel Spaß beim Stricken!
19.06.2025 - 17:17
![]() Salvatore Lo Bosco wrote:
Salvatore Lo Bosco wrote:
A me piace il berretto grigio alla Celentano ,tipo la modella che lo indossa.....se c'è l' avete
04.01.2025 - 17:16DROPS Design answered:
Buonasera Salvatore, ha commentato proprio sulla pagina del modello. Le istruzioni sono sopra il suo commento. Buon lavoro!
04.01.2025 - 19:35
![]() Gitte Kaas Larsen wrote:
Gitte Kaas Larsen wrote:
Kan man ikke strikke den på rundpind så man undgår at skulle sy den sammen
28.09.2024 - 17:51DROPS Design answered:
Hei Gitte. Ja, det kan du. Bare husk å tilpasse oppskriften slik at overgangen passer med perlestrikken. mvh DROPS Design
07.10.2024 - 14:18
![]() Kathy Hall wrote:
Kathy Hall wrote:
You don’t mention suit method to cast on. Please advise.
20.03.2024 - 21:07DROPS Design answered:
Dear Kathy, if there is no particular method mentioned, you can use the one you prefer. In such a case, I would generally use the long tail cast on. Happy Knitting!
20.03.2024 - 21:21
![]() Lucie wrote:
Lucie wrote:
Bonjour, j'ai tricoté en rond. Je suis vers la fin pour tricoter le point mousse. Je voudrais savoir mon dernier rang du point de blé doit être en endroit ou en envers. Merci
17.08.2023 - 15:31DROPS Design answered:
Bonjour Lucie, quand on tricote au point de blé, on alterne (1m end, 1 m env) sur 2 rangs et sur 2 mailles; autrement dit, 2 rangs de (1 m end, 1 m env) et 2 rangs de (1 m env, 1 m end), arrêter votre point de blé après ces 2 rangs pour que le motif soit complet et terminez ensuite au point mousse (alternez 1 tour endroit, 1 tour envers pour le point mousse en rond). Bon tricot!
17.08.2023 - 16:08
![]() Lucie wrote:
Lucie wrote:
Bonjour, je souhaite tricoter en rond. J'aimerais bien savoir après avoir monté les mailles si je dois tricoter le 1er rang en endroit ou je commence tout de suite tricoter les points de blé sans faire un rang en endroit ? Merci
12.08.2023 - 23:50DROPS Design answered:
Bonjour Lucie, si vous voulez tricoter le bonnet en rond, vous devrez tricoter le 1er rang à l'envers, puis continuer au point de blé. Bon tricot!
14.08.2023 - 10:45
![]() Lucie wrote:
Lucie wrote:
Bonjour, je souhaite tricoter en rond. J'aimerais bien savoir après avoir monté les mailles si je dois tricoter le 1er rang en endroit ou je commence tout de suite tricoter les points de blé sans faire un rang en endroit ? Merci
12.08.2023 - 23:48
![]() Girard wrote:
Girard wrote:
Bonjour, j'ai un soucis car le nombre de mailles que je dois monter ne fait pas le tour de ma tête. Je dois monter 120 maille, pouvez-vous m'aider pour répartir les diminutions. Cordialement
05.10.2022 - 17:55DROPS Design answered:
Bonjour Mme Girard, nous ne sommes malheureusement pas en mesure de pouvoir adapter chacun de nos modèles à chaque demande, toutefois, vous pouvez consulter tous nos modèles de bonnets et les trier par le nombre de mailles de votre échantillon pour trouver un modèle analogue et ainsi pouvoir vous en inspirer. Bon tricot!
06.10.2022 - 08:16
![]() Barbara wrote:
Barbara wrote:
Can the hat be knitted in the round rather than on straight needles?
17.11.2021 - 14:55DROPS Design answered:
Dear Barbara, probably, just remember to adapt the double seed stitch pattern in height as well as the garter stitch at the top of hat. Happy knitting!
17.11.2021 - 16:48
![]() Kristin wrote:
Kristin wrote:
How many yards/meters of yarn does this pattern require? I don't see that information in the pattern. Thank you!
08.11.2021 - 03:31DROPS Design answered:
Hi Kristin, You need 100g of Nepal, with approx. 75 metres yarn on each ball of 50g. Happy knitting!
08.11.2021 - 07:18
|
|
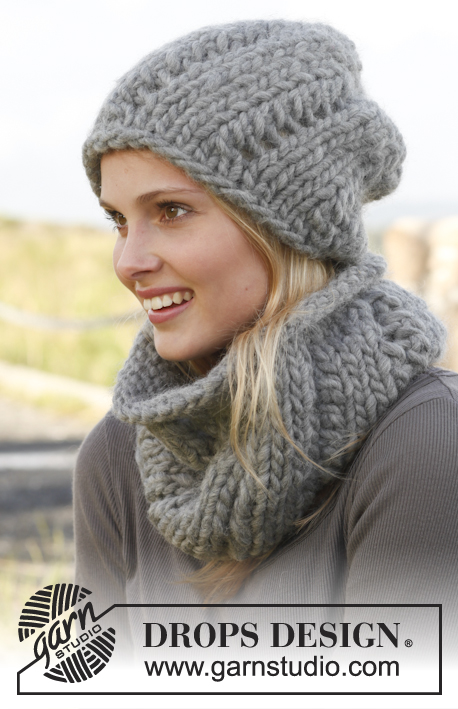
Mossing around#mossingaroundhat |
|
|
|
|
Knitted DROPS hat with seed st in ”Nepal”.
DROPS 150-40 |
|
|
DOUBLE SEED ST (in height): Row 1 (RS): * K 1, P 1 *, repeat from *-*. Row 2 (WS): K over K and P over P. Row 3: P over K and K over P. Row 4: As 2nd row. Repeat row 1 to 4. GARTER ST (back and forth on needle): K all rows. 1 ridge = K2 rows. ---------------------------------------------------------- HAT: Worked back and forth on needle. Cast on 80-88 sts with Nepal on needle size 4.5 mm / US 7. K 1 row, then work DOUBLE SEED ST - see explanation above - over all sts. When piece measures 20-21 cm / 8"-8 1/4" (make sure that last row worked is from RS), work in GARTER ST - see explanation above - until finished measurements AT THE SAME TIME dec every 4th row as follows: Row 4: Dec 16-18 sts evenly (= approx. every 5th st) = 64-70 sts on needle. Row 8: Dec 13-14 sts (= approx. 5th st) = 51-56 sts. Row 12: Dec 10-11 sts (= approx. 5th st) = 41-45 sts. Row 16: Dec 9-9 sts (= approx. 5th st) = 32-36 sts. Row 20: K 2 tog across = 16-18 sts. Row 24: K 2 tog across = 8-9 sts. Cut the yarn and pull it through the remaining sts. Sew hat tog mid back, edge to edge to avoid a chunky seam. Hat measures approx. 26-27 cm / 10 1/4"-10½". Fasten yarn tightly. |
|
Have you finished this pattern?Tag your pictures with #dropspattern #mossingaroundhat or submit them to the #dropsfan gallery. Do you need help with this pattern?You'll find 10 tutorial videos, a Comments/Questions area and more by visiting the pattern on garnstudio.com. © 1982-2025 DROPS Design A/S. We reserve all rights. This document, including all its sub-sections, has copyrights. Read more about what you can do with our patterns at the bottom of each pattern on our site. |


With over 40 years in knitting and crochet design, DROPS Design offers one of the most extensive collections of free patterns on the internet - translated to 17 languages. As of today we count 314 catalogs and 11822 patterns - 11812 of which are translated into English (US/in).
We work hard to bring you the best knitting and crochet have to offer, inspiration and advice as well as great quality yarns at incredible prices! Would you like to use our patterns for other than personal use? You can read what you are allowed to do in the Copyright text at the bottom of all our patterns. Happy crafting!
Post a comment to pattern DROPS 150-40
We would love to hear what you have to say about this pattern!
If you want to leave a question, please make sure you select the correct category in the form below, to speed up the answering process. Required fields are marked *.