
Looking for a yarn?


Comments / Questions (40)
![]() Patrizia Fontana wrote:
Patrizia Fontana wrote:
Vorrei sapere se le maglie vanno riprese dalla parte larga del ventaglio o dall'apice . grazie
07.12.2024 - 22:07DROPS Design answered:
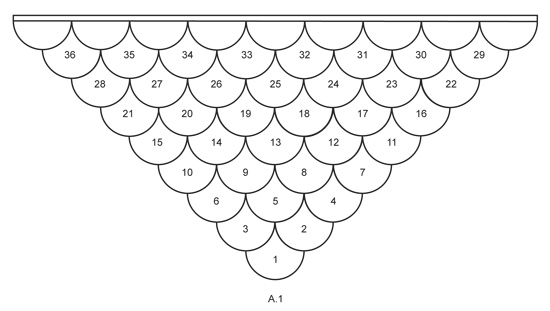
Buonasera Patrizia, il diagramma A.1 le può essere di aiuto per la posizione dei ventagli: le maglie vanno riprese sul bordo destro del 1° ventaglio. Buon lavoro!
13.12.2024 - 22:38
![]() Sandra Vom Schwarzwaldwolloutlet, Schömberg wrote:
Sandra Vom Schwarzwaldwolloutlet, Schömberg wrote:
Ich habe das Tuch in einer unifarbenen Wolle nachgestrickt und habe Glasperlchen eingearbeitet. Es ist wunderschön geworden. Allerdings habe ich den Rand oben nicht laut Anleitung kraus rechts gestrickt, sondern nur mit zwei simplen Reihen gehäkelter, fester Maschen verstärkt. In Uni kommt der kraus rechts gestrickte Rand nicht so gut, wie im Farbverlauf.
29.08.2023 - 23:07
![]() Hanna wrote:
Hanna wrote:
Nie rozumiem w jaki sposób zakończyć górę szala. 4 oczka nabrać na szalu? I te 4 o przerobić i znów nabrać? Proszę o wyjaśnienie.
03.05.2023 - 14:46DROPS Design answered:
Witaj Haniu, na górze będzie brzeg składający się z 4 oczek (coś w stylu obszycia na przodzie swetra, taka plisa biegnąca na całej długości szala), który będziesz stopniowo dołączać wzdłuż góry szala następująco: *przerabiasz 4 oczka brzegu, a na lewej stronie robótki, nabierasz oczko na górze szala (na skrajnym boku), przerabiasz 1-sze oczko z lewego drutu i przekładasz nowe oczko ponad przerobionym oczkiem, dalsze oczka przerabiasz na prawo, obracasz*, itd. Podobna technika jest użyta TUTAJ, tylko tu na łączeniu szala z brzegiem przerabia się 3 oczka razem. Pozdrawiamy!
04.05.2023 - 08:47
![]() Rosetta Buttacavoli wrote:
Rosetta Buttacavoli wrote:
Posso lavorare questo scialle con i ferri dritti?
05.10.2021 - 15:53DROPS Design answered:
Buonasera Rosetta, lo scialle è lavorato in piano e può essere lavorato anche con i ferri dritti. Buon lavoro!
07.10.2021 - 00:20
![]() Marilyn Moss wrote:
Marilyn Moss wrote:
Hi I have just finished the soft mermaid shaw but I am a bit confused on how to finish the top off. Could you please help. The confusion comes from picking up a stitch which once worked is on the right needle not the left ? This doesn’t make sense to me.
24.10.2018 - 13:08DROPS Design answered:
Dear Mrs Moss, you pick up 1 st from the edge of shawl (= 1 st on right needle), then knit 1 stitch from the edge (from left needle) = there is now 2 sts on the right needle, pass the first of these 2 sts over the last st worked = 1 stitch remains on the right needle, work remaining stitches on row, turn and work these 4 sts. Repeat these 2 rows. Happy knitting!
24.10.2018 - 15:55
![]() GRANGER wrote:
GRANGER wrote:
Bonjour,j'ai bien réalisé l'éventail 1 sans problème ensuite j'ai fait l'éventail 2 mais en relevant les mailles que sur la moitié du bord , côté droit , car il m'a paru impossible de relever que mailles sur tout le bord; ça doit tirer , non, donc là, je suis dans l'impasse je vais défaire l'éventail 2 en attendant votre réponse impossible de trouver un tuto sur ce sujet, ce serait bien de le mettre car pas facile de comprendre ce montage : mille merci
12.07.2016 - 22:53DROPS Design answered:
Bonjour Mme Granger, cette vidéo montre comment relever les mailles entre 2 éventails, pour le 2ème du châle, montez 30 m et relevez 31 mm le long du côté droit de l'éventail 1 comme dans la vidéo. Bon tricot!
13.07.2016 - 09:24
![]() Maren wrote:
Maren wrote:
Hallo liebes Team, es heißt z.b. in Reihe 4. - 7. alle Maschen rechts...heißt das kraus rechts oder glatt rechts??? Vielen Dank für die Antwort
04.02.2015 - 10:24DROPS Design answered:
Damit ist immer kraus rechts gemeint, Sie stricken jede R jeweils rechts. Viel Spaß beim Stricken dieses schönen Tuchs!
04.02.2015 - 15:52Catherine Mireault wrote:
Bonjour, je ne comprend pas comment faire la bordure du haut, merci, j'attends vos explications afin de terminer mon tricot
14.09.2014 - 20:33DROPS Design answered:
Bonjour Mme Mireault, la bordure du haut du châle est rattachée au châle au début de chaque rang sur l'envers, on relève 1 m dans le bord du châle, on tricote 1 m de la bordure et on passe la m relevée par-dessus la m tricotée, on tricote les 3 m restantes de la bordure, 1 rang sur l'endroit puis on relève de nouveau 1 m dans le bord du châle comme avant. Bon tricot!
15.09.2014 - 10:02
![]() Mª Josefa Ros wrote:
Mª Josefa Ros wrote:
Estoy terminando de hacerlo, pero en tonos azules, con el color 604. Muy divertido de hacer, y me está quedando precioso! ¡MIL GRACIAS!
03.08.2014 - 11:32
![]() Regal S wrote:
Regal S wrote:
Bonjour,je ne comprends pas les explications : pourquoi une aiguille circulaire pour un tricot à plat? Le modele est-il tout à l'endroit ou en point mousse . Auriez -vous un diagramme pour m'aider à la confection de ce modele je vous remercie ,dans l'attente d'une reponse cdt S Regal
15.02.2014 - 16:00DROPS Design answered:
Bonjour Mme Regal, on tricote ici en allers et retours sur aig. circ. pour avoir plus de place pour les mailles. Chaque éventail se tricote au point mousse (= à l'end) avec quelques rangs ajourés. Suivez attentivement les indications pour chaque rang pour obtenir le bon motif. Bon tricot!
17.02.2014 - 09:15
|
|
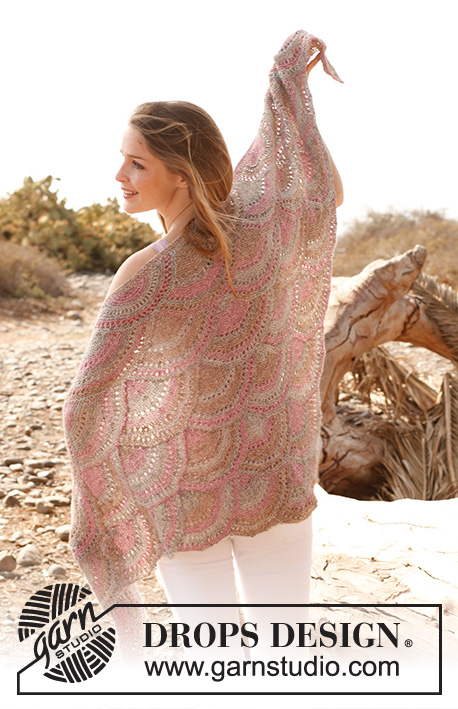
Soft mermaid#softmermaidshawl |
|
 |
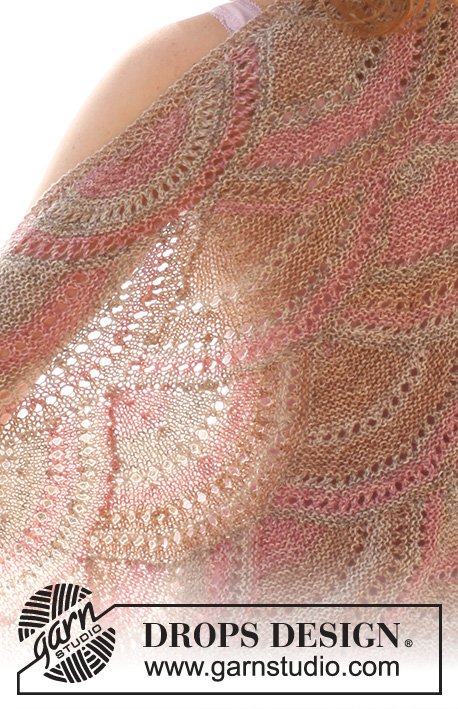 |
Knitted DROPS shawl in garter st with fan pattern in ”Fabel”.
DROPS 148-33 |
|
|
SHAWL: The shawl consists of several fans knitted together along the way. Beg at the bottom of shawl with fan 1 – see diagram A.1. Then work fan 2 as explained below. Then work fan 3 etc. FAN 1: Worked back and forth on circular needle. Cast on 61 sts on circular needle size 4 mm / US 6 with Fabel and work as follows: ROW 1 (= RS): K all sts. ROW 2 (= WS): K all sts. ROW 3: K 2 tog, K 9, * slip 1 st as if to K, K 2 tog, psso, K 6 *, repeat from *-* 5 times in total, K 3, K 2 tog = 49 sts. ROW 4-7: K all sts. ROW 8 (= WS): K 1, * 1 YO, P 2 tog *, repeat from *-* the entire row = 49 sts. ROW 9-10: K all sts. ROW 11: K 2 tog, K 7, * slip 1 st as if to K, K 2 tog, psso, K 4 *, repeat from *-* 5 times in total, K 3, K 2 tog = 37 sts. ROW 12-15: K all sts. ROW 16 (= WS): K 1, * 1 YO, P 2 tog *, repeat from *-* the entire row = 37 sts. ROW 17-18: K all sts. ROW 19: K 2 tog, K 5, * slip 1 st as if to K, K 2 tog, psso, K 7 *, repeat from *-* 2 times in total, slip 1 st as if to K, K 2 tog, psso, K 5, K 2 tog = 29 sts. ROW 20-26: K all sts. ROW 27: K 2 tog, K 3, * slip 1 st as if to K, K 2 tog, psso, K 5 *, repeat from *-* 2 times in total, slip 1 st as if to K, K 2 tog, psso, K 3, K 2 tog = 21 sts. ROW 28-29: K all sts. ROW 30 (= WS): K 1, * 1 YO, P 2 tog *, repeat from *-* the entire row = 21 sts. ROW 31-34: K all sts. ROW 35: K 2 tog, K 7, slip 1 st as if to K, K 2 tog, psso, K 7, K 2 tog = 17 sts. ROW 36-42: K all sts. ROW 43: K 2 tog, K 5, slip 1 st as if to K, K 2 tog, psso, K 5, K 2 tog = 13 sts. ROW 44-48: K all sts. ROW 49: K 2 tog, K 3, slip 1 st as if to K, K 2 tog, psso, K 3, K 2 tog = 9 sts. ROW 50-54: K all sts. ROW 55: K 2 tog, K 1, slip 1 st as if to K, K 2 tog, psso, K 1, K 2 tog = 5 sts. ROW 56-58: K all sts. ROW 59: K 1, slip 1 st as if to K, K 2 tog, psso, K 1 = 3 sts. ROW 60: K all sts. ROW 61: Slip 1 st as if to K, K 2 tog, psso = 1 st. Cut the yarn and pull it through the remaining st and fasten. FAN 2: Cast on 30 sts on needle, in addition pick up 31 sts along the right edge on FAN 1 (seen from RS) – i.e. pick up 1 st in every ridge and approx. 1 st in every row with holes = 61 sts on row. Then work as FAN 1 but from 2nd row (i.e. beg with K from WS). FAN 3: Pick up 31 sts along the left edge on FAN 1 (seen from RS), then cast on 30 new sts at the end of row = 61 sts. Then work as FAN 1 but from 2nd row (i.e. beg with K from WS). FAN 4: Work as FAN 2. FAN 5: Pick up 30 sts along the left edge on FAN 2 (seen from RS), pick up 1 st at the tip at the top on FAN 1 and pick up 30 sts along the right edge on FAN 3 = 61 sts. Then work as FAN 1 but from 2nd row (i.e. beg with K from WS). FAN 6: Work as FAN 3. First, second and third row with fans have been worked. Continue like this upwards - see diagram A.1 for correct order. When a total of 36 fans have been worked, work half circles between every fan so that the edge at the top of shawl is straight. HALF CIRCLE BETWEEN EVERY FAN: Pick up from RS 61 sts along the edge between 2 fans – i.e. pick up 1 st in every ridge and approx. 1 st in every row with holes + 1 st between two fans at the tip at the top of fan from the row below. Then work as follows: ROW 1 (= WS): K all sts. ROW 2 (= RS): K all sts. ROW 3: K all sts. ROW 4: * K 3, K 2 tog *, repeat from *-* until 1 st remains and finish with K 1 = 49 sts. ROW 5: K 1, * 1 YO, P 2 tog *, repeat from *-* the entire row = 49 sts. ROW 6: K all sts. ROW 7 (= WS): K 1, * 1 YO, P 2 tog *, repeat from *-* the entire row = 49 sts. ROW 8-14: K all sts. ROW 15 (= WS): K 1, * 1 YO, P 2 tog *, repeat from *-* the entire row = 49 sts. ROW 16-17: K all sts. ROW 18: K all sts tog 2 by 2 until 1 st remains, finish with K 1 = 25 sts. ROW 19-25: K all sts. ROW 26: K all sts tog 2 by 2 until 1 st remains, finish with K 1 = 13 sts. ROW 27: K all sts. ROW 28: K all sts tog 2 by 2 until 1 st remains, finish with K 1 = 7 sts. ROW 29: K all sts. ROW 30: K all sts tog 2 by 2 until 1 st remains, finish with K 1 = 4 sts. ROW 31: K all sts. ROW 32: Slip 1 st as if to K, K 3 tog and psso = 1 st. Cut the yarn and pull it through the remaining st, tighten tog and fasten. HALF CIRCLE ON THE RIGHT EDGE OF SHAWL (seen from RS): Cast on 30 sts on needle, in addition pick up 31 sts along the right edge on FAN 29 (seen from RS) = 61 sts on row. Then work HALF CIRCLE BETWEEN EVERY FAN. HALF CIRCLE ON THE LEFT EDGE OF SHAWL (seen from RS): Pick up 31 sts along the left edge on FAN 36 (seen from RS), and cast on 30 new sts at the end of row = 61 sts. Then work HALF CIRCLE BETWEEN EVERY FAN. EDGE IN GARTER ST AT THE TOP OF SHAWL: Cast on 4 sts on 1 double pointed needle size 3.5 mm / US 4. K 1 row (= RS). Work next row as follows from WS: * Pick up the outermost st in garter ridge in the left side of shawl (with WS towards you), work first st on left needle, pass the new st over, K the rest of row, turn piece, K back over the 4 sts, turn piece *, repeat these 2 rows from *-* until 1 st has been picked up in approx. every st in garter ridges along the entire edge at the top of shawl. Cut and fasten yarn tails. |
|
|
|
Have you finished this pattern?Tag your pictures with #dropspattern #softmermaidshawl or submit them to the #dropsfan gallery. Do you need help with this pattern?You'll find 10 tutorial videos, a Comments/Questions area and more by visiting the pattern on garnstudio.com. © 1982-2025 DROPS Design A/S. We reserve all rights. This document, including all its sub-sections, has copyrights. Read more about what you can do with our patterns at the bottom of each pattern on our site. |
|


With over 40 years in knitting and crochet design, DROPS Design offers one of the most extensive collections of free patterns on the internet - translated to 17 languages. As of today we count 314 catalogs and 11821 patterns - 11811 of which are translated into English (US/in).
We work hard to bring you the best knitting and crochet have to offer, inspiration and advice as well as great quality yarns at incredible prices! Would you like to use our patterns for other than personal use? You can read what you are allowed to do in the Copyright text at the bottom of all our patterns. Happy crafting!
Post a comment to pattern DROPS 148-33
We would love to hear what you have to say about this pattern!
If you want to leave a question, please make sure you select the correct category in the form below, to speed up the answering process. Required fields are marked *.