
Looking for a yarn?


Comments / Questions (17)
![]() Norma wrote:
Norma wrote:
Thank you for responding back.. Now I'm ready to start knitting this beautiful project...😀
04.12.2016 - 05:01
![]() Norma wrote:
Norma wrote:
Hello, I would like help with the increase 6 sts tips. I'm reading it wrong. Where do the increases coming in at. I've been playing with it for like 30mins. Please rewrite / reword it different for me. Thank you
01.12.2016 - 17:39DROPS Design answered:
Dear Norma, inc 6 sts as follows: Kfb 1st st (= 1 st inc), work to next marker and work the st after marker kfb (= 1 st inc), work to next marker and work the st after marker kfb (= 1 st inc), work to next marker and work the st before marker kfb (= 1 st inc), work to next marker and work the st before marker kfb (= 1 st inc), work to the last st and work ths st kfb (= 1 st inc) = you have inc a total of 6 sts: 1 st at beg + 1 st at the end of row + 1 st after first 2 markers (= 2 sts inc) + 1 st inc before next 2 markers (= 2 sts inc). Happy knitting!
02.12.2016 - 08:55
![]() Henriette Frohn wrote:
Henriette Frohn wrote:
Skal det strikkes i begge garn typer eller kan man strikke det i den ene type ?
01.03.2016 - 21:47DROPS Design answered:
Hej Henriette, Hvis du vil have stribeeffekten skal du strikke med 2 typer/farver, ellers kan du strikke i en type garn. God fornøjelse!
02.03.2016 - 14:10
![]() Dagmar Lange wrote:
Dagmar Lange wrote:
Mit der Reihe 3 habe ich 12 Maschen auf der Nadel, in Reihe 4 setze ich 4 Markierungen wie beschrieben, zwischen den Markierungen sollen jeweils 4 Maschen sein??? Zwischen 2. und 4. Masche ist doch nur 1M und zwischen 4.und 9. liegen 5M ...?? Und wo wandern die Markierungen nach oben ? Das Ganze scheint unsymmetrische Zunahmen zu ergeben
09.08.2013 - 16:38DROPS Design answered:
Liebe Dagmar, vielen Dank für die Rückmeldung, wir hatten einen Übersetzungsfehler in der Anleitung, der jetzt korrigiert ist. Die beiden letzten Markierungen sitzen VOR der 9. bzw. 11. Masche und die Zunahmen sind symmetrisch. Entschuldigung für die Umstände!
10.08.2013 - 14:14
![]() Urszula wrote:
Urszula wrote:
Jeżeli dodajemy oczka w czterech miejscach to dlaczego przybywa sześć oczek?
31.05.2013 - 22:03DROPS Design answered:
Ponieważ dodatkowo w tym samym rzędzie przerabiamy 2 razy również pierwsze i ostatnie oczko (4+2 z brzegów daje łącznie 6). Powodzenia!
31.05.2013 - 22:53
![]() Ester Tollefsen wrote:
Ester Tollefsen wrote:
Strikket i oppgitte farger. Resultat: veldig bra. Spørsmål: Jeg vil strikke enda et sjal og har Delight farge 11. Hvilken farge i Fabel vil passe til? Kan jeg f.eks. bruke nr. 910, eller vil en annen farge passe bedre? Fikk ikke tilfredsstillende hjelp der garnet ble kjøpt.
20.05.2013 - 15:26DROPS Design answered:
Hej Ester. Vi kan desvaerre ikke hjelpe dit her andet en henvise til fargekort: https://www.garnstudio.com/lang/no/visgarn.php?garn=Fabel eller til butikken. Er du ikke tilfreds med den hjelp du fik der, saa pröv en anden.
21.05.2013 - 12:36
![]() Irina wrote:
Irina wrote:
In der 4R ist es wohl eher so gemeint, das der 1 Marker nach der 2M, der nächste Marker nach der 4M, der nächste Marker vor der 9M & der letzte Marker vor der 11M gesetzt werden. Somit haben wir 4 Maschen in der MItte. ll-ll-llll-ll-ll
03.03.2013 - 23:17
![]() Ruby Amparo Gomez wrote:
Ruby Amparo Gomez wrote:
Salve a voi! Scusate,ma prima di comprare il filato vorrei sapere a cosa servono i segna punti,non capisco proprio come andare avanti,se devo fare degli aumenti ai lati dei segna p,o meno. Grazie mille!!!!
01.03.2013 - 14:31DROPS Design answered:
Buongiorno, i segnapunti indicano i punti dove vanno fatti gli aumenti. Per gli aumenti deve seguire il suggerimento per gli aumenti all'inizio delle istruzioni in cui viene indicato in modo dettagliato come aumentare a livello dei segnapunti. Buon lavoro!!
01.03.2013 - 14:52
![]() Ursula Kürten wrote:
Ursula Kürten wrote:
Ich habe bei der Anleitung ein Problem die 4. und 5. Reihe zu installieren.Bitte um Hilfe
22.01.2013 - 09:04DROPS Design answered:
Liebe Frau Kürten, in der 4. R werden nur die Markierungen gesetzt und in der 5. R werden 6 M aufgenommen. Wie Sie das tun, ist oben beschrieben (unter TIPP ZUR AUFNAHME).
14.02.2013 - 09:13Lucy wrote:
Lovely. I'd like to see the shape.
13.01.2013 - 11:57
|
|
Perla#perlashawl |
|
 |
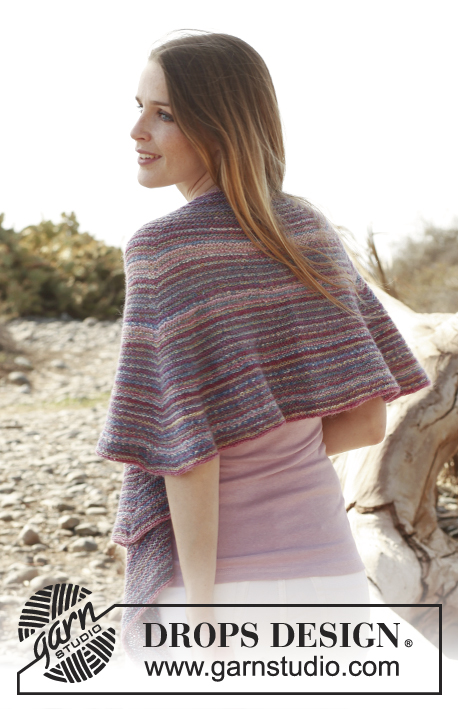 |
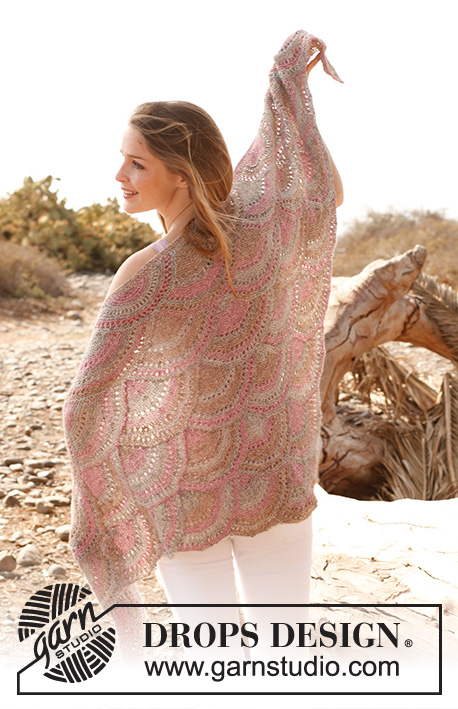
Knitted DROPS shawl in garter st in ”Delight” and ”Fabel”.
DROPS 148-20 |
|
|
KNITTING INFO: The entire shawl is worked in garter st, i.e. K back and forth on all rows. At the same time work stripes as follows: * K 2 rows with Delight pink/purple, K 2 rows with Fabel sea mist *, repeat from *-* until finished measurements. NOTE: Make sure that the edge with color change is not too tight. INCREASE TIP: Inc 1 st by working 2 sts in the same st (i.e. front and back loop of st). Inc 6 sts on row as follows: Work 2 sts in 1st st, * work until next marker, work 2 sts in next st (i.e. in st after marker) *, repeat from *-* 1 time, ** work until 1 st before next marker, work 2 sts in this st (i.e. in st before marker) **, repeat from **-** 1 time, work until 1 st remains on row, work 2 sts in last st = 6 inc. -------------------------------------------------------- SHAWL: Worked back and forth on circular needle from mid back and down. Cast on 3 sts on circular needle size 5 mm / US 8 with Delight pink/purple - READ KNITTING INFO. Row 1 (= RS): K 2 sts in every st (i.e. in front and back loop of every st) = 6 sts. Row 2 (= WS): K all sts. Row 3: Switch to Fabel sea mist and K 2 sts in every st = 12 sts. Row 4: K all sts. Insert 1 marker after 2nd st, 1 marker after 4th st, 1 marker before 9th st, 1 marker before 11th st = 4 markers in total with 4 sts in the middle. NOTE! Move the markers upwards when working. Row 5: Switch Delight pink/purple, K while AT THE SAME TIME inc 6 sts on row - READ INCREASE TIP = 18 sts. Row 6-8: K all sts. REMEMBER THE KNITTING GAUGE AND COLOR CHANGE EVERY OTHER ROW! Repeat row 5 to 8 - i.e. inc with 6 sts every 4 rows - until piece measures approx. 40 cm / 15¾" vertically mid back. Loosely bind off all sts. BLOCKING: Place the shawl in lukewarm water until it is soaking wet. Gently squeeze the water out - do not twist. Then roll the shawl in a towel and squeeze to remove more water - the shawl will now only be moist. Place the shawl on a carpet or mattress - carefully stretch it out. Leave to dry. |
|
Have you finished this pattern?Tag your pictures with #dropspattern #perlashawl or submit them to the #dropsfan gallery. Do you need help with this pattern?You'll find 3 tutorial videos, a Comments/Questions area and more by visiting the pattern on garnstudio.com. © 1982-2025 DROPS Design A/S. We reserve all rights. This document, including all its sub-sections, has copyrights. Read more about what you can do with our patterns at the bottom of each pattern on our site. |
|


With over 40 years in knitting and crochet design, DROPS Design offers one of the most extensive collections of free patterns on the internet - translated to 17 languages. As of today we count 314 catalogs and 11821 patterns - 11811 of which are translated into English (US/in).
We work hard to bring you the best knitting and crochet have to offer, inspiration and advice as well as great quality yarns at incredible prices! Would you like to use our patterns for other than personal use? You can read what you are allowed to do in the Copyright text at the bottom of all our patterns. Happy crafting!
Post a comment to pattern DROPS 148-20
We would love to hear what you have to say about this pattern!
If you want to leave a question, please make sure you select the correct category in the form below, to speed up the answering process. Required fields are marked *.