
Popular categories
Looking for a yarn?


|
||||||||||||||||
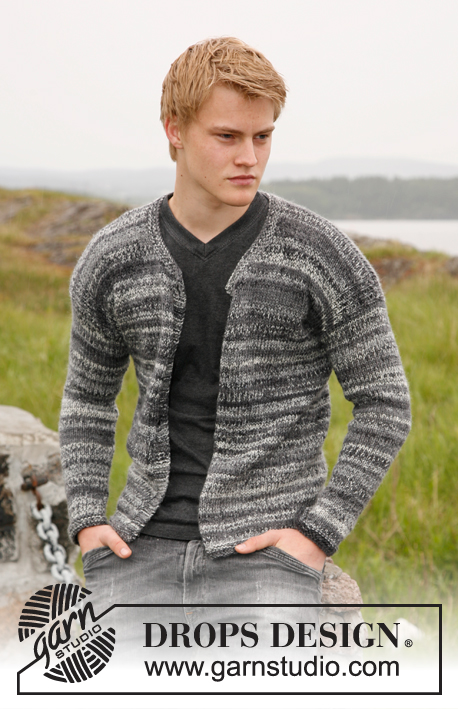
Rambling Man |
||||||||||||||||
 |
 |
|||||||||||||||
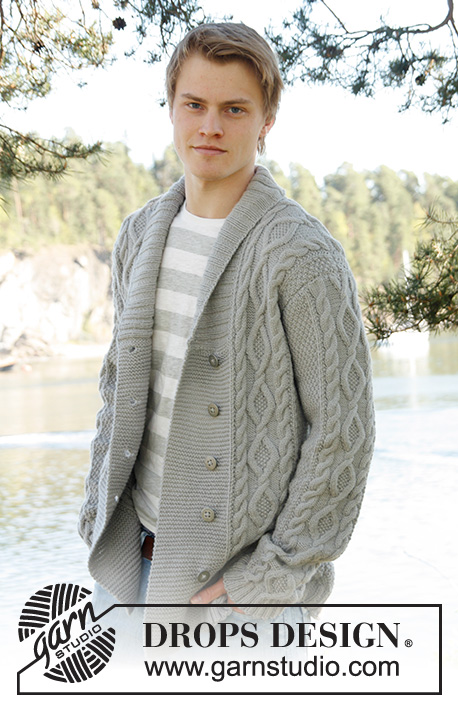
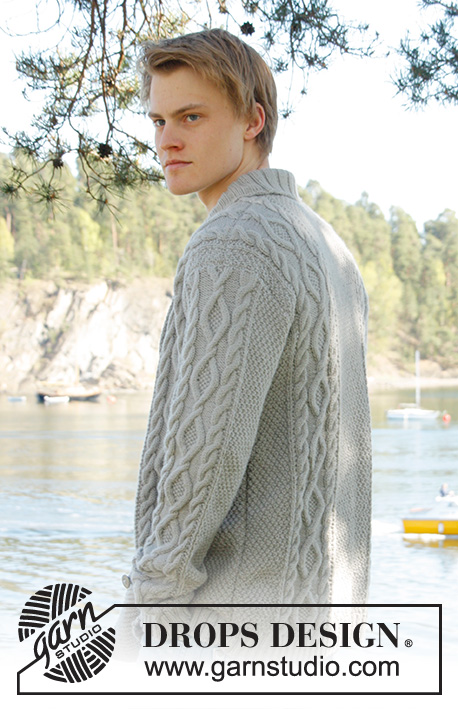
Men's knitted jacket in DROPS Lima, with cable pattern and shawl collar. Size: S - XXXL.
DROPS Extra 0-850 |
||||||||||||||||
|
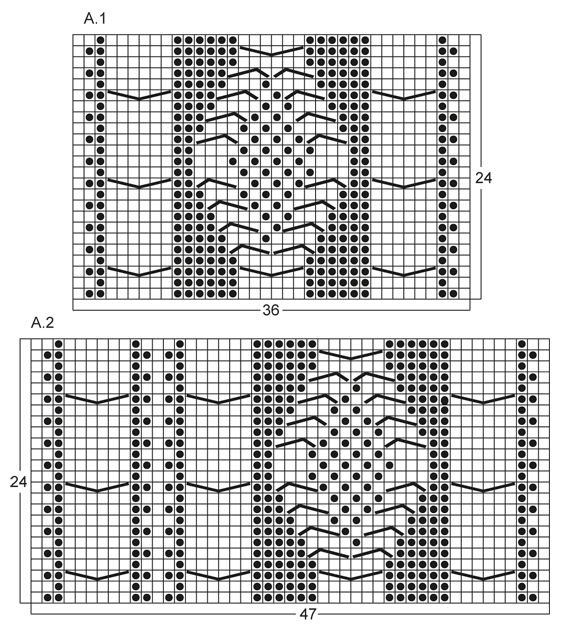
KNITTING TIPS: This design is written with button holes on right front edge, if you wish standard button holes for men, you can make the button holes on left front edge. GARTER ST (back and forth on needle): K all rows. NOTE: All edge sts are worked in garter st. PATTERN: See diagram A.1 to A.4, diagrams show all rows in 1 pattern repetition from RS. SHORT ROWS: RIGHT FRONT PIECE: Work 1 short row on row 3 of every pattern repetition vertically until finished measurements as follows: On 3rd row in pattern (= RS), work 26-26-26-26-30-30 band sts, turn and K back. Then work over all sts on row as before. LEFT FRONT PIECE: Work 1 short row on row 2 of every pattern repetition vertically until finished measurements as follows: On 2nd row in pattern (= WS), work 26-26-26-26-30-30 band sts, turn and K back. Then work over all sts on row as before. BUTTON HOLES: Cast off for 5 button holes from RS on right band. 1 BUTTON HOLE = cast off 7th and 8th st from mid front and cast on 2 new sts on next row over these sts. Cast off for button holes when piece measures: SIZE S: 14, 22, 30, 38 and 46 cm SIZE M: 15, 23, 31, 39 and 47 cm SIZE L: 16, 24, 32, 40 and 48 cm SIZE XL: 17, 25, 33, 41 and 49 cm SIZE XXL: 18, 26, 34, 42 and 50 cm SIZE XXXL: 19, 27, 35, 43 and 51 cm INCREASE TIP: Inc 1 st by making 1 YO, on next row work YO twisted (i.e. work in back loop of st instead front) to avoid holes. ---------------------------------------------------------- BACK PIECE: Worked back and forth on needle. Cast on 136-156-168-180-196-204 sts (incl 1 edge st in each side) on circular needle size 3.5 mm with Lima. Work rib as follows (1st row = RS): 1 edge st in GARTER ST - see explanation above, * K 2, P 2 *, repeat from *-*, finish with K 2 and 1 edge st in garter st. Continue to work like this until rib measures 5-5-5-6-6-6 cm. On last row from WS, P while AT THE SAME TIME dec 20-22-24-26-26-26 sts evenly = 116-134-144-154-170-178 sts. Then switch to needle size 4 mm and work next row from RS as follows: 1 edge st in garter st, 8-16-20-24-20-24 sts in A.4, work A.1 one time in size S - XL, work A.2 one time in size XXL and XXXL, 26-28-30-32-34-34 sts in A.4, then work A.1 one time in size S - XL, work A.3 one time in size XXL and XXXL, finish with 8-16-20-24-20-24 sts in A.4 and 1 edge st in garter st. REMEMBER THE KNITTING TENSION! Continue to work like this until piece measures 47-48-49-50-51-52 cm. Then cast off for armholes at the beg of every row in each side as follows: Cast off 3 sts 0-1-1-2-2-2 times, 2 sts 1-1-1-2-2-2 times, 1 st 4-7-9-8-4-8 times = 104-110-116-118-142-142 sts. Continue with pattern as before until piece measures 66-68-70-72-74-76 cm. Now cast off the middle 20-22-24-26-28-28 sts for neck and finish each part separately. Cast off 2 sts on next row from neck = 40-42-44-44-55-55 sts remain on shoulder. Continue with pattern as before. When piece measures 68-70-72-74-76-78 cm, loosely cast off sts with K over K and P over P. RIGHT FRONT PIECE: Worked back and forth on needle. Cast on 83-91-95-99-111-115 sts (incl 1 edge st in the side) on circular needle size 3.5 mm with Lima. Work rib as follows (1st row = RS): 26-26-26-26-30-30 sts in garter st (= band sts), * K 2, P 2 *, repeat from *-*, finish with 1 edge st in garter st. Continue with rib and band sts in garter st until rib measures 5-5-5-6-6-6 cm. On last row from WS, P over all sts in rib while AT THE SAME TIME dec 12-12-12-12-13-13 sts evenly (do not dec over band sts) = 71-79-83-87-98-102 sts. Then switch to needle size 4 mm and work next row from RS as follows: 26-26-26-26-30-30 band sts, work A.1 one time in size S - XL, work A.3 one time in size XXL and XXXL, 8-16-20-24-20-24 sts in A.4 and 1 edge in garter st. On next row from RS (= 3rd row in pattern) work SHORT ROWS - read explanation above. Continue with pattern and band sts at the front - while AT THE SAME TIME work 1 short row on 3rd row in every pattern repetition vertically until finished measurement. When piece measures 14-15-16-17-18-19 cm, cast off for BUTTON HOLES on right band - see explanation above! Continue to work until piece measures 47-48-49-50-51-52 cm. Then cast off at beg of next row from RS as follows: Cast off the first 25-25-25-25-29-29 sts, insert a marker (this marks where to beg the knit up for collar), work the rest of row. Then cast off for armhole on every row from WS as follows: 3 sts 0-1-1-2-2-2 times, 2 sts 1-1-1-2-2-2 times, 1 st 4-7-9-8-4-8 times = 40-42-44-44-55-55 sts remain on shoulder. Continue with pattern as before. When piece measures 68-70-72-74-76-78 cm, loosely cast off sts with K over K and P over P. LEFT FRONT PIECE: Cast on and work rib as on right front piece but reversed (i.e. * P 2, K 2 *, repeat from *-*) with 26-26-26-26-30-30 band sts in garter st. Continue to work until rib measures 5-5-5-6-6-6 cm. On last row from WS, P over all sts in rib while AT THE SAME TIME dec 12-12-12-12-13-13 sts evenly (do not dec over band sts) = 71-79-83-87-98-102 sts. Then switch to needle size 4 mm and work next row from RS as follows: 1 edge st in garter st, 8-16-20-24-20-24 sts in A.4, work A.1 one time in size S - XL, work A.2 one time in size XXL and XXXL, 26-26-26-26-30-30 band sts in garter st. On next row from WS (= 2nd row in pattern) work SHORT ROWS - read explanation above. Continue to work the same way as on right front piece but without button holes. SLEEVE: Worked back and forth on needle. Cast on 74-78-82-86-90-90 sts (incl 1 edge st in each side) on circular needle size 3.5 mm with Lima. Work rib as follows (1st row = RS): 1 edge st in garter st, * K 2, P 2 *, repeat from *-* and finish with 1 edge st in garter st. Continue to work like this until rib measures 5-5-5-6-6-6 cm. On last row from WS, P while AT THE SAME TIME dec 12-14-16-18-18-18 sts evenly = 62-64-66-68-72-72 sts. Then switch to needle size 4 mm and work next row from RS as follows: 1 edge st in garter st, 12-13-14-15-17-17 sts in A.4, work A.1 one time, 12-13-14-15-17-17 sts in A.4, finish with 1 edge st in garter st. AT THE SAME TIME when piece measures 6 cm, inc 1 st inside 1 edge st in each side - Read INCREASE TIP above. NOTE: Work the inc sts in A.4. Repeat inc every 3½-3-2½-2½-2½-2½ cm a total of 14-15-16-17-16-17 times = 90-94-98-102-104-106 sts. Continue until piece measures 54-53-51-50-48-48 cm (shorter measurements in the larger sizes because of longer sleeve cap and broader shoulder width), cast off at beg of every row in each side: 3 sts 1-1-1-2-2-2 times, 2 sts 1-1-2-2-2-2 times and 1 st 2-2-3-3-4-4 times. Then cast off 2 sts in each side until piece measures 61-61-60-60-59-59 cm, then cast off 3 sts 2 times in each side. When piece measures approx. 62-62-61-61-60-60 cm, loosely cast off sts with K over K and P over P. ASSEMBLY: Sew shoulder seams and sew in sleeves inside 1 edge st. Sew sleeve and side seams in one inside 1 edge st. Sew buttons on to left front piece, approx. 2½ cm from last K st in pattern. SHAWL COLLAR: Knit up sts from RS inside 1 edge st on circular needle size 3.5 mm. Start mid front at marker on right front piece as follows: Knit up approx. 60-70 sts up to shoulder, then 30-40 sts along the neck and 60-70 sts down along left front piece until marker = 150-180 sts. K 1 row from WS while AT THE SAME TIME adjusting no of sts to 144-148-156-164-172-180. Then work rib on next row from RS as follows: 1 sts in garter st, * K 2, P 2 *, repeat from *-* and finish with K 2 and 1 st in garter st. Continue like this until collar measures approx. 5-5-5-6-6-6 cm. Now inc 1 st in each of the middle 14-14-14-16-16-16 P-sections seen from RS (= back of neck) = 158-162-170-180-188-196 sts. Continue until collar measures approx. 12-12-12-12-14-14 cm, then loosely cast off with K over K and P over P. Fasten collar with stitches at the bottom in each side towards band from WS (so that the seam is not visible from RS) – sew edge to edge to avoid a chunky seam. |
||||||||||||||||
Diagram explanations |
||||||||||||||||
|
||||||||||||||||

|
||||||||||||||||
|
||||||||||||||||
|
Have you made this or any other of our designs? Tag your pictures in social media with #dropsdesign so we can see them! Do you need help with this pattern?You'll find tutorial videos, a Comments/Questions area and more by visiting the pattern on garnstudio.com. © 1982-2024 DROPS Design A/S. We reserve all rights. This document, including all its sub-sections, has copyrights. Read more about what you can do with our patterns at the bottom of each pattern on our site. |
||||||||||||||||


With over 40 years in knitting and crochet design, DROPS Design offers one of the most extensive collections of free patterns on the internet - translated to 17 languages. As of today we count 304 catalogues and 11422 patterns - 11422 of which are translated into English (UK/cm).
We work hard to bring you the best knitting and crochet have to offer, inspiration and advice as well as great quality yarns at incredible prices! Would you like to use our patterns for other than personal use? You can read what you are allowed to do in the Copyright text at the bottom of all our patterns. Happy crafting!
Comments / Questions (258)
Beautiful pattern! May I ask for clarification in the bind off for armholes section on back piece for size M? How exactly should I do it(e.g it says bind off 3 sts 1 time,does that mean bind off on left and right side 1 st 3 consecutive rows?)thank you
29.09.2019 - 07:36DROPS Design answered:
Dear Dusica, in size M you bind off at the beginning of each row on each side (= both from RS and WS): 3 sts 1 time (= 3 sts cast off at the beg of next 2 rows), then cast off 2 sts at the beg of next 2 rows (= 5 sts cast off in total on each side), then 1 stitch at the beginning of next 14 rows (= 7 sts cast off on each side = 12 sts cast off in total on each side) = 110 sts remain. Happy knitting!
30.09.2019 - 10:39Hi, its me again, sorry to bother you but my collar stripes direction does not look like they are going in the direction of those in your pattern picture. Am I misinterpreting the instructions? I am following your pattern directions but maybe i am missing something because the direction of the pattern or stripes do not keep consistent with the left/right front directions. Please help as I almost had the collar complete and then had to undo the entire collar because it did not look right. Thx
17.09.2019 - 06:48DROPS Design answered:
Dear Mrs Contino, to work the collar, you pick up stitches along the right side of right front piece, then along the neckline on back piece and along the left side of left front piece (from RS), then you wil work rib (increasing as explained). The rib should then look "horizontal" when you look at the piece from RS, the cast off edge will be the outermost edge of collar (folded from RS). When collar is done, you sew the right side of collar (seen from RS in knitting direction) along the stitches cast off on right front piece and the left side of collar along the stitches cast off on left front piece. It should then look as 2nd picture. Happy knitting!
17.09.2019 - 10:13Thank you very much for your help
10.09.2019 - 19:47Sorry it’s me again. Should I have worked the shawl collar apart from the body of the sweater & then fastened it to the body by sewing it in place? Thank you
10.09.2019 - 08:22DROPS Design answered:
Dear Mrs Contino, please tell us if the previous answer could have helped you. Happy knitting!
10.09.2019 - 09:31Thanks for your reply respecting the collar instructions. I understand the casting off of collar but confused with the fastening of the collar to the band on both sides. What fastening:sewing do I need to do if I have already completed assembly instructions prior to commencing shawl collar as shawl collar is achieved by picking up stitches. Sorry but I must be missing something here. Kindly elaborate a bit more on this. Thank you.
10.09.2019 - 07:57DROPS Design answered:
Dear Mrs Contino, shawl collar is worked by picking up stitches between the front band sts (in garter st) worked on each side. After casting off, you will have now to sew the sides of collar (beg/end of rows on each side) along the 25-29 stitches in garter stitches cast off on each front piece. Happy knitting!
10.09.2019 - 09:30Hi I am at the last part of this sweater and I do not understand this paragraph is there anyway you could please explain in more details? Thanks Continue until collar measures approx. 12-12-12-12-14-14 cm / 4 3/4"-4 3/4"-4 3/4"-4 3/4"-5½"-5½", then loosely bind off with K over K and P over P. Fasten collar with fine stitches at the bottom in each side towards band from WS (so that the seam is not visible from RS) – sew edge to edge to avoid a chunky seam.
10.09.2019 - 03:01DROPS Design answered:
Hi Linda, The casting off is in both knit and purl to make the edge more elastic - so cast off with knit over the knitted stitches and purl over the purled stitches. The fastening of the collar to the band on each side; here you work from the wrong side, but sew in the outermost loop of each outermost stitch. This makes the seam flat rather than having two layers of material on top of each other. I hope this helps and happy knitting!
10.09.2019 - 07:20Bonjour, J'aimerais tricoter ce pull pour un ami qui a beaucoup d'allergies. Il lave donc tous ses vêtements à 60° en machine... Le convertisseur ma donné un fil qui pourrait convenir, le Drops Muskat. Ce fil à l'air assez solide, pensez vous qu'il résistera à ce mode de lavage? :) Je profite aussi de ce commentaire pour vous remercier de tous ces modèles qui occupent mes soirées d'hiver ;) Ce site est unique en son genre!! Merci pour tout, Chloé
20.08.2019 - 11:13DROPS Design answered:
Bonjour Chloé et merci; DROPS Muskat se lave à 40° en cycle délicat, il risque de ne pas convenir - pour toute assistance au choix du fil adéquat, je vous invite à contacter votre magasin DROPS - même par mail ou téléphone - qui saura vous apporter une aide personnalisée. Bon tricot!
20.08.2019 - 11:22Hei. Jeg holder på med denne og det står at knappehull er på venstre side? Er ikke det damelukning?
14.08.2019 - 13:24DROPS Design answered:
Hej Anita, jeg synes der står i opskriften at de skal være på højre stolpe... men du må gerne flytter dem over på venstre stolpe. God fornøjelse!
16.08.2019 - 13:46Can you explain the part oh short rows where it says work 1 short row on row 2 of every pattern repetition, for left front piece.dies this mean that within 1 pattern which has 24 rows I have to make 12 short rows?Thank you.
06.08.2019 - 13:43DROPS Design answered:
Dear Dusica, you wil work short rows every time you will work the row 2 from the diagram. Diagram is 24 rows, work first row as explained, work then row 2 in diagram, work the short rows over the front band sts, and continue diagram to the end. Repeat short row on next row 2 in diagram. Happy knitting!
07.08.2019 - 11:56De mouwkop is met een lengte van 10 cm veel te kort. Moet de totale lengte van de mouw 76 cm zijn, of doe ik iets verkeerd?
09.06.2019 - 12:02DROPS Design answered:
Dag Wil,
De totale lengte van de mouw staat onderaan in de tekening aangegeven en deze is afhankelijk van je maat ergens tussen de 62 en 60
09.06.2019 - 14:21