
Popular categories
Looking for a yarn?


|
|
Summer Circle |
|
 |
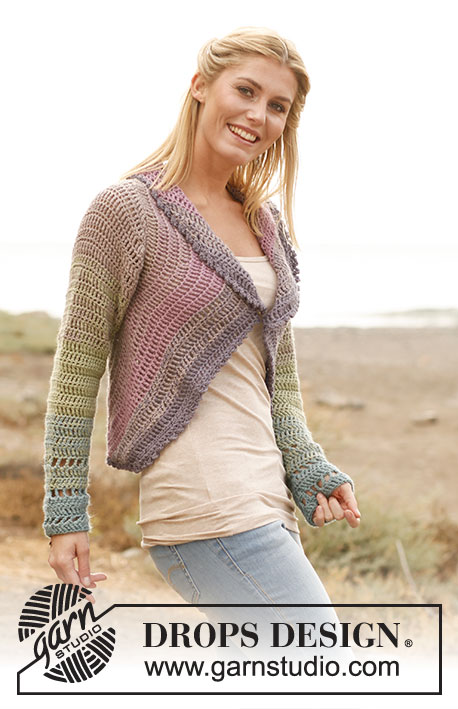 |
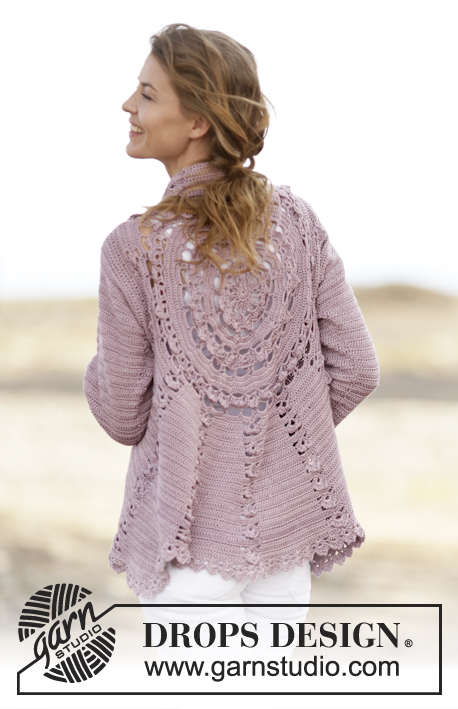
Crochet DROPS jacket worked in a circle in 2 strands ”BabyAlpaca Silk”. Size: S - XXXL.
DROPS 136-1 |
|
|
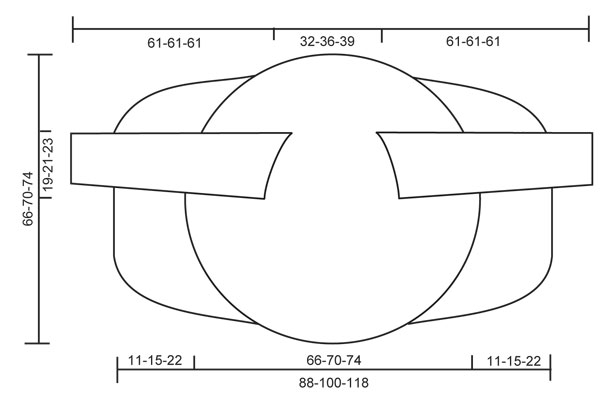
STRIPES: BODY: Beg with 2 strands light sea green. Then work 3-3-4 rounds with each of the following colors: Stripe 1: 2 strands light sea green, Stripe 2: 1 strand light sea green and 1 strand pistachio Stripe 3: 2 strands pistachio Stripe 4: 1 strand pistachio and 1 strand light gray purple Stripe 5: 2 strands light gray purple, Stripe 6: 1 strand light old pink and 1 strand light gray purple Stripe 7: 2 strands light old pink, Stripe 8: 1 strand light old pink and 1 strand gray purple Stripe 9 until finished measurements: 2 strands gray purple SLEEVE: Worked in stripes. Work sleeve cap as 5th-5th-4th stripe, then work 12 cm / 4¾" as stripe 4-4-3, 12 cm / 4¾" as stripe 3-3-2, 12 cm / 4¾" as stripe 2-2-1, and work as stripe 1 until finished measurements. CROCHET TIP: Replace first tr on every round/row with ch 4. DECREASE TIP 1 (applies to the body): Dec as follows: Work tr until 3 tr remain, * in the first of these work 1 dc, in the next 1 hdc and in the last 1 sc, turn with ch 1, skip sc, work 1 sl st in hdc and 1 sl st in dc, then 1 sc in first tr, 1 hdc in next tr and 1 dc in next tr, work tr until 3 tr remain at end of row *, repeat from *-* until a total of 6-8-12 rows have been worked. DECREASE TIP 2 (applies to sleeve): Dec at beg of row by working sl st over the no of tr to be dec. Dec at end of row by working until same no of tr to be dec remains, turn piece. -------------------------------------------------------- BODY: Worked in the round in a circle from mid back with 2 strands BabyAlpaca Silk and STRIPES – see explanation above. Ch 8 on hook size 5 mm / H/8 and form a ring with 1 sl st in first ch. ROUND 1: Work 12 sc in ch-ring, finish with 1 sl st in first sc. ROUND 2: 5 ch (= 1 dc + 2 ch), * 1 dc in next sc, 2 ch *, repeat from *-* the entire round and finish with 1 sl st in 3rd ch from beg of round = 12 dc with 2 ch between each. ROUND 3: READ CROCHET TIP! 1 tr, 2 tr in same dc, * 1 tr in ch-space, 3 tr in next dc *, finish with 1 tr in the last ch-space and 1 sl st in 4th ch from beg of round = 48 tr. ROUND 4: 1 tr, * 2 tr in next tr, 1 tr in next tr *, repeat from *-* and finish with 2 tr in next tr and 1 sl st in 4th ch from beg of round = 72 tr. ROUND 5: 1 tr, * 2 tr in next tr, 1 tr in each of the next 2 tr * repeat from *-* and finish with 2 tr in next tr, 1 tr in next tr and 1 sl st in 4th ch = 96 tr. ROUND 6: 5 ch (= 1 dc + 2 ch), * skip 1 tr, 1 dc in next tr, ch 2 *, repeat from *-* the entire round and finish with 1 sl st in 3rd ch from beg of round = 48 ch-spaces. ROUND 7: Work 1 tr in every dc and work 1 and 2 tr alternately in every ch-space the entire round = 120 tr. ROUND 8: Work 1 tr in every tr but work 2 tr in every 10th tr = 132 tr. ROUND 9: 5 ch (= 1 dc + 2 ch), * skip 1 tr, 1 dc in next tr, ch 2 *, repeat from *-* the entire round and finish with 1 sl st in 3rd ch from beg of round = 66 ch-spaces. ROUND 10: Work 1 tr in every dc and work 1 and 2 tr alternately in every ch-space the entire round = 165 tr. ROUND 11: Work 1 tr in every tr but work 2 tr in every 15th tr = 176 tr. ROUND 12: Work 1 tr in every tr but work 2 tr in every 16th tr = 187 tr. Piece measures approx. 20 cm / 8" from the middle and outwards. SIZE S/M: ROUND 13: ch 1, then work 1 sc in each of the first 45 tr (= up towards neck), ch 30 loosely, skip the next 27 tr (= armhole), then work 1 sc in each of the next 88 tr (= down towards back), ch 30 loosely, skip the next 27 tr (= armhole) and fasten with 1 sl st in first sc on round. ROUND 14: Work 1 tr in every sc - but inc 2 tr evenly over the first 45 sc (= 47 tr), then work 30 tr in ch-row over armhole, work 1 tr in every sc – but inc 3 tr evenly over the bottom 88 sc (= 91 tr), work 30 tr in ch-row over armhole and fasten with 1 sl st in 4th ch = 198 tr. ROUND 15 to 19: Continue with tr – while at the same time inc 6 tr evenly on every round. After 19th round there are 228 tr on the round and piece measures approx. 33 cm / 13" from the middle and outwards. Continue working only over 79 tr in each side – i.e. do not work over 35 tr at top by neck and 35 tr at bottom of back. Cut the yarn. Continue with explanation below for front piece. SIZE L/XL: ROUND 13: Work 1 tr in every tr but work 2 tr in every 17th tr = 198 tr. ROUND 14: 1 ch, then work 1 sc in each of the first 50 tr (= up towards neck), ch 32 loosely, skip the next 29 tr (= armhole), then work 1 sc in each of the next 90 tr (= down towards back), ch 32 loosely, skip the next 29 tr (= armhole) and fasten with 1 sl st in first sc on round. ROUND 15: Work 1 tr in every sc - but inc 3 tr evenly over the first 50 sc (= 53 tr), then work 32 tr in ch-row over armhole, work 1 tr in every sc – but inc 3 tr evenly over the bottom 90 sc (= 93 tr), work 32 tr in ch-row over armhole and fasten with 1 sl st in 4th ch = 210 tr. ROUND 16 to 20: Continue with tr – while at the same time inc 6 tr evenly on every round. After 20th round there are 240 tr on the round and piece measures approx. 35 cm / 13¾" from the middle and outwards. Continue working only over 81 tr in each side – i.e. do not work over 39 tr at top by neck and 39 tr at bottom of back. Cut the yarn. Continue with explanation below for front piece. SIZE XXL/XXXL: ROUND 13: Work 1 tr in every tr but work 2 tr in every 17th tr = 198 tr. ROUND 14: Work 1 tr in every tr but work 2 tr in every 18th tr = 209 tr. ROUND 15: 1 ch, then work 1 sc in each of the first 54 tr (= up towards neck), ch 36 loosely, skip the next 32 tr (= armhole), then work 1 sc in each of the next 91 tr (= down towards back), ch 36 loosely, skip the next 32 tr (= armhole) and fasten with 1 sl st in first sc on round. ROUND 16: Work 1 tr in every sc - but inc 2 tr evenly over the first 54 sc (= 56 tr), then work 36 tr in ch-row over armhole, work 1 tr in every sc – but inc 3 tr evenly over the bottom 91 sc (= 94 tr), and work 36 tr in ch-row over armhole = 222 tr. ROUND 17 to 22: Continue with tr – while at the same time inc 6 tr evenly on every round. After 22nd round there are 258 tr on the round and piece measures approx. 37 cm / 14½" from the middle and outwards. Continue working only over 89 tr in each side – i.e. do not work over 40 tr at top by neck and 40 tr at bottom of back. Continue with explanation below front piece. LEFT FRONT PIECE - ALL SIZES: = 79-81-89 tr. Insert a marker after 23-24-27 sts in from each side (= 33-33-35 sts between markers). Then work tr back and forth over these sts while at the same time inc 1 st at every marker on every row (i.e. inc 2 sts on row, inc alternately before and after marker) and dec 3 sts at end and beg of every row in each side – SEE DECREASE TIP 1 until a total of 6-8-12 rows back and forth have been worked = 55-49-41 tr. RIGHT FRONT PIECE: Work same way as on left piece over 79-81-89 tr in right side. SLEEVE: Worked back and forth from sleeve cap and down with 2 strands BabyAlpaca Silk and STRIPES – see explanation above. Ch 28-34-38 with stripe 5-5-4. Turn and work 1 tr in 5th ch from hook ( = 2 tr), then work 1 tr in every ch = 25-31-35 tr. ROW 2: Work ch 4, 3 tr in first tr, 1 tr in each of the next 23-29-33 tr, 4 tr in the last tr = 31-37-41 tr. Turn. ROW 3, 4 and 5: Work ch 4, 2 tr in first tr, 1 tr in every tr until 1 tr remains, 3 tr in the last tr = 43-49-53 tr. Turn. ROW 6: Work ch 4, 3 tr in first tr, 1 tr in each of the next 41-47-51 tr, 4 tr in the last tr = 49-55-59 tr. Turn. Switch to stripe 4-4-3 here. Then work tr on all rows until piece measures 17-15-15 cm / 6¾"-6"-6". Continue with tr while AT THE SAME TIME dec as follows in each side: SIZE S/M: * Work 1 row where dec 1 tr in each side - see Decrease tip. Work 1 row without dec. Work 1 row where dec 1 tr in each side. Work 2 rows without dec *, repeat from *-* a total of 3 times = 12 dec = 37 tr. SIZE L/XL + XXL/XXXL: * Work 1 row where dec 1 tr in each side - see Decrease tip. Work 1 row without dec *, repeat from *-* a total of 8 times = 16 dec = 39-43 tr. Continue to work as follows: ROW 1: 1 tr in every tr. ROW 2: 6 ch (= 1 tr + ch 2), skip 1 tr, 1 tr in next tr, * ch 2, skip 1 tr, 1 tr in next tr *, repeat from *-* the entire row = 18-19-21 ch-spaces. ROW 3: Work 1 tr in every tr and 1 tr in every ch-space = 37-39-43 tr. Repeat rows 1 to 3 a total of 3 times, sleeve measures approx. 61-61-61 cm / 24"-24"-24". Fasten off. ASSEMBLY: Sew sleeve seams tog edge to edge to avoid a chunky seam. Work 1 round around the entire body and at bottom of sleeves as follows with 2 strands gray purple: 1 sl st, * ch 5, 1 dc in first ch, skip 1 st, fasten with 1 sc in next st *, repeat from *-* the entire round and finish with 1 sl st in first ch. Sew in the sleeves. |
|
|
|
|
Have you made this or any other of our designs? Tag your pictures in social media with #dropsdesign so we can see them! Do you need help with this pattern?You'll find tutorial videos, a Comments/Questions area and more by visiting the pattern on garnstudio.com. © 1982-2024 DROPS Design A/S. We reserve all rights. This document, including all its sub-sections, has copyrights. Read more about what you can do with our patterns at the bottom of each pattern on our site. |
|


With over 40 years in knitting and crochet design, DROPS Design offers one of the most extensive collections of free patterns on the internet - translated to 17 languages. As of today we count 304 catalogs and 11422 patterns - 11417 of which are translated into English (US/in).
We work hard to bring you the best knitting and crochet have to offer, inspiration and advice as well as great quality yarns at incredible prices! Would you like to use our patterns for other than personal use? You can read what you are allowed to do in the Copyright text at the bottom of all our patterns. Happy crafting!
Comments / Questions (191)
Bonjour, je rencontre un pb pour les manches, je ne comprends pas comment la maille chainette de départ de la manche peut être de 28m alors que les instructions font sauter 27 DB au tour 13 pour l'emmanchure... je n'ai qu'un coté de la manche si je travaille sur 28mch au départ de la manche?? Je suis perdue!!
05.01.2019 - 10:37DROPS Design answered:
Bonjour Zia, les manches se crochètent de haut en bas, en commençant par l'arrondi de la manche, les 25 DB du début de la manche (sur 28 ml) vont être augmentées d'abord à 49 brides pour la largeur de l'emmanchure puis on diminuera pour le poignet. Bon crochet!
07.01.2019 - 09:44Il problema è che non ho ben capito il discorso delle diminuzioni; devono essere fatte all'inizio e alla fine di ogni riga, ma le spiegazioni ( diminuzioni 1) mi risultano poco chiare; soprattutto nella prima riga, che è proprio dove dovrei diminuire all'inizio
14.08.2018 - 11:28DROPS Design answered:
Buonasera Gilda, può iniziare la riga come descritto nel suggerimento: "girare il lavoro con 1 cat, saltare 1 m.b, lavorare 1 m.bss nella m.m.a e 1 m.bss nella m.a, poi 1 m.b nella 1° m.a.d, 1 m.m.a nella m.a.d seguente e 1 m.a nella m.a.d seguente, lavorare m.a.d finché non rimangano 3 m.a.d alla fine della riga" Buon lavoro!
14.08.2018 - 19:34Salve, ho difficoltà a capire le istruzioni per quanto riguarda le diminuzioni, sui due lati davanti. Dove si aumenta e diminuisce allo stesso tempo
13.08.2018 - 23:48DROPS Design answered:
Buongiorno Gilda, se ci spiega meglio le sue difficoltà possiamo aiutarla meglio. In ogni caso sul davanti sinistro aumentare 1 maglia alta in corrispondenza di ogni segnapunti su ogni riga (2 aumenti per riga), in modo alternato prima e dopo il segnapunti (quindi su una riga aumenta prima e su quella successiva aumenta dopo) e contemporaneamente diminuire 3 m all' inizio e alla fine di ogni riga ad ogni lato – seguendo il suggerimento per le DIMINUZIONI-1 fino a quando sono state lavorate le righe indicate. Buon lavoro!
14.08.2018 - 10:38Volendo fare il modello piu' grande (circonferenza petto 107cm) come modifico le istruzioni? Grazie
07.07.2018 - 23:42DROPS Design answered:
Buongiorno Barbara. Abbiamo corretto le misure del giropetto. Può ora verificare la misura corretta da seguire. Buon lavoro!
08.07.2018 - 08:02Hej Jag vill anmäla ett fel mönstret. Det behövs 150g av både grålila och gammalrosa garnet i storlek S Jag blev riktigt besviken att ni skrivit fel då det blev fel i min beställning.
18.02.2018 - 14:27Buongiorno, sto facendo questo modello ma mi sono bloccata. sono ferma al 19° giro, cosa intendete per lavorare solo sopra 79 mad ad ogni lato (devo quindi lavorare anche sulle maniche?non riesco a capire come si fa il davanti. Dalle spiegazioni che date sembrerebbe da lavorare a parte, non riesco a capire. Potete spiegarmi meglio Grazie
01.02.2018 - 15:17DROPS Design answered:
Buongiorno Rosaria. Lo spazio per le maniche è stato creato al giro 13 (Taglia s/m), quando ha avviato le 30 cat e saltato le 27 m dello scalfo. Le maglie che lavora nelle cat dello scalfo sono maglie dei davanti. Al giro 19 deve proseguire solo sulle maglie dei davanti, non lavorando più sulla parte del lavoro dello scollo e quella in basso. Le maniche le lavora a parte e le cuce intorno all'apertura degli scalfi. Buon lavoro!
01.02.2018 - 15:52Non capisco bene dalle spiegazioni come effettuare il davanti. Aumenti e diminuzioni?
27.01.2018 - 11:38DROPS Design answered:
Buonasera Rachele, il davanti viene modellato con aumenti e diminuzioni come spiegato nelle istruzioni. Se c'è un punto non chiaro, ci scriva pure. Buon lavoro!
27.01.2018 - 20:04I know the front left side has been addressed, but I am still so confused: I understand up to inc at each marker... Am I to increase on both sides of the marker? Also I don't under inc and dec at the same time. If I'm inc at each marker at every row, how am I dec at the beginning and end of each row? Isn't that the same thing? I'm so confused.
09.11.2017 - 00:35DROPS Design answered:
Dear Christina, you will dec 1 st at each marker, ie on first row inc 1 st before both markers (= 2 sts inc), on next row inc 1 st after both markers (= 2 sts inc) and continue that way. At the same time, decrease at the end of first row + at the beg of next row as explained under DECREASE-TIP-1, and continue dec at the end and beg of row as explained. Happy crocheting!
09.11.2017 - 09:16Roman wrote:
Hi, " in the first of these work 1 tr, in the next 1 htr and in the last 1 dc, turn with 1 ch, skip dc, work 1 sl st in htr and 1 sl st in tr, then 1 dc in first dtr, 1 htr in next dtr and 1 tr in next dtr, work dtr until 3 dtr remain at end of row" ; this is done at the beg. and end of rows in one step?! because it says "turn with". Regards, Roman
18.09.2017 - 07:28DROPS Design answered:
Dear Roman, work end of row as explained until "turn with", then turn piece and work beg of row as explained. Happy crocheting!
18.09.2017 - 09:29Roman wrote:
Hi, working the Left front is soooo confusing, parallel with dec tip 1?!!! Need more clarifications.
15.09.2017 - 16:28DROPS Design answered:
Dear Roman, after you put after the first and before the last 23-24-27 stitch, you should increase before and after this marker, and decrease at the beginning and at the end of the row, according the pattern. the two froms should be symetrical. I hope this helps. Happy Crocheting!
18.09.2017 - 00:49