
Looking for a yarn?


Comments / Questions (31)
![]() Ursula CHEVALLIER wrote:
Ursula CHEVALLIER wrote:
Bonjour, j'ai fais ce modèle en "M", donc 156 m sur l'aiguille rond. Est-ce que j'ai bien compris que le début et fin du rang se trouve au milieu du dos ? Donc le 1ier marqueur après les 6 cm de côtes sera après 39 m et le 2ième marqueur après 78 m ? Merci de me confirmer .
22.08.2024 - 00:20DROPS Design answered:
Bonjour Mme Chevalier, le début des tours peut effectivement être au milieu dos et dans ce cas vous avez raison, vous aurez 2 marqueurs espacés de 78 m dont le 1er et le dernier à 39 m du début des tours. Bon tricot!
22.08.2024 - 08:36
![]() Régine Plessis wrote:
Régine Plessis wrote:
Bonjour, Je suis arrivée au raglan en tours. Pour faire 4 diminutions tous les 2 rangs, j'ai un doute. Après avoir fait une fois les 4 diminutions faut-il faire un tour sans faire de diminution et ensuite un tour avec diminutions? Merci
07.03.2021 - 17:26DROPS Design answered:
Bonjour Mme Plessis, vous diminuez pour le raglan tous les 2 tours autrement dit répétez ainsi: *1 tour de diminutions, 1 tour sans diminuer* 19 fois au total de *à* et diminuez ensuite tous les tours si besoin pour votre taille. Bon tricot!
08.03.2021 - 09:24
![]() Suvi wrote:
Suvi wrote:
Missä kohtaa neuleessa on kerroksen vaihtumiskohta ja miten sen saa tehty mahdollisimman huomaamattomaksi raidoituksen kohdalla vai vaihdetaanko vain väri ja jatketaan neulomisesta normaalisti?
20.09.2020 - 16:39DROPS Design answered:
Hei, kerroksen vaihtumiskohta on keskellä takana. Mikäli saman väristen raitojen välissä ei ole liikaa kerroksia, voit jättää langan odottamaan, kunnes tarvitset sitä uudestaan. Odottamassa olevia lankoja voi myös kuljettaa työn mukana kiertämällä ne rajakohdassa toistensa ympäri.
21.09.2020 - 16:47
![]() Francesca wrote:
Francesca wrote:
I am doing the increases on the sides of the bottom part - I did the first increases and knit a couple of rounds, but the increases are very visible. I used the M1L/M1R technique. Do you have any suggestion on a different technique that would be less visible on the WS? Maybe I should try with the YO+Ktbl? Also, the first decreases after the 3/3 rib: I did all with k2tog, but on some spots they are very visible and mess up a work that would be much more neat otherwise...
25.03.2019 - 01:46DROPS Design answered:
Dear Francesca, you can try with knit front and back - remember jumper will then be turned inside out -the purl side is the right side of piece. Happy knitting!
25.03.2019 - 12:14
![]() Unni Kvil Nordal wrote:
Unni Kvil Nordal wrote:
Hei! Jeg har strikket denne genseren i Paris-garn, (og har riktig strikkefasthet), men syntes den ble litt løs. Hvis jeg prøver å strikke med Nepal-garn, er det garnet litt fastere i strikkefasthet?
31.10.2018 - 13:26DROPS Design answered:
Hei Unni. Paris er et bomullsgarn og er derfor mer "kompakt" og mindre elastisk enn et ullgarn - som feks Nepal. Et ullgarn er ofte "løsere" i teksturen enn bomull og vil nok fylle ut mer mellom maskene. Slevom de har samme strikkefatshet vil nok et ullgarn virke tettere enn et bomullsgarn - fordi det fyller ut mer. Du kan strikke deg en prøvelapp og se hva du syntes. God fornøyelse.
31.10.2018 - 16:20
![]() Laforet Jacqueline wrote:
Laforet Jacqueline wrote:
J'ai les explications mais pas le diagramme M1. Pouvez vous me le faire parvenir
09.09.2018 - 17:25DROPS Design answered:
Bonjour Mme Laforet, les diagrammes sont de nouveau visibles sur notre site après la maintenance de ces derniers jours, vous trouverez M.1 juste à gauche du schéma des mesures. Bon tricot!
11.09.2018 - 08:35
![]() Lion wrote:
Lion wrote:
Bonsoir , Alors , il y a une erreur sur les explications , il est écrit : "diminuer 19 fois tous les 2 rangs pour toutes les tailles , puis diminuer tous les 0-2-4-6-8 rangs " je ne sais pas si je dois suivre le texte ou bien ce que vous m'avez écrit ???? En vous remerciant , cordialement , V LION .
05.02.2016 - 19:22DROPS Design answered:
Bonjour Mme Lion, oups autant pour moi, en taille L ,vous diminuez d'abord 19 fois tous les 2 tours puis tous les 4 tours/rangs, en même temps n'oubliez pas l'encolure. Bon tricot!
08.02.2016 - 10:33
![]() Lion wrote:
Lion wrote:
Bonjour , je reviens vers vous encore pour les diminutions du raglan , en effet il est écrit de diminuer 19 fois tous les 2 rangs puis tous les 4 rangs (taille L ) alors que vous m'écrivez : " tous les rangs " ; comment faire ??? D'autre part , après l'encolure faut-il continuer en aller retour sur les aiguilles circulaires ? En vous remerciant , V Lion .
26.01.2016 - 09:24DROPS Design answered:
Bonjour Mme Lion, en taille L, on diminue d'abord tous les 2 rangs puis 4 fois tous les rangs. Quand vous avez mis les mailles de l'encolure en attente, continuez en allers et retours sur l'aiguille circulaire en rabattant les mailles pour l'encolure au début de chaque rang de chaque côté. Bon tricot!
26.01.2016 - 10:29
![]() Lion wrote:
Lion wrote:
RE bonjour, d'autre part, s'il faut diminuer tous les nombres pairs de rangs , toutes les diminutions se feront toutes à l'endroit ou toutes à l'envers ?????? Cordialement , V Lion .
24.01.2016 - 16:06DROPS Design answered:
Bonjour Mme Lion, on diminue d'abord tous les 2 rangs puis tous les rangs (sauf en taille S), on aura ainsi: d'abord 1 tour/rang avec dim (sur l'endroit) et 1 tour/rang sans diminution (sur l'envers), puis on diminuera tous les tours/rangs (= sur l'endroit et sur l'envers). Bon tricot!
25.01.2016 - 12:21
![]() Lion wrote:
Lion wrote:
Bonjour , je me permets de vous écrire car je ne comprends pas la phrase pour les diminutions : diminuer de chaque côté des 3 m envers , 2 m pour le dos et 1 pour la manche ??????? Ainsi que pour l'encolure : je suppose que à partir des mailles mises en attente il faut tricoter en aller retour ???? En vous remerciant , V LION .
24.01.2016 - 16:00DROPS Design answered:
Bonjour Mme Lion, vous placez vos marqueurs à chaque transition manche/dos/devant, quand on va diminuer, on aura 2 m env (sur le dos et le devant), marqueur, 1 m env (manche) ou vice-versa (1 m env (= manche), marqueur, 2 m env (dos/devant)). Après avoir mis les mailles de l'encolure en attente, on continue effectivement en allers et retours en continuant les diminutions du raglan comme avant. Bon tricot!
25.01.2016 - 12:18
|
|||||||||||||
Banded Stone Sweater#bandedstonesweater |
|||||||||||||
|
|
|||||||||||||
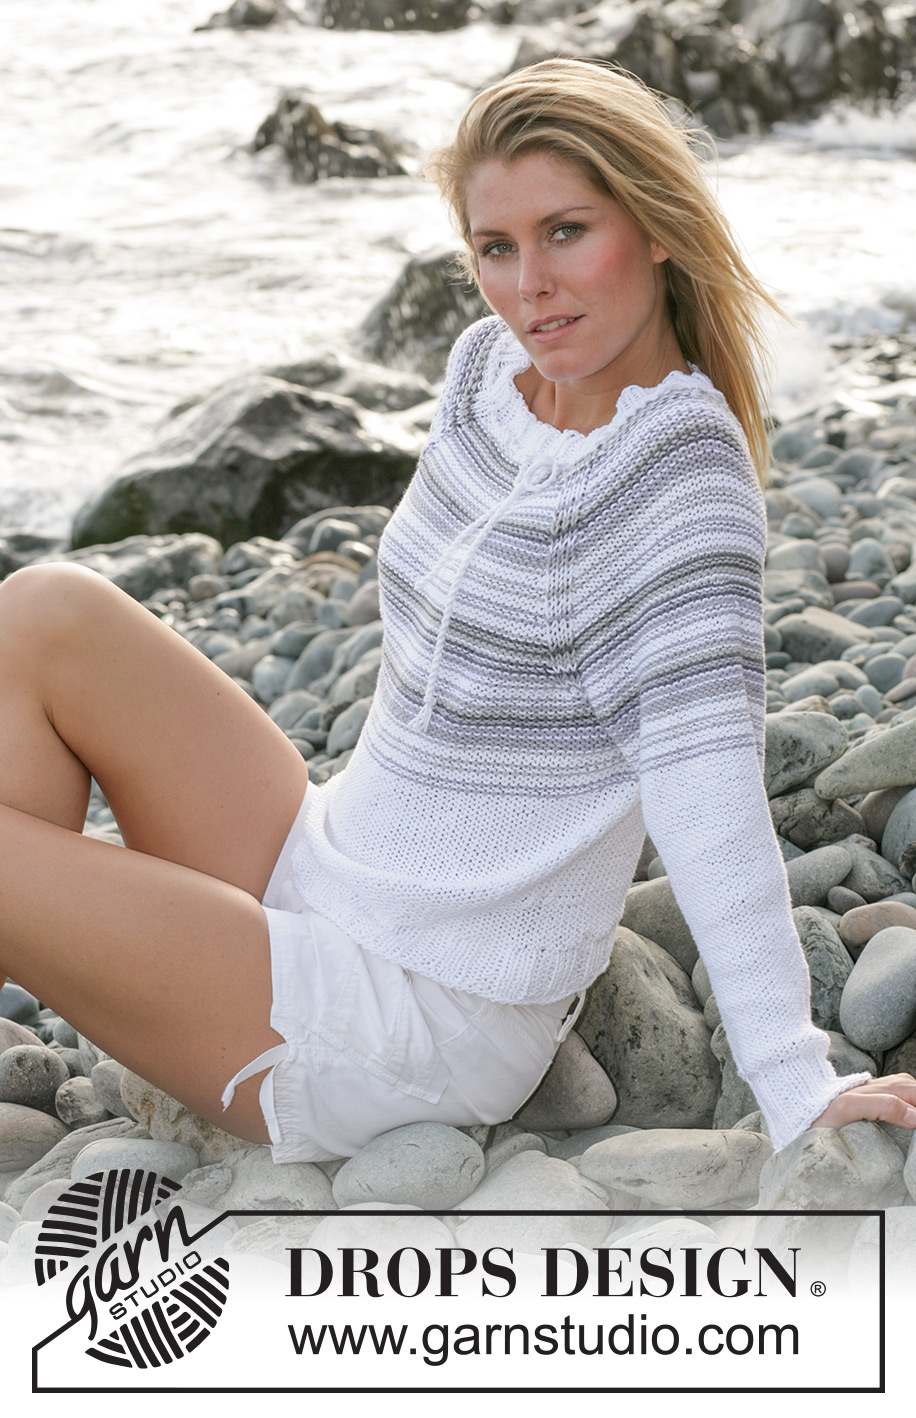
DROPS sweater with raglan and stripes in ”Paris”
DROPS 101-26 |
|||||||||||||
|
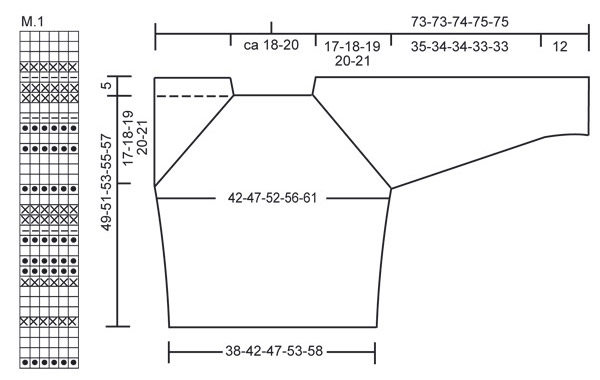
Knitting gauge: 17 sts x 22 rows on needles size 5 mm / US 8 in stockinette sts = 10 x 10 cm / 4" x 4". Rib: * K3, P3 *, repeat from *-*. Stripes: See diagram M.1. Decreasing tip (applies to raglan decrease): Dec on each side of 3 P sts (seen from RS when knitting), 2 of these are from front/back pieces and 1 from sleeve. Dec from RS: Before 3 P sts: K2 tog. After 3 P sts: Slip 1 sts as if to knit, K1, psso. Dec from WS: Before and after 3 K sts: P2 tog. Sweater: When garment is completed turn WS out as RS. Back and front pieces: Work piece in round on needles. Cast on 138-156-174-192-210 sts on circular needle size 4 mm / US 6 with white Paris and P2 rounds. Continue with Rib – see explanation above – until piece measures 6 cm / 2⅜". Read entire text in next section prior to knitting: Change to circular needle size 5 mm / US 8 and place a marker in each side. Complete sweater in stockinette sts – at the same time on 1st round after rib dec 10-12-14-12-14 sts evenly = 128-144-160-180-196 sts. When piece measures 10 cm / 4" inc 1 sts on each side of both markers, repeat on every 6-6-6-9-9 cm / 2⅜"-2⅜"-2⅜"-3½"-3½" a total of 4-4-4-3-3 times = 144-160-176-192-208 sts. At the same time when piece measures 23-24-25-26-27 cm / 9"-9½"-9¾"-10¼"-10⅝" work stripes after diagram M.1. When piece measures approx 32-33-34-35-36 cm / 12½"-13"-13⅜"-13¾"-14¼" bind off 10 sts on each side for armhole = 62-70-78-86-94 sts left on front and back pieces. Leave piece to one side and knit sleeves. Sleeves: Cast on 48-48-54-54-54 sts on double pointed needles size 4 mm / US 6 with white Paris and P2 rounds. Continue in rib – see explanation above - until piece measures 7 cm / 2¾". Change to double pointed needles size 5 mm / US 8, then work stockinette sts until complete measurement is reached – at the same time on 1st round adjust number f sts to 46-48-50-52-54 sts. When piece measures 12 cm / 4¾" inc 2 sts mid under arm, repeat on every 4-3.5-3-2.5-2.5 cm / 1½"-1¼"-1⅛"-⅞"-⅞" a total of 9-10-11-12-13 times = 64-68-72-76-80 sts. At the same time when piece measures 38-37-37-36-36 cm / 15"-14½"-14½"-14¼"-14¼" work stripes after diagram M.1. When sleeve measures approx 47-46-46-45-45 cm / 18½"-18"-18"-17¾"-17¾" (stop after same stripe as back and front pieces) bind off 10 sts mid under sleeve = 54-58-62-66-70 sts left on needle. Put piece a side and make another sleeve. Yoke: Slip sleeves onto circular needle with back and front pieces where bound off for for armholes = 232-256-280-304-328 sts. Insert a marker in every transition between back and front pieces and sleeves = 4 markers. Continue in stockinette sts and diagram M.1. At the same time dec for raglan sleeve on each side of all 4 markers – see Decreasing tip: Dec on every second round 19 times on all sizes, then dec on every 0-2-4-6-8th rounds. At the same time when piece measures 47-49-51-53-55 cm / 18½"-19¼"-20"-21"-21⅝" put middle front 12-14-16-18-20 sts onto a stitch holder and bind off on each side to shape neckline, bind off in beg of each row, each side: 2 sts 1 time and 1 st 1 time. After all dec for raglan and neckline 62-68-74-80-86 sts should be left and piece measure approx 54-56-58-60-62 cm / 21¼"-22"-22¾"-23⅝"-24⅜" to shoulder. Neckline: Work in white. Pick up approx 20 to 30 sts at neck front (incl sts on stitch holder) = approx 82 to 116 sts. Slip all sts onto double pointed needles size 4 mm / US 6. K 1 round at the same time dec evenly to 72-78-78-84-90 sts. Work 3 cm / 1⅛" Rib, bind off. Assembly: Turn sweater inside out so WS is RS. Sew openings under arms. Twisted string: Cut three 3 m/3.2 yds strands of white yarn. Twist tog until they resist, fold string double and let it twist tog. Tie a knot in each end. Pull string up and down with distance of 3 sts in transition between stockinette sts and rib at neck top – start to one side of neck, tie bow here. |
|||||||||||||
Diagram explanations |
|||||||||||||
|
|||||||||||||
|
|||||||||||||
Have you finished this pattern?Tag your pictures with #dropspattern #bandedstonesweater or submit them to the #dropsfan gallery. Do you need help with this pattern?You'll find 22 tutorial videos, a Comments/Questions area and more by visiting the pattern on garnstudio.com. © 1982-2025 DROPS Design A/S. We reserve all rights. This document, including all its sub-sections, has copyrights. Read more about what you can do with our patterns at the bottom of each pattern on our site. |
|||||||||||||


With over 40 years in knitting and crochet design, DROPS Design offers one of the most extensive collections of free patterns on the internet - translated to 17 languages. As of today we count 314 catalogs and 11822 patterns - 11812 of which are translated into English (US/in).
We work hard to bring you the best knitting and crochet have to offer, inspiration and advice as well as great quality yarns at incredible prices! Would you like to use our patterns for other than personal use? You can read what you are allowed to do in the Copyright text at the bottom of all our patterns. Happy crafting!
Post a comment to pattern DROPS 101-26
We would love to hear what you have to say about this pattern!
If you want to leave a question, please make sure you select the correct category in the form below, to speed up the answering process. Required fields are marked *.