
Popular categories
Looking for a yarn?


Comments / Questions (26)
![]() Nelly Prevot wrote:
Nelly Prevot wrote:
Bonjour, J'ai 2 questions svp la 1 ere : A quelle hauteur commencer M1 pour la combinaison en 3 mois? La 2éme : A quelle hauteur commencer les diminutions pour les emmanchures pour la combinaison ? MERCI
14.05.2025 - 12:48DROPS Design answered:
Bonjour Mme Prevot, il manquait cette partie, désolée et merci. Vous allez tricoter M.1 après la côte mousse à 44-48-56 (58-61) cm de hauteur totale, et la division pour les emmanchures se fait elle à 47-51-56 (61-64) cm de hauteur totale. Correction faite, merci. Bonne continuation!
14.05.2025 - 16:34
![]() Sari Karlström wrote:
Sari Karlström wrote:
Hur mycket garn behöver jag beställa om jag endast önskar sticka koftan (med långa ärmar)? /Sari
14.03.2025 - 07:17DROPS Design answered:
Hei Sari. Det har vi ikke informasjon om, men vil tippe mellom 150-250 gram avhengig av hvilken str. du skal strikke. mvh DROPS Design
17.03.2025 - 10:39
![]() Claudia Bertram wrote:
Claudia Bertram wrote:
Bei wieviel cm Höhe wird die Mütze beendet? Oder ...wie oft erfolgen die Abnahmen? Danke für eine schnelle Antwort, Claudia
01.02.2025 - 13:57DROPS Design answered:
Liebe Frau Bertram, die Abnahmen werden in jeder Runde bearbeitet, bis die Mütze 14-15-15 (16-17) cm misst. Viel Spaß beim Stricken!
03.02.2025 - 08:28
![]() Francoise Robert wrote:
Francoise Robert wrote:
Hello je suis arrivée aux manches je ne comprends pas on doit augmenter 2 mailles sous la manche taille 3 mois pour moi de chaque côté 6 fois ça veut dire en début tricot je dois augmenter que d’un cote? Je comprends pas merci de votre réponse
12.08.2024 - 21:45DROPS Design answered:
Bonjour Mme Robert, on tricote les manches en rond, on va augmenter de chaque côté du début du tour: augmentez 1 maille à la fin du tour + 1 maille au début du tour; vous pouvez augmenter par exemple en tricotant 2 fois la dernière maille du tour + 2 fois la 1ère maille du début du tour suivant = vous avez ainsi augmenté 1 fois 2 mailles, tricotez 5 rangs sans augmenter et tricotez ces 6 rangs encore 5 fois (6 fois au total). Bon tricot!
13.08.2024 - 08:56
![]() Francoise Robert wrote:
Francoise Robert wrote:
Hello je suis arrivée à l’encolure devant de la veste pour les diminutions je fait les 2 premières mailles point mousse et je diminue les mailles après merci
05.08.2024 - 20:55
![]() Francoise Robert wrote:
Francoise Robert wrote:
Hello je suis arrivée à l’encolure devant de la veste pour les diminutions je fait les 2 premières mailles point mousse et je diminue les mailles après merci
05.08.2024 - 20:53DROPS Design answered:
Bonjour Mme Robert, pour l'encolure, on doit rabattre et non diminuer, autrement dit, on v rabattre en début de rang sur l'endroit (devant droit)/ sur l'envers (devant gauche) tous les 2 rangs (= tous les rangs sur l'endroit) puis tous les 4 rangs (tous les 2 rangs sur l'endroit) un nombre de mailles différent en fonction de la taille, en même temps, vous formerez l'emmanchure en début de rang sur l'envers (devant droit)/sur l'endroit (devant gauche). Bon tricot!
06.08.2024 - 09:22
![]() Annemarie Spielmann wrote:
Annemarie Spielmann wrote:
Guten Tag, ich finde die Beschreibung sehr verwirrend. Was heißt z.B: Größe 3 6/9-12/18 Monate und dann 2- 3/4 Jahre oder z.B: M1 mit 2 M. Krausrippe auf der rechten Seite und 1 Randmasche. Ich stricke bestimmt viel aber so ein Zahlengewirr habe ich noch nie auf einer Anleitung gesehen. LG A. Spielmann
21.04.2024 - 14:59
![]() Françoise Wehrlen wrote:
Françoise Wehrlen wrote:
Bonjour Pour l'encolure de la veste fait il diminuer au bord (donc ne plus faire les 2 mailles mousse) ou après les 2 mailles mousse ?
14.04.2024 - 17:20DROPS Design answered:
Bonjour Mme Wehrlen, ces mailles sont en fait à rabattre plus qu'à diminuer - la modification de terme a été effectuée. Bon tricot!
15.04.2024 - 08:19
![]() Gunilla Grönvall wrote:
Gunilla Grönvall wrote:
Jag förstår inte den här instruktionen. "När arb mäter 8,5 cm avm det för hals i höger sida så här: 3 mån: På vartannat v: 4 m x 1, 2 m x 14 och sedan på vart 4e v: 2 m x 3, 1 m x 5." Vad menas med x? Vad menas med decimaler a?
27.12.2023 - 21:20DROPS Design answered:
Hej Gunilla, x betyder ggr. När arb mäter 8,5 cm avm det för hals i höger sida så här: 3 mån: På vartannat v: 4 m 1 gång, 2 m 14 ggr och sedan på vart 4e v: 2 m 3 ggr, 1 m 5 ggr :)
05.01.2024 - 11:37
![]() Maria Hollander wrote:
Maria Hollander wrote:
Ich stricke die Jacke von Baby4-3. Das Abnehmen für die Schräge verstehe ich, aber wenn ich von 67 aufgenommenen Maschen 14X 4 abkette, bleiben 56 M. Dann weiter 2M jede vierte Reihe, 5Xmacht 66 Maschen. Da bleibt nichts für die Schulterpartie, wie im Diagramm gezeigt. Ist das so gemeint? auf jeden Fall verwirrend, da Text und Zeichnung nicht übereinstimmen. Bitte genaue Erklärung/Anleitung. Mit freundlichen Grüßen Maria
09.04.2022 - 21:02DROPS Design answered:
Liebe Frau Hollander, Sie ketten für den Halsausschnitt zuerst 4 Maschen 1 x ab, dann 2 Maschen 14 x (= 28 Maschen), danach 2 Maschen 3 x (= 6 Maschen) und zuletzt 1 Masche 5 x (= 5 Maschen), das sind 43 Maschen insgesamt, die Sie für den Halsausschnitt abketten. Für den Armausschnitt ketten Sie insgesamt 7 Maschen ab, sodass für die Schulter 17 Maschen übrig bleiben. Viel Spaß beim Weiterstricken!
13.04.2022 - 10:59
|
|||||||
Sweet Snuggles#sweetsnugglesjacket |
|||||||
 |
 |
||||||
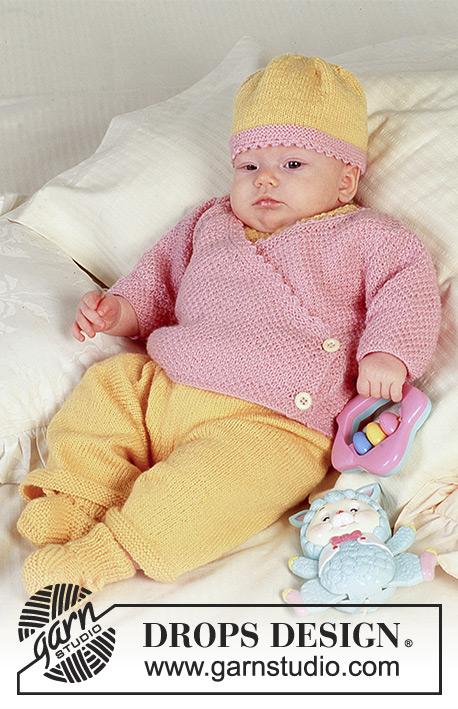
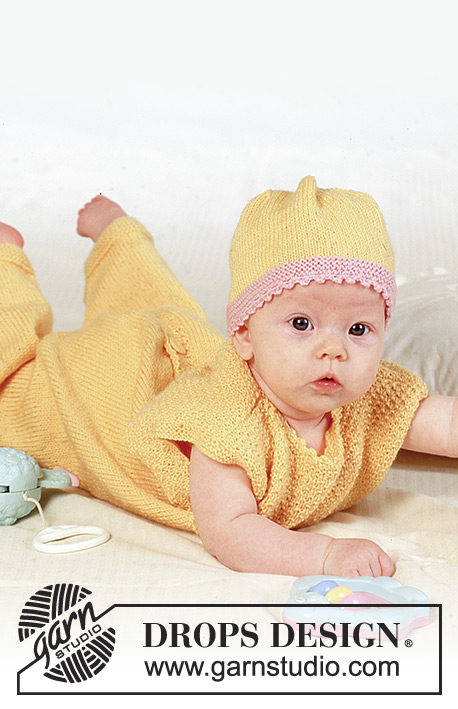
DROPS jacket, jumpsuit or dress, hat and socks in “BabyMerino”.
DROPS Baby 4-3 |
|||||||
|
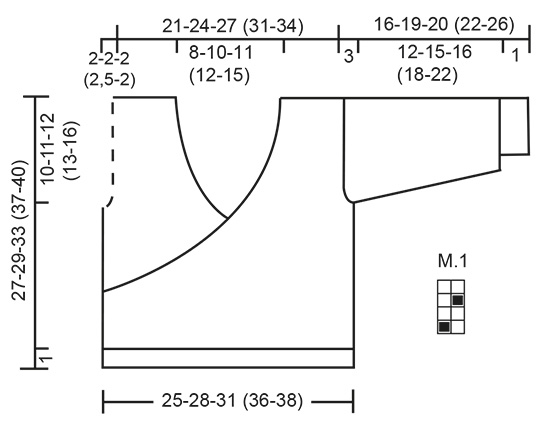
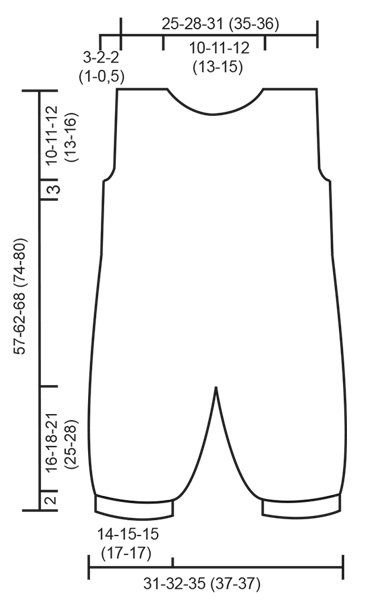
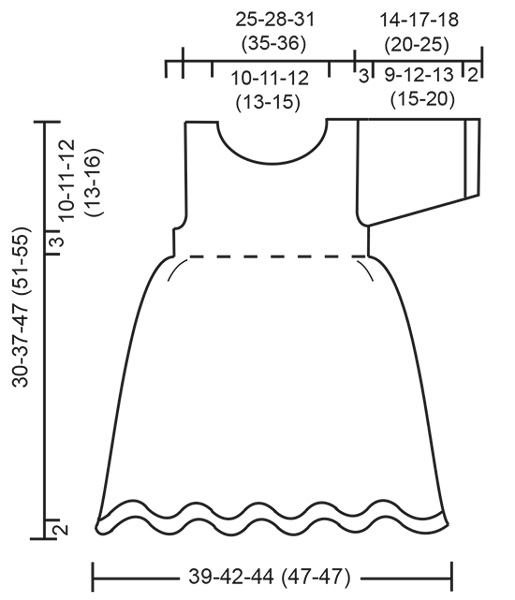
JACKET: Size: 3 – 6/9 – 12/18 months (2 -3/4 years) DROPS pointed needles size 2.5 mm DROPS crochet hook size 2.5 mm DROPS buttons, 4 pcs. Knitting tension: 26 sts x 35 rows on needles size 2.5 mm in pattern = 10 x 10 cm. Garter st, back and forth on needle: K all rows. Garter st, on circular needle: K 1 round, P 1 round. Buttonhole: make buttonholes on both front piece when piece measures 2-2-2 (2-2) cm and 7.5-8-9.5 (10-10) cm. 1 buttonhole = cast off 3rd and 4th st from edge and cast on 2 new sts on return row. Pattern: See diagram. The diagrams show the pattern from the right side. Right front piece: Cast on 67-73-81 (95-99) sts (incl 1 edge st for seam) on needle size 2.5 mm with pink and knit 2 rows garter st. Continue in M.1 with 1 edge st at side and 2 sts towards mid front in garter st. Remember buttonholes (see above) and the knitting tension. When piece measures 8.5-9-10.5 (12-12) cm dec to shape the neckline as follows: Size 3 months: on every other row: 4 sts 1 time, 2 sts 14 times, and then on every 4th row: 2 sts 3 times, 1 st 5 times. Size 6/9 months: on every other row: 6 sts 1 times, 4 sts 2 times, 2 sts 9 times, and then on every 4th row: 2 sts 7 times, 1 st 3 times. Size 12/18 months: on every other row: 6 sts 1 time, 2 sts 19 times, 1 st 3 times, and then on every 4th row: 1 st 7 times. Size 2 years: on every other row: 5 sts 1 time, 2 sts 24 times, and then on every 4th row: 1 st 10 times Size 3/4 years: on every other row: 4 sts 2 times, 2 sts 25 times, and then on every 4th row: 2 sts 3 times, 1 st 5 times. At the same time, when piece measures 17-18-21 (24-24) cm dec to shape the armhole on every other row: 3 sts 1 time, 2 sts 1-1-1 (2-1) times, 1 st 2-1-1 (1-1) times. Cast of remaining sts when piece measures 27-29-33 (37-40) cm. Left front piece: Cast on and knit as right front piece, but mirrored. Remember buttonholes on opposite side. Back piece: Cast on 68-74-82 (96-100) sts (incl 1 edge each side) on needle size 2.5 mm with pink and knit 2 rows garter st. Continue in M.1 with edge sts in garter st. When piece measures 17-18-21 (24-24) cm dec to shape the armhole as described for front piece = 54-62-70 (80-88) sts. When piece measures 25-27-31 (35-38) cm cast off the middle 16-22-24 (28-36) sts for neck and dec to shape the neckline on every other row: 1 st 2 times. Cast of when piece measures 27-29-33 (37-40) cm. Sleeve: Cast on 40-40-42 (44-44) sts on double pointed needles size 2.5 mm with pink and knit 2 rows garter st. Continue in M.1- make sure to have a pattern repeat mid upper arm. At the same time inc 2 sts mid under arm a total of 6-9-10 (12-20) times as follows: Size 3 months: on every 6th round Size 6/9 + 12/18 months: on every 5th round Size 2 years: on every 4th and 5th round alternately Size 3/4 years: on every 3rd and 4th round alternately = 52-58-62 (68-84) sts. When piece measures 13-16-17 (19-23) cm cast off 4 sts mid under arm and complete sleeve back and forth on needle. Dec to shape the sleeve cap each side on every other row: 3 sts 4 times. Cast off, sleeve measures approx 16-19-20 (22-26) cm. Assembly: Sew shoulder seams. Pick up approx 156-178-196 (224-252) sts round the entire neckline on needle size 2.5 mm with pink and knit 4 rows garter st, cast off. Now crochet a border round neckline on crochet hook size 2.5 mm with pink: 1 dc, *3 ch, 1 dc in first ch, skip 2 sts, 1 dc*, repeat from *-*. Set in sleeves. Sew on buttons, 2 on RS of right piece, and 2 on the WS of left piece. JUMPSUIT/DRESS: Size: 3 – 6/9 – 12/18 months (2 -3/4 years) DROPS pointed needles size 2.5 mm DROPS crochet hook size 2.5 mm DROPS buttons, jumpsuit 5 pcs, dress 3 pcs Knitting tension: 26 sts x 35 rows on needles size 2.5 mm in stocking sts = 10 x 10 cm. Garter st, back and forth on needle: K all rows. Garter st, on circular needle: K 1 round, P 1 round. Pattern: See diagram. JUMPSUIT: Left leg: Cast on 72-80-80 (88-88) sts on circular needle size 2.5 mm with yellow and knit 2 cm garter st. Continue in stocking st, at the same time inc on inside leg on every 1-1.5-1.5 (2-2.5) cm: 2 sts 8 times = 88-96-96 (104-104) sts. Remember the knitting tension. When piece measures 17-18-20 (25-28) cm divide piece at inside leg (= split) and complete piece back and forth on needle. Inc 1 st each side for seam = 90-98-98 (106-106) sts. When piece measures 18-20-23 (27-30) cm cast off 5-7-3 (5-5) sts each side = 80-84-92 (96-96) sts. Put piece aside and knit the other leg. Right leg: knit as left leg. Trousers: Put both legs in on the same circular needle = 160-168-184 (192-192) sts. Knit 3 rounds and now inc mid back on both sides of the middle 2 sts on every other row: 1 st 8 times, at the same time dec mid front on every other row on both sides of the middle 2 sts = 160-168-184 (192-192) sts. When piece measures 25-26-28 (33-36) cm cast off 8 sts mid back for opening mid mid back and complete piece back and forth on needle = 152-160-176 (184-184) sts. When piece measures 44-48-53 (58-61) cm knit 2 rows in garter st and complete piece in M.1. When piece measures 47-51-56 (61-64) cm divide piece as follows: 36-38-42 (44-44) sts = back piece, 80-84-92 (96-96) sts = front piece, 36-38-42 (44-44) = back piece. Now complete each piece separately. Dress: Cast on 200-216-216 (224-224) sts on circular needle 2.5 mm with yellow, knit 4 rounds garter sts and continue in stocking st. Remember the knitting tension. When piece measures 17-23-32 (35-36) cm knit 2 rounds in garter st, at the same time dec evenly on first round to 160-168-184 (192-192) sts. Complete piece in M.1. After 2 cm cast off 8 sts mid back for opening and complete piece back and forth on needle = 152-160-176 (184-184) sts. When piece measures 20-26-35 (38-39) cm divide the piece as follows: 36-38-42 (44-44) sts = back piece, 80-84-92 (96-96) sts = front piece, 36-38-42 (44-44) = back piece. Now complete each piece separately. Jumpsuit and dress with or without sleeves: Left back piece: = 36-38-42 (44-44) sts. Dec to shape the armhole on every other row: 2 sts 2-1-1 (1-0) times, 1 st 4-4-4 (1-1) times = 28-32-36 (41-43) sts. When piece measures 55-60-66 (72-78) cm dec to shape the neckline on every other row: 6-7-8 (10-13) sts 1 time, 2 sts 1 time, 1 st 1 time. Cast off remaining sts when piece measures 57-62-68 (74-80) cm. Right back piece: as left front piece. Front piece: = 80-84-92 (96-96) sts. Dec to shape the armhole as described for back piece = 64-72-80 (90-94) sts. When piece measures 53-58-64 (69-75) cm cast off the middle 10-12-14 (18-24) sts for neck and dec to shape the neckline on every other row: 3 sts 1 time, 2 sts 2 times, 1 st 1 time. Cast off remaining sts when piece measures 57-62-68 (74-80) cm. Sleeve: Cast on 38-40-42 (44-44) sts on double pointed needles size 2.5 mm with pink and knit 2 cm garter st. Continue in stocking st, at the same time inc 2 sts mid under arm a total of 7-9-10 (12-20) times as follows: Size 3 + 12/18 months + 3/4 years: on every 3rd round Size 6/9 months + 2 years: on every 4th round = 52-58-62 (68-84) sts. When piece measures 11-14-15 (17-22) cm cast off 6 sts mid under arm and complete sleeve back and forth on needle. Dec to shape the sleeve cap each side on every other row: 4 sts 4 times. Cast off, sleeve measures approx 14-17-18 (20-25) cm. Assembly: Jumpsuit: Left back edge: pick up approx 80-86-94 (100-104) sts along left back piece on circular needle size 2 mm with yellow, P 1 row and knit 2.5 cm Rib back and forth on needle, cast off. Right back edge: pick up and knit as left side, but after 1 cm make 5 buttonholes evenly distributed on row. 1 buttonhole = cast off 3 sts and cast on 3 new sts on return row. Fasten edge at bottom of split. Dress: Left back edge: pick up approx 26-36 sts along left back piece on circular needle size 2 mm with yellow, P 1 row and knit 2.5 cm Rib back and forth on needle, cast off. Right Back edge: pick up and knit as left side, but after 1 cm make 3 buttonholes evenly distributed on row. 1 buttonhole = cast off 3 sts and cast on 3 new sts on return row. Fasten edge at bottom of split. Jumpsuit and dress: Pick up approx 80-80-85 (90-90) sts round the neck on needle size 2.5 mm with yellow and knit 1.5 cm garter st, cast off. If without sleeves: Pick up approx 60-65-70 (85-90) sts round armholes on needle size 2.5 mm with yellow and knit 4 rows garter st, cast off. Now crochet a border round the neckline, armholes and bottom edges on crochet hook size 2.5 mm as follows: 1 dc, *3 ch, 1 dc in first ch, skip 2 sts, 1dc*, repeat from *-*. Sew tog split on inside of legs and sew tog the opening between legs from mid front to mid back. Sew on buttons. HAT: Size: 3 – 6/9 – 12/18 months (2 -3/4 years) Head circumference: 39-41-43 (45-45) cm DROPS pointed needles size 2 mm DROPS crochet hook size 2.5 mm Knitting tension: 28 sts x 38 rows on needles size 2 mm in stocking st = 10 x 10 cm. Garter st on circular needle: K 1 round, P 1 round. Cast on 108-114-120 (126-126) sts on double pointed needles size 2 mm with pink and knit 6 rounds garter st. When piece measures 9-10-10 (10.5-11.5) cm insert 6 MT evenly on round = 18-19-20 (21-21) sts between each MT. Now K tog the 2 sts after each MT (= 6 less sts per round). Repeat this dec on every round until piece measures 14-15-15 (16-17) cm. Cut thread, pull through remaining sts and fasten. Now crochet a border with crochet hook size 2.5 mm with pink round the hat as follows: 1 dc, *3 ch, crochet 1 htr and 1 tr in first ch, skip 2 sts, 1dc*, repeat from *-*. SOCKS: Size: 3 – 6/9 – 12/18 months (2 -3/4 years) Foot length: 10-11-12 (14-15) cm DROPS pointed needles size 2 mm and 2.5 mm DROPS crochet hook size 2.5 mm Knitting tension: 26 sts x 52 rows on needles size 2.5 mm in garter st = 10 x 10 cm. Rib: *K1, P1*, repeat from *-*. Garter st, back and forth on needle: Knit all rows. Cast on 46-50-50 (54-54) sts on needle size 2 mm with yellow and knit 6-7-7 (8-8) cm Rib back and forth on needle. Knit 1 row stocking st and change to needle size 2.5 mm, at the same time dec 10-14-8 (12-8) sts evenly = 36-36-42 (42-46) sts. Knit next row as follows from RS: *K2 tog, 1 yo*, repeat from *-*. Knit 1 row stocking st. Put 12-12-14 (12-14) sts on a thread each side and knit 6-7-9 (10-10) cm garter st on the middle 12-12-14 (18-18) sts. Put sts from threads back on needle and pick up 16-18-23 (26-26) sts on each side of the middle piece = 68-72-88 (94-98) sts. Knit 3-4-4 (5-5) cm garter st on all sts, at the same time after 2-2.5-2.5 (3-3) cm dec on every other row as follows: 1 st at the beg and 1 st at the end of row and K2 tog on both sides of the middle 2 sts for another 3-4-4 (5-5) cm. Cast off and sew seam under foot and along the Rib. Crochet a chain on crochet hook size 2.5 mm, approx 30-35 cm long, and thread through eyelet row. |
|||||||
Diagram explanations |
|||||||
|
|||||||
|
|||||||
|
|||||||
|
|||||||
Have you finished this pattern?Tag your pictures with #dropspattern #sweetsnugglesjacket or submit them to the #dropsfan gallery. Do you need help with this pattern?You'll find 27 tutorial videos, a Comments/Questions area and more by visiting the pattern on garnstudio.com. © 1982-2025 DROPS Design A/S. We reserve all rights. This document, including all its sub-sections, has copyrights. Read more about what you can do with our patterns at the bottom of each pattern on our site. |
|||||||


With over 40 years in knitting and crochet design, DROPS Design offers one of the most extensive collections of free patterns on the internet - translated to 17 languages. As of today we count 314 catalogues and 11821 patterns translated into English (UK/cm).
We work hard to bring you the best knitting and crochet have to offer, inspiration and advice as well as great quality yarns at incredible prices! Would you like to use our patterns for other than personal use? You can read what you are allowed to do in the Copyright text at the bottom of all our patterns. Happy crafting!
Post a comment to pattern DROPS Baby 4-3
We would love to hear what you have to say about this pattern!
If you want to leave a question, please make sure you select the correct category in the form below, to speed up the answering process. Required fields are marked *.