
Popular categories
Looking for a yarn?


|
|||||||||||||||||||||||||
Frosted Mountains Cardigan |
|||||||||||||||||||||||||
 |
 |
||||||||||||||||||||||||
Knitted jacket in DROPS Paris or DROPS Bomull-Lin. Piece is knitted bottom up with lace pattern. Size: S - XXXL
DROPS 240-15 |
|||||||||||||||||||||||||
|
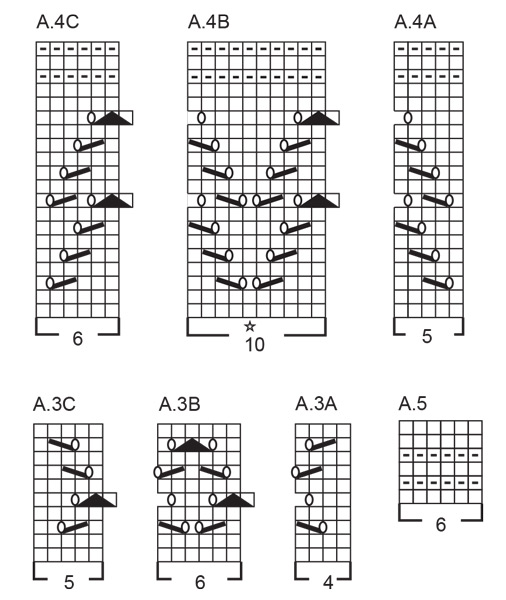
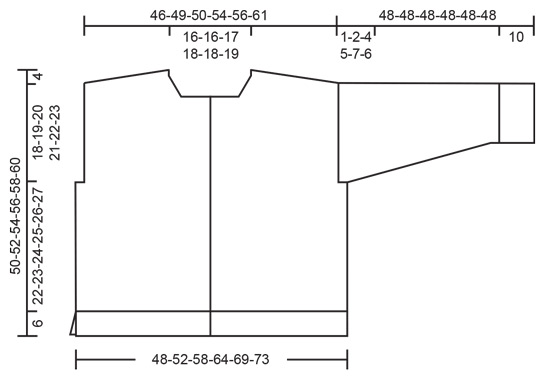
---------------------------------------------------------- EXPLANATION FOR THE PATTERN: ---------------------------------------------------------- GARTER STITCH (back and forth): Knit all rows. 1 ridge vertically = knit 2 rows. PATTERN: See diagrams A.1 to A.5. Choose diagram for your size (applies to A.2). Diagrams show all rows in pattern seen from the right side. DECREASE TIP (applies to neck when decreasing 1 stitch): Decrease for neck inside 3 stitches in stocking stitch. All decreases are done from the right side! DECREASE AS FOLLOWS AFTER 3 STITCHES IN STOCKING STITCH: Slip 1 stitch knitwise, knit 1, pass slipped stitch over stitch worked (= 1 stitch decreased). DECREASE AS FOLLOWS BEFORE 3 STITCHES IN STOCKING STITCH: Work until 5 stitches remain mid front, knit 2 together, work the last 3 stitches in stocking stitch (= 1 stitch decreased). INCREASE TIP (applies to sleeves): Begin 1 stitch before marker thread, make 1 yarn over, work 2 stitches as before (marker thread is between these 2 stitches), make 1 yarn over. On next round work yarn overs twisted to avoid holes. Then work the new stitches in pattern. BUTTONHOLES: Decrease for buttonholes on right band. 1 BUTTONHOLE = knit third and fourth stitch from edge together and make 1 yarn over. On next row knit yarn over to make hole. Decrease for buttonholes when piece measures: S: 7, 16, 26, 35 and 45 cm M: 7, 17, 27, 37 and 47 cm L: 7, 17, 28, 38 and 49 cm XL: 7, 16, 25, 34, 43 and 52 cm. XXL: 7, 16, 25, 35, 44 and 53 cm XXXL: 7, 16, 26, 35, 45 and 54 cm ---------------------------------------------------------- START THE PIECE HERE: ---------------------------------------------------------- JACKET - SHORT OVERVIEW OF THE PIECE: Work back piece and front pieces back and forth on circular needle, bottom up, separately. Work sleeves in the round on double pointed needles/circular needle from bottom and up to sleeve cap, then work the rest of sleeve back and forth on circular needle until finished measurements. Finish with a neck edge. BACK PIECE: Cast on 94-98-110-122-134-138 stitches on circular needle size 4 mm with DROPS Paris or DROPS Bomull-Lin. Purl 1 row from wrong side. Then work rib as follows from right side: 2 stitches in GARTER STITCH - read explanation above - * knit 2, purl 2 *, work from *-* until 4 stitches remain, knit 2 and finish with 2 stitches in garter stitch. Continue rib like this for 6 cm. Switch to circular needle size 5 mm, work in stocking stitch with 1 edge stitch in garter stitch in each side while same time decreasing 10-8-10-12-14-12 stitches evenly on first row = 84-90-100-110-120-126 stitches. Continue in stocking stitch until piece measures 7-8-10-10-10-11 cm from cast-on edge. Continue to work pattern from right side as follows: 1 edge stitch in garter stitch, work A.1 until 1 stitch remains, finish with 1 edge stitch in garter stitch. On last row in A.1 decrease 1-0-1-1-1-1 stitch inside 1 stitch in garter stitch = 83-90-99-109-119-125 stitches. When A.1 has been worked 1 time vertically, work as follows from right side: 1 edge stitch in garter stitch, 0-0-0-1-2-1 stitches as first stitch in A.2, work A.2 10-11-12-13-14-15 times in total, work 1-0-1-2-3-2 stitches as last stitch in A.2, finish with 1 edge stitch in garter stitch. When A.2 has been worked 1 time vertically, work as follows from right side: 1 edge stitch in garter stitch, 0-0-2-1-0-0 stitches in stocking stitch, A.3A, work A.3B 12-13-14-16-18-19 times in total, A.3C, work 0-1-2-1-0-0 stitches in stocking stitch, 1 edge stitch in garter stitch. When A.3 has been worked 1 time vertically, work A.1 with 1 edge stitch in garter stitch in each side, at the same time increase 1-0-1-1-1-1 stitch on first row inside 1 stitch in garter stitch = 84-90-100-110-120-126 stitches. When A.1 has been worked one time vertically piece measures approx. 26-27-29-30-30-31 cm. Then work A.2 from right side as explained here while at the same time decreasing 1-0-1-1-1-1 stitch on first row = 83-90-99-109-119-125 stitches. Work 1 edge stitch in garter stitch, 0-0-0-1-2-1 stitches as first stitch in A.2, work A.2 10-11-12-13-14-15 times in total, work 1-0-1-2-3-2 stitches as last stitch in A.2, finish with 1 edge stitch in garter stitch. AT THE SAME TIME when piece measures 28-29-30-31-32-33 cm, cast off 2-3-7-9-12-11 stitches for armholes at the beginning of the next 2 rows = 79-84-85-91-95-103 stitches. When A.2 has been worked 1 time vertically, work as follows from right side: 1 edge stitch in garter stitch, 3-0-1-4-1-0 stitches as first stitch in A.4A, A.4A, work A.4B 6-7-7-7-8-9 times in total, work A.4C, 3-1-1-4-1-0 stitches as last stitch in A.4C and 1 edge stitch in garter stitch. When A.4 has been worked 1 time vertically, work A.5 with 1 edge stitch in garter stitch in each side. Repeat A.5 2 times in total vertically. Then work in stocking stitch until finish measurements with 1 edge stitch in garter stitch in each side. OVERVIEW OF NEXT SECTION: When piece measures 46-48-50-52-54-56 cm, decrease for neck and slip stitches on a thread for diagonal shoulder as explained below. Read section NECK and DIAGONAL SHOULDER before continuing. NECK: Cast off the middle 21-22-23-25-25-27 stitches for neck and finish each shoulder separately. Then decrease 1 stitch for neck on every row from right side 3 times in total - read DECREASE TIP. DIAGONAL SHOULDER: AT THE SAME TIME when piece measures 46-48-50-52-54-56 cm, slip the outermost stitches towards armhole on a thread for diagonal shoulder, work them before slipping them on the thread to avoid cutting the yarn. Slip 7-7-7-8-8-9 stitches on a thread 3 times, and then the last 5-7-7-6-8-8 stitches on the thread. All stitches have now been cast off or slipped on a thread. Slip the 26-28-28-30-32-35 stitches from thread back on circular needle size 5 mm. Purl 1 row from wrong side but to avoid a hole where turning mid piece, pick up the yarn between 2 stitches and work twisted together with first stitch on left needle. Then loosely cast off all stitches by knitting from right side. Piece measures approx. 50-52-54-56-58-60 cm from the top of shoulder. Work the other shoulder the same way. LEFT FRONT PIECE: Cast on 53-57-61-65-73-77 stitches on circular needle size 4 mm with DROPS Paris or DROPS Bomull-Lin. Purl 1 row from wrong side, then work rib as follows from right side: 2 stitches in garter stitch, * knit 2, purl 2 *, work from *-* until 7 stitches remain, knit 2 and 5 band stitches in garter stitch. Continue rib like this for 6 cm. Switch to circular needle size 5 mm and work from right side as follows: 1 stitch in garter stitch, work in stocking stitch until 5 stitches remain on needle and decrease at the same time 5-7-5-5-7-9 stitches evenly over these stitches, finish with 5 stitches in garter stitch = 48-50-56-60-66-68 stitches. Continue in stocking stitch with 1 edge stitch in garter stitch towards the side and 5 band stitches in garter stitch towards mid front until piece measures 7-8-10-10-10-11 cm from cast-on edge. Continue to work pattern from right side as follows: 1 edge stitch in garter stitch, work A.1 until 5 stitches remain, finish with 5 stitches in garter stitch towards mid front. On last row in A.1 decrease 1 stitch inside 1 edge stitch in garter stitch = 47-49-55-59-65-67 stitches. When A.1 has been worked 1 time vertically, continue as follows: 1 edge stitch in garter stitch, 0-1-0-2-1-2 stitches as first stitch in A.2, work A.2 5-5-6-6-7-7 times in total, work 1-2-1-3-2-3 stitches as last stitch in A.2, finish with 5 stitches in garter stitch. When A.2 has been worked 1 time vertically, work as follows from right side: 1 edge stitch in garter stitch, 1-2-2-1-1-2 stitches in stocking stitch, A.3A, work A.3B 5-5-6-7-8-8 times in total, A.3C, work 1-2-2-1-1-2 stitches in stocking stitch and 5 stitches in garter stitch. When A.3 has been worked 1 time vertically, work A.1 with 1 edge stitch in garter stitch towards the side and 5 stitches in garter stitch as before towards mid front, at the same time increase 1 stitch on first row = 48-50-56-60-66-68 stitches. When A.1 has been worked one time vertically piece measures approx. 26-27-29-30-30-31 cm. Then work A.2 from right side as explained here while at the same time decreasing 1 stitch on first row = 47-49-55-59-65-67 stitches. Work 1 edge stitch in garter stitch, 0-1-0-2-1-2 stitches as first stitch in A.2, work A.2 5-5-6-6-7-7 times in total, work 1-2-1-3-2-3 stitches as last stitch in A.2, finish with 5 stitches in garter stitch towards mid front. When piece measures 28-29-30-31-32-33 cm, cast off 2-3-7-9-12-11 stitches for armhole = 45-46-48-50-53-56 stitches (work the stitches that do not fit the pattern in stocking stitch). When A.2 has been worked 1 time vertically, work A.4 from right side as explained here while at the same time adjusting number of stitch to 47-47-49-49-53-57 stitches on first row. Work 1 edge stitch in garter stitch, 0-0-1-1-3-0 stitches as first stitch in A.4A, A.4A, work A.4B 3-3-3-3-3-4 times in total, work A.4 C, 0-0-1-1-3-0 stitches as last stitch in A.4C and 5 stitches in garter stitch. When A.4 has been worked 1 time vertically, work A.5 with 1 edge stitch in garter stitch towards the side and 5 stitches in garter stitch towards mid front. At the same time adjust number of stitches to 45-47-48-50-53-56 stitches on first row. Repeat A.5 2 times in total vertically. Then finish front piece in stocking stitch with 1 stitch in garter stitch towards the side and 5 stitches in garter stitch towards mid front. When piece measures 44-46-47-49-50-52 cm, slip the outermost 15-15-16-16-17-17 stitches towards mid front on a thread for neck, work them before slipping them on the thread to avoid cutting the yarn. OVERVIEW OF NEXT SECTION: Cast off for neck and slip stitches on a thread for diagonal shoulder as explained below. Read section NECK and DIAGONAL SHOULDER before continuing. NECK: Decrease for as follows: Decrease 1 stitch for neck on every row from right side 4 times in total - remember DECREASE TIP. DIAGONAL SHOULDER: AT THE SAME TIME when piece measures 46-48-50-52-54-56 cm, slip the outermost stitch on a thread for diagonal shoulder the same way as on back piece. When all stitches have been decreased and slipped on a thread, slip the 26-28-28-30-32-35 stitches from thread back on circular needle size 5 mm. Work 1 row in stocking stitch, the same way as on back piece and then loosely cast off all stitches. Piece measures approx. 50-52-54-56-58-60 cm from the top of shoulder. RIGHT FRONT PIECE: Cast on 53-57-61-65-73-77 stitches on circular needle size 4 mm with DROPS Paris or DROPS Bomull-Lin. Purl 1 row from wrong side, then work rib as follows from right side: 5 band stitches in garter stitch, * knit 2, purl 2 *, repeat from *-* until 4 stitches remain, knit 2 and 2 stitches in garter stitch. Continue rib like this for 6 cm. Switch to circular needle size 5 mm and work from right side as follows: 5 stitches in garter stitch, work in stocking stitch until 1 stitch remains on needle and decrease at the same time 5-7-5-5-7-9 stitches evenly over these stitches, finish with 1 stitch in garter stitch = 48-50-56-60-66-68 stitches. Continue in stocking stitch with 5 band stitches in garter stitch towards mid front and 1 edge stitch in garter stitch towards the side until piece measures 7-8-10-10-10-11 cm from cast-on edge. Continue to work pattern from right side as follows: 5 stitches in garter stitch, work A.1 until 1 stitch remains, finish with 1 stitch in garter stitch. On last row in A.1 decrease 1 stitch inside 1 edge stitch in garter stitch = 47-49-55-59-65-67 stitches. When A.1 has been worked 1 time vertically, work as follows from right side: 5 stitches in garter stitch, 0-1-0-2-1-2 stitches as first stitch in A.2, work A.2 5-5-6-6-7-7 times in total, work 1-2-1-3-2-3 stitches as last stitch in A.2, finish with 1 edge stitch in garter stitch. When A.2 has been worked 1 time vertically, work as follows from right side: 5 stitches in garter stitch, 1-2-2-1-1-2 stitches in stocking stitch, A.3A, work A.3B 5-5-6-7-8-8 times in total, A.3C, work 1-2-2-1-1-2 stitches in stocking stitch and 1 edge stitch in garter stitch. When A.3 has been worked 1 time vertically, work A.1 with 5 stitches in garter stitch towards mid front and 1 edge stitch in garter stitch towards the side, at the same time increase 1 stitch on first row = 48-50-56-60-66-68 stitches. When A.1 has been worked one time vertically piece measures approx. 26-27-29-30-30-31 cm. Then work A.2 from right side as explained here while at the same time decreasing 1 stitch on first row = 47-49-55-59-65-67 stitches. Work 5 stitches in garter stitch, 0-1-0-2-1-2 stitches as first stitch in A.2, work A.2 5-5-6-6-7-7 times in total, work 1-2-1-3-2-3 stitches as last stitch in A.2 and 1 edge stitch in garter stitch. When piece measures 28-29-30-31-32-33 cm, cast off 2-3-7-9-12-11 stitches for armhole = 45-46-48-50-53-56 stitches (work the stitches that do not fit the pattern in stocking stitch). When A.2 has been worked 1 time vertically, work A.4 from right side as explained here while at the same time adjusting number of stitch to 47-47-49-49-53-57 stitches on first row. Work 5 stitches in garter stitch, 0-0-1-1-3-0 stitches as first stitch in A.4A, A.4A, work A.4B 3-3-3-3-3-4 times in total, work A.4C, 0-0-1-1-3-0 stitches as last stitch in A.4C and 1 stitch in garter stitch. When A.4 has been worked 1 time vertically, work A.5 with 5 stitches in garter stitch towards mid front and 1 edge stitch in garter stitch towards the side. At the same time adjust number of stitches to 45-47-48-50-53-56 stitches on first row. Repeat A.5 2 times in total vertically. Then finish front piece in stocking stitch with 5 stitches in garter stitch towards mid front and 1 stitch in garter stitch towards the side. When piece measures 44-46-47-49-50-52 cm, slip the outermost 15-15-16-16-17-17 stitches towards mid front on a thread for neck, work them before slipping them on the thread to avoid cutting the yarn. OVERVIEW OF NEXT SECTION: Cast off for neck and slip stitches on a thread for diagonal shoulder as explained below. Read section NECK and DIAGONAL SHOULDER before continuing. NECK: Decrease for neck as follows: Cast off 1 stitch for neck on every row from right side 4 times in total - remember DECREASE TIP. DIAGONAL SHOULDER: AT THE SAME TIME when piece measures 46-48-50-52-54-56 cm, slip the outermost stitch on a thread for diagonal shoulder the same way as on back piece. When all stitches have been decreased and slipped on a thread, slip the 26-28-28-30-32-35 stitches from thread back on circular needle size 5 mm. Work 1 row in stocking stitch, the same way as on back piece and then loosely cast off all stitches. Piece measures approx. 50-52-54-56-58-60 cm from the top of shoulder. SLEEVES: Cast on 56-56-60-60-64-64 stitches on double pointed needles size 4 mm with DROPS Paris or DROPS Bomull-Lin. Knit 1 round. Insert 1 marker thread at beginning of round. Work rib (knit 2/purl 2) for 10 cm. Switch to double pointed needles size 5 mm. Knit 1 round and decrease 11-9-11-9-11-9 stitches evenly = 45-47-49-51-53-55 stitches. Insert 1 marker in the 23rd-24th-25th-26th-27th-28th stitch on round (mid on top of sleeve). Marker thread mid under sleeve is used when increasing under sleeve and marker mid on top of sleeve should be used to count where to begin pattern. Now work pattern and increase stitches as explained below: Count out from the middle stitch where the pattern should start - stitch with marker on sleeve should fit middle stitch in diagram. Work the stitches that do not fit the pattern in stocking stitch. Work pattern upwards as follows: A.1, A.2, A.4B, A.5. When the patterns have been worked in this order, work in stocking stitch until finished measurements. AT THE SAME TIME when piece measures 12-12-12-13-14-12 cm, increase 1 stitch on each side of marker thread - read INCREASE TIP. Increase like this every 4½-4-3½-3-2½-2½ cm 8-9-9-10-11-12 times in total = 61-65-67-71-75-79 stitches (these increases are done before the sleeve cap is worked). When piece measures approx. 47-46-44-42-41-42 cm, divide piece at the marker thread and work sleeve cap back and forth on circular needle. Cast off when sleeve measures 48 cm in all sizes. Work the other sleeve the same way. ASSEMBLY: Sew the shoulder seams. Sew side seams inside 1 edge stitch – begin at armhole and sew down to rib to create vents in the sides. Sew sleeve cap to armhole inside edge stitch on front pieces / back piece. Then sew vent at the top of sleeve to bottom of armhole - see chart. NECK EDGE: Begin from right side, and pick up approx. 88 to 106 stitches around the neck (including stitches slipped on a thread mid front) on circular needle size 4 mm with DROPS Paris or DROPS Bomull-Lin. Number of stitches must be divisible by 4. Work rib as follows from wrong side: 5 band stitches in garter stitch, * purl 2, knit 2 *, repeat from *-* until 7 stitches remain on needle, purl 2 and finish with 5 band stitches in garter stitch. Continue rib like this for 4 cm. Cast off knitting from right side. |
|||||||||||||||||||||||||
Diagram explanations |
|||||||||||||||||||||||||
|
|||||||||||||||||||||||||

|
|||||||||||||||||||||||||
|
|||||||||||||||||||||||||

|
|||||||||||||||||||||||||
|
|||||||||||||||||||||||||
|
Have you made this or any other of our designs? Tag your pictures in social media with #dropsdesign so we can see them! Do you need help with this pattern?You'll find tutorial videos, a Comments/Questions area and more by visiting the pattern on garnstudio.com. © 1982-2024 DROPS Design A/S. We reserve all rights. This document, including all its sub-sections, has copyrights. Read more about what you can do with our patterns at the bottom of each pattern on our site. |
|||||||||||||||||||||||||


With over 40 years in knitting and crochet design, DROPS Design offers one of the most extensive collections of free patterns on the internet - translated to 17 languages. As of today we count 304 catalogues and 11422 patterns - 11422 of which are translated into English (UK/cm).
We work hard to bring you the best knitting and crochet have to offer, inspiration and advice as well as great quality yarns at incredible prices! Would you like to use our patterns for other than personal use? You can read what you are allowed to do in the Copyright text at the bottom of all our patterns. Happy crafting!
Comments / Questions (5)
I've just finished knitting the cardigan and sleeve cape is much shorter than armhole for joining and I done everything by the pattern what have I done wrong ? I increased the 65sts as stated
13.06.2023 - 12:26DROPS Design answered:
Dear Sylvia, in this video we show how to finish such a sleeve (first worked in the round then back and forth) and how to sew the sleeve around armhole. In the 2nd size you should have 65 sts = appro. 38 cm / 2 = 19 cm just as deep as the armhole in this size (see chart). Happy assembly!
13.06.2023 - 13:40I’m struggling to understand left front neck shaping m size after says slip 15sts of for neck it says decrease 1st 4 times do I start that on next row or wait till measures 48cm? If I do it then will have to carry on bit longer for shoulder. After casting off for shoulder should I be left with the 15sts for neck?
01.06.2023 - 14:32DROPS Design answered:
Dear Sylvia, you are working size M, right? then when piece measures 46 cm, work one row from wrong side slipping the first 15 sts on a thread (work them first), then work row to the end and continue in pattern as before and decrease for neck on next row from RS (at the end of row) as explained under DECREASE TIP. At the same time, work short rows for shoulder when piece measures 48 cm. After all stitches are decreased for neck there are 28 sts for shoulder. You will work the 15 sts from thread when working neck edge afterwards. Happy knitting!
01.06.2023 - 16:46Bonjour Je ne comprend pas pour la tete manche : Diviser l ouvrage au fil marqueur ? Il faut que je tricote separement en 2 fois au fil marqueur ? Et après faire une couture sur l épaule ? Merci pour votre réponse. Bonne journée
03.04.2023 - 08:45DROPS Design answered:
Bonjour Mme Rey, la manche se tricote en rond jusqu'à la tête de manche, on continue ensuite en rangs, en commençant au milieu sous la manche (au niveau du marqueur du début des tours), Dans cette vidéo, nous montrons comment nous continuons la manche en rangs. Bon tricot!
11.04.2023 - 10:57Bonjour, Je ne comprends pas comment faire l'encolure. Si on prend celle du dos tailles S, j'ai 26 mailles de chaque côté en attentes, 21 mailles rabattues au milieu et 3 mailles entre chaque.... "Diminuer ensuite pour l'encolure 3 fois 1 maille tous les rangs sur l'endroit " cela me semble impossible d'autant que si je dois rabattre les mailles du milieu en premier je ne peux plus faire de diminution.... Merci d'avance de votre aide
28.03.2023 - 19:59DROPS Design answered:
Bonjour Mme Hiiroki, vous devez former l'encolure et le biais des épaules en même temps; rabattez les 21 mailles centrales pour l'encolure et mettez les mailles de l'épaule en attente (= en début de rang sur l'envers (épaule gauche dos) / sur l'endroit (épaule droit dos), et en même temps, rabattez pour l'encolure en début de rang à partir de l'encolure (sur l'endroit, épaule gauche dos / sur l'envers, épaule droite dos). Bon tricot!
29.03.2023 - 09:46Lumi mereliival
19.01.2023 - 22:03