
Popular categories
Looking for a yarn?


|
||||||||||
October Breeze |
||||||||||
 |
 |
|||||||||
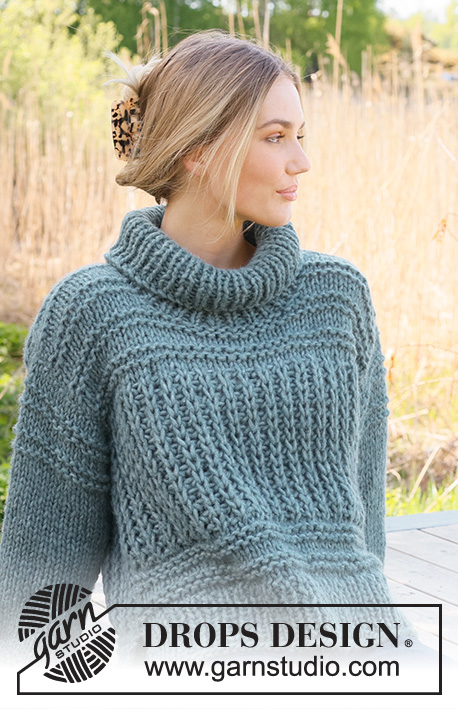
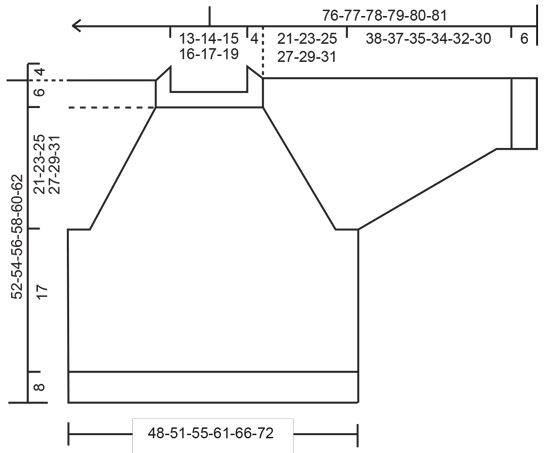
Knitted jumper in DROPS Nepal. The piece is worked top down with double neck and raglan. Sizes XS - XXL.
DROPS 236-14 |
||||||||||
|
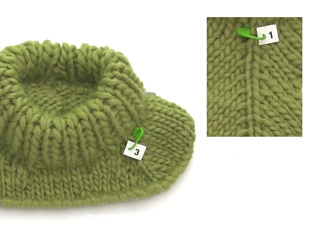
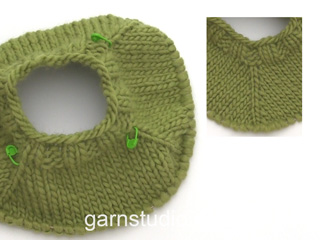
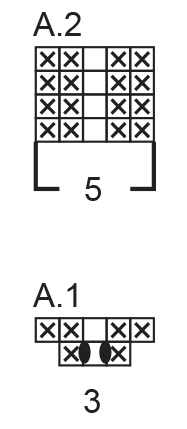
------------------------------------------------------- EXPLANATIONS FOR THE PATTERN: ------------------------------------------------------- RIDGE/GARTER STITCH (worked back and forth): Knit all rows. 1 ridge = knit 2 rows. PATTERN: See diagrams A.1 and A.2. The diagrams show all rows in the pattern from the right side. RAGLAN: All increases before/after A.1/A.2 (marker-stitch is the middle stitch in A.1/A.2). Increase for the body before markers 1 and 3 and after markers 2 and 4 when working from the right side and after markers 1 and 3 and before markers 2 and 4 when working from the wrong side. Increase for the sleeves after markers 1 and 3 and before markers 2 and 4 (always increase from the right side on the sleeves). Increase 1 stitch by making 1 yarn over. The yarn overs are worked as follows from the wrong side: BEFORE MARKER: Purl the back loop. No hole. AFTER MARKER: Slip the yarn-over off the left needle and replace it twisted (insert the left needle from the back when replacing it). Purl the front loop. No hole. The yarn overs are worked as follows from the right side: BEFORE MARKER: Slip the yarn-over off the left needle and replace it twisted (insert the left needle from the back when replacing it). Knit the front loop. The stitch twists to the right. No hole. AFTER MARKER: Knit the back loop (the stitch twists to the left). No hole. DECREASE TIP (for sleeves): Start 3 stitches before the marker, knit 2 together, knit 2 (marker sits between these 2 stitches), slip 1 stitch as if to knit, knit 1 and pass the slipped stitch over the knitted stitch. ------------------------------------------------------- START THE PIECE HERE: ------------------------------------------------------- JUMPER – SHORT OVERVIEW OF THE PIECE: The neck and yoke are worked in the round with circular needle, from mid back and top down. The yoke is divided for body and sleeves and the body is continued in the round with circular needle. The sleeves are worked with short circular needle/double pointed needles. DOUBLE NECK: Cast on 84-88-92-96-100-104 stitches with DROPS Nepal using short circular needles size 4 and 5 mm held together. Remove the needle size 5 mm keeping the stitches on the needle size 4 mm (this gives you an elastic cast-on edge). Work rib in the round (knit 1, purl 1) for 9 cm. Fold the neck double to the inside and work 1 more round of rib, working every 2nd stitch together with its corresponding stitch on the cast-on edge. You now have a double neck. Insert 4 markers without working the stitches, which are then used when increasing to raglan. Count 10-12-12-14-14-16 stitches (half back piece), insert marker-1 in the next stitch, count 19 stitches (sleeve), insert marker-2 in the next stitch, count 21-23-25-27-29-31 stitches (front piece), insert marker-3 in the next stitch, count 19 stitches (sleeve), insert marker-4 in the next stitch, there are 11-11-13-13-15-15 stitches left after the last marker (half back piece). Cut the strand. NECK-LINE: Change to circular needle size 5 mm. Now work a neck-line with short rows AT THE SAME TIME as increasing for raglan. In addition work A.1 at each marker (marker-stitch is the middle stitch in A.1): Start from the right side, 2 stitches before marker-3 (front left-hand side of the neck when the garment is worn). Work stocking stitch, A.1 and increase for RAGLAN on both sides of each A.1 – read description above, until you are 2 stitches past marker-2 (front right-hand side of neck and 8 stitches increased). Turn, tighten the strand and work from the wrong side, increasing for raglan only on the body, to 2 stitches past where the short rows began (4 stitches increased). Turn, tighten the strand and work from the right side to 2 stitches past where you turned last time – working A.2 over each A.1 and increasing for raglan on both sides of each A.2. Turn, tighten the strand and work from the wrong side to 2 stitches past where you turned last time, increasing for raglan only on the body. Cut the strand. YOKE: = 116-120-124-128-132-136 stitches. Work in the round over all stitches in the different sizes as follows: SIZES XS, S, M and L: Start mid-back, work stocking stitch, A.2, and increase raglan on the body and sleeves (on each side of A.2) every 2nd round 3-3-8-10 times = 140-144-188-208 stitches. Continue with stocking stitch, A.2 and increase for raglan, but every 2nd increase is only on the body (4 stitches increased); i.e. increase on the body every 2nd round and on the sleeves every 4th round. Increase like this 18-20-16-18 times on the body (9-10-8-9 times on the sleeves). A total of 25-27-28-32 times on the body and 14-15-18-21 times on the sleeves. After the last increase there are 248-264-284-316 stitches. Go to ALL SIZES. SIZES XL and XXL: Start mid-back, work stocking stitch, A.2 and continue to increase for raglan every round on the body 2-6 more times and every 2nd round on the sleeves 1-3 times = 144-172 stitches. Then increase on the body and sleeves (both sides of each A.2) every 2nd round 9-9 times = 216-244 stitches Continue with stocking stitch, A.2 and increase for raglan, but every 2nd increase is only on the body (4 stitches increased) – increase on the body every 2nd round and on the sleeves every 4th round. Increase like this 20-20 times on the body (10-10 times on the sleeves). A total of 35-39 times on the body and 22-24 times on the sleeves. After the last increase there are 336-364 stitches. Go to ALL SIZES. ALL SIZES. = 248-264-284-316-336-364 stitches. Work stocking stitch and A.2 without further increases until the yoke measures 21-23-25-27-29-31 cm after the neck, measured mid-front. On the next round divide for the body and sleeves: Work 37-41-42-48-51-57 stitches (half back piece), place the next 49-51-57-63-65-69 stitches on a thread for the sleeve, cast on 6-6-8-8-10-10 stitches (in side under sleeve), work 75-81-85-95-103-113 stitches (front piece), place the next 49-51-57-63-65-69 stitches on a thread for the sleeve, cast on 6-6-8-8-10-10 stitches (in side under sleeve), work 38-40-43-47-52-56 stitches (half back piece). Finish the body and sleeves separately. The piece is now measured from here! BODY: = 162-174-186-206-226-246 stitches. Insert 1 marker in the middle of the new stitches under each sleeve. Allow the markers to follow your work onwards; they are used when working the split in each side. Work stocking stitch in the round for a further 17 cm. On the next round divide the piece at both markers, place 81-87-93-103-113-123 stitches between the markers on circular needle size 4 mm and keep the remaining 81-87-93-103-113-123 stitches on the circular needle size 5 mm. Knit 1 row from the right side and increase 20-20-22-24-24-28 stitches evenly spaced = 101-107-115-127-137-151 stitches. Work back from the wrong side as follows: 1 stitch in GARTER STITCH – read description above, * purl 1, knit 1 *, work from *-* until there are 2 stitches left, purl 1 and 1 stitch in garter stitch. Continue this rib for 8 cm. Cast off a little loosely with knit over knit and purl over purl. Place the last 81-87-93-103-113-123 stitches back on circular needle 4 mm and knit 1 row from the right side increasing 20-20-22-24-24-28 stitches evenly spaced = 101-107-115-127-137-151 stitches. Work rib for 8 cm as for the first piece. Cast off a little loosely with knit over knit and purl over purl. The jumper measures approx. 52-54-56-58-60-62 cm from the shoulder down. SLEEVES: Place the 49-51-57-63-65-69 stitches from the thread on the one side of the piece on short circular needle/double pointed needles size 5 mm and knit up 1 stitch in each of the new stitches cast on under the sleeve = 55-57-65-71-75-79 stitches. Insert a marker in the middle of the new stitches under the sleeve. Allow the marker to follow your work onwards; it is used when decreasing under the sleeve. Work stocking stitch in the round for 4-4-4-3-3-3 cm. Now decrease 2 stitches on each side of the marker – read DECREASE TIP. Decrease like this every 6-6-3½-3-2½-2 cm a total of 6-6-9-11-12-13 times = 43-45-47-49-51-53 stitches. Continue working until the sleeve measures 38-37-35-34-32-30 cm from the division (or to desired length. There is approx. 6 cm left). Knit 1 round and increase 9 stitches evenly spaced = 52-54-56-58-60-62 stitches. Change to double pointed needles size 4 mm and work rib (knit 1, purl 1) for 6 cm. Loosely cast off with knit over knit and purl over purl. The sleeve measures approx. 44-43-41-40-38-36 cm from the division. Work the other sleeve in the same way. |
||||||||||
Diagram explanations |
||||||||||
|
||||||||||
|
||||||||||
|
||||||||||
|
Have you made this or any other of our designs? Tag your pictures in social media with #dropsdesign so we can see them! Do you need help with this pattern?You'll find tutorial videos, a Comments/Questions area and more by visiting the pattern on garnstudio.com. © 1982-2024 DROPS Design A/S. We reserve all rights. This document, including all its sub-sections, has copyrights. Read more about what you can do with our patterns at the bottom of each pattern on our site. |
||||||||||


With over 40 years in knitting and crochet design, DROPS Design offers one of the most extensive collections of free patterns on the internet - translated to 17 languages. As of today we count 304 catalogues and 11422 patterns - 11422 of which are translated into English (UK/cm).
We work hard to bring you the best knitting and crochet have to offer, inspiration and advice as well as great quality yarns at incredible prices! Would you like to use our patterns for other than personal use? You can read what you are allowed to do in the Copyright text at the bottom of all our patterns. Happy crafting!
Comments / Questions (31)
Bonjour, Pour la mesure totale de l’empiècement « 21-23-25-27-29-31 cm après le col, mesurer le long du devant ». Le long du devant ? C’est le milieu du devant (entre deux marqueurs ?) ou le long du marqueur devant ? Le long du raglan ? Je vous remercie.
27.02.2023 - 14:43DROPS Design answered:
Bonjour Marlene, on doit mesurer après le col, au milieu du devant, autrement dit entre les marqueurs des raglans et bien dans le sens du tricot. Bon tricot!
27.02.2023 - 16:07Sorry, on my previous question, I made a mistake. The A1 pattern should read as this: [p 1, YO, k 1, YO, p 1].
05.02.2023 - 15:47DROPS Design answered:
Dear Celese, correct, A.1 from RS will be worked P1, YO, K1, YO, P1 - these YO are for the pattern not for the raglan increases, you should increase before/after A.1 (see RAGLAN) - and on 2nd row work A.1 from WS (K2, P1, K2) then work A.2 (from RS = P2, K1, P2). Happy knitting!
06.02.2023 - 10:04Could you please confirm how then to start and end this very first row of the neckline? This is what I have written down in order to assist me: starting 2 stitches before marker 3 - Yarn Over (raglan increase), followed by A1 [p 2, YO, k 1, YO, p2}, YO (raglan increase) then carry on knitting until the next marker and do the same. How do you then finish this first row before turning? If I do A1 and the 2 raglan increases I will finish on a YO - do I knit an extra stitch before turning?
05.02.2023 - 15:29DROPS Design answered:
Dear Celeste, starting 2 sts before marker will let you start 2 stitches before the stitch with the 2nd marker, k1, *YO (increase for raglan) then work A.1 (= Purl 1 (the first 2 sts before 2nd marker are worked), YO (increase for diagram), K, YO (increase for diagram, P), YO (increase for raglan)*, knit until next marker and repeat from *-*. From wrong side, purl twisted the yarn overs on each side of A.1 and work the 5 sts in A.1 (P2, K1, P2) increasing after/before A.1 on front and back piece only (increase 4 sts). Happy knitting!
06.02.2023 - 10:03Efter halsen er jeg meget i tvivl om, hvordan jeg kommer videre. A1: jeg skal tage ud på vrangsiden - hvor og hvordan gøres dette? Det er ikke nemt at gennemskue :-) er dette efter den drejet ret, eller er det før de to retmasker på vrangsiden? Mh Ida
26.12.2022 - 23:38DROPS Design answered:
Hei Ida. Du øker til raglan på hver siden av A.1 fra retten og når du snur og strikker fra vrangen økes det kun til raglan på bolen, SAMTIDIG som kastene strikkes. Da må du lese forklaringen til hvordan kastene strikkes fra vrangen før/etter merket. Les hele avsnittet til RAGLAN. Se også hjelpevideoen nederst på oppskriften: Hvordan øke til raglan samtidig som det strikkes forkortete pinner mvh DROPSDesign
02.01.2023 - 13:21In confused again - I'm working the small size - when I finished the yoke increases I had 264 stitches as it says in the pattern - after I had divided for the body and sleeves and cast on 6 stitches twice (12 stitches in total ) the pattern says I should have 274 stitches - but 264+12=276 - how many stitches should I have? Oops sorry I just realise I hadn't read the pattern right - ignore this question
08.12.2022 - 14:28In confused again - I'm working the small size - when I finished the yoke increases I had 264 stitches as it says in the pattern - after I had divided for the body and sleeves and cast on 6 stitches twice (12 stitches in total ) the pattern says I should have 274 stitches - but 264+12=276 - how many stitches should I have?
08.12.2022 - 14:20DROPS Design answered:
Dear Frances, when piece measures 23 cm, you will divide piece for sleeve, ie slip the 51 sts for each sleeve on a thread and cast on 6 new sts for under sleeve, so that you will have from mid back: 41 sts (mid back), 6 new sts, 81 sts (front piece), 6 sts, 40 sts (mid back) = 41+6+81+6+40=174 sts for body (and 2 threads with each 51 sts for sleeves). Happy knitting!
08.12.2022 - 17:27When working the yoke for the small size do I work the raglan increase in the 4th row as well as doing the sleeves increase - increasing 8 stitches
06.12.2022 - 11:57DROPS Design answered:
Dear Frances, in size XS you first increase on body + sleeve (8 sts) on every other round = 140 sts in total, then increase on body on every 2nd round and on sleeves on every 4th round (alternately 4 and 8 sts) a total of 18 times on body (9 times on sleeves) = 248 sts. Happy knitting!
06.12.2022 - 16:19Hei, joku ilm. Kysyikin jo norjaksi, mutta en ymmärrä. Lisäys + raglan 8+4+8+4 +92 niin summa ei ole 124. Missä puuttuvat 8 silmukkaa?
30.11.2022 - 20:17Bonjour, Est-ce qu’il ne faut pas reprendre les aiguilles 4 pour les côtes en bas du dos et devant, ou reste-on bien avec les aiguilles 5? Merci!
22.11.2022 - 17:12DROPS Design answered:
Bonjour Jessica, on doit effectivement continuer avec l'aiguille 4 - la correction a été faite, merci pour votre retour. Bonne continuation!
23.11.2022 - 08:44Str m starter med 92 masker. Efter halskant skal tages 8+4+8+4 masker ud = 116 masker. Ifølge opskrift skal der nu være 124 masker. Er der noget jeg har misforstået?
22.11.2022 - 13:54DROPS Design answered:
Hei Eva. Ser ut som du har glemt økningne i selve diagram A.1, 1. omgang. Du øker som du skriver til raglan ( 8+4+8+4), men når du strikker A.1 er det også 2 økninger i selve diagrammet. Du strikker A.1 4 ganger = 8 økte masker + raglanøkningene = 8+8+4+8+4+92= 124 masker. mvh DROPS Design
28.11.2022 - 09:36