
Popular categories
Looking for a yarn?


|
||||||||||
Falling Water |
||||||||||
 |
 |
|||||||||
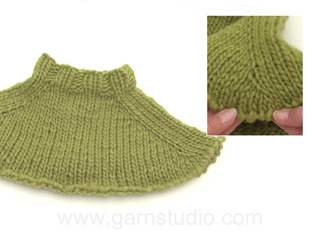
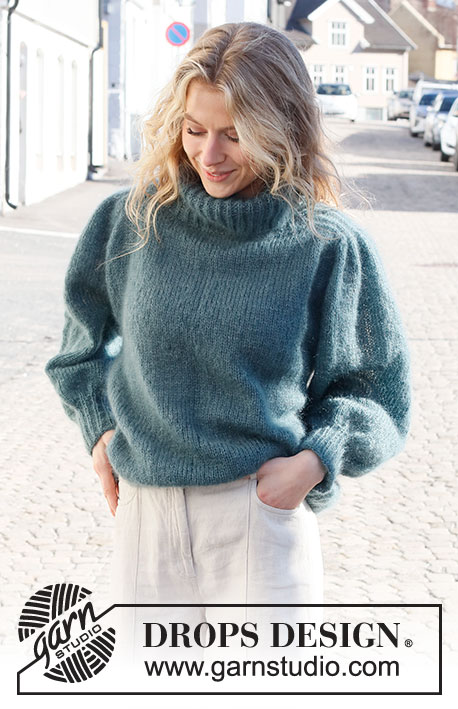
Knitted jacket in 2 strands DROPS Kid-Silk. The piece is worked top down with saddle shoulders, puffed sleeves and high neck. Sizes S - XXXL.
DROPS 227-40 |
||||||||||
|
------------------------------------------------------- EXPLANATIONS FOR THE PATTERN: ------------------------------------------------------- RIDGE/GARTER STITCH (worked back and forth): Knit all rows. 1 ridge = knit 2 rows. PATTERN: See diagrams A.1 to A.3. The diagrams show all rows in the pattern from the right side. INCREASE/DECREASE TIP (evenly spaced): To work out how to increase/decrease evenly, count the number of stitches on to be increased/decreased over (e.g. 7 stitches) and divide by the number of increases/decreases to be made (e.g. 2) = 3.5. In this example, increase by making 1 yarn over after alternately each 3rd and 4th stitch. On the next row work the yarn overs twisted to avoid holes. When decreasing, knit together alternately each 2nd and 3rd stitch and each 3rd and 4th stitch. INCREASE TIP-1: All increases are worked from the right side! Increase 1 stitch by making 1 yarn over. On the next row (wrong side) knit the yarn over twisted to avoid a hole. INCREASE TIP-2: All increases are worked from the right side! BEFORE MARKER-STITCH: The new stitch twists to the right. Use the left needle to pick up the strand between 2 stitches from the previous round, pick up the back strand and knit in the front loop. AFTER MARKER-STITCH: The new stitch twists to the left. Use the left needle to pick up the strand between 2 stitches from the previous round, pick up the front strand and knit in the back loop. DECREASE TIP (for sleeves): Decrease 1 stitch on either side of the marker thread as follows: Work until there are 3 stitches left before the marker thread, knit 2 together, knit 2 (marker thread sits between these 2 stitches), slip 1 stitch as if to knit, knit 1 and pass the slipped stitch over the knitted stitch (2 stitches decreased). BUTTONHOLES: Work buttonholes on the right band (when the garment is worn). Work from the right side when there are 3 stitches left on the row as follows: Make 1 yarn over, knit 2 together and knit 1. On the next row (wrong side), knit the yarn over to leave a hole. The first buttonhole is worked from the right side when the front/back pieces and shoulders are worked onto the same needle. The other 5-5-5-6-6-6 buttonholes are worked with 9½-9½-10-10-8½-9 cm between each one. CASTING-OFF TIP: To avoid the cast-off edge being tight you can cast off with a larger size needle. If the edge is still tight, make 1 yarn over after approx. each 4th stitch at the same time as casting off; the yarn overs are cast off as normal stitches. ------------------------------------------------------- START THE PIECE HERE: ------------------------------------------------------- JACKET – SHORT OVERVIEW OF THE PIECE: The jacket is worked from top down with 2 strands. The neck is worked back and forth, then divided for the front and back pieces and the shoulders. The shoulders are continued back and forth, before replacing the front and back pieces on the needle; stitches are picked up along the sides of the shoulders. The yoke is continued back and forth from mid-front, then divided for the body and sleeves. The body is continued back and forth. The sleeves are worked in the round with short circular needle/double pointed needles. NECK: Cast on 114-114-127-127-143-143 stitches with circular needle size 3 mm and 2 strands DROPS Kid-Silk. Work pattern as follows: 1 edge stitch in GARTER STITCH – read description above, A.3 over the next 24-24-27-27-30-30 stitches, A.2 over the next 12-12-14-14-16-16 stitches, work the first stitch in A.2, A.1 over the next 36-36-39-39-45-45 stitches, work the first 2 stitches in A.1, A.2 over the next 12-12-14-14-16-16 stitches, work the first stitch in A.2, A.1 over the next 24-24-27-27-30-30 stitches, 1 edge stitch in garter stitch. Continue this pattern back and forth for 8 cm – adjust so the next row is from the right side and work as follows: Knit 7 and decrease 2 stitches over these stitches – read INCREASE/DECREASE TIP (= the 7 band stitches are now 5), knit 18-18-21-21-24-24 and decrease 1-0-2-1-3-3 stitches over these stitches (= front piece), work pattern as before over the next 13-13-15-15-17-17 stitches (= shoulder), knit 38-38-41-41-47-47 and decrease 4-2-3-1-5-5 stitches over these stitches (= back piece), work pattern as before over the next 13-13-15-15-17-17 stitches (= shoulder), knit 18-18-21-21-24-24 and decrease 1-0-2-1-3-3 stitches over these stitches (= front piece), knit the last 7 stitches and decrease 2 stitches over these stitches (= the 7 band stitches are now 5). There are 104-108-116-120-128-128 stitches on the needle (17-18-19-20-21-21 stitches on each front piece, 34-36-38-40-42-42 stitches on the back piece and 13-13-15-15-17-17 stitches on each shoulder. Purl 1 row from the wrong side, with the first and last 5 stitches knitted (bands) and pattern worked over the 13-13-15-15-17-17 shoulder stitches on each side. Now work the shoulders; leave the other stitches on the needle or place them on a thread. SADDLE SHOULDERS: Starting from the right side with circular needle size 3 mm and 2 strands DROPS Kid-Silk work as follows: Cast on 1 stitch (= edge stitch), work the 13-13-15-15-17-17 stitches in pattern A.2 as before, at the same time as each purl-1 is increased to purl-2 – read INCREASE TIP-1 (= 6-6-7-7-8-8 stitches increased), cast on 1 stitch at the end of the row (= edge stitch) = 21-21-24-24-27-27 stitches. Work 1 row from the wrong side then work the next row from the right side as follows: 1 edge stitch in garter stitch, A.3 until there are 2 stitches left, work the first stitch in A.3 (so the pattern is symmetrical), 1 edge stitch in garter stitch. Continue this pattern back and forth until the piece measures 8-8-9-9-10-10 cm from the purl-increases – adjust so the next row is from the right side. Place these stitches on a thread and work the other shoulder in the same way. Now work the front and back pieces and the shoulders onto the same circular needle size 5 mm, at the same time as stitches are knitted up along the sides of the shoulders. Start on the left front piece, from the right side as follows: LEFT FRONT PIECE: 5 band stitches in garter stitch, work stocking stitch over the next 17-18-19-20-21-21 stitches (left front piece), knit up 14-14-14-15-15-15 stitches inside the edge stitch along the side of the shoulder. SHOULDER: Knit 1, * knit 1 in both the front and back loops of the next stitch, make 1 yarn over *, work from *-* a total of 18-18-21-21-24-24 times, knit 1 in both the front and back loops of the next stitch, knit 1 (= 37-37-43-43-49-49 stitches increased and 58-58-67-67-76-76 stitches on the shoulder). BACK PIECE: Knit up 14-14-14-15-15-15 stitches, inside the edge stitch along the other side of the shoulder, work stocking stitch over the next 34-36-38-40-42-42 stitches (back piece), knit up 14-14-14-15-15-15 stitches inside the edge stitch along the side of the other shoulder. SHOULDER: Knit 1, * knit 1 in both the front and back loops of the next stitch, make 1 yarn over *, work from *-* a total of 18-18-21-21-24-24 times, knit 1 in both the front and back loops of the next stitch, knit 1 (= 37-37-43-43-49-49 stitches increased and 58-58-67-67-76-76 stitches on the shoulder). RIGHT FRONT PIECE: Knit up 14-14-14-15-15-15 stitches, inside the edge stitch along the other side of the shoulder, knit 17-18-19-20-21-21, 5 band stitches in garter stitch (right front piece) – remember the BUTTONHOLES on the right band – read description above. There are 250-254-276-284-306-306 stitches on the needle. YOKE: Insert a marker thread after the band. THE PIECE IS NOW MEASURED FROM HERE! Insert 4 markers as follows: Marker 1: Work 5 band stitches in garter stitch, stocking stitch over the next 31-32-33-35-36-36 stitches, insert the marker in the next stitch (= front piece). Marker 2: Work stocking stitch over the next 56-56-65-65-74-74 stitches, insert the marker in the next stitch (= sleeve). Marker 3: Work stocking stitch over the next 62-64-66-70-72-72, stitches, insert the marker in the next stitch (= back piece). Marker 4: Work stocking stitch over the next 56-56-65-65-74-74 stitches, insert the marker in the next stitch (= sleeve). Work stocking stitch over the next 31-32-33-35-36-36 stitches, 5 stitches in garter stitch (band stitches) (= front piece). Allow the 4 markers to follow your work onwards; they are used when increasing. Continue back and forth with stocking stitch and 5 band stitches in garter stitch on each side. AT THE SAME TIME, on the next from the right side, start to increase for the sleeves and yoke: Increases are worked at the same time, but in size L, XL, XXL and XXXL, the increases on yoke continue after the increases on sleeves are done. Increase as explained below: On the first row from the right side, increase 4 stitches for the sleeves and 4 stitches for the yoke. Increase 1 stitch on each side of the 4 markers – read INCREASE TIP-2 (= 8 increases on the row), as follows: SLEEVE INCREASES: Increase AFTER markers 1 and 3 and BEFORE markers 2 and 4. Increase like this every 2nd row a total of 7-9-6-9-6-8 times = 72-76-79-85-88-92 stitches on the sleeves (including the marker-stitches on each side) YOKE INCREASES: Increase BEFORE markers 1 and 3 and AFTER markers 2 and 4. Increase like this every 2nd row a total of 7-9-11-12-16-21 times = 38-41-44-47-52-57 stitches (+ 5 band stitches) on the front pieces and 76-82-88-94-104-114 stitches on the back piece. When all the increases are finished there are 306-326-344-368-394-422 stitches. Continue with stocking stitch until the piece measures 19-21-22-24-25-27 cm from the marker thread after the neck. Now divide for the body and sleeves on the next row as follows: Work the first 43-46-49-52-57-62 stitches (front piece), place the next 72-76-79-85-88-92 stitches on a thread for the sleeve, cast on 6-6-8-10-10-10 stitches (= in side under sleeve), work the next 76-82-88-94-104-114 stitches (= back piece), place the next 72-76-79-85-88-92 stitches on a thread for the sleeve, cast on 6-6-8-10-10-10 stitches (= in side under sleeve), work the last 43-46-49-52-57-62 stitches (= front piece). The body and sleeves are finished separately. THE PIECE IS NOW MEASURED FROM HERE. BODY: = 174-186-202-218-238-258 stitches. Continue back and forth with stocking stitch and 5 band stitches in garter stitch on each side for 29 cm. Try the jacket on and work to desired length (3 cm left to finished length). On the next row from the wrong side increase 38-41-43-48-52-56 stitches evenly spaced = 212-227-245-266-290-314 stitches. Change to circular needle size 3 mm. Work from the right side as follows: 5 band stitches in garter stitch, A.3 until there are 6 stitches left, work the first stitch in A.3 (so the pattern is symmetrical), 5 band stitches in garter stitch. Continue this pattern for 3 cm. Cast off with knit over Fisherman’s rib and purl over purl – read CASTING-OFF TIP. The jacket measures approx. 56-58-60-62-64-66 cm from the shoulder down. SLEEVES: Place the 72-76-79-85-88-92 stitches from the thread on the one side of the piece on double pointed needles/short circular needle size 5 mm and knit up 1 stitch in each of the 6-6-8-10-10-10 stitches cast on under the sleeve = 78-82-87-95-98-102 stitches. Insert a marker thread in the middle of the new stitches under the sleeve. Start at the marker thread and work stocking stitch in the round for 4 cm. Now decrease 1 stitch on either side of the marker thread – read DECREASE TIP. The decreases in sizes S and M are finished (= a total of 1-1 time). In sizes L, XL, XXL and XXXL repeat the decrease every 8-2½-2-2 cm 1-3-4-4 more time(s) (= a total of 2-4-5-5 times). When all decreases are worked, there are 76-80-83-87-88-92 stitches on the round. Continue working until the sleeve measures 27-25-25-23-22-21 cm from the division. Try the jacket on and work to desired length (9 cm left to finished length). Knit 1 round where you decrease 34-38-38-42-40-41 stitches evenly spaced = 42-42-45-45-48-51 stitches. Change to double pointed needles size 3 mm and work A.1 for 9 cm. Cast off with knit over Fisherman’s rib and purl over purl – remember CASTING-OFF TIP. The sleeve measures approx. 36-34-34-32-31-30 cm from the division. Work the other sleeve in the same way. ASSEMBLY: Sew the buttons onto the left band. |
||||||||||
Diagram explanations |
||||||||||
|
||||||||||

|
||||||||||
|
Have you made this or any other of our designs? Tag your pictures in social media with #dropsdesign so we can see them! Do you need help with this pattern?You'll find tutorial videos, a Comments/Questions area and more by visiting the pattern on garnstudio.com. © 1982-2024 DROPS Design A/S. We reserve all rights. This document, including all its sub-sections, has copyrights. Read more about what you can do with our patterns at the bottom of each pattern on our site. |
||||||||||


With over 40 years in knitting and crochet design, DROPS Design offers one of the most extensive collections of free patterns on the internet - translated to 17 languages. As of today we count 304 catalogues and 11422 patterns - 11422 of which are translated into English (UK/cm).
We work hard to bring you the best knitting and crochet have to offer, inspiration and advice as well as great quality yarns at incredible prices! Would you like to use our patterns for other than personal use? You can read what you are allowed to do in the Copyright text at the bottom of all our patterns. Happy crafting!
Comments / Questions (12)
Jeg kan ikke helt gennemskue, hvordan man kommer i gang med mønsteret på kraven, når man skal starte A3 med at stikke pinden gennem masken under næste maske (patentmaske). Der er jo ingen maske under opslaget?
13.01.2024 - 19:25Bonjour, Deux tailles d'aiguilles sont recommandées : n°5 et n°3. Pour quelle taille d'aiguille la dimension de l'échantillon est-elle prévue ? Merci par avance,
05.11.2023 - 09:43DROPS Design answered:
Bonjour Emmanuel, tricotez l'échantillon en jersey avec les aiguilles 5 (ou bien celles qui vous seront nécessaires pour avoir les bonnes dimensions). Bon tricot!
06.11.2023 - 08:24Kan man strikke almindelig rib i halsen, og forkorte den? I så fald, skal man så skifte pindestr og maskeantal?
10.04.2023 - 18:57DROPS Design answered:
Hej Vera, jo da, det bestemmer du jo selv :)
13.04.2023 - 12:04Jag funderar på att sticka "Falling Water" koftan. Men eftersom jag har några nystan Baby Merino över funderar jag på att kombinera en tråd Kid Silk med en tråd Baby Merino. Det borde väl fungera?
17.10.2022 - 11:09DROPS Design answered:
Hei Gunnel. Ja, det skal fungere. Både DROPS Baby Merino og DROPS Kid-Silk tilhørere samme garngruppe (A). Men husk å dobbelsjekke strikkefasthet din med det som står i oppskriften. Og husk: vaske etter vaskeanvisning til den kvaliteten som er mest følsom (i dette tilfelle Kid-Silk). mvh DROPS Design
17.10.2022 - 13:31Hei igjen... om man skulle strikket en XS hvordan reduseres maskeantallet proporsjonert?
21.09.2022 - 12:32DROPS Design answered:
Hej Rebekka, det kommer helt an på hvor stor du vil at XS skal være, vi kan desværre ikke hjælpe dig med at skrive opskriften om. :)
22.09.2022 - 14:42Hei! Angående lengden på armene i de ulike str, er det riktig at M skal være 25 cm og XXL 21 cm?
11.09.2022 - 22:12DROPS Design answered:
Hei Rebekka. Ja, det stemmer. Det er kortere mål i de større størrelsene pga bredere skuldervidde. Når ermene strikkes ovenfra og ned, er det veldig praktisk å kunne prøve plagget på, slik at man kan måle og få den lengden man selv måtte ønske :) mvh DROPS design
12.09.2022 - 14:21Bonjour , pour le Col on demande de monter 114 mailles mais après quand on fait le compte des mailles à tricoter nous avons 1-24-12-36-12-24 et 1 mailles soit 110 mailles. Il y en a donc 4 non utilisées. Merci
20.02.2022 - 21:32DROPS Design answered:
Bonjour Sylvie, votre décompte n'est pas tout à fait exact, pour que A.2 soit symétrique, on termine chaque section tricotée en A.2 par la 1ère m de A.2 et de même avec les 2 premières m de A.1, autrement dit: on tricote A.2 sur 12 mailles + la 1ère maille de A.2 = 13 mailles au total; et A.1 sur 36 mailles + les 2 premières mailles de A.1 = 38 mailles, vous avez retrouvé ainsi vos 4 mailles manquantes. Bon tricot!
21.02.2022 - 10:08Mönster 227-40. Stickar storlek L . När man stickar ihop på stickor nr 5 har man 5+19+14+67(ärm)+14+38+14+67(ärm)+14+19+5=276maskor. När man sen skall sätta markörerna har man 5+33+65(ärm)+66+65(ärm)+33+5=272maskor. Jag antar att det skall vara 67m på vardera ärmen. Om detta sen får konsekvenser för maskantalet längre fram i beskrivningen vet jag inte eftersom jag inte kommit längre än. Mvh Ulla
07.02.2022 - 15:05Collo: devo lavorare solo la 1^maglia di A2 e poi La sequenza di A1lavorare la 1° maglia di A.2, A.1 sulle 36 maglie? oppure solo le prime maglie di A2 e A1 in sequenza?
08.01.2022 - 22:28DROPS Design answered:
Buonasera Carmen, deve lavorare la 1° maglia di A.2, poi 36 maglie in A.1, la prime 2 maglie di A.1 e 12 maglie di A.2 e così via. Buon lavoro!
08.01.2022 - 23:06De 8 cm van de schouder trekt helemaal samen als je langs beide kanten 14 steken moet oprapen. Komt dat in orde als je verder breit
27.12.2021 - 13:25DROPS Design answered:
Dag Sabina,
Bij een stekenverhouding van 17 steken = 10 cm kom je ongeveer op 14 steken over een lengte van 8 cm, dus het aantal steken zou wel moeten kloppen. Misschien moet je de steken iets losser opnemen?
28.12.2021 - 19:04