
Looking for a yarn?


Comments / Questions (24)
![]() Karin Börner wrote:
Karin Börner wrote:
Ich vermisse einen Aufteilungs-Schlüssel für die Maschen, nach der Passen-Zunahme,? Z.B. Größe XL: es sind 408 Maschen vorhanden, davon werden je 80 Maschen für die Ärmel benötigt, bleiben 246 Maschen für den Rumpf. So weit, so gut. Ich arbeite aber mit dünnerem Garn und einer Größe zwischen X und XL . Es geht mir um das Aufteilungsprinzip, z.B. der 56 Maschen nach der Passenzunahme bei XL. Wie geht das?
13.03.2022 - 17:13DROPS Design answered:
Liebe Frau Börner, leider könnnen wir nicht jede unsere Anleitung nach jeder Maschenprobe umrechnen, in XXL hier, stricken Sie 3 Maschen am Anfang/Ende Rücken- und Vorderteil für die Ärmel, so haben Sie 65-3 = 62 M für 1/2 Vorderteil, 74+(2x3)= 80 M für jede Ärmel und 130 - (2x3)= 124 M. Hoffentlich kann es Ihnen helfen. Viel Spaß beim stricken!
14.03.2022 - 12:02
![]() Barbara wrote:
Barbara wrote:
Buongiorno, ho finito il maglione ma il collo è troppo stretto e vorrei rifarlo. Essendo un modello top down non so se è possibile disfare il collo essendo che è all’inizio del lavoro e non alla fine. Come devo procedere?
01.02.2022 - 10:35DROPS Design answered:
Buonasera Barbara, per un'assistenza così personalizzata può rivolgersi al suo rivenditore DROPS di fiducia. Buon lavoro!
01.02.2022 - 22:22
![]() Barbara wrote:
Barbara wrote:
Buongiorno, ho finito il maglione che è venuto benissimo. Ma il collo è troppo stretto e non fa l’effetto a cratere. Posso disfarlo dall’alto e rifarlo con Ferri più grossi? Grazie
31.01.2022 - 12:31DROPS Design answered:
Buonasera Barbara, può apportare le modifiche che desidera al modello. Buon lavoro!
31.01.2022 - 23:31
![]() Mel wrote:
Mel wrote:
There are 46-48-48-56-58-58 stitches between the marker-stitches on each sleeve. AT THE SAME TIME on the next round increase 8 stitches for yoke as follows: Increase 1 stitch on each side of the 4 marker-stitches – Increase like this every 2nd round a total of 5-5-6-7-7-8 times place the next 60-64-70-78-80-82 stitches on 1 thread for the sleeve since it appears that all the created stitches go into the sleeve, these numbers dont add up correctly.
31.12.2021 - 01:18DROPS Design answered:
Dear Mel, some of the stitches on the sleeve will be worked for the body, divide piece as stated to get the correct measurements as in the chart. Happy knitting!
03.01.2022 - 14:23
![]() Christiane wrote:
Christiane wrote:
Sauf que dans la vidéo, à 1:35, c'est une augmentation APRÈS le marqueur, et non avant. Je persiste : à mon avis, ce que dit le modèle et ce que dit la vidéo sont en contradiction. Car augmentation manche : on augmente APRÈS le 1er marqueur, et AVANT le marqueur suivant (2ème), le nb de mailles dos et devant restant constant.
04.10.2021 - 09:27DROPS Design answered:
Bonjour Christiane, en fait la vidéo est exacte, c'est le texte qui accompagne la vidéo qui doit être corrigé :) merci pour votre retour et insistance, les explications du modèle sont correctes telles quelles; Bon tricot!
04.10.2021 - 15:18
![]() Christiane wrote:
Christiane wrote:
AUGMENTATIONS-2: contradiction entre tuto vidéo et explication du modèle. Qui a raison, le tuto ou le modèle ? Selon tuto vidéo: … relever le fil entre 2 mailles du rang précédent, de l'avant vers l'arrière et tricoter la maille à l'endroit, dans le brin arrière … APRÈS le marqueur : … relever le fil entre 2 mailles du rang précédent, de l'arrière vers l'avant et tricoter la maille à l'endroit, dans le brin avant …
02.10.2021 - 14:29DROPS Design answered:
Bonjour Christiane, dans cette vidéo, on augmente bien avant le marqueur (ex 1:35) en relevant le fil de l'arrière vers l'avant pour le tricoter dans le brin avant et on augmente après le marqueur (ex. 2:06) en relevant le fil de l'avant vers l'arrière pour le tricoter dans le brin arrière - ou bien ai-je mal compris votre question?
04.10.2021 - 08:02
![]() Sarah Kring wrote:
Sarah Kring wrote:
Hi, I am just starting out on this pattern. The pattern is easy to follow etc. Now I haven't knitted this far but for the amount of sts - I cannot make it go up. You start with 100 + 32= 132 then you increase by 4 a total off 13 times (4x13=52) that gives a total of 184 sts before starting the sleeve increase no? But the pattern says 236 sts (52 more sts?) Please let me know if I missed something? Thanks
22.09.2021 - 04:31DROPS Design answered:
Dear Mrs Kring, you should increase 8 sts and not only 4 , see INCREASE TIP-1 (saddle shoulder increase):, ie 132 sts + (8 x 13) = 236 sts. Happy knitting!
22.09.2021 - 07:47
![]() Jardé wrote:
Jardé wrote:
En vous donnant le nom du modèle est il possible d'avoir les explications en XS c'est à dire 34-36 ? Merci
19.04.2021 - 17:06DROPS Design answered:
Bonjour Mme Jardé, Nous ne sommes malheureusement pas en mesure de pouvoir adapter chacun de nos modèles à chaque demande. Vous pouvez vous inspirer d'un modèle analogue et de même tension disponible en XS à l'aide des mesures . Votre magasin saura vous aider, même par mail ou téléphone, pour toute assistance complémentaire. Merci pour votre compréhension.
20.04.2021 - 07:12
![]() Jardé wrote:
Jardé wrote:
Je remarque que quasiment tous vos modèles commencent à partir du S qui correspond à un 36-38.... Ce serait bien d'avoir le choix du XS..Merci bien .
08.04.2021 - 09:35DROPS Design answered:
Bonjour Mme Jardé, effectivement, la majorité de nos modèles commence en S, nous en avons toutefois certains en XS. Bon tricot!
08.04.2021 - 15:42
![]() Maria wrote:
Maria wrote:
Hola! Tengo una duda en el aumento del canesu, ya que dice que tengo que mover los marcadores a la zona más externa de las mangas, pero no me calzan la cantidad de puntos que deben haber entre los marcadores. Tejiendo la talla S dice que deberían haber 46 puntos, pero tengo 56 puntos (26 de A1 más los 30 puntos de los aumentos de mangas, que se aumentaban 2 puntos por 15 veces). Entonces no entiendo donde poner los marcadores y los 10 puntos extra. Entendí algo mal?
27.01.2021 - 05:23
|
||||||||||||||||||||||
Country Muse#countrymusesweater |
||||||||||||||||||||||
 |
 |
|||||||||||||||||||||
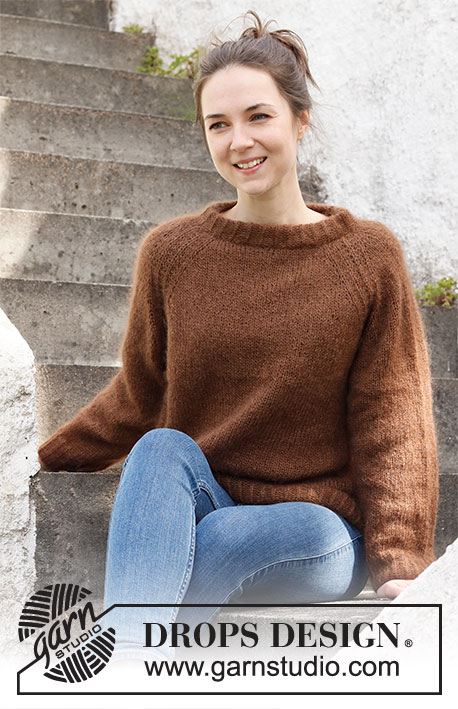
Knitted jumper in DROPS Lima. The piece is worked top down with double neck and saddle shoulders. Sizes S - XXXL.
DROPS 216-40 |
||||||||||||||||||||||
|
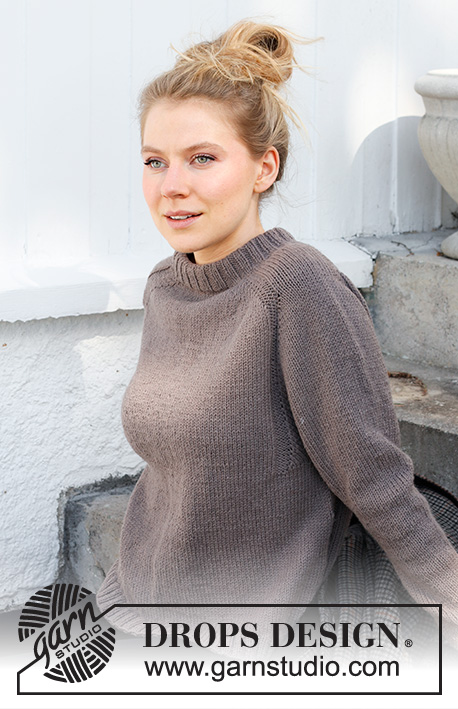
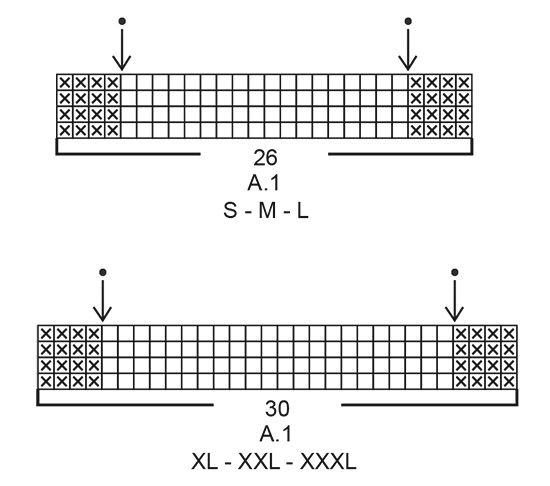
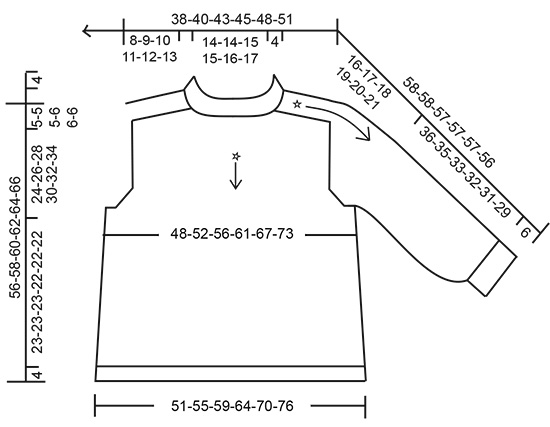
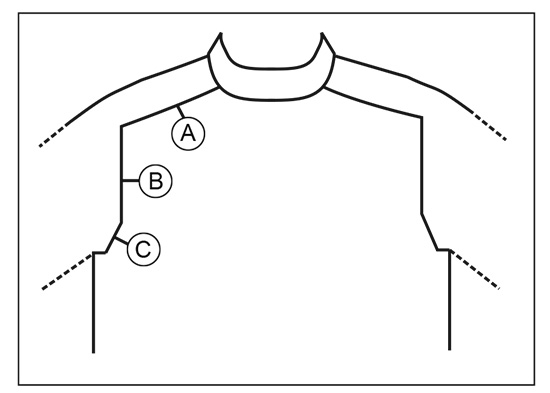
------------------------------------------------------- EXPLANATIONS FOR THE PATTERN: ------------------------------------------------------- PATTERN: See diagram A.1. Choose diagram for your size. INCREASE/DECREASE TIP (evenly spaced): To work out how to increase/decrease evenly, count the total number of stitches on needle (e.g. 92 stitches), and divide by the number of increases/decreases to be made (e.g. 28) = 3.3. In this example, increase by making 1 yarn over after alternately each 3rd and 4th stitch. On the next row work the yarn overs twisted to avoid holes. When decreasing, knit together alternately each 2nd and 3rd stitch and each 3rd and 4th stitch. INCREASE TIP-1 (saddle shoulder increase): Increase 2 stitches on each side of the 26-26-26-30-30-30 shoulder stitches by making 1 yarn over as described below. On the next round knit the yarn overs twisted to avoid holes. Then work the new stitches in stocking stitch. NOTE: The number of shoulder stitches remains the same – the increases are on the front and back pieces. BEFORE MARKER: Start 4 stitches before the marker, make 1 tight yarn over, 4 stitches in stocking stitch, make 1 tight yarn over (= 2 stitches increased). AFTER MARKER: Make 1 tight yarn over, 4 stitches in stocking stitch, make 1 tight yarn over (= 2 stitches increased). INCREASE TIP-2 (sleeve increase): BEFORE MARKER: The new stitch will be twisted, leaning towards the right. Use left needle to pick up strand between 2 stitches from the row below, pick up strand from behind and knit stitch in front loop (= 1 stitch increased). AFTER MARKER: The new stitch will be twisted, leaning towards the left. Use left needle to pick up strand between 2 stitches from the row below, pick up strand from the front and knit stitch in back loop (= 1 stitch increased). INCREASE TIP-3 (yoke increase): Start before the marker-stitch, use left needle to pick up strand between 2 stitches from the row below, pick up strand from behind and knit stitch in front loop, work marker-stitch in stocking stitch as before, use left needle to pick up strand between 2 stitches from the row below, pick up strand from the front and knit stitch in back loop (= 1 stitch increased on each side of the marker-stitch). Work the new stitches in stocking stitch. INCREASE TIP-4 (sides of body): Work until there are 3 stitches left before the stitch with the marker thread, make 1 yarn over, work 6 stitches in stocking stitch (marker thread sits in the middle of these 6 stitches), 1 yarn over (= 2 stitches increased). On the next round knit the yarn overs twisted to avoid holes. Then work the new stitches in stocking stitch. DECREASE TIP (for sleeves): Start 3 stitches before the marker thread, knit 2 together, knit 2 (marker thread sits between these 2 stitches), slip 1 stitch as if to knit, knit 1 and pass the slipped stitch over the knitted stitch (2 stitches decreased). CASTING-OFF TIP: To avoid the cast-off edge being tight you can cast off with a larger size needle. If the edge is still tight, make 1 yarn over after approx. each 8th stitch at the same time as casting off; the yarn overs are cast off as normal stitches. ------------------------------------------------------- START THE PIECE HERE: ------------------------------------------------------- JUMPER – SHORT OVERVIEW OF THE PIECE: The neck and yoke are worked in the round with circular needle, top down from mid back. Stitches are increased for the saddle shoulders, then for the sleeves and then for yoke. The yoke is divided for body and sleeves and the body continued in the round with circular needle. The sleeves are worked in the round with short circular needle/double pointed needles, top down. NECK: Cast on 92-96-100-104-108-112 stitches with short circular needle size 3.5 mm and Lima. Knit 1 round, then work rib in the round (= knit 2, purl 2) for 9 cm. When the rib is finished, knit 1 round where you increase 28-28-32-40-40-44 stitches evenly spaced – read INCREASE/DECREASE TIP = 120-124-132-144-148-156 stitches. Knit 1 round (yarn overs knitted twisted). YOKE: Change to circular needle size 4.5 mm. Insert 1 marker in the middle of the round (= mid-front) - yoke is measured from this marker! Work yoke as follows: In addition insert 4 new markers as described below – these markers are inserted without working the stitches, and each marker is placed between 2 stitches. These markers are used when increasing for saddle shoulders and should have a different colour from the marker mid-front. Start mid back, count 17-18-20-21-22-24 stitches (= ½ back piece), insert marker 1 before the next stitch, count 26-26-26-30-30-30 stitches (= shoulder), insert marker 2 before the next stitch, count 34-36-40-42-44-48 stitches (= front piece), insert marker 3 before the next stitch, count 26-26-26-30-30-30 stitches (= shoulder), insert marker 4 before the next stitch. There are 17-18-20-21-22-24 stitches left after the last marker; allow the markers to follow your work onwards. SADDLE SHOULDER INCREASE: Read the whole section before continuing! The piece is continued with stocking stitch on the front and back pieces and A.1 over the 26-26-26-30-30-30 shoulder stitches (i.e. between markers 1 and 2 and markers 3 and 4). AT THE SAME TIME on the first round increase 8 stitches for the saddle shoulders as follows: Increase 2 stitches BEFORE markers 1 and 3 (i.e. before A.1) and increase 2 stitches AFTER markers 2 and 4 (i.e. after A.1) – read INCREASE TIP-1. Remember there are only increases on front piece and back piece and number of shoulder stitches remains the same. Continue this pattern and increase every 2nd round a total of 10-12-13-14-16-17 times = 200-220-236-256-276-292 stitches. REMEMBER THE KNITTING TENSION! After the last increase, the piece measures approx. 8-9-10-11-12-13 cm from the marker on the neck. Now increase for sleeves as described below. SLEEVE INCREASE: Move the 4 markers from saddle shoulder increase so they are now on each side of the middle 18-18-18-22-22-22 stitches in A.1 on each shoulder – see arrows in A.1. Continue with stocking stitch and A.1 over A.1 as before. AT THE SAME TIME on the next round increase 4 stitches for the sleeves as follows: Increase 1 stitch AFTER markers 1 and 3 and increase 1 stitch BEFORE markers 2 and 4 – read INCREASE TIP-2. Remember there are only increases on sleeves and number of stitches in A.1 is increasing, but number of stitches on front piece and back piece remains the same – the increased stitches are worked in stocking stitch. Increase like this every 2nd round a total of 15-16-16-18-19-19 times = 260-284-300-328-352-368 stitches. After the last increase, the piece measures approx 11-12-12-13-14-14 cm from where the sleeve increases started. Now increase for yoke as described below. YOKE INCREASE: Move the 4 markers so each marker sits in the outermost sleeve stitches on each side. There are 46-48-48-56-58-58 stitches between the marker-stitches on each sleeve. Continue with stocking stitch and 4 purled stitches from A.1 which will continue down the front and back pieces as before. AT THE SAME TIME on the next round increase 8 stitches for yoke as follows: Increase 1 stitch on each side of the 4 marker-stitches – read INCREASE TIP-3. Increase like this every 2nd round a total of 5-5-6-7-7-8 times = 300-324-348-384-408-432 stitches. Continue working without further increases until the piece measures 16-17-18-19-20-21 cm from where the sleeve increase started after saddle shoulder increase. The piece measures approx. 24-26-28-30-32-34 cm from marker by the neck. On the next round divide the yoke for the body and sleeves as follows: Work the first 45-49-52-57-62-67 stitches as before (= ½ back piece), place the next 60-64-70-78-80-82 stitches on 1 thread for the sleeve, cast on 6-6-8-8-10-12 new stitches on the needle (= in side under sleeve), work 90-98-104-114-124-134 stitches as before (= front piece), place the next 60-64-70-78-80-82 stitches on 1 thread for the sleeve, cast on 6-6-8-8-10-12 new stitches on the needle (= in side under sleeve), work the last 45-49-52-57-62-67 stitches as before (= ½ back piece). Cut the strand and remove all markers. Body and sleeves are finished separately. THE PIECE IS NOW MEASURED FROM HERE! BODY: = 192-208-224-244-268-292 stitches. Insert 1 marker thread in the middle of the 6-6-8-8-10-12 stitches cast on under each sleeve. Allow the threads to follow your work onwards – they are used when increasing in the sides. Start the round at one of the marker threads and work stocking stitch in the round over all stitches. When the piece measures 6 cm from the division, increase 1 stitch on each side of both marker threads – read INCREASE TIP-4 (= 4 stitches increased). Increase like this every 6 cm a total of 3 times on each side = 204-220-236-256-280-304 stitches. Continue working until the piece measures 23-23-23-22-22-22 cm from the division. There is approx. 4 cm left to finished length; try the jumper on and work to desired length. Knit 1 round where you increase 48-52-56-64-68-76 stitches evenly spaced – remember INCREASE/DECREASE TIP = 252-272-292-320-348-380 stitches. NOTE: This is done to avoid the rib being tight. Change to circular needle size 3.5 mm and work rib (knit 2, purl 2) for 4 cm. Cast off with knit over knit and purl over purl – read CASTING-OFF TIP! The jumper measures approx. 56-58-60-62-64-66 cm from the shoulder down. SLEEVE: Place the 60-64-70-78-80-82 stitches from the thread on the one side of the piece on double pointed needles/short circular needle size 4.5 mm and knit up 1 stitch in each of the 6-6-8-8-10-12 stitches cast on under the sleeve = 66-70-78-86-90-94 stitches. Insert a marker thread in the middle of the 6-6-8-8-10-12 stitches under the sleeve. Allow the thread to follow your work onwards; it will be used when decreasing under the sleeve. Start at the marker thread and work stocking stitch in the round over all stitches. When the sleeve measures 2 cm from the division in all sizes, decrease 2 stitches under the sleeve – read DECREASE TIP. Decrease like this every 2-2-1½-1-1-1 cm a total of 7-8-11-14-15-16 times = 52-54-56-58-60-62 stitches. Continue working until the sleeve measures 36-35-33-32-31-29 cm from the division. There is approx. 6 cm left to finished length; try the jumper on and work to desired length. NOTE: Shorter measurements in larger sizes due to broader shoulders and longer yoke. Knit 1 round where you decrease 4-6-4-6-4-6 stitches evenly spaced – remember INCREASE/DECREASE TIP = 48-48-52-52-56-56 stitches. Change to double pointed needles size 3.5 mm and work rib (knit 2, purl 2) for 6 cm. Cast off with knit over knit and purl over purl – remember CASTING-OFF TIP! The sleeve measures approx. 42-41-39-38-37-35 cm from the division. Work the other sleeve in the same way. ASSEMBLY: Fold the neck to the inside of the piece and sew down. To avoid the neck being tight and rolling outwards, it is important the seam is elastic. |
||||||||||||||||||||||
Diagram explanations |
||||||||||||||||||||||
|
||||||||||||||||||||||
 |
||||||||||||||||||||||
 |
||||||||||||||||||||||
 |
||||||||||||||||||||||
Have you finished this pattern?Tag your pictures with #dropspattern #countrymusesweater or submit them to the #dropsfan gallery. Do you need help with this pattern?You'll find 30 tutorial videos, a Comments/Questions area and more by visiting the pattern on garnstudio.com. © 1982-2025 DROPS Design A/S. We reserve all rights. This document, including all its sub-sections, has copyrights. Read more about what you can do with our patterns at the bottom of each pattern on our site. |
||||||||||||||||||||||


With over 40 years in knitting and crochet design, DROPS Design offers one of the most extensive collections of free patterns on the internet - translated to 17 languages. As of today we count 320 catalogues and 12095 patterns translated into English (UK/cm). 12095
We work hard to bring you the best knitting and crochet have to offer, inspiration and advice as well as great quality yarns at incredible prices! Would you like to use our patterns for other than personal use? You can read what you are allowed to do in the Copyright text at the bottom of all our patterns. Happy crafting!
Post a comment to pattern DROPS 216-40
We would love to hear what you have to say about this pattern!
If you want to leave a question, please make sure you select the correct category in the form below, to speed up the answering process. Required fields are marked *.