
Popular categories
Looking for a yarn?


|
|||||||||||||||||||
Icefall |
|||||||||||||||||||
 |
 |
||||||||||||||||||
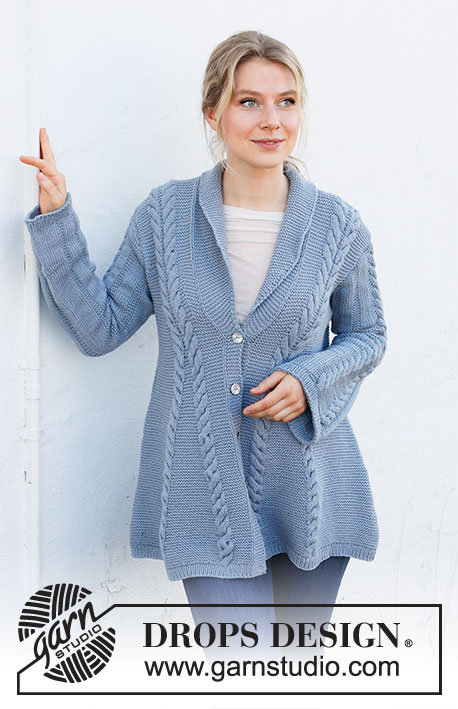
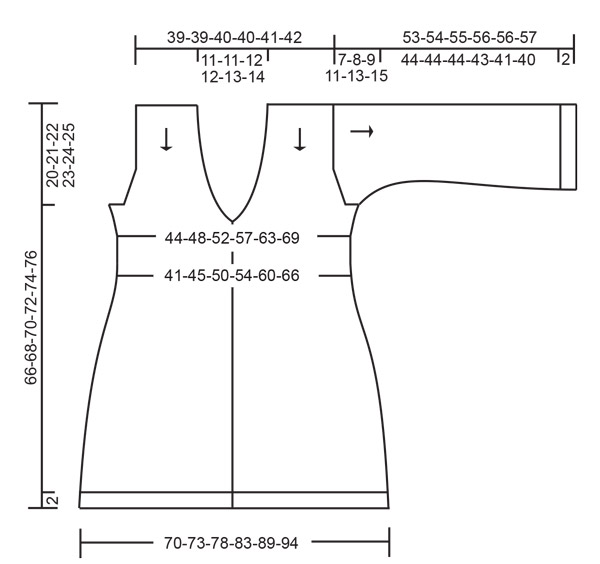
Knitted jacket in DROPS Merino Extra Fine. The piece is worked top down with shawl collar, garter stitch, cables and A-shape. Sizes S - XXXL.
DROPS 216-4 |
|||||||||||||||||||
|
------------------------------------------------------- EXPLANATIONS FOR THE PATTERN: ------------------------------------------------------- RIDGE/GARTER STITCH (worked back and forth): Knit all rows. 1 ridge in height = Knit 2 rows. PATTERN: See diagrams A.1 and A.2. The diagrams show all rows in the pattern from the right side. MEASURING TIP: All widths are taken with the piece lying flat and without stretching. All lengths are taken holding the piece up, or the garment will be too long when worn. INCREASE TIP-1: Increase 1 stitch by knitting in the front and back of the same stitch. INCREASE TIP-2: Increase 1 stitch by purling in the front and back of the same stitch. INCREASE TIP-3 (evenly spaced): To work out how to increase evenly, count the total number of stitches on the needle (e.g. 75 stitches) minus edge stitch and band (e.g. 7 stitches) and divide the remaining stitches by the number of increases to be made (e.g. 18) = 3.8. In this example, increase by making 1 yarn over after approx. each 4th stitch. Do not increase over the edge stitch/band. On the next row work the yarn overs twisted to avoid holes. INCREASE/DECREASE TIP (for neck, armholes, on each side of A.1 and working the A-shape): All increases/decreases are worked from the right side! INCREASE 1 STITCH: Make 1 yarn over; on the next row knit the yarn over twisted to avoid a hole. Then work the new stitch in garter stitch. DECREASE 1 STITCH TOWARDS THE RIGHT: Knit 2 together. DECREASE 1 STITCH TOWARDS THE LEFT: Slip 1 stitch as if to knit, knit 1 and pass the slipped stitch over the knitted stitch. DECREASE TIP (for sleeves): Decrease 1 stitch on either side of the marker thread as follows: Work until there are 3 stitches left before the marker thread, knit 2 together, knit 2 (marker thread sits between these 2 stitches), slip 1 stitch as if to knit, knit 1 and pass the slipped stitch over the knitted stitch (2 stitches decreased). BUTTONHOLES: Work buttonholes on the right band (when the garment is worn). Work from the right side when there are 4 stitches left on the row as follows: Make 1 yarn over, knit 2 together and knit 2. On the next row (wrong side), knit the yarn over to leave a hole. The first buttonhole is worked approx. 2-2-2-2-3-3 cm after the increases for the V-neck are finished. Then work the 3 other buttonholes with approx. 8-8-8-9-9-9 cm between each one. CASTING-OFF TIP: To avoid the cast-off edge being tight you can cast off with a larger size needle. If the edge is still tight, make 1 yarn over after approx. each 6th stitch at the same time as casting off; the yarn overs are cast off as normal stitches. ------------------------------------------------------- START THE PIECE HERE: ------------------------------------------------------- JACKET – SHORT OVERVIEW OF THE PIECE: The front and back pieces are worked separately, with circular needle back and forth, top down. The sleeve is worked back and forth with circular needle, top down over the sleeve cap. It is then continued in the round with short circular needle/double pointed needles. The sections are sewn together to finish. SHAWL COLLAR ON LEFT FRONT PIECE (when garment is worn): Cast on 22-22-24-24-26-28 stitches with circular needle size 3 mm and Merino Extra Fine. Start from the right side and work GARTER STITCH back and forth – read description above – with short rows as follows: * 1 ridge back and forth over all stitches, 1 ridge over the first 16-16-18-18-20-22 stitches towards mid front *, work from *-* until the collar measures approx. 7-7-8-8-8-9 cm along the shortest side (approx. 14-14-16-16-16-18 cm along the longest side). Knit 1 row from the right side over all 22-22-24-24-26-28 stitches, do not turn but cast on 30 new stitches at the end of this row for the shoulder = 52-52-54-54-56-58 stitches. THE PIECE IS NOW MEASURED FROM HERE! Change to circular needle size 4 mm and knit 1 row from the wrong side, knit 1 row from the right side and knit 1 row from the wrong side (over all stitches). Now continue with the left front piece. LEFT FRONT PIECE: = 52-52-54-54-56-58 stitches. The first row is worked as follows from the right side: Work 32-32-34-34-36-38 stitches in garter stitch, increase 1 stitch in each of the next 4 stitches – read INCREASE TIP-1, work 2 stitches in garter stitch, increase 1 stitch in each of the next 4 stitches and 10 stitches in garter stitch = 60-60-62-62-64-66 stitches. Work back from the wrong side with 10 stitches in garter stitch, purl 8, 2 stitches in garter stitch, purl 8, 9 stitches in garter stitch, purl 1 and 22-22-24-24-26-28 stitches in garter stitch. Insert 1 marker thread after the first 23-23-25-25-27-29 stitches on the row (seen from the right side) – allow the thread to follow your work onwards; it will be used when increasing for the neck. The next row is worked as follows from the right side: Work 22-22-24-24-26-28 stitches in garter stitch, 1 stitch in stocking stitch, 9 stitches in garter stitch, A.1 (= 18 stitches) and finish with 10 stitches in garter stitch towards the armhole. Continue this pattern. Read MEASURING TIP and REMEMBER THE KNITTING TENSION! Now you will increase for the armhole and neck, the cable will be displaced and the collar decreased for the band. It is important to read all sections for the left front piece before continuing – increases and decreases are worked simultaneously and whether you start decreasing first for the armhole or the neck varies in different sizes. ARMHOLE (left front piece): When the piece measures 19-17-16-17-14-12 cm from the shoulder, increase 1 stitch for the armhole on the inside of the outermost 3 stitches (inside the last 3 stitches at on the row from the right side) – read INCREASE/DECREASE TIP. Increase like this every 4th row a total of 1-4-6-7-10-13 times. Then cast on 4-5-7-11-13-15 new stitches for the armhole at the end of the next row from the right side = 5-9-13-18-23-28 stitches increased. After casting on, the piece measures approx. 20-21-22-23-24-25 cm from the shoulder. Work back as before from the wrong side. NECK (and displacement of the cable, left front piece): AT THE SAME TIME when the piece measures 14-14-15-16-16-16 cm from the shoulder, begin to increase for the neck; to allow the cable in A.1 to follow the neck, you decrease before and increase after A.1 on the same row as you increase for the neck. Work as follows: Increase 1 stitch for the neck after the marker thread (i.e. after the stocking stitch right after the shawl collar), decrease 1 stitch to the right before A.1 and increase 1 stitch after A.1 – read INCREASE/DECREASE TIP. Increase and decrease like this every 6th row a total of 6-6-6-6-6-6 times, then every 4th row a total of 6-6-7-7-8-9 times. When the increases to the neck are finished, stop the displacements of the cable. The piece measures approx. 27-28-29-30-31-32 cm from the shoulder and you have increased 12-12-13-13-14-15 stitches for the neck. Continue the pattern back and forth as before. COLLAR TO BAND (left front piece): AT THE SAME TIME when the piece measures 14-14-15-16-16-16 cm from the shoulder, decrease 1 stitch outermost on the collar by knitting together stitches 2 and 3 at the beginning of the row from the right side. Decrease like this every 6th row a total of 6-6-6-6-6-6 times, then every 4th row a total of 6-6-7-7-8-9 times (these 12-12-13-13-14-15 decreases are worked on the same rows as the increases for the neck) and finally every 2nd row a total of 4-4-5-5-6-7 times (decreases continue 4-4-5-5-6-7 times after the increases for the neck are finished). After the last decrease for the band, there are 6 stitches in garter stitch towards mid front and the piece measures approx. 29-30-31-32-34-35 cm from the shoulder down. DECREASE IN SIDE (left front piece): When the piece measures 2 cm from the bottom of the armhole (approx. 22-23-24-25-26-27 cm from the shoulder), decrease 1 stitch towards the right inside the outermost 3 stitches on the side – read INCREASE/DECREASE TIP. Decrease like this every 2 cm a total of 3 times. A-SHAPE (left front piece): When the piece measures 32-33-34-35-36-37 cm from the shoulder, start increasing for the A-shape. All increases/decreases for the armhole, neck and band have now finished and there are 58-62-67-72-78-84 stitches on the needle before these increases begin. Increase 1 stitch on the inside of the 3 outermost stitches on the side, as well as increasing 1 stitch on each side of the 2 garter stitches in the middle of A.1 – remember INCREASE/DECREASE TIP (= 3 stitches increased). Increase on each side of the garter stitches in the middle of A.1 every 3-3-3½-3½-3½-3½ cm a total of 10 times – the garter stitch section between the cables increases in size and you always increase on each side of this section. In addition increase in the side every 6-6-7-7-7-7 cm a total of 5 times. After the final increase there are 83-87-92-97-103-109 stitches on the needle. Continue working until the front piece measures 64-66-68-70-72-74 cm from the shoulder – remember MEASURING TIP! Knit 1 row from the right side over all stitches and decrease AT THE SAME TIME 8 stitches by knitting all cable stitches together 2 and 2 = 75-79-84-89-95-101 stitches. Purl 1 row from the wrong side (6 band stitches worked in garter stitch towards mid front) and increase 18-18-19-22-22-24 stitches evenly spaced on this row – read INCREASE TIP-3 = 93-97-103-111-117-125 stitches. NOTE: This is done to avoid the rib being tight. Change to circular needle size 3 mm and work the next row from the right side as follows: 6 band stitches in garter stitch, * knit 1, purl 1 *, work from *-* until there is 1 stitch left and 1 edge stitch in garter stitch. Continue this rib for 2 cm. Cast off with garter stitch over garter stitch, knit over knit and purl over purl – read CASTING-OFF TIP. The front piece measures approx. 66-68-70-72-74-76 cm from the shoulder. SHAWL COLLAR ON RIGHT FRONT PIECE (when garment is worn): Cast on 22-22-24-24-26-28 stitches with circular needle size 3 mm and Merino Extra Fine. Knit 1 row from the right side. Then work garter stitch back and forth with short rows as follows from the wrong side: *1 ridge back and forth over all stitches, 1 ridge over the first 16-16-18-18-20-22 stitches towards mid front *, work from *-* until the collar measures approx. 7-7-8-8-8-9 cm along the shortest side (approx. 14-14-16-16-16-18 cm along the longest side). Knit 1 row from the wrong side over all 22-22-24-24-26-28 stitches, do not turn but cast on 30 new stitches at the end of this row for the shoulder = 52-52-54-54-56-58 stitches. THE PIECE IS NOW MEASURED FROM HERE! Change to circular needle size 4 mm, knit 1 row from the right side and knit 1 row from the wrong side (over all stitches). Now continue with the right front piece.. RIGHT FRONT PIECE: = 52-52-54-54-56-58 stitches. The first row is worked as follows from the right side: Work 10 stitches in garter stitch, increase 1 stitch in each of the next 4 stitches – remember INCREASE TIP-1, work 2 stitches in garter stitch, increase 1 stitch in each of the next 4 stitches and work 32-32-34-34-36-38 stitches in garter stitch = 60-60-62-62-64-66 stitches. Work back from the wrong side with 22-22-24-24-26-28 stitches in garter stitch, purl 1, 9 stitches in garter stitch, purl 8, 2 stitches in garter stitch, purl 8 and 10 stitches in garter stitch. Insert 1 marker thread before the last 23-23-25-25-27-29 stitches on the row (seen from the right side) – allow the thread to follow your work onwards; it will be used when increasing for the neck. The next row is worked as follows from the right side: Work 10 stitches in garter stitch towards the armhole, A.1 (= 18 stitches), 9 stitches in garter stitch, 1 stitch in stocking stitch and 22-22-24-24-26-28 stitches in garter stitch over the collar. Continue this pattern – remember MEASURING TIP! Now you will increase for the armhole and neck, the cable will be displaced and the collar decreased for the band. It is important to read all sections for the right front piece before continuing – increases and decreases are worked simultaneously and whether you start decreasing first for the armhole or the neck varies in different sizes. ARMHOLE (right front piece): When the piece measures 19-17-16-17-14-12 cm from the shoulder, increase 1 stitch for the armhole on the inside of the outermost 3 stitches (inside the first 3 stitches at the beginning of the row from the right side) – remember INCREASE/DECREASE TIP. Increase like this every 4th row a total of 1-4-6-7-10-13 times. Then cast on 4-5-7-11-13-15 new stitches for the armhole at the end of the next row from the wrong side = 5-9-13-18-23-28 stitches increased. After casting on, the piece measures approx. 20-21-22-23-24-25 cm from the shoulder. NECK (and displacement of the cable, right front piece): AT THE SAME TIME when the piece measures 14-14-15-16-16-16 cm from the shoulder, begin to increase for the neck; to allow the cable in A.1 to follow the neck, you increase before A.1 and decrease after A.1 on the same rows as the neck-increases. Work as follows: Increase 1 stitch before A.1, decrease 1 stitch towards the left after A.1 and increase 1 stitch for the neck before the marker thread (before the stocking stitch just before the shawl collar) – remember INCREASE/DECREASE TIP. Increase and decrease like this every 6th row a total of 6-6-6-6-6-6 times, then every 4th row a total of 6-6-7-7-8-9 times. When the increases to the neck are finished, stop the displacements of the cable. The piece measures approx. 27-28-29-30-31-32 cm from the shoulder and you have increased 12-12-13-13-14-15 stitches for the neck. Continue the pattern back and forth as before – remember BUTTONHOLES on the right band– read description above. COLLAR TO BAND (right front piece): AT THE SAME TIME when the piece measures 14-14-15-16-16-16 cm from the shoulder, decrease 1 stitch outermost on the collar by working as before until there are 3 stitches left on the row, knit 2 twisted together and knit 1. Decrease like this every 6th row a total of 6-6-6-6-6-6 times, then every 4th row a total of 6-6-7-7-8-9 times (these 12-12-13-13-14-15 decreases are worked on the same rows as the increases for the neck) and finally every 2nd row a total of 4-4-5-5-6-7 times (decreases continue 4-4-5-5-6-7 times after the increases for the neck are finished). After the last decrease for the band, there are 6 stitches in garter stitch towards mid front and the piece measures approx. 29-30-31-32-34-35 cm from the shoulder down. DECREASE IN SIDE (right front piece): When the piece measures 2 cm from the bottom of the armhole (approx. 22-23-24-25-26-27 cm from the shoulder), decrease 1 stitch towards the left inside the outermost 3 stitches on the side – rememeber INCREASE/DECREASE TIP. Decrease like this every 2 cm a total of 3 times. A-SHAPE (right front piece): When the piece measures 32-33-34-35-36-37 cm from the shoulder, start increasing for the A-shape. All increases/decreases for the armhole, neck and band have now finished and there are 58-62-67-72-78-84 stitches on the needle before the increases begin. Increase 1 stitch on the inside of the 3 outermost stitches on the side, as well as increasing 1 stitch on each side of the 2 garter stitches in the middle of A.1 – remember INCREASE/DECREASE TIP (= 3 stitches increased). Continue to increase on each side of the garter stitches in the middle of A.1 every 3-3-3½-3½-3½-3½ cm a total of 10 times – the garter stitch section between the cables increases in size and you always increase on each side of this section. In addition increase in the side every 6-6-7-7-7-7 cm a total of 5 times. After the final increase there are 83-87-92-97-103-109 stitches on the needle. Continue working until the front piece measures 64-66-68-70-72-74 cm from the shoulder – remember MEASURING TIP! Knit 1 row from the right side over all stitches and decrease AT THE SAME TIME 8 stitches by knitting all cable stitches together 2 and 2 = 75-79-84-89-95-101 stitches. Purl 1 row from the wrong side (6 band stitches worked in garter stitch towards mid front) and increase 18-18-19-22-22-24 stitches evenly spaced on this row = 93-97-103-111-117-125 stitches. NOTE: This is done to avoid the rib being tight. Change to circular needle size 3 mm and work the next row from the right side as follows: 1 edge stitch in garter stitch, * purl 1, knit 1 *, work from *-* until there are 6 stitches left and finish with 6 band stitches in garter stitch. Continue this rib for 2 cm. Cast off with garter stitch over garter stitch, knit over knit and purl over purl – remember CASTING-OFF TIP. BACK PIECE: The back piece is worked in garter stitch with cables. The right shoulder is worked, then the left shoulder and the 2 sections joined together by casting on for the neck. The back piece is finished back and forth. RIGHT SHOULDER (when the garment is worn): Cast on 30 stitches with circular needle size 4 mm and Merino Extra Fine. Knit 1 row from the wrong side, knit 1 row from the right side and knit 1 row from the wrong side. The next row is worked as follows from the right side: Work 10 stitches in garter stitch, increase 1 stitch in each of the next 4 stitches – remember INCREASE TIP-1, 2 stitches in garter stitch, increase 1 stitch in each of the next 4 stitches and finish with 10 stitches in garter stitch = 38 stitches. Work back from the wrong side with 10 stitches in garter stitch, purl 8, 2 stitches in garter stitch, purl 8 and 10 stitches in garter stitch. The next row is worked as follows from the right side: 10 stitches in garter stitch, work A.1 (= 18 stitches) and 10 stitches in garter stitch. Continue this pattern. AT THE SAME TIME on the next row from the wrong side, cast on 1 new stitch at the end of the row towards the neck (this stitch is also worked in garter stitch) = 39 stitches. Work 2 more rows. The piece measures approx. 2 cm from the cast-on edge. Lay the piece to one side and work the left shoulder. LEFT SHOULDER: Cast on 30 stitches with circular needle size 4 mm and Merino Extra Fine. Knit 1 row from the wrong side, knit 1 row from the right side and knit 1 row from the wrong side. The next row is worked as follows from the right side: Work 10 stitches in garter stitch, increase 1 stitch in each of the next 4 stitches, 2 stitches in garter stitch, increase 1 stitch in each of the next 4 stitches and finish with 10 stitches in garter stitch = 38 stitches. Work back from the wrong side with 10 stitches in garter stitch, purl 8, 2 stitches in garter stitch, purl 8 and 10 stitches in garter stitch. The next row is worked as follows from the right side: 10 stitches in garter stitch, work A.1 (= 18 stitches) and 10 stitches in garter stitch. Continue this pattern. AT THE SAME TIME on the next row from the right side, cast on 1 new stitch at the end of the row towards the neck (this stitch is also worked in garter stitch) = 39 stitches. When the piece measures 2 cm from the cast-on edge (the same row from the wrong side in A.1 as on the right shoulder), work the back piece as described below. BACK PIECE: Now work the 2 shoulders together by casting on stitches for the neck as follows: Start on the right side of the left shoulder and work pattern as before over the 39 stitches, do not turn but cast on 22-22-24-24-26-28 new stitches for the neck and then work pattern as before over the 39 stitches on the right shoulder = 100-100-102-102-104-106 stitches. Continue back and forth with garter stitch and A.1 as before. Now you will increase for the armholes and the cables will be displaced towards the middle. It is important to read all sections for the back piece before continuing – increases and decreases are worked simultaneously and whether you start decreasing first for the armhole or displace the cables varies in different sizes. ARMHOLES (back piece): When the piece measures 19-17-16-17-14-12 cm from the shoulder, increase 1 stitch for the armhole on the inside of the 3 outermost stitches on each side – remember INCREASE/DECREASE TIP. Increase like this every 4th row a total of 1-4-6-7-10-13 times. Then cast on 4-5-7-11-13-15 new stitches at the end of the next 2 rows = a total of 5-9-13-18-23-28 stitches increased on each side. After casting on, the piece measures 20-21-22-23-24-25 cm and there are 110-118-128-138-150-162 stitches. DISPLACEMENT OF CABLES (back piece): AT THE SAME TIME when the piece measures 14-15-16-18-19-20 cm from the shoulder begin to displace the cables towards mid-back. Increase 1 stitch before the first A.1 (seen from the right side) and increase 1 stitch after the second A.1 (seen from the right side) – remember INCREASE/DECREASE TIP. In addition, on the same row, decrease 1 stitch towards the left after the first A.1 and decrease 1 stitch towards the right before the second A.1 (= 2 stitches increased and 2 stitches decreased). Increase and decrease like this every 6th row a total of 7-7-7-8-8-8 times, then every 4th row a total of 4-4-4-2-2-2 times. When the increases and decreases are finished, the piece measures approx. 27-28-29-30-31-32 cm from the shoulder and there are 22-22-24-26-28-30 garter stitches between the cables mid-back. Continue the pattern without displacements. DECREASE IN SIDES (back piece): When the piece measures 2 cm from the bottom of the armholes (approx. 22-23-24-25-26-27 cm from the shoulder), decrease 1 stitch on each side in the same way as on the front pieces (decrease 1 stitch towards the left on the inside of the first 3 stitches from the right side and decrease towards the right on the inside of the last 3 stitches remember INCREASE/DECREASE TIP). Decrease like this every 2 cm a total of 3 times = 104-112-122-132-144-156 stitches. A-SHAPE (back piece): When the piece measures 32-33-34-35-36-37 cm from the shoulder, increase 8 stitches for the A-shape from the right side as follows: Increase 1 stitch on the inside of the outermost 3 stitches on each side, increase 1 stitch on each side of the 22-22-24-26-28-30 garter stitches mid-back and increase 1 stitch on each side of the 2 garter stitches in the middle of both A.1 (= 8 stitches increased - remember INCREASE/DECREASE TIP). NOTE: All the new stitches are worked in garter stitch. Continue the increases on each side of the garter stitches in A.1 every 3-3-3½-3½-3½-3½ cm a total of 10 times –the cables divide and the garter stitch sections between them increases. In addition continue to increase on each side of the back piece and on each side of the garter stitches mid-back every 6-6-7-7-7-7 cm a total of 5 times. After the last increase there are 164-172-182-192-204-216 stitches on the needle. Continue working until the piece measures 64-66-68-70-72-74 cm from the shoulder – remember MEASURING TIP! Knit 1 row from the right side and AT THE SAME TIME decrease 16 stitches by knitting together all cable stitches 2 and 2 = 148-156-166-176-188-200 stitches. Purl 1 row from the wrong side (with 1 edge stitch in garter stitch on each side) where you increase 37-39-41-43-47-49 stitches evenly spaced = 185-195-207-219-235-249 stitches; this is done to avoid the rib being tight. Change to circular needle size 3 mm and work as follows from the right side: 1 edge stitch in garter stitch, * knit 1, purl 1 *, work from *-* until there are 2 stitches left, knit 1 and 1 edge stitch in garter stitch. Continue this rib for 2 cm. Cast off with garter stitch over garter stitch, knit over knit and purl over purl – remember CASTING-OFF TIP. SLEEVE: The sleeve top is worked back and forth with circular needle; the rest of the sleeve is worked in the round with short circular needle/double pointed needles. Cast on 38-38-38-34-30-26 stitches with circular needle size 4 mm and Merino Extra Fine. The first row is worked as follows from the wrong side: Purl 14-14-14-12-10-8 stitches, increase 1 stitch in each of the next 4 stitches – remember INCREASE TIP-2, work 2 stitches in garter stitch, increase 1 stitch in each of the next 4 stitches and purl 14-14-14-12-10-8 = 46-46-46-42-38-34 stitches. Insert 1 marker thread in the middle of the row; the thread should match the arrow in A.2. Work A.2 back and forth; but note that sleeve cap has fewer stitches than A.2, so count out from the middle to find the beginning of the pattern and as you increase work more stitches into A.2; the other stitches are worked in stocking stitch. AT THE SAME TIME cast on new stitches for the sleeve cap at the end of every row as follows: Cast on 3 stitches 1-1-1-1-1-1 time on each side, 2 stitches 2-2-2-2-3-4 times on each side, 1 stitch 4-5-7-7-9-10 times on each side, 2 stitches 2-2-2-3-3-4 times on each side, 3 stitches 0-0-0-1-1-1 time on each side and 3-5-6-6-6-6 stitches 1 time on each side = 82-88-94-100-104-110 stitches. After the final cast-on, the sleeve cap measures approx. 7-8-9-11-13-15 cm from the cast-on edge. Remove the marker thread. The rest of the sleeve is now worked in the round with short circular needle/double pointed needles size 4 mm. Start of the round = mid under sleeve. Insert 1 marker thread at the beginning of the round and allow it to follow your work onwards; it will be used when decreasing under the sleeve. THE PIECE IS NOW MEASURED FROM HERE! Continue with A.2 over the middle 56 stitches on top of the sleeve and stocking stitch over the other stitches. AT THE SAME TIME when the sleeve measures 2-2-2-2-1-1 cm from where you began working in the round, decrease 2 stitches mid-under the sleeve – read DECREASE TIP. Decrease like this every 4th-3rd-2nd-2nd-2nd-2nd round a total of 9-11-13-13-14-16 times = 64-66-68-74-76-78 stitches. When the sleeve measures 17-16-16-16-15-15 cm from where you began working in the round, increase 4 stitches as follows: 1 stitch on each side of the middle 6 stitches under the sleeve – read INCREASE TIP-1 and 1 stitch on each side of the 2 garter stitches in the middle of A.2. The 2 stitches under the sleeve are worked in stocking stitch, the 2 stitches in A.2 are worked in garter stitch. Increase like this every 5-5-5-7-6-6 cm a total of 5-5-5-4-4-4 times = 84-86-88-90-92-94 stitches. Continue working until the piece measures 44-44-44-43-41-40 cm from where you began working in the round. There is approx. 2 cm left to finished length; try the jacket on and work to desired length. NOTE: Shorter measurements in larger sizes due to broader shoulders and longer sleeve cap. Knit 1 round where you decrease 8 stitches by knitting all cable stitches together 2 and 2 = 76-78-80-82-84-86 stitches. Knit 1 round where you increase 20 stitches evenly spaced in all sizes = 96-98-100-102-104-106 stitches. Change to short circular needle size 3 mm and work rib (knit 1, purl 1) for 2 cm. Cast off with knit over knit and purl over purl – remember CASTING-OFF TIP. The sleeve measures approx. 53-54-55-56-56-57 cm from the cast-on edge. Work the other sleeve in the same way. ASSEMBLY: Sew the shoulder seams inside the cast-on edge. Sew the collar together mid-back – make sure the seam is on the inside when the collar is turned down. Sew the collar to the neck at the back. Sew the side seams from the armholes and down, inside the 1 edge stitch. Sew in the sleeves, inside the 1 edge stitch on the armholes. Sew the buttons onto the left band. |
|||||||||||||||||||
Diagram explanations |
|||||||||||||||||||
|
|||||||||||||||||||

|
|||||||||||||||||||
|
|||||||||||||||||||
|
Have you made this or any other of our designs? Tag your pictures in social media with #dropsdesign so we can see them! Do you need help with this pattern?You'll find tutorial videos, a Comments/Questions area and more by visiting the pattern on garnstudio.com. © 1982-2024 DROPS Design A/S. We reserve all rights. This document, including all its sub-sections, has copyrights. Read more about what you can do with our patterns at the bottom of each pattern on our site. |
|||||||||||||||||||


With over 40 years in knitting and crochet design, DROPS Design offers one of the most extensive collections of free patterns on the internet - translated to 17 languages. As of today we count 304 catalogues and 11422 patterns - 11422 of which are translated into English (UK/cm).
We work hard to bring you the best knitting and crochet have to offer, inspiration and advice as well as great quality yarns at incredible prices! Would you like to use our patterns for other than personal use? You can read what you are allowed to do in the Copyright text at the bottom of all our patterns. Happy crafting!
Comments / Questions (23)
Liebes Drops Team, Dies ist ein wunderschönes Werk! Ich bin am Halsausschnitt und weiss nicht genau wie der Zopf verschoben wird. Wenn ich nach der rechten Masche eine zunehme zählt die dann auch zu diesen 9 Maschen bis A1 anfängt? Bleiben also zwischen dem Schallkragen und dem Zopf immer 9 Maschen? Vielen Dank. Annie
08.05.2021 - 08:44DROPS Design answered:
Liebe Annie, zwischen die glatt rechte Masche und A.1 sollen Sie immer 9 Maschen kraus rechts haben, dh nach der glatt rechte Maschen 1 Umschlag stricken (= Zunahme), 7 M rechts stricken, 1 Abnahme (= 2 M re zs), dann A.1 stricken, 1 Umschlag und wie zuvor weiterstricken. Viel Spaß beim stricken!
10.05.2021 - 10:47Je veux tricoter le Modèle n° me-204. On n'indique pas combien de balles de laine est requis. Pour un modèle de grandeur L, combien m'en faudra-t-il? Merci.
05.05.2021 - 22:18DROPS Design answered:
Bonjour Mme Gauthier, vous trouverez toujours la quantité requise pour chaque taille, au poids, dans l'en-tête, en même temps que les tailles, les aiguilles et (dans les derniers modèles) l'échantillon, autrement dit, en L il vous faut ici 1100 g DROPS Merino Extra Fine/50 g la pelote = il vous faudra 22 pelotes Merino Extra Fine en taille L. Bon tricot!
06.05.2021 - 07:37Hi I love this cardigan and can't wait to get started. I've scanned through the instructions and found something odd. Is this right here?: ARMHOLES (back piece): When the piece measures 19-17-16-17-14-12 cm from the shoulder - The number 17 comes up twice, shouldn't it be 15? Is this intentional? Thank you so much for your help, Ria
06.04.2021 - 09:25DROPS Design answered:
Dear Ria, when unsure about a line of numbers (like measurements, etc) you can always check the Norvegian version. In this case that has the same measurements, so the translations are correct, but let me check with the Design dept, and get back to you. Happy Knitting until then.
06.04.2021 - 09:35Liebes drops team vielen dank für gute nachricht ich habe nur gedacht ich frage vorher denn das ganze wieder aufzuziehen erscheint etwas schwierig. jetzt kann ich stricken. Wann kommt die frühjahr- sommerkollektion zur ansicht. Es sind immer wieder mald tolle modelle dabei. viele grüsse aus friesenheim ingrid
05.01.2021 - 18:11Hallo liebes drops team, ich wende mich heute nochmal an euch, da ich immer nochd keine rückmeldung habe auf die korrektur des rückenteils. ich möchte doch endlich fertigsgtricken. liebe grüsse ingrid
05.01.2021 - 09:42DROPS Design answered:
Liebe Ingrid, Entschuldigung für die Verspätung, es ist also so richtig, die Verschiebung wird beim Rückentil etwas unterschiedlich sein. Viel Spaß beim stricken!
05.01.2021 - 15:15Hallo, danke für die mitteilung ich hoffe, dass die korrektur bald kommt ich möchte doch die jakce schnellstens fertig stricken. Danke , ingrid
04.01.2021 - 08:40Hallo danke für die schnelle bearbeitung. Muss ich ,mich nochmals melden oder kommt die antwort automatisch. bin ich registriert zur beantwortung
23.12.2020 - 13:46DROPS Design answered:
Liebe Ingrid, kommen Sie regelmäßig wieder, wenn eine Korrektur gemacht wird, dann sehen Sie den neuen Text auch unter "Diese Anleitungn wurde korrigiert" ganz am Ende der Anleitung. Danke für Ihren Geduld.
04.01.2021 - 07:19Hallo , sind die zunahmen und abnahmen beim rückenteil nicht identisch mit den vorderteilen . die zunahmen und abnahmen sind höhenmäßig nicht identisch mit den vorderteilen. ich bitte um antwort noch vor den feiertagen. vielen dank liebe grüße ingrid
22.12.2020 - 18:36DROPS Design answered:
Liebe Ingrid, Ihren Hinweis wurde unsere Design Team weiterleitet, leider wird es nicht vor den Feiertagen erledigt - danke im voraus für Ihren Geduld.
23.12.2020 - 10:54Hallo bin gerade am stricken dieser jacke. mir ist nicht ganz klar warum die zopfverschiebung beim vorderteil nach 14 cm beginnt und beim rückenteil nach 16 cm beginn der zopfverschiebung. das kann doch nicht sein sonst wäre es unterschiedlich zwischen vorder- und rückenteil. ich bitte um baldi ge antwort da ich sonst nicht weiterstricken kann.
22.12.2020 - 13:51I diagram förklaring så är flätorna vridna åt samma håll. Ska inte den ena sättas 4 maskor på flätstickan bakom arbetet? Som det är nu sätts båda framför arbetet.
19.12.2020 - 23:55DROPS Design answered:
Hej Malin. Tack för info, det var fel i den svenska översättningen och detta är nu rättat. Mvh DROPS Design
21.12.2020 - 10:22