
Looking for a yarn?


Comments / Questions (157)
![]() Anette wrote:
Anette wrote:
Jag ska börja sticka A1 på första varvet - stl L - men får ihop 33 maskor. Det står 31 maskor i beskrivningen. Vad gör jag för fel? Jag börjar med 1 omslag - 1rät maska- 1 omslag - 3 räta - lyft/2m tills osv.
12.01.2021 - 23:25DROPS Design answered:
Hej Anette. Det stämmer att du har 33 maskor efter att du stickat första varvet i A.1 (innan det är stickat så är det 31 maskor, därför skriver vi 31 maskor). Mvh DROPS Design
14.01.2021 - 10:08
![]() Lærke wrote:
Lærke wrote:
Jeg tror der er en fejl i opskriften. “start arbejdet 3 masker før de nye masker under ærmet.” passer ikke med mønsteret i A.4. Det vil passe hvis man starter i maske nr 3 af de nyopslåede masker (dvs man strikker 5/7 m) eller har jeg misforstået noget? Og hvorfor klipper i tråden i stedet for at fortsætte?
11.01.2021 - 22:23DROPS Design answered:
Hej Lærke, det er svært at forestille sig når man ikke har arbejdet foran... men passer mønsteret, så starter du bare der hvor du siger, det vigtige er at det passer over de andre masker som allerede strikkes i mønster. Behøver du ikke klippe tråden for at få det til at passe med mønsteret så er det super :)
19.01.2021 - 15:16
![]() Ketty Langfeldt Steensig wrote:
Ketty Langfeldt Steensig wrote:
Jeg forstår ikke strikke opskriften, hvor i mønstret kan jeg se hvor jeg skal lave udtagninger. Ketty
09.01.2021 - 21:48
![]() Pysson wrote:
Pysson wrote:
Ik brei maat xl . Ik heb nu a3 1x volledig gebreid en moet nu verder doen met a3b. Ik heb telkens 1 steek over( werk verdeeld in 2x 61 steken en 2 x 41 steken met telkens 2 tricosteken ertussen ) en als ik a3b brei kom ik 1 steek over want a3b . telt 10 steken ,6x10 =60 en ik heb 61/41 steken . Wat doe ik verkeerd.
09.01.2021 - 10:14
![]() Agnieszka wrote:
Agnieszka wrote:
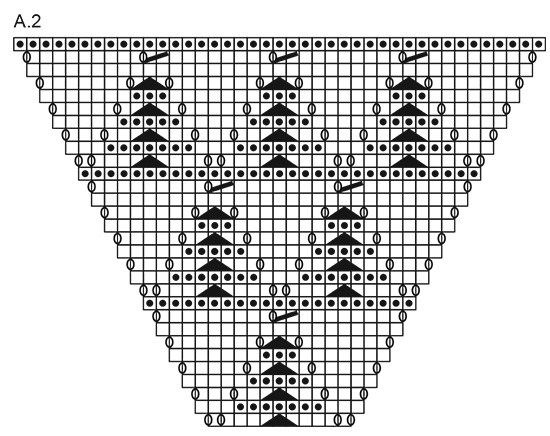
Dzień dobry. Po przerobieniu schematu A1 i A2 zupełnie nie rozumiem jak przerabiajac schemat A3 będą mi przybywać oczka. Przecież schemat A3 ma stała liczba oczek. Gdzie powinnam dodawać te oczka i w jaki sposób? Pozdrawiam
05.01.2021 - 16:01DROPS Design answered:
Witaj Agnieszko, po przerobieniu schematów A.1 i A.2 dalej przerabiasz jak wcześniej, tzn. z 2 oczkami dżersejem w miejscu każdego raglanu i wykonując narzuty przed i za tymi 2 oczkami dżersejem, jak to robiłaś wcześniej w schematach A.1 i A.2 (początek i koniec schematów) i przerabiasz schemat A.3 na środku (np. w 1-szym okrążeniu dodajesz oczka jak w schemacie A.1, dalej przerabiasz A.3A, powtarzasz A.3B, A.3C i dodajesz oczka jak na końcu schematu A.1) Miłej pracy!
05.01.2021 - 17:35
![]() Marita wrote:
Marita wrote:
Hallo zusammen, Erst einmal wünsche ich ein Frohes Neues Jahr! Ich möchte die Größe S stricken. Die Rapporte A1 und A2 habe ich bis zum Ende gestrickt. Ich habe jetzt insgesamt 192 Maschen. Leider verstehe ich nicht, wie ich den Rapport A3 weiter stricken soll, um auf 272 Maschen zu kommen. Pro Runde sollen doch nur 8 Maschen zugenommen werden. Das geht für mich rechnerisch mit 25 Zunahmen nicht auf.
01.01.2021 - 10:20DROPS Design answered:
Liebe Marita, wir wünschen Ihnen auch ein frohes Neues Jahr! Nachdem Sie A.1/A.2 gestrickt haben stricken Sie so: nehmen Sie wie beim A.1/A.2 zu, dann stricken Sie A.3A, dann A.3B wiederholen und mit A.3C + Zunahme wie bei A.1/A.2. d.h. Muster wird wie zuvor gestrickt, die Zunahmen beidseitig wie zuvor in A.1/A.2 gestrickt bis 25 Mal 8 Maschen (= 200 Zunahmen) zugenommen wird = es sind jetzt 72 + 200 Zunahmen = 272 M. Viel Spaß beim stricken!
04.01.2021 - 14:08
![]() Crystal wrote:
Crystal wrote:
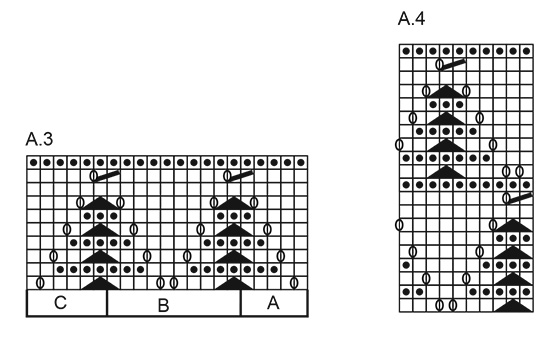
After dividing for sleeves and body, my stitch counts are correct. I start the round 3 stitches before the under arm cast on stitches but my stitches don’t line up with the pattern. Where on A.4 do I start to get the pattern to line up? Do I start 3 stitches in on the diagram as well as 3 stitches before the cast on stitches? Should I cast on 8 stitches plus the 2 raglan (now body) stitches to get 10 stitches to match the repeat? I’ve tried several times but can’t get it to line up
18.12.2020 - 06:29DROPS Design answered:
Dear Chrystal, you should start A.4 so that the triangles will match the previous one worked on yoke to continue the pattern, check out from the stitches on yoke where you finished and count towards the first stitch on the round to know how to begin this round. Happy knitting!
18.12.2020 - 07:34
![]() Crystal wrote:
Crystal wrote:
After dividing for sleeves and body, my stitch counts are correct. I start the round 3 stitches before the under arm cast on stitches but my stitches don’t line up with the pattern. Where on A.4 do I start to get the pattern to line up? Do I start 3 stitches in on the diagram as well as 3 stitches before the cast on stitches? Should I cast on 8 stitches plus the 2 raglan (now body) stitches to get 10 stitches to match the repeat? I’ve tried several times but can’t get it to line up
18.12.2020 - 06:28
![]() Sylviane wrote:
Sylviane wrote:
Merci
07.12.2020 - 13:42
![]() Sylviane wrote:
Sylviane wrote:
Bonjour voilà j'ai commencé aux aig circulaire le col puis j ai continué le diagramme à la lettre L au 2ème rang puis au 4ème il y a des points envers si vous regardez le modèle sur la photo les points envers sont positionnés vers le bas et non au ras du col donc le dessin est inversé j’espère que vous m’avez comprise merci de votre compréhension
07.12.2020 - 09:35DROPS Design answered:
Bonjour Sylviane, lorsque vous commencez le point fantaisie, vous commencez (pour toutes les tailles) par un triangle au point mousse (fin du motif) en commençant par 1 triangle entier dont la 1ère moitié se tricote en jersey. autrement dit, en suivant le diagramme, vous obtiendrez bien le résultat sur la photo. Bon tricot!
07.12.2020 - 10:00
|
||||||||||||||||
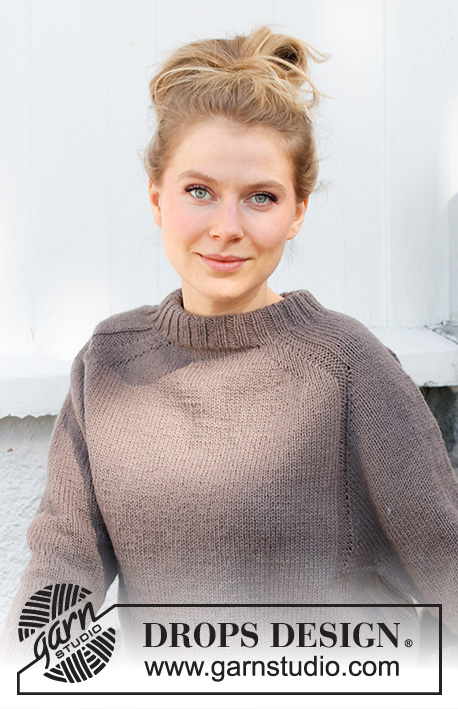
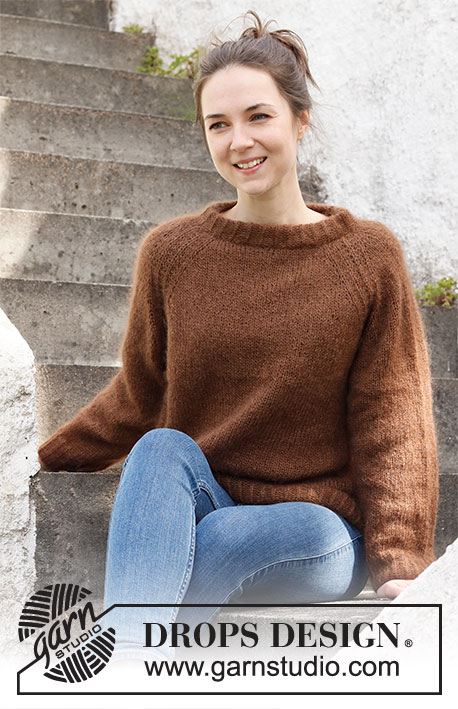
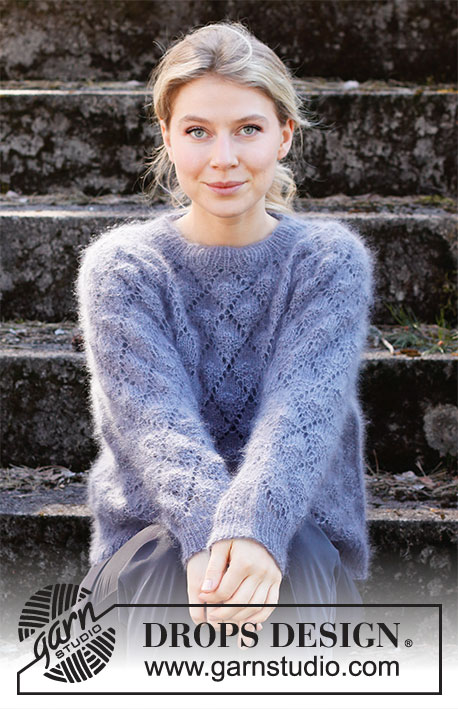
Frosted Leaves#frostedleavessweater |
||||||||||||||||
 |
 |
|||||||||||||||
Knitted jumper in 1 strand DROPS Brushed Alpaca Silk or 2 strands DROPS Kid-Silk. The piece is worked top down with raglan and lace pattern. Sizes S - XXXL.
DROPS 216-3 |
||||||||||||||||
|
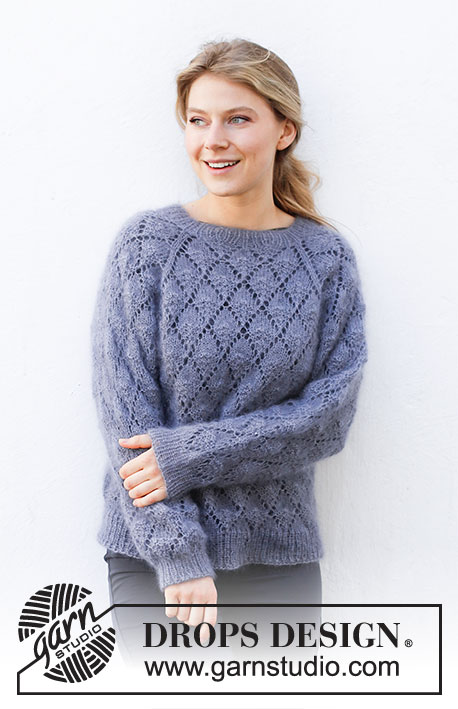
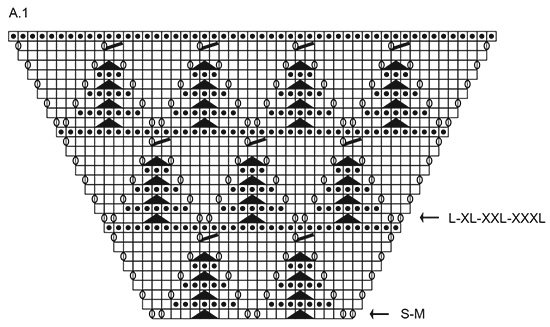
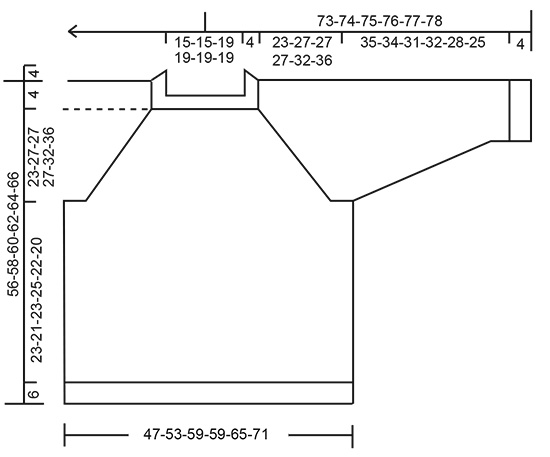
------------------------------------------------------- EXPLANATIONS FOR THE PATTERN: ------------------------------------------------------- PATTERN: See diagrams A.1 to A.4 DECREASE TIP-1 (evenly spaced): To work out how to decrease evenly, count the total number of stitches on needle (e.g. 48 stitches) and divide by number of decreases to be made (e.g. 8) = 6. In this example decrease by knitting each 5th and 6th stitch together. DECREASE TIP-2 (for sleeves): Decrease 1 stitch on either side of the marker thread as follows: Work until there are 3 stitches left before the marker thread, knit 2 together, knit 2 (marker thread sits between these 2 stitches), slip 1 stitch as if to knit, knit 1 and pass the slipped stitch over the knitted stitch (= 2 stitches decreased). CASTING-OFF TIP: To avoid the cast-off edge being tight you can cast off with a larger size needle. If the edge is still tight, make 1 yarn over after approx. each 4th stitch at the same time as casting off; the yarn overs are cast off as normal stitches. ------------------------------------------------------- START THE PIECE HERE: ------------------------------------------------------- JUMPER – SHORT OVERVIEW OF THE PIECE: The neck and yoke are worked in the round with circular needle, top down. The yoke is divided for body and sleeves and the body continued in the round with circular needle. The rounds start at the transition between sleeve and back piece. The sleeves are worked in the round with short circular needle/double pointed needles, top down. The piece is worked with 1 strand Brushed Alpaca Silk or 2 strands Kid-Silk. NECK: Cast on 72-72-92-92-92-92 stitches with circular needle size 4 mm and 1 strand Bruched Alpaca Silk or 2 strands Kid-Silk. Knit 1 round. Then work rib (knit 1, purl 1) for 4 cm. Insert 1 marker at the beginning of the round. The yoke will be measured from this marker. Change to circular needle size 5 mm and work the yoke as described below. REMEMBER THE KNITTING TENSION! YOKE: On the next round work pattern as follows: Work 1 stitch in stocking stitch, A.1 (= 21-21-31-31-31-31 stitches, see start-arrow for your size), 2 stitches in stocking stitch, A.2 (= 11 stitches), 2 stitches in stocking stitch, A.1 (= 21-21-31-31-31-31 stitches, see start-arrow for your size), 2 stitches in stocking stitch, A.2 (= 11 stitches) and 1 stitch in stocking stitch. Continue this pattern; all increases are drawn into the diagrams. 8 stitches are increased every 2nd round. When A.1 and A.2 have been worked 1 time in height, continue with A.3. Work A.3 A over the first 5 stitches, repeat A.3 B until there are 6 stitches left on the row and work A.3 C over the last 6 stitches. Each time A.3 has been worked 1 time in height there is room for 1 more repeat of A.3 B in width. Continue the increases as shown in A.1 and A.2. Increase every 2nd round a total of 25-30-30-30-35-40 times = 272-312-332-332-372-412 stitches. The piece measures approx. 23-27-27-27-32-36 cm from the marker thread. Now divide the yoke for body and sleeves as follows (continue the pattern as before; you should be on the last round in a repeat of A.3, where all stitches are purled): Work 73-83-93-93-103-113 stitches (= back piece), place the next 63-73-73-73-83-93 stitches on 1 thread for the sleeve, cast on 7 new stitches on the needle (= in side under sleeve), work 73-83-93-93-103-113 stitches as before (= front piece), place the next 63-73-73-73-83-93 stitches on 1 thread for the sleeve and cast on 7 new stitches on the needle (= in side under sleeve). Body and sleeves are finished separately. Cut the strand. BODY: = 160-180-200-200-220-240 stitches. Start 3 stitches before the 7 new stitches cast on in the side and work A.4 over all stitches; make sure the pattern matches the pattern on the yoke. Continue working until the piece measures 23-21-23-25-22-20 cm from the division (there is approx. 6 cm left to finished length; you can try the jumper on and work to desired length). Change to circular needle size 4 mm and work rib (knit 1, purl 1) for 6 cm. Cast off with knit over knit and purl over purl – read CASTING-OFF TIP! The jumper measures approx. 56-58-60-62-64-66 cm from the shoulder down. SLEEVES: Place the 63-73-73-73-83-93 stitches from the thread on the one side of the piece on short circular needle/double pointed needles size 5 mm and knit up 1 stitch in each of the 7 stitches cast on under the sleeve = 70-80-80-80-90-100 stitches. Insert a marker thread in the middle of the 7 stitches under the sleeve. Allow the thread to follow your work onwards; it will be used when decreasing under the sleeve. Cut the strand and start working 3 stitches before the new stitches under the sleeve and continue the pattern in the round according to A.4; make sure the pattern matches the pattern on the yoke. When the sleeve measures 3 cm from the division in all sizes, decrease 2 stitches mid under the sleeve – read DECREASE TIP-2. Decrease like this every 3-2-1½-2-1-1 cm a total of 11-15-15-13-17-21 times = 48-50-50-54-56-58 stitches. The stitches which do not fit into the pattern when decreasing are worked in stocking stitch. Continue working until the sleeve measures 35-34-31-32-28-25 cm from the division (there is approx. 4 cm left to finished length; you can try the jumper on and work to desired length). NOTE: Shorter measurements in larger sizes due to wider neck and longer yoke. Knit 1 round where you decrease 8 stitches evenly spaced – read DECREASE TIP-1 = 40-42-42-46-48-50 stitches. Change to double pointed needles size 4 mm and work rib (knit 1, purl 1) for 4 cm. Cast off with knit over knit and purl over purl – remember CASTING-OFF TIP! The sleeve measures approx. 39-38-35-36-32-29 cm from the division. Work the other sleeve in the same way. |
||||||||||||||||
Diagram explanations |
||||||||||||||||
|
||||||||||||||||
 |
||||||||||||||||
 |
||||||||||||||||
 |
||||||||||||||||
 |
||||||||||||||||
Have you finished this pattern?Tag your pictures with #dropspattern #frostedleavessweater or submit them to the #dropsfan gallery. Do you need help with this pattern?You'll find 25 tutorial videos, a Comments/Questions area and more by visiting the pattern on garnstudio.com. © 1982-2025 DROPS Design A/S. We reserve all rights. This document, including all its sub-sections, has copyrights. Read more about what you can do with our patterns at the bottom of each pattern on our site. |
||||||||||||||||


With over 40 years in knitting and crochet design, DROPS Design offers one of the most extensive collections of free patterns on the internet - translated to 17 languages. As of today we count 320 catalogues and 12095 patterns translated into English (UK/cm). 12095
We work hard to bring you the best knitting and crochet have to offer, inspiration and advice as well as great quality yarns at incredible prices! Would you like to use our patterns for other than personal use? You can read what you are allowed to do in the Copyright text at the bottom of all our patterns. Happy crafting!
Post a comment to pattern DROPS 216-3
We would love to hear what you have to say about this pattern!
If you want to leave a question, please make sure you select the correct category in the form below, to speed up the answering process. Required fields are marked *.