
Looking for a yarn?


Comments / Questions (157)
![]() Carmen wrote:
Carmen wrote:
Buongiorno a tutte, ho difficoltà a capire A3, dice di lavorare A3A sulle prime 5 maglie continuare con A3B ed alla fine del ferro su 6 maglie lavorare A3C, dove bisogna includere gli accavallati in A3A o in A3B? stessa cosa per A3C? Grazie mille
27.10.2020 - 09:14DROPS Design answered:
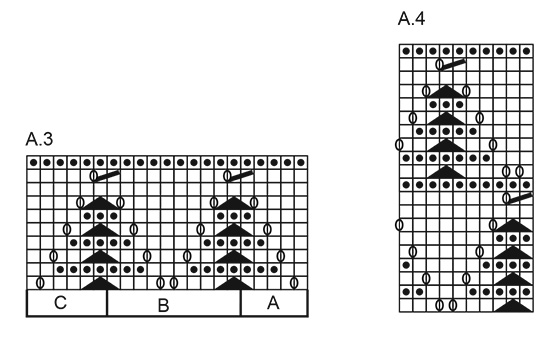
Buongiorno Carmen. L'ultima maglia di A.3A è la maglia che passa senza lavorarla, le prime due maglie di A.3B sono le maglie che lavora insieme e poi accavalla la maglia passata su queste due maglie. Analogamente quando ripete A.3B (l'ultima maglia della ripetizione è quella che passa) e quando passa da A.3B a A3.C. Buon lavoro!
27.10.2020 - 13:37
![]() Crystal wrote:
Crystal wrote:
I want to use 1 thread of Kid Silk and 1 thread of Nord. How many grams of each would I need for XL? Thank you.
21.10.2020 - 16:12DROPS Design answered:
Dear Crystal, you will find how to calculate the new amount of yarn in the both yarns here - Remember your DROPS store can also assist you if you need some more help. Happy knitting!
21.10.2020 - 16:43
![]() Troupin Isabelle wrote:
Troupin Isabelle wrote:
Bonjour le groupe, Je voudrais remercier Drop pour ce site très bien réalisé, complet, et agréable. Je souhaite réaliser ce modèle mais j'ai envie de modifier 2 choses, la première, je souhaite faire le col en point mousse et non en côte 1/1 est ce que ça va me poser problème? Je souhaiterais ne pas faire le dessin à l'intérieur des losanges, j'ai vu le modèle Miss Lemon est ce que je peux utiliser ce diagramme? D'avance merci
20.10.2020 - 17:08DROPS Design answered:
Bonjour Mme Troupin, vous pouvez à priori tricoter le col au point mousse si vous préférez, rappelez-vous que les côtes resserrent en largeur, ce que ne fait pas le point mousse, il faudra peut être ajuster le nombre de mailles. Nous ne sommes malheureusement pas en mesure de pouvoir adapter chacun de nos modèles à chaque demande, Miss Lemon se tricote avec une tension différente, les diagrammes sont adaptés en conséquence avec les augmentations du raglan, à vous d'ajuster comme vous le souhaitez si besoin. N'hésitez pas à consulter un forum ou/et votre magasin DROPS. Bon tricot!
21.10.2020 - 08:59
![]() Marte wrote:
Marte wrote:
Hei, i diagrammet står det; "mellom 2 masker lages det 1 kast om pinnen, på neste pinne strikkes kastet vrang, det skal bli hull", men i diagrammet kan det stå at det skal strikkes rett over der et kast har vært. Skal jeg alltid strikke disse vrang, eller skal jeg følge diagrammet og strikke rett?
19.10.2020 - 10:35DROPS Design answered:
Hej Marte. Du ska sticka enligt diagrammet, texten till den symbolen har nu rättats. Tack för info! Mvh DROPS Design
22.10.2020 - 12:26
![]() Carmen wrote:
Carmen wrote:
Grazie per il celere riscontro “Continuare questo motivo; tutti gli aumenti sono indicati nei diagrammi; aumentare 8 maglie ogni 2 giro. Alla fine di A.1 e A.2, continuare con A.3. Lavorare A.3 A sulle prime 5 maglie, ripetere A.3 B fino a quando rimangono 6 maglie sul ferro e lavorare A.3 C sulle ultime 6 maglie. Ogni volta che viene lavorato A.3 in altezza, c’è spazio per 1 ripetizione in più di A.3 B in larghezza”
16.10.2020 - 10:07DROPS Design answered:
Buongiorno Carmen. Quando lavora i diagrammi A.1 e A.2, ogni 2 giri le maglie sul ferro aumentano di 8 m. Questi aumenti sono presenti nei diagrammi stessi (sono la prima e l’ultima maglia gettata dei diagrammi), non deve quindi prevedere altri aumenti. Finiti A1 e A2, lavora A3 come scritto nel testo, ma continua ad aumentare negli stessi punti di prima, il numero di volte indicato per la sua taglia. Dopo le 10 righe del diagramma A3, ricomincia dalla prima, lavorando A.3A sulle prime 5 maglie, A.3C sulle ultime 6 maglie e A.3B sulle altre maglie. Buon lavoro!
16.10.2020 - 11:28
![]() Carmen wrote:
Carmen wrote:
Grazie per il modello, bisogna lavorare in sequenza affiancata A1-A2 e A3? le 8 maglie vanno aumentate in modo uniforme ogni 2 giri? Purtroppo non riesco a capire le istruzioni Grazie
15.10.2020 - 18:44DROPS Design answered:
Buongiorno, ci può spiegare esattamente a quale punto delle spiegazioni fa riferimento? In questo modo potremo aiutarla in modo più preciso. Buon lavoro!
15.10.2020 - 23:28
![]() Jose wrote:
Jose wrote:
Kan ik dit patroon ook vanaf het boord omhoog breien.
10.10.2020 - 07:42DROPS Design answered:
Dag José
Nee, dit patroon is helaas alleen geschreven om van boven naar beneden te breien. Veel Noorse patronen worden zo gebreid en ook met rondbreinaalden. Het is eerst enorm wennen, maar het kan ook zijn voordelen hebben. De reden waarom hier vaak (of steeds meer) voor gekozen wordt is dat het meer flexibiliteit geeft tijdens het breien. Zie ook het antwoord op deze vraag in de faq
. Als je door de oudere patronen bladert kun je wel patronen vinden die van onder naar boven worden gebreid. 11.10.2020 - 14:30
![]() Angelika Krug wrote:
Angelika Krug wrote:
Hallo, Ich habe die Passe soweit fertig, dass ich jetzt auf A3 wechseln muss. Leider verstehe ich nicht, wie ich das Muster weiter führe. Ich starte die Reihe mit einer Masche vom Raglan und muss dann einen Umschlag machen, damit das Muster passt. Am Ende ( vor den nächsten 2 rechten Maschen) habe ich dann irgendwie eine Masche Zuviel oder müsste mit Umschlag/ Masche/Umschlag enden. Dann würde ich aber nur an einer Seite im Muster bleiben. Liebe Grüße
04.10.2020 - 10:37DROPS Design answered:
Liebe Frau Krug, also Sie stricken jetzt das Muster wie zuvor (= mit A.3A anfangen, dann A.3B wiederholen und mit A.3C enden) aber gleichzeitig nehmen Sie wie zuvor (beim A.1/A.2) zu, die neuen Maschen werden wie die ersten/letzten Maschen (= die Zunahmen) in A.1 und A.2 gestrickt. Viel Spaß beim stricken!
05.10.2020 - 10:36
![]() Kifaya wrote:
Kifaya wrote:
Hej Jeg kan ikke få A4 til at passe når jeg starte med at strikke ryg & forstykke. Kan I hjælpe med at tegne/ forklare hvordan jeg kan starte med at strække ryg & forstykke.
27.09.2020 - 21:51
![]() Anna wrote:
Anna wrote:
Good day! I’ be finished A1, A2, A3 under A1 in size L. All in all, patterns for sleeve and body are different from your photo 4. I have two halftriangles in a body part and whole triangle for sleeve. In photo #4 half- triangles locates in sleeve part. If I continue part for body as A3, I see a mistake in pattern. Could u help me to correct a problem! Thank u!
14.09.2020 - 21:15DROPS Design answered:
Dear Anna, after you have worked A.1 you now work A.3 but continue to increase as before on either side of A.3 (insert marker to mark each diagram A, B and C to make sure you always get the same number of sts in each diagram and knit the raglan increases on each side of A.3). After you have worked A.3 once in height, repeat A.3 again working A.3A/C over the new sts increased on each side and B inbetween. Happy knitting!
15.09.2020 - 09:48
|
||||||||||||||||
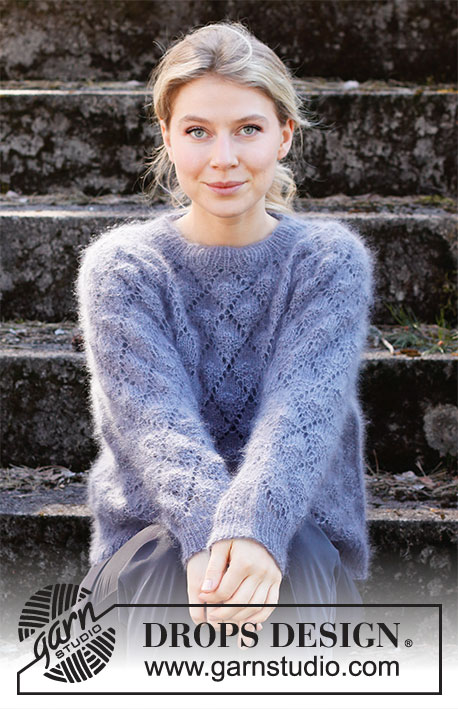
Frosted Leaves#frostedleavessweater |
||||||||||||||||
 |
 |
|||||||||||||||
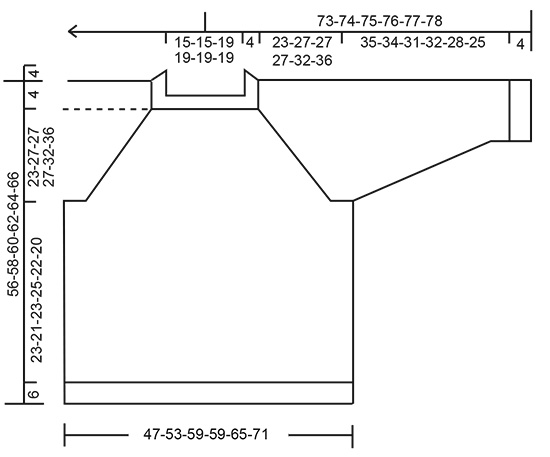
Knitted jumper in 1 strand DROPS Brushed Alpaca Silk or 2 strands DROPS Kid-Silk. The piece is worked top down with raglan and lace pattern. Sizes S - XXXL.
DROPS 216-3 |
||||||||||||||||
|
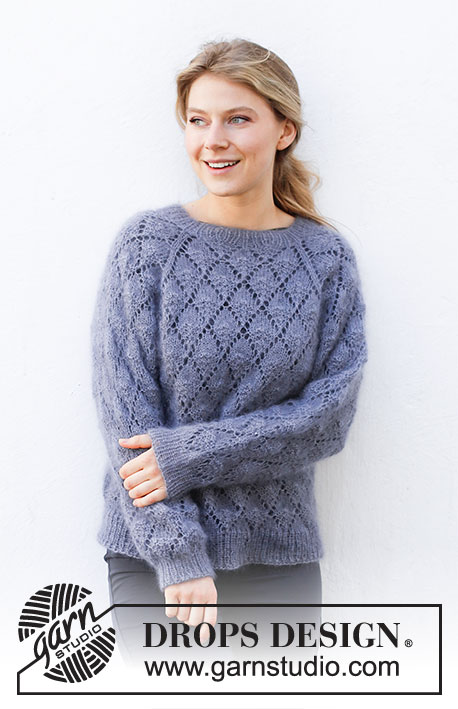
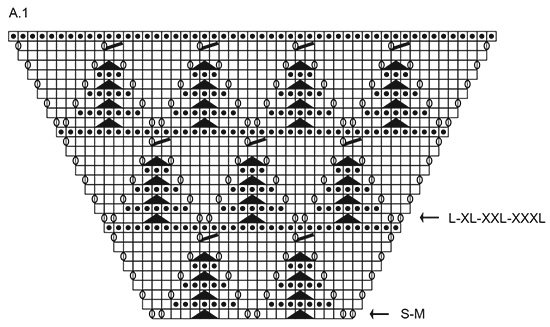
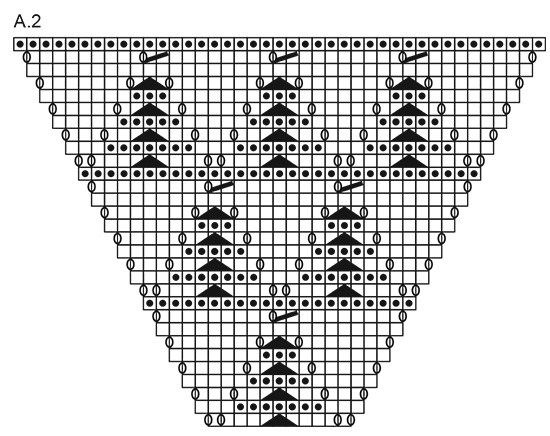
------------------------------------------------------- EXPLANATIONS FOR THE PATTERN: ------------------------------------------------------- PATTERN: See diagrams A.1 to A.4 DECREASE TIP-1 (evenly spaced): To work out how to decrease evenly, count the total number of stitches on needle (e.g. 48 stitches) and divide by number of decreases to be made (e.g. 8) = 6. In this example decrease by knitting each 5th and 6th stitch together. DECREASE TIP-2 (for sleeves): Decrease 1 stitch on either side of the marker thread as follows: Work until there are 3 stitches left before the marker thread, knit 2 together, knit 2 (marker thread sits between these 2 stitches), slip 1 stitch as if to knit, knit 1 and pass the slipped stitch over the knitted stitch (= 2 stitches decreased). CASTING-OFF TIP: To avoid the cast-off edge being tight you can cast off with a larger size needle. If the edge is still tight, make 1 yarn over after approx. each 4th stitch at the same time as casting off; the yarn overs are cast off as normal stitches. ------------------------------------------------------- START THE PIECE HERE: ------------------------------------------------------- JUMPER – SHORT OVERVIEW OF THE PIECE: The neck and yoke are worked in the round with circular needle, top down. The yoke is divided for body and sleeves and the body continued in the round with circular needle. The rounds start at the transition between sleeve and back piece. The sleeves are worked in the round with short circular needle/double pointed needles, top down. The piece is worked with 1 strand Brushed Alpaca Silk or 2 strands Kid-Silk. NECK: Cast on 72-72-92-92-92-92 stitches with circular needle size 4 mm and 1 strand Bruched Alpaca Silk or 2 strands Kid-Silk. Knit 1 round. Then work rib (knit 1, purl 1) for 4 cm. Insert 1 marker at the beginning of the round. The yoke will be measured from this marker. Change to circular needle size 5 mm and work the yoke as described below. REMEMBER THE KNITTING TENSION! YOKE: On the next round work pattern as follows: Work 1 stitch in stocking stitch, A.1 (= 21-21-31-31-31-31 stitches, see start-arrow for your size), 2 stitches in stocking stitch, A.2 (= 11 stitches), 2 stitches in stocking stitch, A.1 (= 21-21-31-31-31-31 stitches, see start-arrow for your size), 2 stitches in stocking stitch, A.2 (= 11 stitches) and 1 stitch in stocking stitch. Continue this pattern; all increases are drawn into the diagrams. 8 stitches are increased every 2nd round. When A.1 and A.2 have been worked 1 time in height, continue with A.3. Work A.3 A over the first 5 stitches, repeat A.3 B until there are 6 stitches left on the row and work A.3 C over the last 6 stitches. Each time A.3 has been worked 1 time in height there is room for 1 more repeat of A.3 B in width. Continue the increases as shown in A.1 and A.2. Increase every 2nd round a total of 25-30-30-30-35-40 times = 272-312-332-332-372-412 stitches. The piece measures approx. 23-27-27-27-32-36 cm from the marker thread. Now divide the yoke for body and sleeves as follows (continue the pattern as before; you should be on the last round in a repeat of A.3, where all stitches are purled): Work 73-83-93-93-103-113 stitches (= back piece), place the next 63-73-73-73-83-93 stitches on 1 thread for the sleeve, cast on 7 new stitches on the needle (= in side under sleeve), work 73-83-93-93-103-113 stitches as before (= front piece), place the next 63-73-73-73-83-93 stitches on 1 thread for the sleeve and cast on 7 new stitches on the needle (= in side under sleeve). Body and sleeves are finished separately. Cut the strand. BODY: = 160-180-200-200-220-240 stitches. Start 3 stitches before the 7 new stitches cast on in the side and work A.4 over all stitches; make sure the pattern matches the pattern on the yoke. Continue working until the piece measures 23-21-23-25-22-20 cm from the division (there is approx. 6 cm left to finished length; you can try the jumper on and work to desired length). Change to circular needle size 4 mm and work rib (knit 1, purl 1) for 6 cm. Cast off with knit over knit and purl over purl – read CASTING-OFF TIP! The jumper measures approx. 56-58-60-62-64-66 cm from the shoulder down. SLEEVES: Place the 63-73-73-73-83-93 stitches from the thread on the one side of the piece on short circular needle/double pointed needles size 5 mm and knit up 1 stitch in each of the 7 stitches cast on under the sleeve = 70-80-80-80-90-100 stitches. Insert a marker thread in the middle of the 7 stitches under the sleeve. Allow the thread to follow your work onwards; it will be used when decreasing under the sleeve. Cut the strand and start working 3 stitches before the new stitches under the sleeve and continue the pattern in the round according to A.4; make sure the pattern matches the pattern on the yoke. When the sleeve measures 3 cm from the division in all sizes, decrease 2 stitches mid under the sleeve – read DECREASE TIP-2. Decrease like this every 3-2-1½-2-1-1 cm a total of 11-15-15-13-17-21 times = 48-50-50-54-56-58 stitches. The stitches which do not fit into the pattern when decreasing are worked in stocking stitch. Continue working until the sleeve measures 35-34-31-32-28-25 cm from the division (there is approx. 4 cm left to finished length; you can try the jumper on and work to desired length). NOTE: Shorter measurements in larger sizes due to wider neck and longer yoke. Knit 1 round where you decrease 8 stitches evenly spaced – read DECREASE TIP-1 = 40-42-42-46-48-50 stitches. Change to double pointed needles size 4 mm and work rib (knit 1, purl 1) for 4 cm. Cast off with knit over knit and purl over purl – remember CASTING-OFF TIP! The sleeve measures approx. 39-38-35-36-32-29 cm from the division. Work the other sleeve in the same way. |
||||||||||||||||
Diagram explanations |
||||||||||||||||
|
||||||||||||||||
 |
||||||||||||||||
 |
||||||||||||||||
 |
||||||||||||||||
 |
||||||||||||||||
Have you finished this pattern?Tag your pictures with #dropspattern #frostedleavessweater or submit them to the #dropsfan gallery. Do you need help with this pattern?You'll find 25 tutorial videos, a Comments/Questions area and more by visiting the pattern on garnstudio.com. © 1982-2025 DROPS Design A/S. We reserve all rights. This document, including all its sub-sections, has copyrights. Read more about what you can do with our patterns at the bottom of each pattern on our site. |
||||||||||||||||


With over 40 years in knitting and crochet design, DROPS Design offers one of the most extensive collections of free patterns on the internet - translated to 17 languages. As of today we count 320 catalogues and 12095 patterns translated into English (UK/cm). 12095
We work hard to bring you the best knitting and crochet have to offer, inspiration and advice as well as great quality yarns at incredible prices! Would you like to use our patterns for other than personal use? You can read what you are allowed to do in the Copyright text at the bottom of all our patterns. Happy crafting!
Post a comment to pattern DROPS 216-3
We would love to hear what you have to say about this pattern!
If you want to leave a question, please make sure you select the correct category in the form below, to speed up the answering process. Required fields are marked *.