
Popular categories
Looking for a yarn?


Comments / Questions (48)
![]() Arja Taskinen wrote:
Arja Taskinen wrote:
Ruutupiirros puuttuu naisten mallista DROPS 215 - 21
28.11.2020 - 15:33
![]() HUANG wrote:
HUANG wrote:
Bonjour, je souhaite tricoter les points fantaisie uniquement sur le devant du pull avec une couleur et le reste en jersey avec une autre couleur pour faire ressortir les points fantaisie . A partir de quelle étape devrai-je procéder ainsi? Merci par avance de votre retour!
28.10.2020 - 14:33DROPS Design answered:
Bonjour Mme Huang, nous ne sommes malheureusement pas en mesure de pouvoir adapter chacun de nos modèles à chaque demande; vous pouvez contacter un forum tricot ou bien votre magasin pour toute assistance personnalisée. Merci pour votre compréhension. Bon tricot!
28.10.2020 - 15:39
![]() Wendy wrote:
Wendy wrote:
Goedemiddag! Is mijn vraag mogelijk over het hoofd gezien? Ik zou graag verder gaan. Groet Wendy
23.10.2020 - 15:35DROPS Design answered:
Dag Wendy,
Inderdaad over het hoofd gezien, maar er is nu geantwoord. Hopelijk kun je zo verder.
25.10.2020 - 19:26
![]() Pramila Chugani wrote:
Pramila Chugani wrote:
Hello, is it possible to knit this pattern flat instead of in the round on a circular needle?
22.10.2020 - 22:20DROPS Design answered:
Dear Mrs Chugani, you will find how to adapt a pattern into straight needles here. Happy knitting!
23.10.2020 - 09:06
![]() Wendy K wrote:
Wendy K wrote:
Hallo!\r\nBij meerderen voor de pas raak ik in de war: de laatste steek voor markeerdraad 1 en 3 is bij mij een averechtse steek (laatste van 4 steken in het patroon A1.) Klopt dit? Moet daar dan voor een steek gemaakt worden en verschuift het patroon dan?Of is het anders? Dank alvast
12.10.2020 - 12:07DROPS Design answered:
Dag Wendy,
De steken die je meerdert worden gaandeweg in patroon gebreid. Je hebt niet gelijk genoeg steken om in patroon te breien, dus de eerste gemeerderde steek brei je in de eerste steek van het patroon (dus averecht), de tweede steek in de tweede steek van het patroon (dus recht), enzovoort. (Wanneer je 2 rechte steken hebt kun je dus ook het ajourpatroon maken.
25.10.2020 - 19:25
![]() Marga Grützmann wrote:
Marga Grützmann wrote:
Ich finde bei dem Modell das Diagramm nicht. Es ist beim Ausdruck nicht dabei. Was kann ich tun?
01.10.2020 - 16:43DROPS Design answered:
Liebe Frau Grützmann, Das Diagram A.1 ist ein kleines Diagram, über 4 Maschen und 8 Reihen gestrickt - das finden Sie neben der Maßskizze (unter der Ärmel). Viel Spaß beim stricken!
02.10.2020 - 08:05
![]() Liisa Rapeli wrote:
Liisa Rapeli wrote:
Hei! En löydä suomenkielisestä ohjeesta mallipiirroksia. Muilla kielillä piirrokset löytyvät. Onko piirrokset jossakin piilossa vai onko ne unohtunut?
24.09.2020 - 20:24DROPS Design answered:
Nyt piirrokset avautuvat.
08.12.2020 - 18:28
![]() Lisbeth wrote:
Lisbeth wrote:
Hej Drops Super flot sweater som jeg er gået i gang med. Er det rigtigt at der er fejl i diagram beskrivelse af “omslag” og skal det på,efterfølgende pind strikkes så,der bliver hul?
16.09.2020 - 13:18DROPS Design answered:
Hej Lisbeth. Ja det var fel i den danska översättningen, detta är nu rättat. Tack för info! Det skal på efterfølgende pind strikkes så der bliver hul. Mvh DROPS Design
17.09.2020 - 09:47
![]() Verena wrote:
Verena wrote:
Hallo Drops-Team, bei der Schulterzunahme steht 4 Maschen vor bzw. nach dem Markierer zunehmen - das ist klar. Jedoch woher kommen die anderen Maschen, damit ich auf 24 (bei Größe L) zusätzliche Maschen pro Runde komme? Danke für die Hilfe.
22.08.2020 - 15:01DROPS Design answered:
Liebe Verena, es wird für die Schulter insgesamt 24 Mal 4 Maschen = 96 Maschen im Total zugenommen - es gab 120 M + 96 = 216 Maschen wenn alle Zunahmen fertig sind - oder habe ich Ihre Frage misverstanden?
24.08.2020 - 08:14
![]() Jo Gray wrote:
Jo Gray wrote:
Is this pattern available in children’s sizes? :)
12.08.2020 - 14:07DROPS Design answered:
Dear Mrs Gray, this pattern is only available in woman size - you will find our jumper for children here. Happy knitting!
12.08.2020 - 17:03
|
||||||||||||||||||||||||||||
Follow the Fjord#followthefjordsweater |
||||||||||||||||||||||||||||
 |
 |
|||||||||||||||||||||||||||
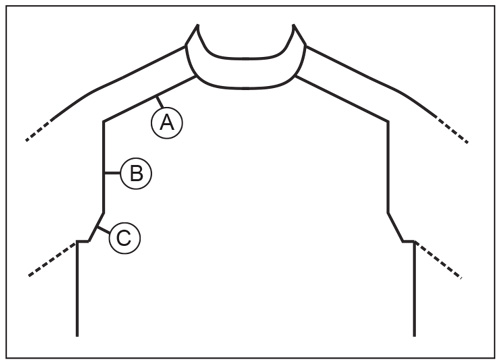
Knitted jumper in DROPS Karisma. The piece is worked top down with saddle shoulders and lace pattern. Sizes S - XXXL.
DROPS 215-21 |
||||||||||||||||||||||||||||
|
------------------------------------------------------- EXPLANATIONS FOR THE PATTERN: ------------------------------------------------------- PATTERN: See diagram A.1. INCREASE TIP-1 (evenly spaced): To work out how to increase evenly, count the total number of stitches on the needle (e.g. 12 stitches) and divide by the number of increases to be made (e.g. 4) = 3. In this example, increase by making 1 yarn over after each 3rd stitch. On the next round work the yarn overs twisted to avoid holes. INCREASE TIP-2: BEFORE MARKER: The new stitch will be twisted, leaning towards the right. Use left needle to pick up strand between 2 stitches from the round below, pick up strand from behind and knit stitch in front loop. AFTER MARKER: The new stitch will be twisted, leaning towards the left. Use left needle to pick up strand between 2 stitches from the round below, pick up strand from the front and knit stitch in back loop. DECREASE TIP (for sleeves): Decrease 1 stitch on either side of the marker as follows: Work until there are 3 stitches left before the marker, knit 2 together, knit 2 (marker thread sits between these 2 stitches), slip 1 stitch as if to knit, knit 1 and pass the slipped stitch over the knitted stitch. CASTING-OFF TIP: To avoid the cast-off edge being tight you can cast off with a larger size needle. If the edge is still tight, make 1 yarn over after approx. each 4th stitch at the same time as casting off; the yarn overs are cast off as normal stitches ------------------------------------------------------- START THE PIECE HERE: ------------------------------------------------------- JUMPER – SHORT OVERVIEW OF THE PIECE: The piece is worked in the round, top down. Stiches are increased on the yoke for the shoulders front and back, then stitches are increased for the sleeves. The yoke is divided for the body and sleeves; the body is continued in the round. The sleeves are worked in the round with double pointed needles, top down. NECK: Cast on 96-104-104-112-120-128 stitches with circular needle size 3.5 mm and Karisma. Knit 1 round. Then work rib as follows: Purl 1, * knit 2, purl 2 *, work from *-* until there are 3 stitches left, knit 2 and purl 1. Continue this rib for 8½ cm. Change to circular needle size 4.5 mm. Insert a marker at the beginning of the round (mid-back). Leave the marker there; THE PIECE IS MEASURED FROM THE MARKER! YOKE: On the next round you increase stitches, work pattern and insert 4 markers (between stitches) as follows: Work A.1 (= 4 stitches) over 16-20-20-20-20-24 stitches (= 4-5-5-5-5-6 times in width = half back piece), insert marker 1, knit 12-12-12-12-16-16 and increase 4-4-8-8-8-8 stitches evenly over these stitches – read INCREASE TIP-1, insert marker 2 (= shoulder), A.1 over the next 36-40-40-44-44-48 stitches (= 9-10-10-11-11-12 times in width = front piece), insert marker 3, knit 12-12-12-12-16-16 and increase 4-4-8-8-8-8 stitches evenly over these stitches, insert marker 4 (= shoulder) and A.1 over the last 20-20-20-24-24-24 stitches (= 5-5-5-6-6-6 times in width = half back piece) = 104-112-120-128-136-144 stitches. SADDLE SHOULDER INCREASE: Work stocking stitch over the shoulder stitches and pattern A.1 over the front and back pieces. On the next round increase for saddle shoulders as follows: Increase 1 stitch BEFORE markers 1 and 3 and 1 stitch AFTER markers 2 and 4 - read INCREASE TIP-2 (= 4 stitches increased). I.e. there are increases on back piece and front piece, and number of shoulder stitches remain the same. The increased stitches are worked into A.1 as you go. Pattern A.1 is repeated in height. Increase like this every round a total of 20-20-24-24-28-28 times = 184-192-216-224-248-256 stitches. The piece measures approx. 8-8-9-9-11-11 cm from the marker on the neck. REMEMBER THE KNITTING TENSION! SLEEVE INCREASE: Now increase for the sleeves as follows: Increase 1 stitch AFTER markers 1 and 3 and 1 stitch BEFORE markers 2 and 4 (= 4 stitches increased). I.e. increase in shoulder stitches, number of stitches in front piece and back piece remains the same. Increase like this every 2nd round a total of 14-11-13-12-12-14 times = 240-236-268-272-296-312 stitches. The piece measures approx. 19-16-19-18-20-22 cm from the marker. Continue with stocking stitch and pattern as before without further increases until the piece measures 19-17-19-19-20-22 cm. YOKE INCREASE: Now increase 1 stitch on each side of the marker as follows: Work until 1 stitch remain before markers 1 and 3, increase 1 stitch BEFORE marker, work 1 stitch, move the marker to the right needle and increase 1 stitch AFTER marker. Work until markers 2 and 4, increase 1 stitch BEFORE marker, move the marker to the right needle, work one stitch and increase 1 stitch AFTER marker (= 8 stitches increased). The increased stitches on the front and back pieces are worked into pattern A.1 and the increased stitches on the sleeves are worked in stocking stitch (stitches between markers 1 and 2 and markers 3 and 4). Increase like this every 2nd round a total of 8-12-12-16-16-16 times = 304-332-364-400-424-440 stitches. When all the increases are finished, the piece measures 25-26-28-30-32-34 cm from the marker on the neck. Now divide the piece for body and sleeves on the next round as follows: Work the first 44-52-56-60-64-68 stitches (= half back piece), place the next 60-62-70-76-80-84 stitches on a thread for the sleeve, cast on 8-8-8-8-8-12 stitches under the sleeve, work 92-104-112-124-132-136 stitches (= front piece), place the next 60-62-70-76-80-84 stitches on a thread for the sleeve, cast on 8-8-8-8-8-12 stitches under the sleeve and work the last 48-52-56-64-68-68 stitches (= half back piece). Body and sleeves are finished separately. BODY: = 200-224-240-264-280-296 stitches. Continue with pattern A.1 as before with stocking stitch over the 8-8-8-8-8-12 stitches cast on under each sleeve. A.1 is repeated 23-26-28-31-33-34 times in width on both the front and the back piece. When the body measures 22-23-23-23-23-23 cm, change to circular needle size 3.5 mm and work rib as follows: Purl over purl and knit over the lace pattern and over the 8-8-8-8-8-12 stocking stitches under the sleeves work as follows: Purl 1, * knit 2, purl 2 *, work from *-* 1-1-1-1-1-2 times, knit 2 and purl 1. You now have a rib with knit 2, purl 2 over all stitches. When the rib measures 7 cm, cast off with knit over knit and purl over purl – read CASTING-OFF TIP! SLEEVE: Place the 60-62-70-76-80-84 stitches from the thread on the one side of the piece on double pointed needles size 4.5 mm and knit up 1 stitch in each of the 8-8-8-8-8-12 stitches cast on under the sleeve = 68-70-78-84-88-96 stitches. Insert a marker in the middle of the new stitches under the sleeve. This will be used when decreasing under the sleeve. Work stocking stitch in the round. When the piece measures 3 cm from the division, decrease 1 stitch on each side of the marker – read DECREASE TIP. Repeat this decrease every 6-5-3-2-2-1½ cm a total of 5-5-8-10-11-14 times = 58-60-62-64-66-68 stitches. Continue with stocking stitch until the body measures 33-32-31-30-30-28 cm from the division. Knit 1 round where you increase 18-16-18-16-18-16 stitches evenly spaced = 76-76-80-80-84-84 stitches. Change to circular needle size 3.5 mm. Work rib (= knit 2, purl 2) for 5 cm. Cast off with knit over knit and purl over purl – remember CASTING-OFF TIP. Work the other sleeve in the same way. ASSEMBLY: Fold the neck double to the inside and sew down. To avoid the neck being tight and rolling outwards, it is important that the seam is elastic. |
||||||||||||||||||||||||||||
Diagram explanations |
||||||||||||||||||||||||||||
|
||||||||||||||||||||||||||||

|
||||||||||||||||||||||||||||
|
||||||||||||||||||||||||||||
Have you finished this pattern?Tag your pictures with #dropspattern #followthefjordsweater or submit them to the #dropsfan gallery. Do you need help with this pattern?You'll find 27 tutorial videos, a Comments/Questions area and more by visiting the pattern on garnstudio.com. © 1982-2025 DROPS Design A/S. We reserve all rights. This document, including all its sub-sections, has copyrights. Read more about what you can do with our patterns at the bottom of each pattern on our site. |
||||||||||||||||||||||||||||


With over 40 years in knitting and crochet design, DROPS Design offers one of the most extensive collections of free patterns on the internet - translated to 17 languages. As of today we count 314 catalogues and 11820 patterns translated into English (UK/cm). 11820
We work hard to bring you the best knitting and crochet have to offer, inspiration and advice as well as great quality yarns at incredible prices! Would you like to use our patterns for other than personal use? You can read what you are allowed to do in the Copyright text at the bottom of all our patterns. Happy crafting!
Post a comment to pattern DROPS 215-21
We would love to hear what you have to say about this pattern!
If you want to leave a question, please make sure you select the correct category in the form below, to speed up the answering process. Required fields are marked *.