
Looking for a yarn?


Comments / Questions (57)
![]() Francesco wrote:
Francesco wrote:
Per il davanti è scritto che il primo aumento per il collo va fatto all'Inizio del ferro, sia per la spalla destra che per quella sinistra. Non credo sia esatto
13.05.2021 - 18:03DROPS Design answered:
Buonasera Francesco, abbiamo inoltrato la sua segnalazione al settore design. Se il modello verrà corretto troverà la correzione direttamente online nei prossimi giorni. Buon lavoro!
15.05.2021 - 22:35
![]() Mamen wrote:
Mamen wrote:
Hola. Tengo una duda: cuando en el aumento de las sisas dice: " después montar puntos nuevos para las sisas al final de cada hilera de la manera siguiente: Montar 2 puntos 0-2-2-3-3-4 veces y 3 puntos 0-0-1-1-2-3 veces" ¿Se refiere a las hileras del derecho o a todas (derecho y revés)? Gracias.
06.04.2021 - 13:11DROPS Design answered:
Hola Mamen, depende del tamaño del chaleco que hagas. Pueden ser tambien las hileras reves. Buen trabajo!
06.04.2021 - 17:33
![]() Jan Erickson wrote:
Jan Erickson wrote:
The pattern says cast on 19 stitches including 1 edge stitch on each side . Does that mean 21 stitches? Or are the edge stitches icluded in the 19.
29.03.2021 - 03:19DROPS Design answered:
Hi Jan, The edge stitches are included in the 19. Happy knitting!
29.03.2021 - 07:43
![]() Nina wrote:
Nina wrote:
Hej, er det muligt at få målene på vesten eller få at vide hvilken str. modellen har på? Er i tvivl om hvilken str. jeg skal strikke den i. tak.
25.03.2021 - 08:32DROPS Design answered:
Hej Nina, målene på vesten finder du nederst i opskriften. God fornøjelse!
25.03.2021 - 08:50
![]() Maria wrote:
Maria wrote:
Hallo! zou het kunnen dat bij het samenvoegen van de schouders de verhoudingen verkeerd staan bij het naar beneden breien? er staat namelijk '18-18-18-17-17-16 cm' wat mij niet logisch lijkt en ook eens '2-1-1-3-4-4', dit lijkt mij niet de juiste volgorde? Alvast bedankt voor uw antwoord en een prettige dag gewenst!
15.02.2021 - 14:44DROPS Design answered:
Dag Maria,
Nee, want in de grotere maten moet je frequenter steken op zetten, dus over meer naalden in de hoogte. Hierdoor moet je eerder beginnen met meerderen.
09.03.2021 - 19:52
![]() Synne wrote:
Synne wrote:
Strikker denne i L. Det sår etter man har samlet skuldrene; Når arbeidet måler 18cm legges det opp til ermehull. Er det 18cm fra midten (halsen) eller 18cm på toppen av skulderen?
12.02.2021 - 10:33DROPS Design answered:
Hej synne, du måler fra der hvor du slog op til skulderen, altså fra starten :)
16.02.2021 - 15:09
![]() Katarina Johansson wrote:
Katarina Johansson wrote:
Det står att man ska minska i sidorna totalt 4 ggr med 10 cm mellan ( stl L). Hur är det möjligt om den första minskningen görs efter 5 cm och sidan är totalt 36 cm . (4x10 = 40 cm +5)
16.12.2020 - 21:43DROPS Design answered:
Hej Katarina. Du gör den fösta minskningen vid 5 cm, andra vid 15 cm, tredje vid 25 cm och fjärde vid 35 cm. Mvh DROPS Design
18.12.2020 - 08:11
![]() Rosanna Ferro wrote:
Rosanna Ferro wrote:
Buona sera, vorrei realizzare questo gilet e sarebbe il primo che faccio... è possibile realizzare questo modello in piano senza l'uso dei ferri circolari (davanti e dietro separati)? Come vengono calcolati gli aumenti per il lato sotto manica? E le diminuzioni del corpo? Grazie
14.12.2020 - 23:03DROPS Design answered:
Buongiorno Rosanna, può continuare a lavorare in piano se preferisce, mantenendo la cucitura laterale e distribuendo aumenti e diminuzioni sulle 2 parti. Buon lavoro!
15.12.2020 - 09:52
![]() Miriam Bøe wrote:
Miriam Bøe wrote:
Er det riktig at man skal øke før ribbestrikken nederst? Ville heller minske før vrangbord.
01.12.2020 - 13:58
![]() Charlotte H wrote:
Charlotte H wrote:
Hei, hva er grunnen til at man strikker ovenfra og ned? Mye enklere å forstå når man strikker nedenfra og opp, det ser man jo på kommentarene her også . Mvh Charlotte.
23.11.2020 - 22:28
|
||||
Georgetown Vest#georgetownvest |
||||
 |
 |
|||
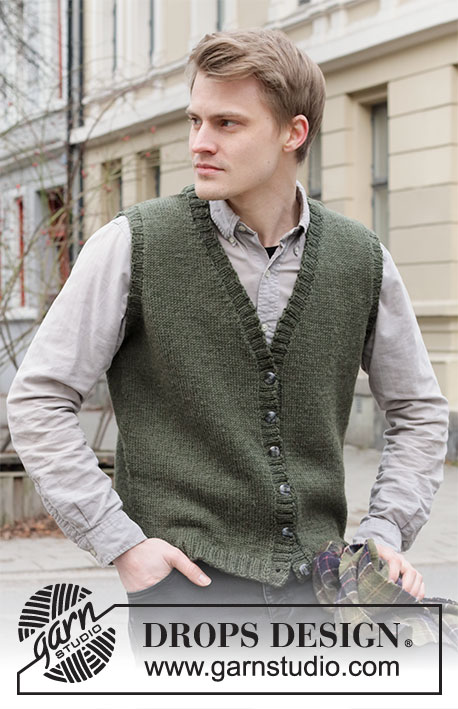
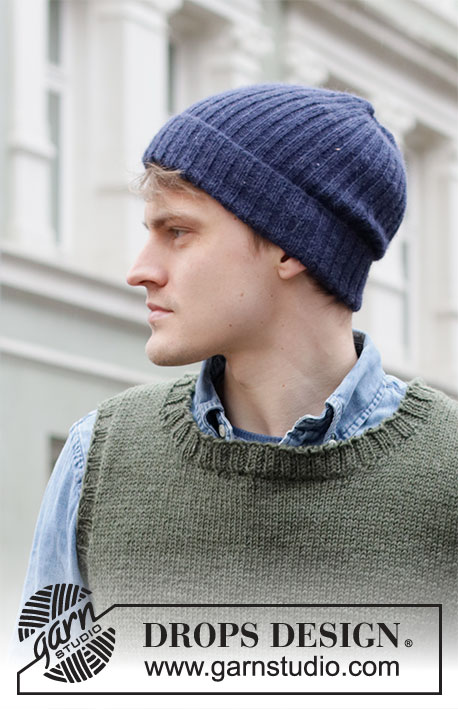
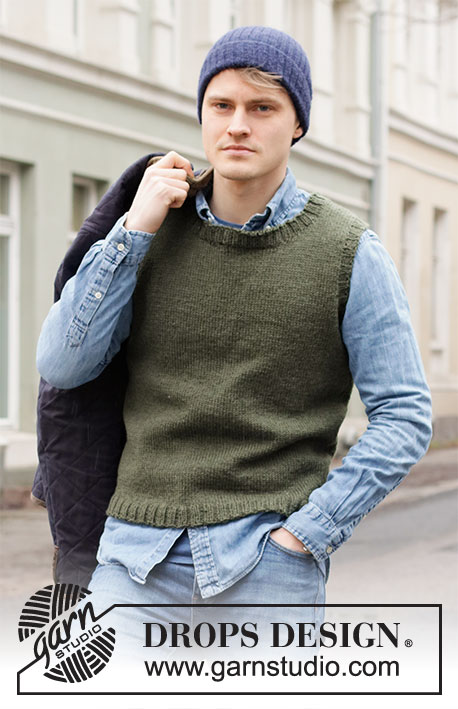
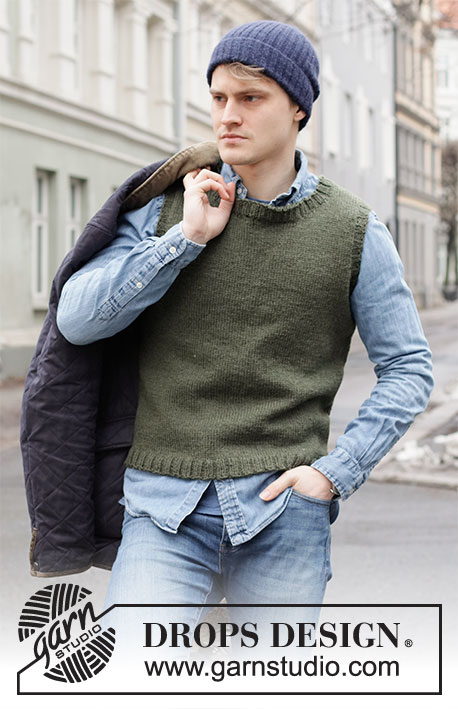
Knitted vest / slipover for men in DROPS Karisma or DROPS Soft Tweed. The piece is worked top down with round neck and ribbed edges. Sizes S - XXXL.
DROPS 219-1 |
||||
|
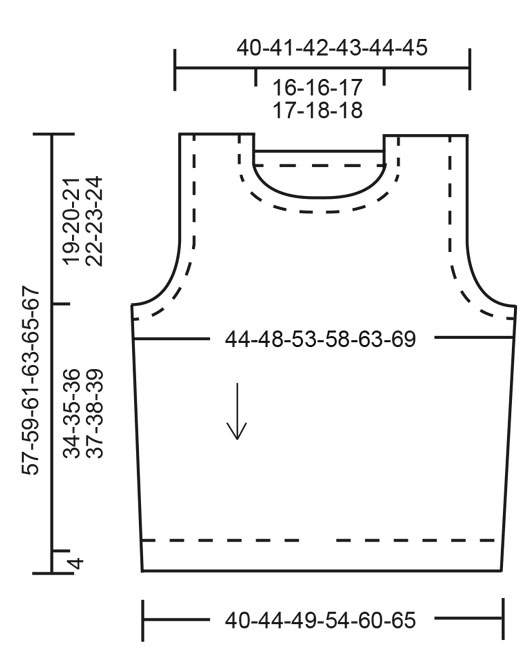
------------------------------------------------------- EXPLANATIONS FOR THE PATTERN: ------------------------------------------------------- RIDGE/GARTER STITCH (worked back and forth): Knit all rows. 1 ridge in height = Knit 2 rows. INCREASE TIP: Increase 1 stitch by making 1 yarn over. On the next row, work the yarn over twisted to avoid a hole. DECREASE TIP (for sides of body): Decrease 1 stitch on each side of the stitch with the marker thread as follows: Work until there are 3 stitches left before the stitch with the marker thread, knit 2 together, knit 1, slip 1 stitch as if to knit, knit 1 and pass the slipped stitch over the knitted stitch (= 2 stitches decreased). CASTING-OFF TIP: To avoid the cast-off edge being tight you can cast off with a larger size needle. If the edge is still tight, make 1 yarn over after approx. each 4th stitch at the same time as casting off; the yarn overs are cast off as normal stitches. ------------------------------------------------------- START THE PIECE HERE: ------------------------------------------------------- VEST – SHORT OVERVIEW OF THE PIECE: The vest is worked top down. Each shoulder is first worked separately, back and forth, at the same time stitches are increased/cast on for the neck. The front and back pieces are worked separately, back and forth, until the increases for the armholes are finished. Then the pieces are joined and the body worked in the round. Stiches are picked up for the neck and sleeve edges and worked in rib in the round. BACK PIECE: Each shoulder is worked separately. Right shoulder: Cast on 18-19-19-20-20-21 stitches (including 1 edge stitch on each side) using circular needle size 4 mm and Karisma. Work 1 edge stitch in GARTER STITCH – read description above, work stocking stitch until there is 1 stitch left on the row and then 1 edge stitch in garter stitch. Continue like this back and forth. When the piece measures 4 cm increase 1 stitch inside 1 edge stitch on the beginning of next row from the right side – read INCREASE TIP in description above = 19-20-20-21-21-22 stitches. Lay the piece to one side and work the left shoulder. Left shoulder: Cast on 18-19-19-20-20-21 stitches (including 1 edge stitch on each side) using circular needle size 4 mm and Karisma. Work 1 edge stitch in GARTER STITCH – read description above, work stocking stitch until there is 1 stitch left on the row and then 1 edge stitch in garter stitch. Continue like this back and forth. When the piece measures 4 cm, increase 1 stitch inside 1 edge stitch at the end of the next row from the right side = 19-20-20-21-21-22 stitches. Work 1 row back from the wrong side. REMEMBER THE KNITTING TENSION! Now join the 2 shoulders together as follows: Knit the 19-20-20-21-21-22 stitches on the left shoulder, cast on 40-40-42-42-44-44 stitches at the end of the row (= neck), knit the 19-20-20-21-21-22 stitches from the right shoulder onto the same needle = 78-80-82-84-86-88 stitches. Continue back and forth with stocking stitch and 1 edge stitch in garter stitch on each side. When the piece measures 18-18-18-17-17-16 cm, increase/cast on stitches for the armhole on each side as follows: Increase 1 stitch inside 1 edge stitch on each row from the right side 2-1-1-3-4-4 times, then cast on new stitches for the armholes at the end of each row as follows: Cast on 2 stitches 0-2-2-3-3-4 times and 3 stitches 0-0-1-1-2-3 times (= a total of 2-5-8-12-16-21 stitches increased for each armhole) = 82-90-98-108-118-130 stitches. Lay the piece to one side and work the front piece. FRONT PIECE: Each shoulder is worked separately. Left shoulder: Cast on 18-19-19-20-20-21 stitches (including 1 edge stitch on each side) using circular needle size 4 mm and Karisma. Work 1 edge stitch in garter stitch, work stocking stitch until there is 1 stitch left on the row and then 1 edge stitch in garter stitch. Continue like this back and forth. When the piece measures 5-5-6-6-7-7 cm, increase/cast on stitches for the neck as follows: Increase 1 stitch inside 1 edge stitch on the beginning of the next row from the right side = 19-20-20-21-21-22 stitches. Then cast on stitches at the end of each row from the wrong side as follows: Cast on 2 stitches 3 times and 3 stitches 1 time = 28-29-29-30-30-31 stitches. Lay the piece to one side and work the right shoulder. Right shoulder: Cast on 18-19-19-20-20-21 stitches (including 1 edge stitch on each side) using circular needle size 4 mm and Karisma. Work 1 edge stitch in garter stitch, work stocking stitch until there is 1 stitch left on the row and then 1 edge stitch in garter stitch. Continue like this back and forth. When the piece measures 5-5-6-6-7-7 cm, increase/cast on stitches for the neck as follows: Increase 1 stitch inside 1 edge stitch at the end of the next row from the right side = 19-20-20-21-21-22 stitches. Then cast on stitches at the end of each row from the right side as follows: Cast on 2 stitches 3 times and 3 stitches 1 time = 28-29-29-30-30-31 stitches. Now join the right and left shoulders together from the right side as follows: Knit the 28-29-29-30-30-31 stitches on the right shoulder, cast on 22-22-24-24-26-26 stitches for the neck, knit the 28-29-29-30-30-31 stitches from the left shoulder = 78-80-82-84-86-88 stitches. Continue back and forth with stocking stitch and 1 edge stitch in garter stitch on each side. When the piece measures 18-18-18-17-17-16 cm, increase/cast on stitches for the armholes as follows. Increase 1 stitch inside 1 edge stitch on each row from the right side 2-1-1-3-4-4 times, then cast on new stitches for the armholes at the end of each row as follows: Cast on 2 stitches 0-2-2-3-3-4 times and 3 stitches 0-0-1-1-2-3 times (= a total of 2-5-8-12-16-21 stitches increased for each armhole) = 82-90-98-108-118-130 stitches. THE PIECE IS NOW MEASURED FROM HERE! BODY: Now join the front and back pieces together from the right side as follows: Work stocking stitch over the 82-90-98-108-118-130 stitches from the front piece, cast on 11-11-13-13-15-15 new stitches on the needle (= in side under sleeve), stocking stitch over the next 82-90-98-108-118-130 stitches on the back piece and cast on 11-11-13-13-15-15 new stitches on the needle (= in side under sleeve) = 186-202-222-242-266-290 stitches. Insert 1 marker in the middle stitch of the 11-11-13-13-15-15 new stitches in each side. Allow the markers to follow your work onwards; stitches will later be decreased on each side of both markers. Work stocking stitch in the round. When the piece measures 5 cm, decrease on both sides of each marker – read DECREASE TIP (= 4 stitches decreased). Decrease like this every 9-9-10-10-10-11 cm a total of 4 times = 170-186-206-226-250-274 stitches. When the piece measures 34-35-36-37-38-39 cm increase 26-26-30-34-38-42 stitches evenly spaced = 196-212-236-260-288-316 stitches. Change to circular needle size 3 mm and work rib (= knit 2 / purl 2) in the round for 4 cm. Cast off with knit over knit and purl over purl – read CASTING-OFF TIP. The vest measures approx. 57-59-61-63-65-67 cm from the shoulder down. ASSEMBLY: Sew the shoulder seams with grafting stitches. ARMHOLE EDGE: Knit up approx. 88-132 stitches inside the 1 stitch with short circular needle size 3 mm and Karisma. Adjust so the number of stitches is divisible by 4. Work rib (= knit 2 / purl 2) in the round for 2 cm. Cast off with knit over knit and purl over purl – remember CASTING-OFF TIP! Work the other sleeve edge in the same way. NECK: Knit up 104-120 stitches inside the 1 stitch with short circular needle size 3 mm and Karisma. Adjust so the number of stitches is divisible by 4. Work rib (= knit 2 / purl 2) in the round for 2 cm. Cast off with knit over knit and purl over purl. |
||||
Diagram explanations |
||||
|
||||
 |
||||
Have you finished this pattern?Tag your pictures with #dropspattern #georgetownvest or submit them to the #dropsfan gallery. Do you need help with this pattern?You'll find 24 tutorial videos, a Comments/Questions area and more by visiting the pattern on garnstudio.com. © 1982-2025 DROPS Design A/S. We reserve all rights. This document, including all its sub-sections, has copyrights. Read more about what you can do with our patterns at the bottom of each pattern on our site. |
||||


With over 40 years in knitting and crochet design, DROPS Design offers one of the most extensive collections of free patterns on the internet - translated to 17 languages. As of today we count 320 catalogues and 12094 patterns translated into English (UK/cm). 12094
We work hard to bring you the best knitting and crochet have to offer, inspiration and advice as well as great quality yarns at incredible prices! Would you like to use our patterns for other than personal use? You can read what you are allowed to do in the Copyright text at the bottom of all our patterns. Happy crafting!
Post a comment to pattern DROPS 219-1
We would love to hear what you have to say about this pattern!
If you want to leave a question, please make sure you select the correct category in the form below, to speed up the answering process. Required fields are marked *.