
Looking for a yarn?


Comments / Questions (57)
![]() Cheryl Brunetti wrote:
Cheryl Brunetti wrote:
Hi - follow up to my question about setting the first shoulder piece aside. I understand that you put the stitches on a stitch holder or another needle, but what do you do with the working yarn? Do you start the left shoulder piece with another skein? If so, what do you do when you put the two shoulders and neckline together, because then you would have two working skeins (one on each shoulder)? Thanks!
12.03.2023 - 17:09DROPS Design answered:
Dear Cheryl, you start the other shoulder with another thread/ skein. Then, when you join both shoulders and the neckline, work with the thread of the left shoulder (so you cut the working yarn of the right shoulder). Happy knitting!
12.03.2023 - 18:49
![]() Cheryl wrote:
Cheryl wrote:
Hello - I need clarification on how to “set aside” part of the piece. Do you move the stitches to a stitch holder? Do you cut the yarn? I am at the very beginning, where I’ve done the 1 1/2” of the right shoulder, then done a stitch increase and then worked one more ws row. How do I now set that aside to then make the left shoulder? Thanks!
12.03.2023 - 04:57DROPS Design answered:
Dear Cheryl, put the stitches on a stitch-holder, or a piece of leftover yarn, or -if you have it, an extra needle. Or, if you have more needles of the appropriate size, you can leave it on, and use your extra needle to knit the next piece. Happy Crafting!
12.03.2023 - 15:52
![]() Kirsten Kudsk Jensen wrote:
Kirsten Kudsk Jensen wrote:
Opskriften på herre-vest 219-1, Karisma fungerer ikke som den skal i str L. Der er flere irriterende fejl i den. Stykket man har strikket inden man går til ærmegab er for lille og maskeantallet passer ikke, det bliver 90 masker og ikke 98. Derudover undrer det mig at man i “kroppen” til en herre skal tage ind og ud og ind. Jeg håber ikke andre har strikket forgæves som jeg🤨🥲 Mvh Kirsten tlf 0045 22724045
11.01.2023 - 13:42
![]() Lucy wrote:
Lucy wrote:
Hello, Do you have instructions and measurements available for an XS size? Thank you!
23.11.2022 - 17:19
![]() Suzanna Santrac wrote:
Suzanna Santrac wrote:
Hej! Stickar i storlek XL och undrar hur många maskor det kan vara rimligt att plocka upp till ärmkant resp. halskant? Det står ärmkant 88-132 och halskant 104-120. Tacksam för svar!
28.04.2022 - 13:28DROPS Design answered:
Hei Suzanna. Ville ha strikket opp 116 eller 120 masker ved ermkanten og til hals 112 eller 116 masker, begge steder må det være et tall som er delelig med 4. mvh DROPS Design
02.05.2022 - 10:32
![]() Maria Schwartson wrote:
Maria Schwartson wrote:
Hvad størrelse er modellen i?
23.04.2022 - 13:28DROPS Design answered:
Hei Maria. Medium, men det er viktig å se på målskissen til oppskriften for å finne din riktige str. mvh DROPS Design
25.04.2022 - 11:02
![]() Elisabeth wrote:
Elisabeth wrote:
Hej Stickar Georgetown Vest och fick byta storlek på stickorna från 4 till 3 när det gällde slätstickning för stt få rätt stickfasthet Byter jag också storlek på stickorna tii resåren från 3 till 2? Tack för svar på förhand
22.02.2022 - 20:35DROPS Design answered:
Hej Elisabeth. Ja då hade jag bytt till storlek 2 på resåren. Mvh DROPS Design
23.02.2022 - 10:22
![]() Jeanne Pigage wrote:
Jeanne Pigage wrote:
Hello again ! At the bottom of the Georgetown Vest and I can't believe it says to increase 26 stitches , ( I am doing the medium), before the ribbing which isdone in smaller needle but wow, that seems like an awful lot ! Is it possible to stay with the same needles and start the ribbing? Also when picking up the stitches around the arm hole and neck, you don't specify how many stitches ..just I guess what feels right?
22.01.2022 - 18:12DROPS Design answered:
Dear Jeanne those increses are there, so the ribbing would not pull in the piece. Also, the pattern tells you to pick up 88-132 stitches around the armholes, the exact amount depends on your gage (among outher things). Happy Stitching!
24.01.2022 - 00:50
![]() Diya wrote:
Diya wrote:
Hi, I'm a little confused by this part (for the XL): "Increase 1 stitch inside 1 edge stitch on each row from the right side 3 times, then cast on new stitches for the armholes at the end of each row as follows: Cast on 2 stitches 3 times and 3 stitches 1 times." Does that mean we increase and cast on every row? (3 increase rows, 4 CO rows). Or for the increase, do we only increase on the right side rows? (3 increase rows, 3 normal WS rows, 4 CO rows) Thank you!
19.01.2022 - 04:05DROPS Design answered:
Dear Diya, this means you will work the RS rows as follows: 1 edge stitch, increase 1 stitch, work until 1 stitch remain, increase 1 stitch, 1 edge stitch. Repeat this RS row a total of 3 times (= 3 sts increased on each side = 6 in total). Then at the end of next RS row cast on 2 sts, turn work WS row and cast on 2 sts; repeat these 2 rows 2 more times, then cast on 3 sts on each side a total of 2 times the same way = there are 108 sts on needle. Happy knitting!
19.01.2022 - 08:56
![]() Jeanne Pigage wrote:
Jeanne Pigage wrote:
I am doing the Georgetown vest and am at the point of the decreases before and after the middle stitch at each underarm. The decrease tip is very confusing. Do I knit 2 together, knit the middle stitch and then slip 1, knit 1, and pass slipped stitch over?
16.01.2022 - 01:42DROPS Design answered:
Dear Jeanne, you knit 2 together, then knit 1, then knit the stitch with the stitch marker (middle stitch), then knit 1 and then slip 1, knit 1, and pass slipped stitch over. Happy knitting!
17.01.2022 - 00:02
|
||||
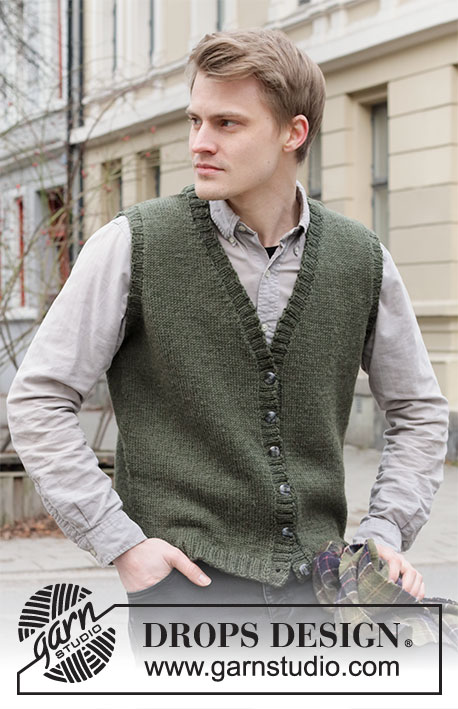
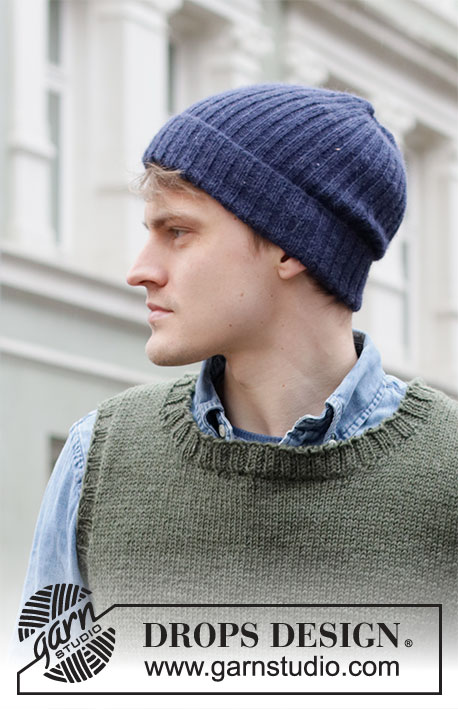
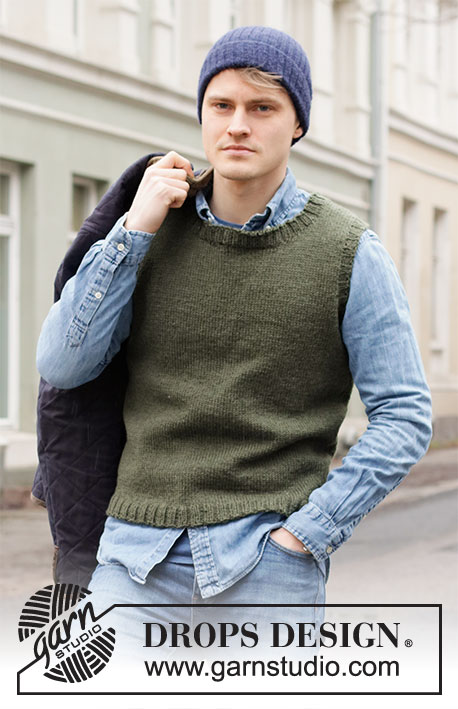
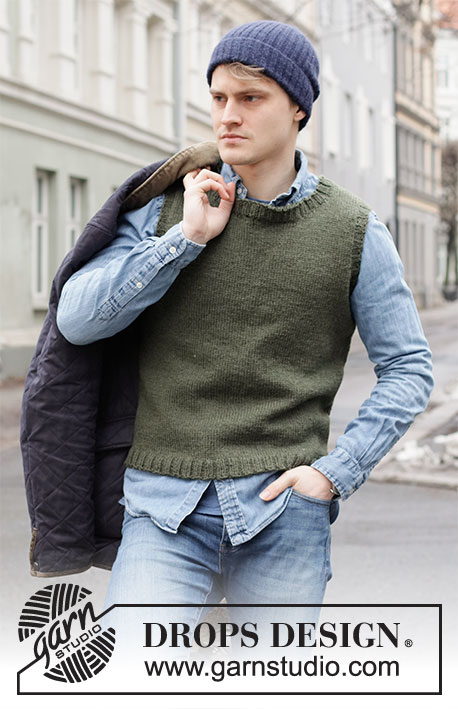
Georgetown Vest#georgetownvest |
||||
 |
 |
|||
Knitted vest / slipover for men in DROPS Karisma or DROPS Soft Tweed. The piece is worked top down with round neck and ribbed edges. Sizes S - XXXL.
DROPS 219-1 |
||||
|
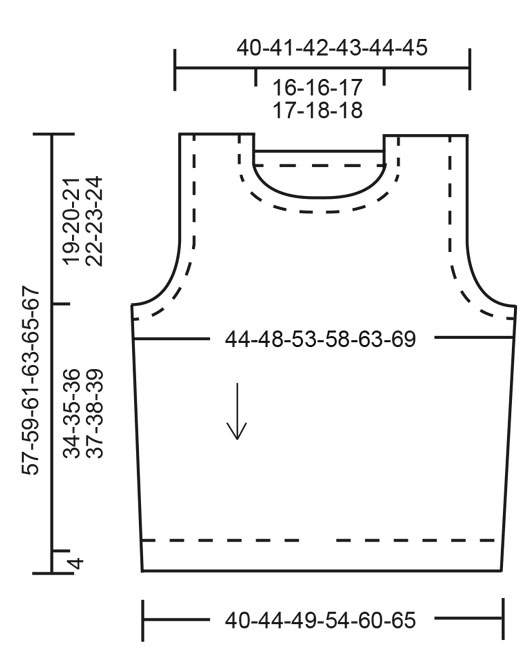
------------------------------------------------------- EXPLANATIONS FOR THE PATTERN: ------------------------------------------------------- RIDGE/GARTER STITCH (worked back and forth): Knit all rows. 1 ridge in height = Knit 2 rows. INCREASE TIP: Increase 1 stitch by making 1 yarn over. On the next row, work the yarn over twisted to avoid a hole. DECREASE TIP (for sides of body): Decrease 1 stitch on each side of the stitch with the marker thread as follows: Work until there are 3 stitches left before the stitch with the marker thread, knit 2 together, knit 1, slip 1 stitch as if to knit, knit 1 and pass the slipped stitch over the knitted stitch (= 2 stitches decreased). CASTING-OFF TIP: To avoid the cast-off edge being tight you can cast off with a larger size needle. If the edge is still tight, make 1 yarn over after approx. each 4th stitch at the same time as casting off; the yarn overs are cast off as normal stitches. ------------------------------------------------------- START THE PIECE HERE: ------------------------------------------------------- VEST – SHORT OVERVIEW OF THE PIECE: The vest is worked top down. Each shoulder is first worked separately, back and forth, at the same time stitches are increased/cast on for the neck. The front and back pieces are worked separately, back and forth, until the increases for the armholes are finished. Then the pieces are joined and the body worked in the round. Stiches are picked up for the neck and sleeve edges and worked in rib in the round. BACK PIECE: Each shoulder is worked separately. Right shoulder: Cast on 18-19-19-20-20-21 stitches (including 1 edge stitch on each side) using circular needle size 4 mm and Karisma. Work 1 edge stitch in GARTER STITCH – read description above, work stocking stitch until there is 1 stitch left on the row and then 1 edge stitch in garter stitch. Continue like this back and forth. When the piece measures 4 cm increase 1 stitch inside 1 edge stitch on the beginning of next row from the right side – read INCREASE TIP in description above = 19-20-20-21-21-22 stitches. Lay the piece to one side and work the left shoulder. Left shoulder: Cast on 18-19-19-20-20-21 stitches (including 1 edge stitch on each side) using circular needle size 4 mm and Karisma. Work 1 edge stitch in GARTER STITCH – read description above, work stocking stitch until there is 1 stitch left on the row and then 1 edge stitch in garter stitch. Continue like this back and forth. When the piece measures 4 cm, increase 1 stitch inside 1 edge stitch at the end of the next row from the right side = 19-20-20-21-21-22 stitches. Work 1 row back from the wrong side. REMEMBER THE KNITTING TENSION! Now join the 2 shoulders together as follows: Knit the 19-20-20-21-21-22 stitches on the left shoulder, cast on 40-40-42-42-44-44 stitches at the end of the row (= neck), knit the 19-20-20-21-21-22 stitches from the right shoulder onto the same needle = 78-80-82-84-86-88 stitches. Continue back and forth with stocking stitch and 1 edge stitch in garter stitch on each side. When the piece measures 18-18-18-17-17-16 cm, increase/cast on stitches for the armhole on each side as follows: Increase 1 stitch inside 1 edge stitch on each row from the right side 2-1-1-3-4-4 times, then cast on new stitches for the armholes at the end of each row as follows: Cast on 2 stitches 0-2-2-3-3-4 times and 3 stitches 0-0-1-1-2-3 times (= a total of 2-5-8-12-16-21 stitches increased for each armhole) = 82-90-98-108-118-130 stitches. Lay the piece to one side and work the front piece. FRONT PIECE: Each shoulder is worked separately. Left shoulder: Cast on 18-19-19-20-20-21 stitches (including 1 edge stitch on each side) using circular needle size 4 mm and Karisma. Work 1 edge stitch in garter stitch, work stocking stitch until there is 1 stitch left on the row and then 1 edge stitch in garter stitch. Continue like this back and forth. When the piece measures 5-5-6-6-7-7 cm, increase/cast on stitches for the neck as follows: Increase 1 stitch inside 1 edge stitch on the beginning of the next row from the right side = 19-20-20-21-21-22 stitches. Then cast on stitches at the end of each row from the wrong side as follows: Cast on 2 stitches 3 times and 3 stitches 1 time = 28-29-29-30-30-31 stitches. Lay the piece to one side and work the right shoulder. Right shoulder: Cast on 18-19-19-20-20-21 stitches (including 1 edge stitch on each side) using circular needle size 4 mm and Karisma. Work 1 edge stitch in garter stitch, work stocking stitch until there is 1 stitch left on the row and then 1 edge stitch in garter stitch. Continue like this back and forth. When the piece measures 5-5-6-6-7-7 cm, increase/cast on stitches for the neck as follows: Increase 1 stitch inside 1 edge stitch at the end of the next row from the right side = 19-20-20-21-21-22 stitches. Then cast on stitches at the end of each row from the right side as follows: Cast on 2 stitches 3 times and 3 stitches 1 time = 28-29-29-30-30-31 stitches. Now join the right and left shoulders together from the right side as follows: Knit the 28-29-29-30-30-31 stitches on the right shoulder, cast on 22-22-24-24-26-26 stitches for the neck, knit the 28-29-29-30-30-31 stitches from the left shoulder = 78-80-82-84-86-88 stitches. Continue back and forth with stocking stitch and 1 edge stitch in garter stitch on each side. When the piece measures 18-18-18-17-17-16 cm, increase/cast on stitches for the armholes as follows. Increase 1 stitch inside 1 edge stitch on each row from the right side 2-1-1-3-4-4 times, then cast on new stitches for the armholes at the end of each row as follows: Cast on 2 stitches 0-2-2-3-3-4 times and 3 stitches 0-0-1-1-2-3 times (= a total of 2-5-8-12-16-21 stitches increased for each armhole) = 82-90-98-108-118-130 stitches. THE PIECE IS NOW MEASURED FROM HERE! BODY: Now join the front and back pieces together from the right side as follows: Work stocking stitch over the 82-90-98-108-118-130 stitches from the front piece, cast on 11-11-13-13-15-15 new stitches on the needle (= in side under sleeve), stocking stitch over the next 82-90-98-108-118-130 stitches on the back piece and cast on 11-11-13-13-15-15 new stitches on the needle (= in side under sleeve) = 186-202-222-242-266-290 stitches. Insert 1 marker in the middle stitch of the 11-11-13-13-15-15 new stitches in each side. Allow the markers to follow your work onwards; stitches will later be decreased on each side of both markers. Work stocking stitch in the round. When the piece measures 5 cm, decrease on both sides of each marker – read DECREASE TIP (= 4 stitches decreased). Decrease like this every 9-9-10-10-10-11 cm a total of 4 times = 170-186-206-226-250-274 stitches. When the piece measures 34-35-36-37-38-39 cm increase 26-26-30-34-38-42 stitches evenly spaced = 196-212-236-260-288-316 stitches. Change to circular needle size 3 mm and work rib (= knit 2 / purl 2) in the round for 4 cm. Cast off with knit over knit and purl over purl – read CASTING-OFF TIP. The vest measures approx. 57-59-61-63-65-67 cm from the shoulder down. ASSEMBLY: Sew the shoulder seams with grafting stitches. ARMHOLE EDGE: Knit up approx. 88-132 stitches inside the 1 stitch with short circular needle size 3 mm and Karisma. Adjust so the number of stitches is divisible by 4. Work rib (= knit 2 / purl 2) in the round for 2 cm. Cast off with knit over knit and purl over purl – remember CASTING-OFF TIP! Work the other sleeve edge in the same way. NECK: Knit up 104-120 stitches inside the 1 stitch with short circular needle size 3 mm and Karisma. Adjust so the number of stitches is divisible by 4. Work rib (= knit 2 / purl 2) in the round for 2 cm. Cast off with knit over knit and purl over purl. |
||||
Diagram explanations |
||||
|
||||
 |
||||
Have you finished this pattern?Tag your pictures with #dropspattern #georgetownvest or submit them to the #dropsfan gallery. Do you need help with this pattern?You'll find 24 tutorial videos, a Comments/Questions area and more by visiting the pattern on garnstudio.com. © 1982-2025 DROPS Design A/S. We reserve all rights. This document, including all its sub-sections, has copyrights. Read more about what you can do with our patterns at the bottom of each pattern on our site. |
||||


With over 40 years in knitting and crochet design, DROPS Design offers one of the most extensive collections of free patterns on the internet - translated to 17 languages. As of today we count 320 catalogues and 12094 patterns translated into English (UK/cm). 12094
We work hard to bring you the best knitting and crochet have to offer, inspiration and advice as well as great quality yarns at incredible prices! Would you like to use our patterns for other than personal use? You can read what you are allowed to do in the Copyright text at the bottom of all our patterns. Happy crafting!
Post a comment to pattern DROPS 219-1
We would love to hear what you have to say about this pattern!
If you want to leave a question, please make sure you select the correct category in the form below, to speed up the answering process. Required fields are marked *.