
Popular categories
Looking for a yarn?


Comments / Questions (144)
![]() Annethe Kullerud wrote:
Annethe Kullerud wrote:
Ønsker oppskriften ifra neden fra og opp😁
21.09.2021 - 00:01DROPS Design answered:
Hej Annethe. Det har vi dessvärre inte, men du hittar flera andra oppskrifter nedenfra og opp här :)
22.09.2021 - 10:13
![]() Bjørg Fostvedt wrote:
Bjørg Fostvedt wrote:
Hei! Ønsker oppskrift som strikkes nedenfra og istedenfor motsatt som her.
08.09.2021 - 13:11
![]() Anita wrote:
Anita wrote:
Hei, når det står A2 =1 maske, betyr det at på hele runden så kastes det bare en maske?
05.09.2021 - 10:56DROPS Design answered:
Hei Anita, Både A.2 og A.4 har kast og de er gjentatt flere ganger i løpet av omgangen. God fornøyelse!
06.09.2021 - 09:02
![]() Jeanette Haugrud wrote:
Jeanette Haugrud wrote:
På diagram A2 og A4 (omgang 15) der det skal lages et kast - skal det lages med den grå eller hvite tråden? Har tidligere brukt den hvite tråden, men ble usikker når masken før/etter er grå
31.08.2021 - 20:24DROPS Design answered:
Hei Jeanette. Bruk den hvite tråden/bunn fargen slik du allerede har gjort. mvh DROPS design
06.09.2021 - 13:01
![]() Linda Danielsen wrote:
Linda Danielsen wrote:
Hei igjen. Fortsettelse på mitt første spørsmål som kanskje ikke var tydelig nok: hvorfor må jeg begynne å telle 3 masker før merketråden/start når det skal settes 80 masker på hjelpetråd?
27.08.2021 - 09:32DROPS Design answered:
Hej Linda, Har du set rettelsen som blev lagt ud 12/8 ?
06.10.2021 - 14:05
![]() Linda Danielsen wrote:
Linda Danielsen wrote:
Hei. Strikker XL og når jeg skal dele ermer og bol står der at jeg må begynne 3 masker før omgangens start. Blir det ikke skjevt da?
26.08.2021 - 21:09DROPS Design answered:
Hei Linda, Omgangens start er midt under ermet, så for å få jevne ermehull må du fell av like mange masker på begge sider av merkene. Du kan enten gjøre det som oppskriften foreslår ( 3 masker før første merket) eller felle av de 3 første og 3 siste masken på omgangen. God fornøyelse!
27.08.2021 - 08:33
![]() DROPS Design wrote:
DROPS Design wrote:
Correction: The pattern has been looked over, the number of stitches on sleeves and body after the first raglan increase has been added. The diagrams A.2, A.3 og A.4 has be divided. And in addition a error when dividing for sleeves/body has been corrected.
Rettelse: Oppskriften er blitt gjennomgått, det er oppgitt antall masker på ermer og bol etter første økning til raglan. Diagrammene A.2, A.3 og A.4 er delt opp. I tillegg er det rettet opp en feil ved deling til bol/ermer.
12.08.2021 - 15:46
![]() Beatrice Norrgård wrote:
Beatrice Norrgård wrote:
Är det verkligen möjligt att man bara stickar 24 cm efter delning på fram och bakstycket?
16.05.2021 - 21:27
![]() Mari Nydahl Nilssen wrote:
Mari Nydahl Nilssen wrote:
Hei. Nå skal jeg begynne på mønsteret, men jeg syns det ser ut som mønsteret blir feil i forhold til hvordan genseren ser ut til slutt? De første 6 omgangene med mønster havner to bokser ved siden av hverandre, og sånn er det ikke i virkeligheten? På bilde er det «boks» «strek» «boks» «strek», men oppskriften viser «boks» «strek» «boks» «boks» «strek». Hvordan skal dette bli riktig?
19.04.2021 - 22:17DROPS Design answered:
Hei Mari. På bildet ser du det du forklarer "«boks» «strek» «boks» «boks» «strek» og raglanlinjen (blir et lite hvit felt øverst ved høyre skulder). Det er det samme som er forklart i oppskriften med diagrammene. mvh DROPS design
03.05.2021 - 10:36
![]() Siri wrote:
Siri wrote:
Dette var en FORFERDELIG vanskelig oppskrift å forstå, selv for meg som har strikket daglig de siste 50 årene. Til spørsmålet: Har lagt opp for 2XL, dvs 108 masker. Etter halskanten er økt til 128 og når jeg da begynner på mønsteret og skal strikke første omgang får jeg 8 masker til overs. Har trippelsjekket og får samme antall hver gang. Skjønner ikke hva som skjer.
03.04.2021 - 13:10DROPS Design answered:
Hei Siri, Den første pinnen er: A.2 = 1 maske, 40 masker med A.3, A.4 = 1 maske, A.5 = 2 masker, A.2 = 1 maske, 16 masker med A.3, A.4 = 1 maske, A.5 = 2 masker, A.2 = 1 maske, 40 masker med A.3, A.4 = 1 maske, A.5 = 2 masker, A.2 = 1 maske, 16 masker med A.3, A.4 = 1 maske, A.5 = 2 masker. I alle A.2 og A.4 øker du 1 maske slik at du får økning til raglan på hver side av A.5 som er raglanlinje. Totalt skal du ha 136 masker etter den første pinnen. God fornøyelse!
07.04.2021 - 08:29
|
|||||||||||||
Reykjavik#reykjaviksweater |
|||||||||||||
 |
 |
||||||||||||
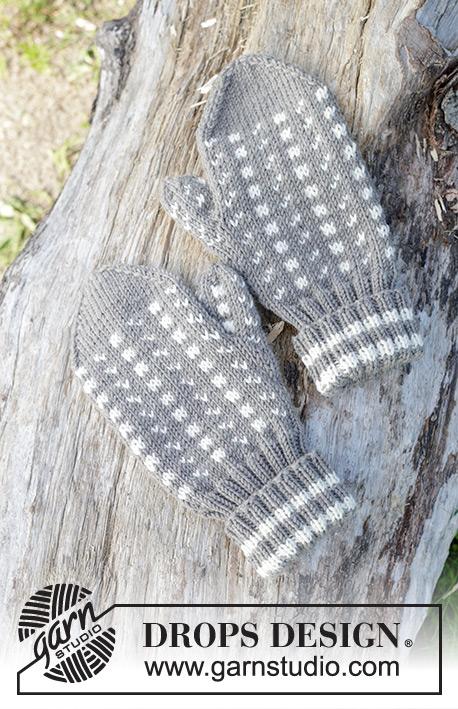
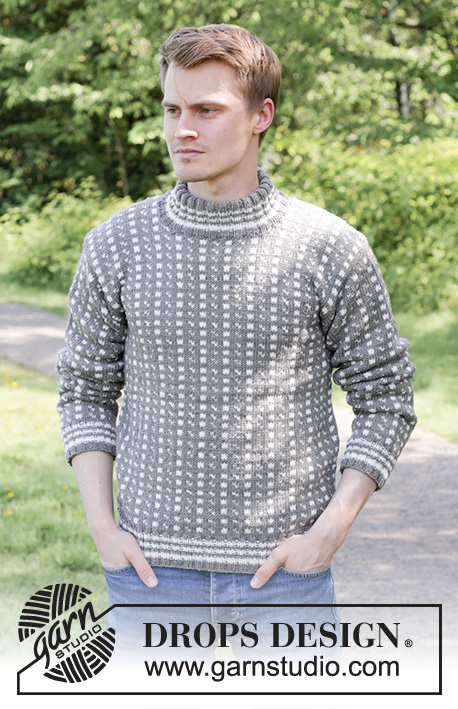
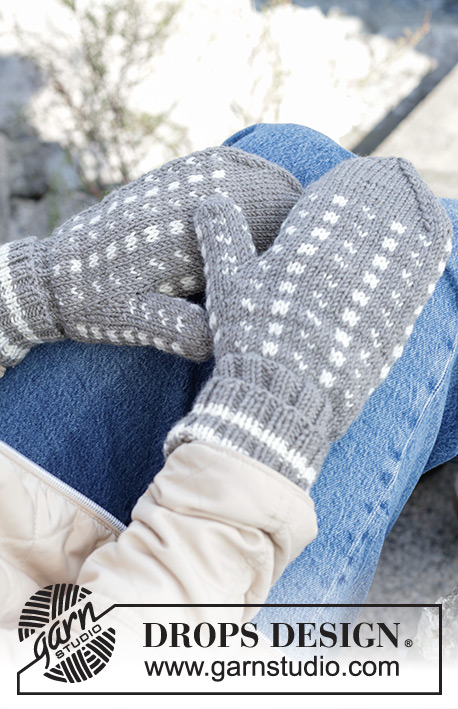
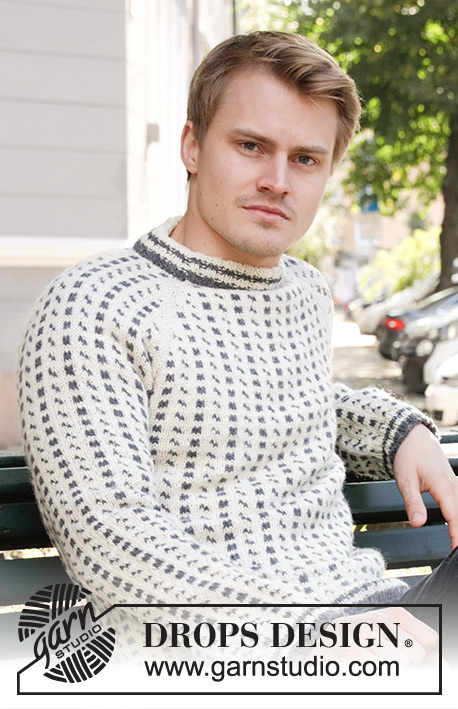
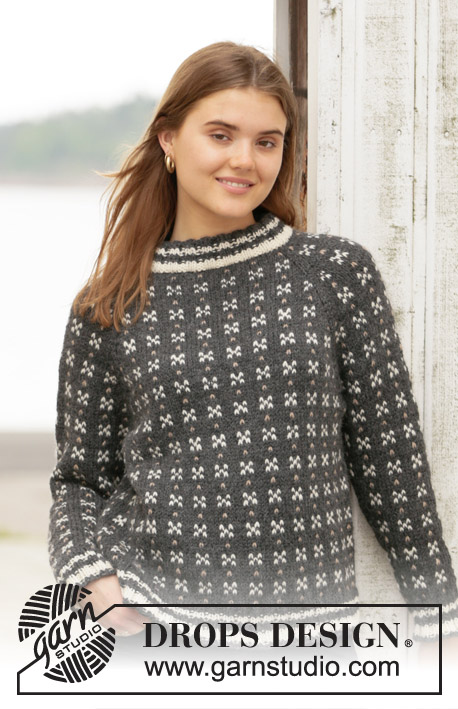
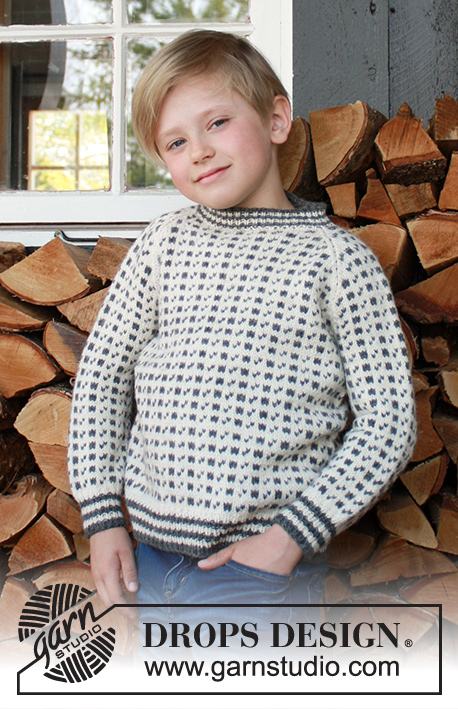
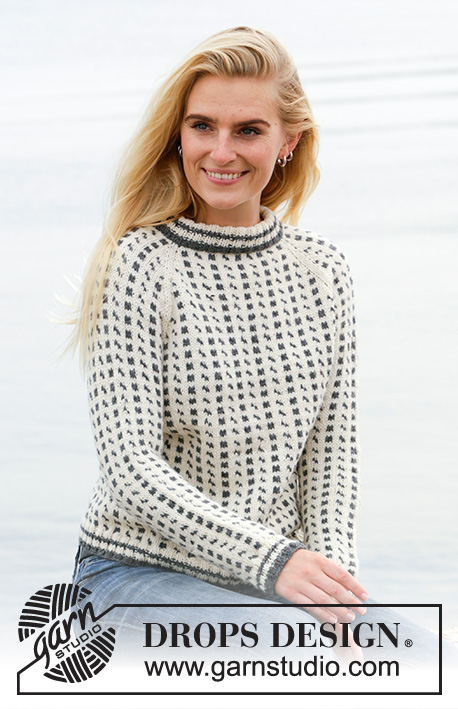
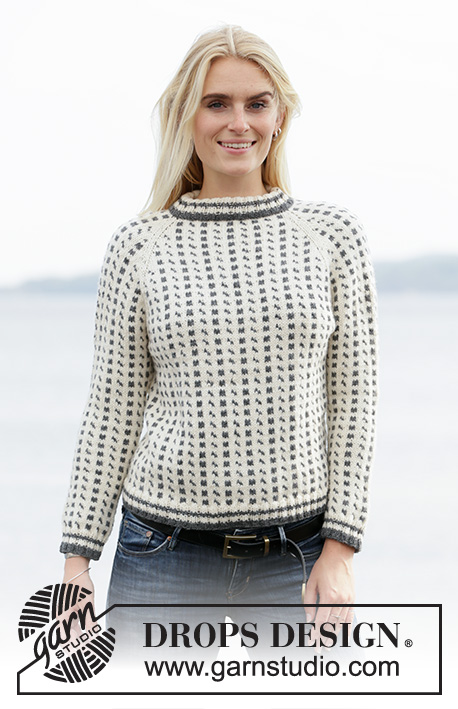
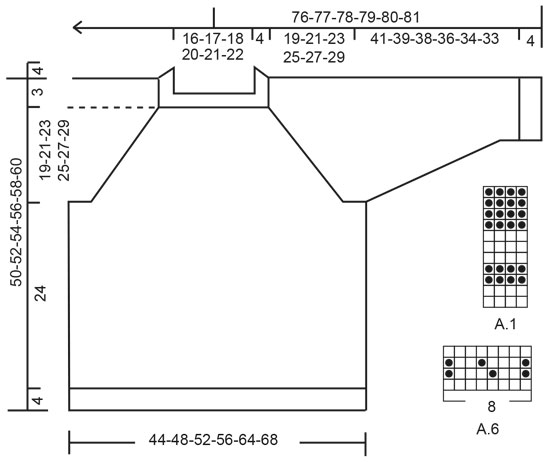
Knitted jumper with Nordic Icelandic pattern and raglan in DROPS Lima. The piece is worked top down. Sizes S - XXXL.
DROPS 205-18 |
|||||||||||||
|
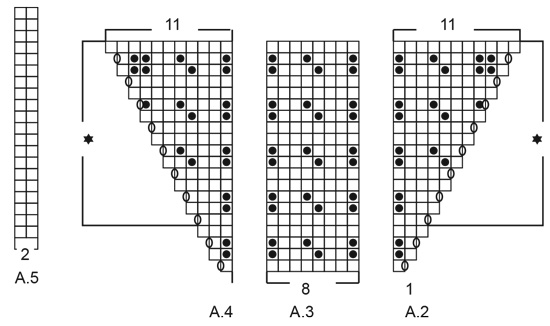
------------------------------------------------------- EXPLANATIONS FOR THE PATTERN: ------------------------------------------------------- PATTERN: See diagrams A.1 to A.6. Pattern A.1 is worked in rib. Patterns A.2 to A.6 are worked in stocking stitch. INCREASE TIP (evenly spaced): To work out how to increase evenly, count the total number of stitches on the needle (e.g. 88 stitches) and divide by the number of increases to be made (e.g. 8) = 11. In this example, increase by making 1 yarn over after each 11th stitch. On the next round knit the yarn overs twisted to avoid holes. ELEVATION (back of neck): Skip this section if you do not want an elevation. Start from the wrong side with off-white and purl 9-9-9-10-11-11 stitches past the marker thread in the middle of the back, turn, tighten strand and knit 18-18-18-20-22-22 stitches back. Turn, tighten strand and purl 27-27-27-30-33-33 stitches, turn, tighten strand and knit 36-36-36-40-44-44 stitches back. Turn, tighten strand and purl 45-45-45-50-55-55 stitches, turn, tighten strand and knit 54-54-54-60-66-66 stitches back. Turn, tighten the strand and purl 17-17-17-17-21-21 stitches past the marker thread in the middle of the back. Move the marker thread here. Then work YOKE as described in the text. KNITTING TIP: To avoid the knitting tension becoming tighter when working pattern it is important that the strands at the back are not tight. Use a size larger needle when working pattern if this is a problem. CASTING OFF TIP: To avoid the cast-off edge being tight you can cast off with a ½ size larger needle. DECREASE TIP (for sleeves): Decrease 1 stitch on each side of the marker thread as follows: Work until there are 2 stitches left before the marker thread, knit 2 together with off-white, (marker thread sits here), slip 1 stitch as if to knit, knit 1 with off-white and pass the slipped stitch over the knitted stitch. ------------------------------------------------------- START THE PIECE HERE: ------------------------------------------------------- JUMPER – SHORT OVERVIEW OF THE PIECE: The neck, yoke and body are worked in the round with circular needle, top down. After the neck you can work an elevation to make the neck slightly higher at the back. This elevation can be left out; the neck will then be the same front and back – see description in text. The sleeves are worked in the round with short circular needle/double pointed needles, top down. NECK: Cast on 88-92-96-104-108-112 stitches with short circular needle size 3.5 mm and dark grey. Change to off-white and knit 1 round, then work rib (= knit 2/ purl 2) for 4 cm. Now work A.1 in rib. Knit 1 round with off-white where you increase 8-4-0-8-20-16 stitches evenly spaced – read INCREASE TIP = 96-96-96-112-128-128 stitches. Change to circular needle size 4.5 mm. Insert a marker thread at the beginning of the round, or in the middle of the back if you want to work an ELEVATION in the back of the neck – read description above or go straight to YOKE. YOKE: The first round is worked as follows: Work A.2 (= 1 stitch), A.3 over the next 32-32-32-32-40-40 stitches (= 4-4-4-4-5-5 repeats of 8 stitches) and A.4 (= 1 stitch) = back piece, work A.5 (= 2 stitches) = raglan-line, A.2 (= 1 stitch), A.3 over the next 8-8-8-16-16-16 stitches (= 1-1-1-2-2-2 repeats of 8 stitches) and A.4 (= 1 stitch) = sleeve, work A.5 (= 2 stitches) = raglan-line, A.2 (= 1 stitch), A.3 over the next 32-32-32-32-40-40 stitches (= 4-4-4-4-5-5 repeats of 8 stitches) and A.4 (= 1 stitch) = front piece, work A.5 (= 2 stitches) = raglan-line, A.2 (= 1 stitch), A.3 over the next 8-8-8-16-16-16 stitches (= 1-1-1-2-2-2 repeats of 8 stitches) and A.4 (= 1 stitch) = sleeve. Finally work A.5 (= 2 stitches) = raglan-line. The first increase for raglan is now finished, and there is 104-104-104-120-136-136 stitches on the needle (there is 36-36-36-36-44-44 stitches for back and for front piece, 12-12-12-20-20-20 stitches for each sleeve and 2 stitches in each of the 4 raglan lines). Continue this pattern; i.e. increase 1 stitch on each side of A.2/A.4 (= a total of 8 stitches increased every 2nd round). Read KNITTING TIP and REMEMBER THE KNITTING TENSION! When A.2 to A.4 have been worked 1 time in height there are 176-176-176-192-208-208 stitches on the needle. Continue, repeating the patterns as shown in A.2/A.4. Diagram A.3 is worked 2 more times in width each time the 16 rows are repeated in height. Continue increasing like this for a total of 22-26-30-32-32-34 times in height on each side of A.2/A.4. When the last increase is finished there are 272-304-336-368-384-400 stitches on the needle and the piece measures approx. 17-20-23-25-25-26 cm from the neck-edge. Continue the pattern as before but without further increases until the piece measures 19-21-23-25-27-29 cm from the neck. The next round is worked as follows, start 1-1-1-3-3-5 stitches before the beginning of the round: Work 80-88-96-104-112-120 stitches as before (= back piece), place the next 56-64-72-80-80-80 stitches on 1 thread for sleeve, cast on 8-8-8-8-16-16 new stitches on the needle (= in side under sleeve), work 80-88-96-104-112-120 stitches as before (= front piece), place the next 56-64-72-80-80-80 stitches on 1 thread for sleeve, cast on 8-8-8-8-16-16 new stitches on the needle (= in side under sleeve). Cut the strand. Body and sleeves are finished separately. THE PIECE IS NOW MEASURED FROM HERE! BODY: = 176-192-208-224-256-272 stitches. Insert 1 marker thread on the one side of the piece, in the middle of the 8-8-8-8-16-16 stitches cast on under the sleeve. Allow the thread to follow your work onwards; it marks the beginning of the round. Work A.6 in the round (= 22-24-26-28-32-34 repeats of 8 stitches) – start with the correct stitch and row in the diagram so the pattern is repeated as before in both width and height. Continue working until the piece measures approx. 24 cm from the division – adjust to after a complete repeat in height. Change to circular needle size 3.5 mm and knit 1 round with off-white where you increase 36-36-40-44-48-52 stitches evenly spaced = 212-228-248-268-304-324 stitches. Work A.1 in rib (= knit 2/ purl 2). When A.1 has been completed, cast off with knit over knit and purl over purl using dark grey – read CASTING OFF TIP. SLEEVE: Place the 56-64-72-80-80-80 stitches from the thread on the one side of the piece on short circular needle/double pointed needles size 4.5 mm and knit up 1 stitch in each of the 8-8-8-8-16-16 stitches cast on under the sleeve = 64-72-80-88-96-96 stitches. Insert 1 marker thread in the middle of the 8-8-8-8-16-16 new stitches and allow it to follow your work onwards; it will be used when decreasing mid under sleeve. Start the round by the marker thread and work A.6 in the round (= 8-9-10-11-12-12 repeats of 8 stitches) – start with the correct stitch and row in the diagram so the pattern is repeated as before in both width and height, but the first and last stitch of the round are always worked with off-white (to give neat decreases under the sleeve). When the piece measures 2 cm from the division decrease 2 stitches mid under sleeve – read DECREASE TIP. Decrease like this every 3½-2½-2-1½-1-1 cm a total of 11-14-17-20-23-22 times = 42-44-46-48-50-52 stitches left on needles. Continue working until the piece measures 41-39-38-36-34-33 cm from the division – or to desired length; there is approx. 4 cm left to finished length. NOTE: shorter measurements in larger sizes due to wider neck and longer yoke – adjust so you finish after a complete repeat in height. Change to double pointed needles size 3.5 mm and knit 1 round with off-white where you increase 2-0-2-0-2-0 stitches evenly spaced = 44-44-48-48-52-52 stitches. Work A.1 in rib (= knit 2/ purl 2). When A.1 has been completed, cast off with knit over knit and purl over purl using dark grey – remember CASTING OFF TIP. Work the other sleeve in the same way. ASSEMBLY: Fold the neck to the wrong side. Sew the cast-on edge down using dark grey – sew small, neat stitches on the inside of the jumper (make sure the seam does not show on the right side and the seam is not tight). |
|||||||||||||
Diagram explanations |
|||||||||||||
|
|||||||||||||
 |
|||||||||||||
 |
|||||||||||||
Have you finished this pattern?Tag your pictures with #dropspattern #reykjaviksweater or submit them to the #dropsfan gallery. Do you need help with this pattern?You'll find 26 tutorial videos, a Comments/Questions area and more by visiting the pattern on garnstudio.com. © 1982-2026 DROPS Design A/S. We reserve all rights. This document, including all its sub-sections, has copyrights. Read more about what you can do with our patterns at the bottom of each pattern on our site. |
|||||||||||||


With over 40 years in knitting and crochet design, DROPS Design offers one of the most extensive collections of free patterns on the internet - translated to 17 languages. As of today we count 325 catalogues and 12298 patterns translated into English (UK/cm). 12298
We work hard to bring you the best knitting and crochet have to offer, inspiration and advice as well as great quality yarns at incredible prices! Would you like to use our patterns for other than personal use? You can read what you are allowed to do in the Copyright text at the bottom of all our patterns. Happy crafting!
Post a comment to pattern DROPS 205-18
We would love to hear what you have to say about this pattern!
If you want to leave a question, please make sure you select the correct category in the form below, to speed up the answering process. Required fields are marked *.