
Popular categories
Looking for a yarn?


Comments / Questions (58)
![]() Thea wrote:
Thea wrote:
Er staat een tik foutje bij het achterpand. Bij maat L heb je 84 steken, je kant 30 steken af voor de hals. Dat is voor elke schouder 27 steken over. En dan nog 1 steek afkanten is totaal 26 voor elke schouder, zoals ook bij de voorpanden. Maar er staat een eind totaal van 27 steken
11.02.2024 - 10:31
![]() Carmela Russo wrote:
Carmela Russo wrote:
Salve vorrei un aiuto,c'è scritto nel testo dove si spiega come confezionare la maglia,che sullo scollo del dietro si cuce il colletto ma no c'è la spiegazione di come realizzarlo potete aiutarmi grazie spero di essere stata chiara
05.02.2024 - 11:06DROPS Design answered:
Buonasera Carmela, nelle spiegazioni di ogni davanti è riportato come lavorare il colletto. Buon lavoro!
25.02.2024 - 22:05
![]() Anna wrote:
Anna wrote:
Hello, decreases for V-neck are only from the right side, and it starts on the 1st row after division from the right side, then we continue back and forth, which means that every 2nd, 4th and 6th rows will be from the wrong side. Could you please explain how I can decrease from the right side on the 6th row
24.12.2023 - 17:36DROPS Design answered:
Dear Anna, since the first decrease was on the first row and the decrease should be every 6th row (not on the 6th row, but 6 rows after the first one) you will then decrease on the 7th row and the 13th row. Then on the 17 th row e.t.c. Happy knitting!
28.12.2023 - 23:13
![]() Emmanuelle wrote:
Emmanuelle wrote:
Bonjour. Je pense qu'il y a une erreur pour la manche sur la mesure de la 2ème diminutions qui doit se faire à 38 cm. Comment faire puisque vous indiquez pour la taille XXXL qu'après cette 2ème dim. (à 38cm), il faut aller jusqu'à 37cm pour commencer les aug. Merci pour votre aide.
12.11.2023 - 18:57
![]() Emmanuelle wrote:
Emmanuelle wrote:
Bonjour. Dans les explications pour l'assemblage vous notez : "Assembler le col au milieu dos en grafting et le coudre le long de l'encolure dos – la couture doit être sur l'envers" mais je ne vois pas d'explication pour le col à coudre au dos. Pourriez-vous m'expliquez. Merci.
01.11.2023 - 15:14DROPS Design answered:
Bonjour Emmanuelle, à la fin de chaque devant, quand on a rabattu les mailles de l'épaule, on continue le diagramme A.3 sur les 8 ou 11 mailles restantes (cf taille) jusqu'à ce que cette partie du col mesure 6, 7 ou 8 cm; puis on diminue les mailles de la torsade et on rabat les 5 ou 7 mailles restantes. On termine les 2 devants de la même façon, on assemble les 5 ou 7 mailles rabattues ensemble puis on va coudre cette bande le long de l'encolure dos. Dans cette vidéo, nous montrons (pour un autre modèle) comment tricoter ce type de col. Bon tricot!
02.11.2023 - 17:16
![]() Fabienne Cluts wrote:
Fabienne Cluts wrote:
Bonjour, je voudrais avoir une confirmation est ce bien juste que pour avoir du jersey quand on tricote en circulaire il faut tout faire à l'endroit ? et comment fait-on pour avoir le jersey à l'extérieur de sont travail, est ce kle fait de faire le 1er tout à l'endroit ? Merci
08.06.2023 - 10:52DROPS Design answered:
Bonjour Mme Cluts, tout à fait, pour tricoter du jersey, en rond, on va toujours tricoter à l'endroit (cette vidéo illustre cette façon de tricoter); quand on tricote en rond, on tricote les mailles telles qu'elles doivent se présenter sur l'endroit, pour du jersey endroit, on tricote à l'endroit et pour du jersey envers, on tricote à l'envers. Bon tricot!
08.06.2023 - 16:46
![]() Bettie wrote:
Bettie wrote:
Hallo had u een vraag gesteld voor patroon 205/37maar was niet duidelijk als ik a1 en a2 brei en de lussen meetel dan komen er geen acht rechten boven maar negen dat komt door de lus ik voeg 2 av toe in het begin en aan het rechten vriendelijk dank
27.04.2023 - 15:36DROPS Design answered:
Dag Bettie,
Op de tweede naald van A.1 en A.2 ben je van 7 naar 11 steken gegaan omdat je 4 omslagen hebt gemaakt. Je maakt ook een omslag tussen de de 2 averecht (aan de rechterkant van A.1 en de linkerkant van A.2. Op de tweede toer wordt die omslag averecht gebreid aan de goede kant en recht aan de verkeerde kant. Je hebt dan dus 3 averecht en 8 recht in zowel A.1 als A.2.
30.04.2023 - 16:58
![]() Bettie wrote:
Bettie wrote:
Hallo wil de drops 205/37 graag breien maar snap het tel patroon a1 a2 niet goed want terug moet ik de lussen ook breien en dan komt het niet goed boven elkaar zou u mij hier mee kunnen helpen vr groet b fokkema
25.04.2023 - 18:58DROPS Design answered:
Dag Bettie,
Bij A.1 en A.2 maak je in de eerste naald omslagen tussen de rechte steken. Deze brei je op de volgende naald gedraaid. Wat bedoel je met dat het niet boven elkaar komt?
27.04.2023 - 08:03
![]() Petra wrote:
Petra wrote:
Ich habe eine Frage zu den Abnahmen am V-Ausschnitt. Ich nehme in der ersten Hinreihe auf jeder Seite 1 Masche ab. Dann nehme ich in jeder 6. Reihe 2x 1 Masche ab, dann in jeder 4. Reihe 1x1 Masche und in jeder 2. Reihe 7 x 1 Masche. Das sind doch insgesamt 11 Maschen je Seite? Ich habe beim Beginn des V-Ausschnitts 45 Maschen je Vorderteil. 5 Maschen fur den Armausschnitt, 11 Maschen Abnahme V-Ausschnitt, 8 Maschen für den Zopf, bleiben 21 Maschen übrig. Ich stricke in Größe S.
26.01.2023 - 08:00DROPS Design answered:
Liebe Petra, in S nehmen Sie für den Hals 1 Masche x 2 Mal in jeder 6. Reihe dann 1 Mal in jeder 4. Reihe und 7. Mal in jeder 2. Reihe = 10 Mal insgesamt; und gleichzeitig werden 5 Maschen für das Armloch bei der Verteilung abgekettet, es waren 90 M für das Vorderteil /2 = 45 M - 5 M (Armloch) - 10 M (V-Hals) = es sind 30 M übrig. Viel Spaß beim stricken!
26.01.2023 - 10:12
![]() Emma wrote:
Emma wrote:
Hi, What is the recommended ease for this pattern? I have a 108 cm bust, and don’t know whether to go for medium or large? I understand you need a fair bit of ease for drop shoulders
24.01.2023 - 18:23DROPS Design answered:
Dear Emma, choose your own desire ease measuring a similar garment you have and like the shape and compare these to the chart - if you want something tight rather use M or if you want it somewhat looser choose L. Read more here. Happy knitting!
25.01.2023 - 11:34
|
||||||||||||||||||||||
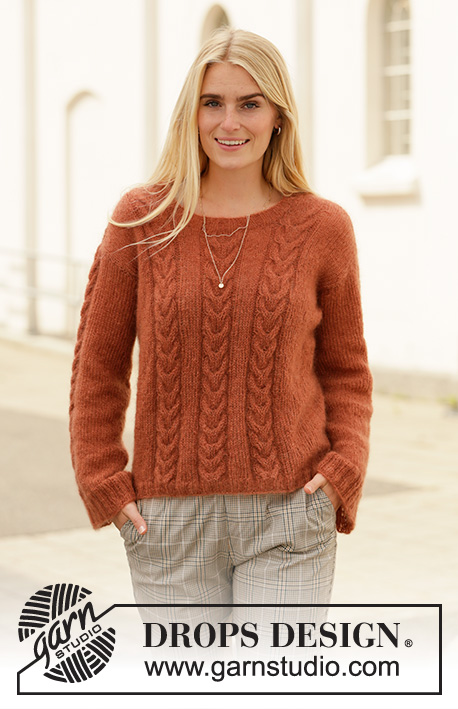
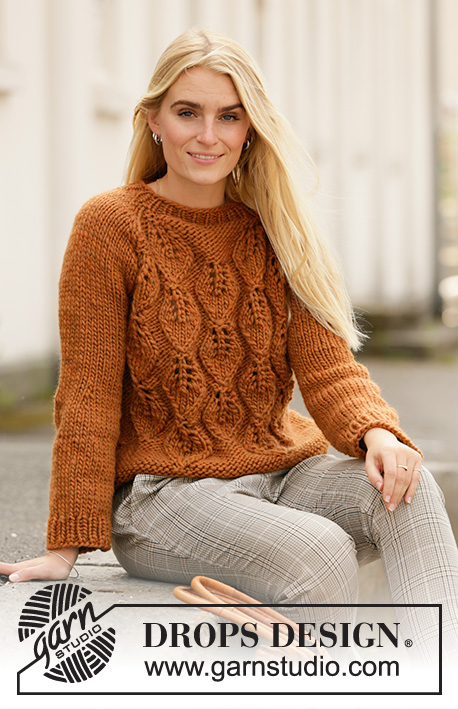
Golden Fall#goldenfallsweater |
||||||||||||||||||||||
 |
 |
|||||||||||||||||||||
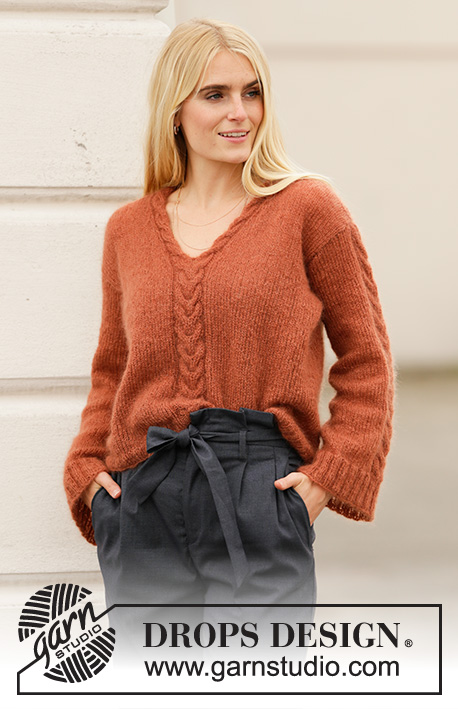
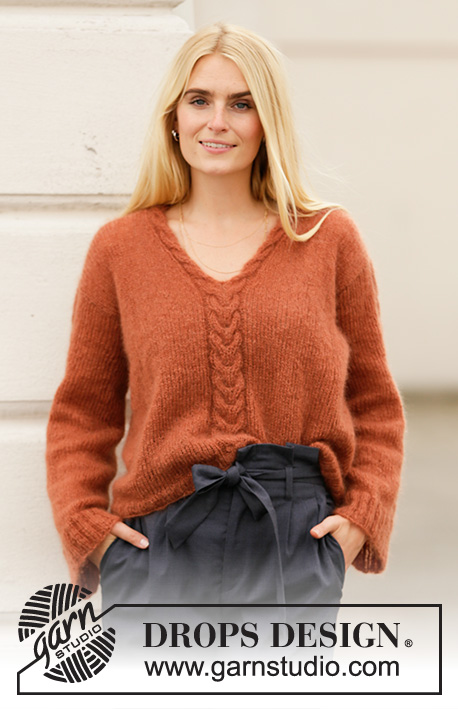
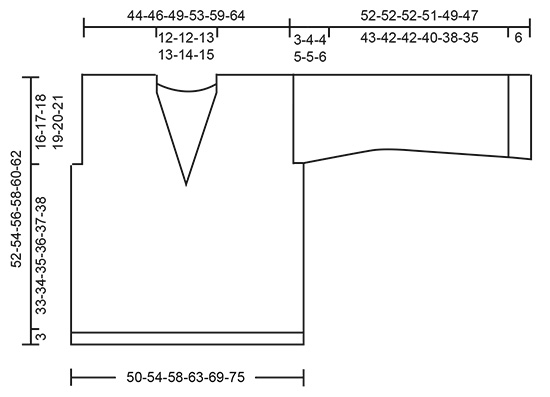
Knitted jumper in 2 strands DROPS Kid-Silk or 1 strand DROPS Brushed Alpaca Silk. The piece is worked with cables and V-neck with shawl collar. Sizes S - XXXL.
DROPS 205-37 |
||||||||||||||||||||||
|
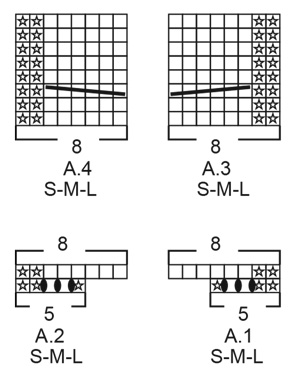
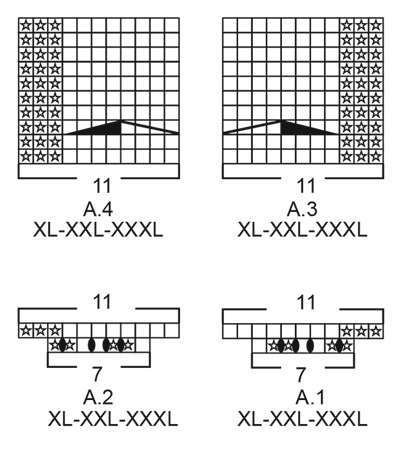
------------------------------------------------------- EXPLANATIONS FOR THE PATTERN: ------------------------------------------------------- PATTERN: See diagrams A.1 to A.4. The diagrams show all rows in the pattern seen from the right side. DECREASE TIP-1 (evenly spaced): To work out how to decrease evenly, count the total number of stitches over which to decrease (e.g. 46 stitches) and divide by number of decreases to be made (e.g. 9) = 5.1. In this example, decrease by knitting approx each 4th and 5th stitch together. DECREASE TIP-2 (for V-neck): All decreases are worked from the right side! Decrease 1 stitch before A.3 as follows: Work until there are 2 stitches left before A.3, knit 2 together (= 1 stitch decreased) Decrease 1 stitch after A.4 as follows: Work A.4, slip 1 stitch as if to knit, knit 1 and pass the slipped stitch over the knitted stitch (= 1 stitch decreased). DECREASE TIP-3 (for sleeves): Decrease 1 stitch on each side of the marker thread as follows: Work until there are 3 stitches left before the marker thread, knit 2 together, knit 2 (marker thread sits between these 2 stitches), slip 1 stitch as if to knit, knit 1 and pass the slipped stitch over the knitted stitch. INCREASE TIP (for sleeves): Work until there is 1 stitch left before the marker thread, 1 yarn over, knit 2 (marker thread sits between these 2 stitches), 1 yarn over. On the next round knit the yarn overs twisted to avoid holes. Then work the new stitches in stocking stitch. ------------------------------------------------------- START THE PIECE HERE: ------------------------------------------------------- JUMPER – SHORT OVERVIEW OF THE PIECE: The piece is worked in the round with circular needle as far as the V-neck, then the front and back pieces are worked back and forth from mid front as far as the armholes. Finally the front and back pieces are finished separately. The sleeves are worked in the round with short circular needle/double pointed needles. BODY: Cast on 200-220-232-260-284-308 stitches with circular needle size 4 mm and 2 strands Kid-Silk or 1 strand Brushed Alpaca Silk. Knit 1 round, then work rib (= knit 2 / purl 2) for 3 cm. Change to circular needle size 5 mm and work the next round as follows: Insert 1 marker thread at the beginning of the round (= side), work stocking stitch over the first 46-50-54-58-62-70 stitches – decrease 9-9-10-11-10-13 stitches evenly over these stitches – read DECREASE TIP-1, work A.1 over the next 5-5-5-7-7-7 stitches, A.2 over the next 5-5-5-7-7-7 stitches, work stocking stitch over the next 46-50-54-58-62-70 stitches – decrease 9-9-10-11-10-13 stitches evenly over these stitches (= front piece), insert 1 marker thread here (= side), work stocking stitch over the remaining 98-110-114-130-146-154 stitches – decrease 14-18-16-22-28-26 stitches evenly over these stitches (= back piece). When A.1 and A.2 have been completed there are 174-190-202-224-244-264 stitches on the needle (= 90-98-104-116-126-136 stitches on front piece and 84-92-98-108-118-128 stitches on back piece). Now work A.3 (= 8-8-8-11-11-11 stitches) over A.1 and A.4 (= 8-8-8-11-11-11 stitches) over A.2; the remaining stitches are worked in stocking stitch. Continue this pattern, A.3 and A.4 are repeated in height. REMEMBER THE KNITTING TENSION! Work until the piece measures 34-35-36-37-38-39 cm – adjust to after an even-numbered round. Now divide the piece for the neck between the 2 cables on the front piece. Continue working back and forth from mid front, starting from the right side. Decrease for the V-neck on the first row from the right side – at the same time, when the piece measures 36-37-38-39-40-41 cm, cast off for the armholes; work as follows (pattern continues as before): V-NECK: Decrease for the V-neck on the first row from the right side - read DECREASE TIP-2. Decrease every 6th row a total of 2 times then every 4th row a total of 1-2-2-3-3-3 times and then every 2nd row a total of 7-6-7-6-7-8 times. ARMHOLES: When the piece measures 36-37-38-39-40-41 cm cast off 10-14-14-18-18-20 stitches in each side (= 5-7-7-9-9-10 stitches on each side of the marker threads in the sides). Front and back pieces are finished separately as described below. RIGHT FRONT PIECE: Continue with stocking stitch, A.4 and neck decreases as before. When the decreases for the neck are finished there are 30-32-34-38-42-45 stitches on the needle. Continue working until the piece measures 16-17-18-19-20-21 cm from where you cast off for the armhole (the piece measures a total of 52-54-56-58-60-62 cm). On the next row from the wrong side, cast off the first 22-24-26-27-31-34 stitches for the shoulder = 8-8-8-11-11-11 stitches on the needle. Continue with A.4 over the remaining stitches for the shawl collar for 6-6-7-7-7-8 cm. On the next row from the right side knit the cable stitches together 2 and 2 = 5-5-5-7-7-7 stitches, cast off on the next row from the right side. LEFT FRONT PIECE: Continue with stocking stitch, A.3 and decreases for V-neck. When the decreases for neck are finished there are 30-32-34-38-42-45 stitches left on the needle. Continue working until the piece measures 16-17-18-19-20-21 cm from where stitches were cast off for the armholes (the piece measures a total of 52-54-56-58-60-62 cm). On the next row from the right side cast off the first 22-24-26-27-31-34 stitches for the shoulder = 8-8-8-11-11-11 stitches. Continue with A.3 over the remaining stitches until the collar measures 6-6-7-7-7-8 cm. On the next row from the right side knit the cable stitches together 2 and 2 = 5-5-5-7-7-7 stitches, cast off on the next row from the right side. BACK PIECE: = 74-78-84-90-100-108 stitches. Continue with stocking stitch back and forth until the piece measures 14-15-16-17-18-19 cm from where stitches were cast off for the armholes (the piece measures a total of 50-52-54-56-58-60 cm). On the next row from the right side, cast off the middle 28-28-30-34-36-38 stitches for neck and each shoulder is finished separately. Cast off 1 stitch on the next row from the neck = 22-24-27-27-31-34 stitches left on shoulder. Continue working until the piece measures 52-54-56-58-60-62 cm, loosely cast off. Work the other shoulder in the same way . SLEEVE: Cast on 72-80-80-84-92-96 stitches with short circular needle/double pointed needles size 4 mm and 2 strands Kid-Silk or 1 strand Brushed Alpaca Silk. Knit 1 round, then work rib (= knit 2 / purl 2) for 6 cm. Insert 1 marker thread at the beginning of the round; it will be used when decreasing and increasing mid under sleeve. Change to short circular needle size 5 mm and work the next round as follows: Knit the first 30-34-34-34-38-42 stitches – decrease 8-10-8-9-11-13 stitches evenly over these stitches, work A.1 over the next 5-5-5-7-7-7 stitches, A.2 over the next 5-5-5-7-7-7 stitches, knit the remaining 32-36-36-36-40-40 stitches – decrease 10-12-10-11-13-11 stitches evenly over these stitches. When A.1 and A.2 have been completed there are 60-64-68-72-76-80 stitches on the needle. Then work A.3 (= 8-8-8-11-11-11 stitches) over A.1 and work A.4 (= 8-8-8-11-11-11 stitches) over A.2; the remaining stitches are worked in stocking stitch. When the piece measures 14 cm, decrease 2 stitches mid under sleeve – read DECREASE TIP-3. Repeat the decrease when the piece measures 35 cm = 56-60-64-68-72-76 stitches. Continue working until the sleeve measures 42-42-42-41-39-37 cm. Now increase 2 stitches mid under sleeve – read INCREASE TIP. Increase like this every 3 cm a total of 2 times = 60-64-68-72-76-80 stitches. Continue working until the piece measures 49-48-48-46-44-41 cm – adjust to after an even-numbered round. Now work back and forth over all stitches until the piece measures 52-52-52-51-49-47 cm. On the next row from the right side knit the 6-6-6-8-8-8 cable stitches together 2 and 2 = 54-58-62-64-68-72 stitches. Cast off. Work the other sleeve in the same way. ASSEMBLY: Sew the shoulder seams inside the cast-off edge. Sew the collar together mid back with grafting stitches and then sew it to the neck at the back – the seam should turn in to the wrong side. Sew in the sleeves – sew the cast-off edge on the sleeve to the armhole and sew the opening under the sleeve to where stitches were cast off on the body. |
||||||||||||||||||||||
Diagram explanations |
||||||||||||||||||||||
|
||||||||||||||||||||||
 |
||||||||||||||||||||||
 |
||||||||||||||||||||||
 |
||||||||||||||||||||||
Have you finished this pattern?Tag your pictures with #dropspattern #goldenfallsweater or submit them to the #dropsfan gallery. Do you need help with this pattern?You'll find 22 tutorial videos, a Comments/Questions area and more by visiting the pattern on garnstudio.com. © 1982-2026 DROPS Design A/S. We reserve all rights. This document, including all its sub-sections, has copyrights. Read more about what you can do with our patterns at the bottom of each pattern on our site. |
||||||||||||||||||||||


With over 40 years in knitting and crochet design, DROPS Design offers one of the most extensive collections of free patterns on the internet - translated to 17 languages. As of today we count 324 catalogues and 12245 patterns translated into English (UK/cm). 12245
We work hard to bring you the best knitting and crochet have to offer, inspiration and advice as well as great quality yarns at incredible prices! Would you like to use our patterns for other than personal use? You can read what you are allowed to do in the Copyright text at the bottom of all our patterns. Happy crafting!
Post a comment to pattern DROPS 205-37
We would love to hear what you have to say about this pattern!
If you want to leave a question, please make sure you select the correct category in the form below, to speed up the answering process. Required fields are marked *.