
Popular categories
Looking for a yarn?


Comments / Questions (113)
![]() Yolande wrote:
Yolande wrote:
Goedenamiddag, ik heb geen rondbreinaald. Graag uitleg hoe ik de muts kan breien met 2 of 4 breinaalden. Alvast bedankt
31.03.2022 - 16:08
![]() Ulrike Dahlmann wrote:
Ulrike Dahlmann wrote:
Ich würde gerne das Modell 'Talvik' in den angegebenen Farben nachstricken. Leider gibt es aber die Farbe 403 mittelbraun nicht mehr. Welche Alternativen gibt es dafür?
29.01.2022 - 09:40DROPS Design answered:
Liebe Frau Dahlmann, gerne wird Ihnen Ihr DROPS Händler, die besten Farbenmöglichkeiten - auch telefonisch oder per E-Mail anbieten. Viel Spaß beim stricken!
31.01.2022 - 08:46
![]() Belén Chocano Arias wrote:
Belén Chocano Arias wrote:
Hello! In the part of "edge of the neckline" they mention that you should DECREASE 20 POINTS, when in the tips to "knit from top to bottom" they say that you should INCREASE points to place the separating threads. And then in Canesú they say that you have to increase 20 points plus the 4 increased in each lap ... I don't understand, since how am I going to decrease when I have to increase to create the shoulder part, neckline?
26.01.2022 - 20:13DROPS Design answered:
Dear Mrs Chocano Arias, you first work the neck edge with rib for 3 cm, then decrease evenly 20 sts because rib is tightening piece and you will change to larger needles. You then work diagram A.1 increasing on the rows shown in the diagram (= 4 sts increased in every repeat in width in the round) increasing evenly on the row with a star; then work A.2 increasing evenly on the rows wiht an arrow. And then increase evenly more sts in the round. Happy knitting!
27.01.2022 - 08:41
![]() Belén Chocano wrote:
Belén Chocano wrote:
Hola! En la parte de "orilla del escote" mencionan que se debe DISMINUIR 20 PUNTOS, cuando en el tips para "tejer de arriba hacia abajo" dicen que se deben AUMENTAR puntos para colocar los hilos separadores. Y luego en Canesú dicen que hay que aumentar 20 puntos mas lo 4 aumentados en cada vuelta... No entiendo, ya que ¿cómo voy a disminuir cuando debo aumentar para crear la parte de hombros, escote??
21.01.2022 - 20:39
![]() Lena wrote:
Lena wrote:
Hittar inte garn 403 mellanbrun!
21.12.2021 - 11:53DROPS Design answered:
Hei Lena. Den fargen er nok utgått fra vårt sortiment. Noen butikker kan ha den inne, men det har vi kke oversikten over. Evnt kan du bytte til en anne farge, f.eks hasselnøtt nr. 9025 (men den er noe lysere enn 403). mvh DROPS Design
21.12.2021 - 14:17
![]() Cointeaux Nicole wrote:
Cointeaux Nicole wrote:
Le coloris drops alpaca 403 n’est plus disponible , quel coloris me conseillez-vous pour le remplacer? Merci
11.11.2021 - 02:28DROPS Design answered:
Bonjour Mme Cointeaux, pour toute assistance au choix d'une couleur, merci de bien vouloir vous adresser directement à votre magasin, même par mail ou téléphone, on pourra vous aider plus simplement. Bon tricot!
11.11.2021 - 08:59
![]() Henriette wrote:
Henriette wrote:
Hvorfor må man øke så mange masker før man begynner med borden av bolen?
17.10.2021 - 22:37
![]() Zsuzsa wrote:
Zsuzsa wrote:
I have just knitted this jumper. Very light and still warm, I love it :) but the yarn was very hard to work with. Am I the only one? Whatever I did the stitches remained uneven.
15.08.2021 - 12:32
![]() Poppy wrote:
Poppy wrote:
Thanks I would do that but no cross appearing to click off .
03.08.2021 - 16:03DROPS Design answered:
Dear Poppy, you will find this black cross on the top corner over the small window (not in the window itself) - hope it will help.
04.08.2021 - 08:01
![]() Poppy wrote:
Poppy wrote:
How do I turn off the drop down Its time to vote. I voted but still its blocking the pattern?
03.08.2021 - 15:11DROPS Design answered:
Dear Poppy, click on the cross (X) to close this window. Happy knitting!
03.08.2021 - 15:29
|
||||||||||||||||||||||||||||
Talvik#talviksweater |
||||||||||||||||||||||||||||
 |
 |
|||||||||||||||||||||||||||
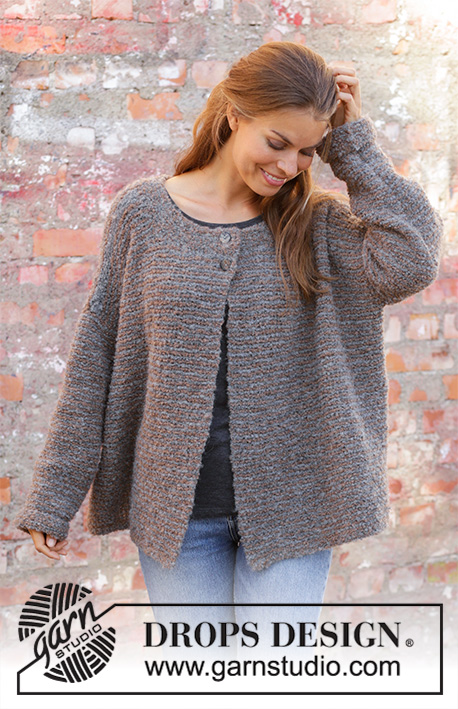
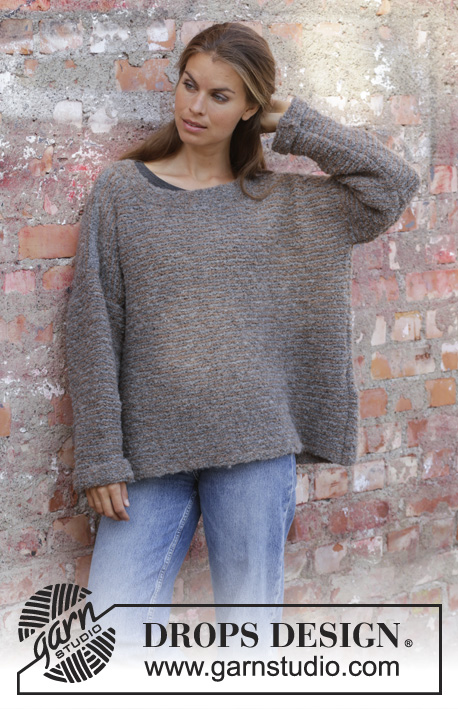
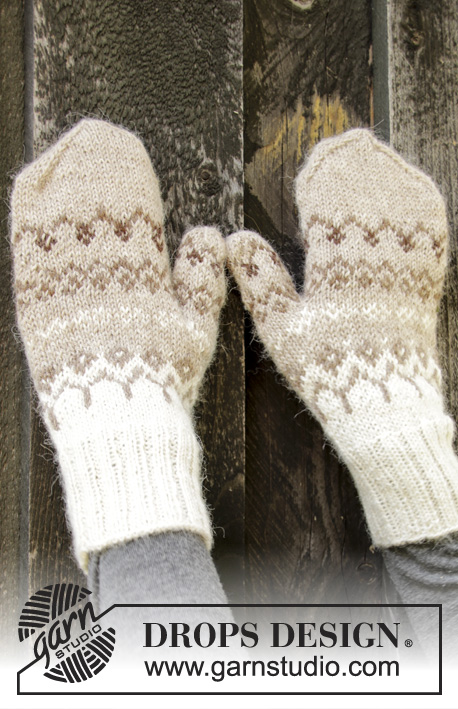
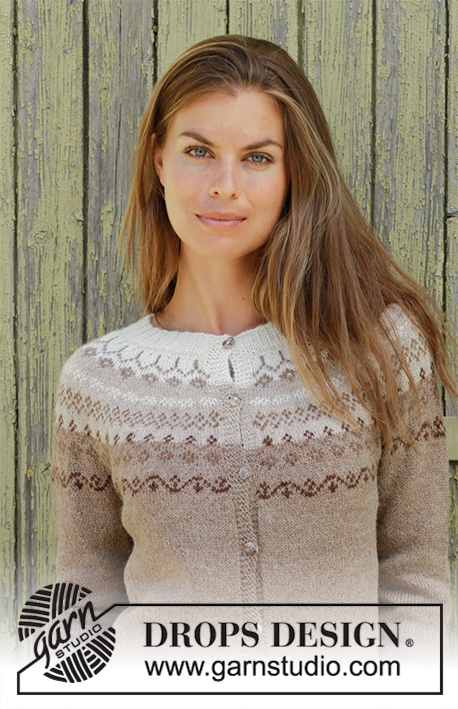
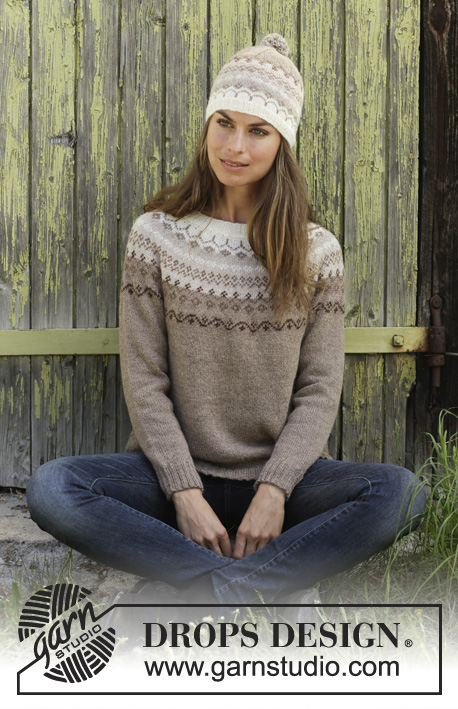
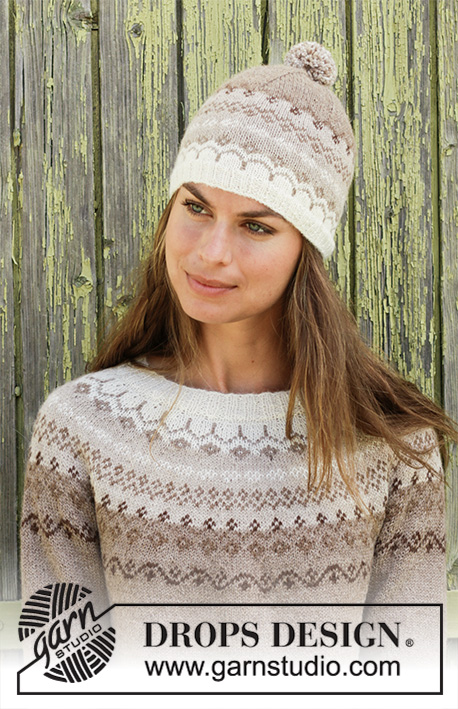
Knitted jumper with round yoke in DROPS Alpaca. Piece is knitted top down with Nordic pattern. Size: S - XXXL Knitted hat with Nordic pattern and pompom in DROPS Alpaca.
DROPS 197-10 |
||||||||||||||||||||||||||||
|
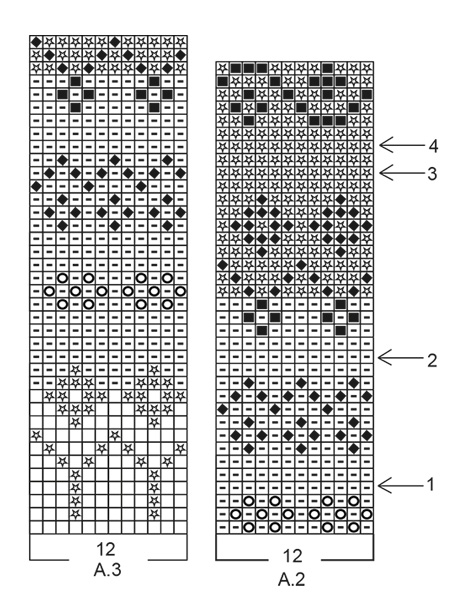
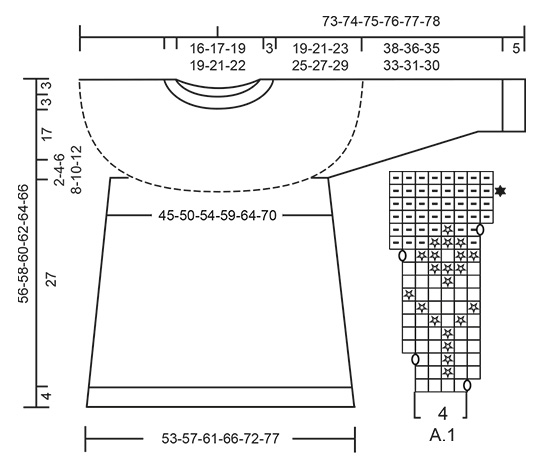
EXPLANATION FOR THE PATTERN: ---------------------------------------------------------- PATTERN: Jumper: See diagrams A.1 and A.2. Hat: See diagram A.3. Work all stitches in stocking stitch. DECREASE/INCREASE TIP (evenly): To calculate how to decrease/increase evenly, use the total number of stitches on round (e.g. 124 stitches) and divide stitches by number of decreased/increases to be done (e.g. 20) = 6.2. In this example decrease by knitting approx. every 5th and 6th stitch together. When increasing make a yarn over after approx. every 6th stitch. On next round work yarn over twisted to avoid hole. KNITTING TIP: To avoid the knitting tension to tighten when working pattern, it is important not to tighten the strands on back side of piece. Switch to a higher needle number when working pattern if the pattern is somewhat tight. INCREASE TIP (applies to sides of body): Work until 2 stitches remain before marker thread, make 1 yarn over, knit 4 (marker thread is in the middle of these stitches), make 1 yarn over (= 2 stitches increased). On next round knit yarn over twisted to avoid holes. Then work the new stitches in stocking stitch. DECREASE TIP-1 (applies to mid under sleeve): Decrease 1 stitch on each side of marker thread as follows: Work until 4 stitches remain before marker and knit 2 together, knit 4 (marker thread is between these 4 stitches), slip 1 stitch knitwise, knit 1, pass slipped stitch over stitch worked (= 2 stitches decreased). DECREASE TIP-2 (applies to hat): Work until 2 stitches remain before marker thread, knit the next 2 stitches together (= 1 stitch decreased). Repeat at each of the remaining marker threads. ---------------------------------------------------------- START THE PIECE HERE: ---------------------------------------------------------- JUMPER - SHORT OVERVIEW OF THE PIECE: Worked in the round on circular needle from mid back, work top down. Work sleeves in the round on double pointed needles/a short circular needle. NECK EDGE: Cast on 124-128-136-140-148-152 stitches on a short circular needle size 2.5 mm with off white. Knit 1 round. Now work rib (= knit 2/purl 2) for 3 cm. Knit 1 round while decreasing 20-20-20-20-20-20 stitches evenly - read DECREASE/INCREASE TIP = 104-108-116-120-128-132 stitches. Knit 1 round. YOKE: Switch to circular needle size 3 mm. Read KNITTING TIP and REMEMBER THE KNITTING TENSION! Now work pattern A.1 (= 4 stitches) 26-27-29-30-32-33 times in total on round. On round with black star in A.1 increase 20-24-20-24-32-36 stitches evenly – remember DECREASE/INCREASE TIP = 228-240-252-264-288-300 stitches (including the 4 stitches increased in every repetition of A.1. Now work pattern A.2 in the round, AT THE SAME TIME on round with arrow increase evenly as follows: ARROW-1: Increase 24-36-36-36-36-36 stitches = 252-276-288-300-324-336 stitches. ARROW-2: Increase 24-24-36-36-36-36 stitches = 276-300-324-336-360-372 stitches. ARROW-3: Increase 24-24-24-36-36-36 stitches = 300-324-348-372-396-408 stitches. ARROW-4: Increase 12-24-24-24-24-24 stitches = 312-348-372-396-420-432 stitches. When entire A.2 has been worked vertically, piece measures 20 cm from cast-on edge. Now work piece in light beige and stocking stitch, AT THE SAME TIME on first round increase 14-10-14-17-20-14 stitches evenly. Increase like this every 4th-4th-5th-6th-8th-8th round 1-2-2-2-2-4 times in total = 326-368-400-430-460-488 stitches. Then work until piece measures 22-24-26-28-30-32 cm from cast-on edge. Work next round as follows: Knit 49-54-58-64-70-75 (= half back piece), slip the next 64-75-83-86-90-93 stitches on a stitch holder for sleeve, cast on 10-10-12-12-14-16 new stitches on needle (= in the side under sleeve), knit 99-109-117-129-140-151 (= front piece), slip the next 64-75-83-86-90-93 stitches on a stitch holder for sleeve, cast on 10-10-12-12-14-16 new stitches on needle (= in the side under sleeve) and knit the remaining 50-55-59-65-70-76 stitches (= half back piece). Finish body and sleeves separately. NOW MEASURE PIECE FROM HERE! BODY: = 218-238-258-282-308-334 stitches. Insert 1 marker thread in the middle of the 10-10-12-12-14-16 new stitches that were cast on under sleeves. Move the marker threads upwards when working. Continue in the round with light beige and stocking stitch. When piece measures 4 cm from division, increase 1 stitch on each side of both marker threads - read INCREASE TIP (= 4 stitches increased). Increase like this every 8th round 9 times in total = 254-274-294-318-344-370 stitches. Continue like this until piece measures 27 cm. Knit 1 round while increasing 82-86-94-106-116-122 stitches evenly - remember DECREASE/INCREASE TIP = 336-360-388-424-460-492 stitches. Switch to circular needle size 2.5 mm and work rib = knit 2/purl 2 for 4 cm. Cast off with knit over knit and purl over purl but to avoid at tight cast-off edge make 1 yarn over after every 4th stitch (cast off yarn overs as stitches). Jumper measures approx. 56-58-60-62-64-66 cm from shoulder and down. SLEEVE: Slip the 64-75-83-86-90-93 stitches from stitch holder in one side of piece double pointed needles/a short circular needle size 3 mm and pick in addition up 1 stitch in each of the 10-10-12-12-14-16 new stitches cast on under sleeve = 74-85-95-98-104-109 stitches. Insert 1 marker thread in the middle of the 10-10-12-12-14-16 stitches under sleeve. Begin round here and work in stocking stitch in the round. When sleeve measures 4 cm from division, decrease 2 stitches mid under sleeve - read DECREASE TIP-1! Decrease like this every 10th-8th-6th-6th-6th-4th round 7-3-9-5-1-18 times and every 8th-6th-4th-4th-4th-2nd round 4-12-10-14-20-4 times = 52-55-57-60-62-65 stitches. When sleeve measures 38-36-35-33-31-30 cm from division (shorter measurements in the larger sizes because of longer yoke), knit 1 round while increasing 16-17-19-20-18-19 stitches evenly - remember DECREASE/INCREASE TIP = 68-72-76-80-80-84 stitches. Switch to double pointed needles size 2.5 mm and work rib in the round = knit 2/purl 2. When rib measures 5 cm, cast off with knit over knit and purl over purl but to avoid a tight cast-off edge make 1 yarn over after every 4th stitch (cast off yarn overs as regular stitches). Sleeve measures approx. 43-41-40-38-36-35 cm from division. Work the other sleeve the same way. ---------------------------------------------------------- HAT - SHORT OVERVIEW OF THE GARMENT: Work in the round on a short circular needle. Switch to double pointed needles when needed. HAT: Cast on 120-132 stitches on circular needle size 2.5 mm with off white. Knit 1 round. Then work rib (= knit 2/purl 2) for 2 cm. Switch to circular needle size 3 mm and work pattern A.3 (= 12 stitches) 10-11 times in total on round. REMEMBER THE KNITTING TENSION! When A.3 has been worked vertically, piece measures approx. 14-14 cm. Then work in stocking stitch in the round with light beige. When piece measures 15-15 cm, insert 6 marker threads in the piece, 20-22 stitches apart each marker thread. On next round, decrease 1 stitch before every marker thread – read DECREASE TIP-2. Decrease like this every other round 14-17 times in total = 36-30 stitches. Knit 2 and 2 stitches together until there are 9-8 stitches on needle. Cut the yarn and pull it through the remaining stitches, tighten tog and fasten. Hat measures approx. 24-26 cm. Make a pompom approx. 6 cm in diameter. Use 3 strand light camel, 1 strand off white and 1 strand light beige to make pompom and fasten at the top of hat. |
||||||||||||||||||||||||||||
Diagram explanations |
||||||||||||||||||||||||||||
|
||||||||||||||||||||||||||||
 |
||||||||||||||||||||||||||||
 |
||||||||||||||||||||||||||||
Have you finished this pattern?Tag your pictures with #dropspattern #talviksweater or submit them to the #dropsfan gallery. Do you need help with this pattern?You'll find 26 tutorial videos, a Comments/Questions area and more by visiting the pattern on garnstudio.com. © 1982-2026 DROPS Design A/S. We reserve all rights. This document, including all its sub-sections, has copyrights. Read more about what you can do with our patterns at the bottom of each pattern on our site. |
||||||||||||||||||||||||||||


With over 40 years in knitting and crochet design, DROPS Design offers one of the most extensive collections of free patterns on the internet - translated to 17 languages. As of today we count 324 catalogues and 12245 patterns translated into English (UK/cm). 12245
We work hard to bring you the best knitting and crochet have to offer, inspiration and advice as well as great quality yarns at incredible prices! Would you like to use our patterns for other than personal use? You can read what you are allowed to do in the Copyright text at the bottom of all our patterns. Happy crafting!
Post a comment to pattern DROPS 197-10
We would love to hear what you have to say about this pattern!
If you want to leave a question, please make sure you select the correct category in the form below, to speed up the answering process. Required fields are marked *.