
Popular categories
Looking for a yarn?


Comments / Questions (144)
![]() Katja wrote:
Katja wrote:
In A.3 XL Reihe 5: Ist es richtig dass ich die 1. Masche in Natur zunehme und so nach 16 Maschen immer 2 Maschen in Natur habe, statt 1 grün 1 natur ?
20.08.2025 - 20:33
![]() Hedda wrote:
Hedda wrote:
Jeg strikker str medium.Det står at det skal være 75+ 10 m rundt ermet. På måltegningen står at det blir 23( x 2= 46 ) cm omkrets øverstpå ermet. Med oppgitt strikkefasthet blir 85 m rundt ermet 35 cm i omkrets…. Får det ikke til å stemme… mvh
18.07.2025 - 14:44DROPS Design answered:
Hei Hedda. Tallet 23 er ikke omkrestsen på ermet, men høyden fra ermhullet til skulderen (+ 3 cm i forhøyningbak). Under BÆRESTYKKE og når siste omgang i A.3 er ferdig strikket skal arbeidet måle ca 26 cm (23 + 3) som målskissen viser. mvh DROPS design
04.08.2025 - 10:41
![]() Charlotte wrote:
Charlotte wrote:
Ich glaube, die Frage ist schon auf niederländisch gestellt worden, aber ich habe Probleme mit den Zunahmen in A3, da die Spitzen der Romben doch mit Faden Kreuzen auf einer Maschenlinie bleiben sollen.
31.03.2025 - 21:17DROPS Design answered:
Liebe Charlotte, setzen Sie vielleicht Markierer zwischen jedem Diagram, so werden die Zunahmen an der richtigen Stelle bearbeitet, und so wird Ihre Arbeit genauso wie bei dem Diagram aussehen. Viel Spaß beim Stricken!
01.04.2025 - 09:17
![]() Valerie wrote:
Valerie wrote:
Dans les Dans les instructions pour le pull, sous le titre 'empiècement' il est indiqué "L'ouvrage mesure maintenant environ 24-26-28-30-32-34 cm depuis le rang de montage, mesuré au milieu devant. NOTE: si l’ouvrage est plus court, continuer en jersey vert jusqu’à la longueur requise." Qu'est-ce que le "rang de montage"? Merci
13.03.2025 - 22:16DROPS Design answered:
Bonjour Valérie, le rang de montage correspond aux mailles que vous avez monté au tout début du col, autrement dit de l'ouvrage. Vous mesurez donc cette hauteur non pas à partir du début de l'empiècement mais à partir du tout début, soit col + empiècement - mesurez bien au milieu du devant (au milieu dos, l'ouvrage sera plus long à cause des rangs raccourcis). Bon tricot!
14.03.2025 - 07:51
![]() Constanze wrote:
Constanze wrote:
Der Pullover wird ja von oben nach unten gestrickt. Man beginnt mit der Halspasse und soll dann fast 20 Maschen abnehmen???? das verstehe ich nicht. Danke für Ihre Erklärung. LG Constanze
11.03.2025 - 12:39DROPS Design answered:
Liebe Constanze, ja genau, man braucht mehr Maschen für Bündchen mit kleineren Nadeln als für Glattrechts mit grösseren Nadeln, so muss man nach Bündchen abnehmen, damit die Passe nicht zu weit am Anfang wird. Viel Spaß beim Stricken!
12.03.2025 - 09:05
![]() Johanna Eriksson wrote:
Johanna Eriksson wrote:
Jag är intresserad av detta mönster. Men vill gärna använda ett garn som inte behöver handtvättas. Till vilket garn kan jag byta om jag vill att det ska kunna tvättas i maskin? Tack på förhand!
09.01.2025 - 14:15DROPS Design answered:
Hej Johanna. Då kan du använda DROPS Baby merino eller DROPS Fabel. Båda dessa kan tvättas i maskin. Mvh DROPS Design
09.01.2025 - 14:44
![]() Pepi Cano Pulido wrote:
Pepi Cano Pulido wrote:
Hola. Estoy realizando el patrón A3 y veo que si aumento un punto cada 19 entre el dibujo de rombos se me queda un punto de más entre los rombos y no me va a coincidir el resto del dibujo. ¿Cómo puedo solucionar este desajuste? Gracias por anticipado
01.01.2025 - 17:47DROPS Design answered:
Hola Pepi, si aumentas cómo se indica en el diagrama, el aumento cada 19 puntos debería ser justo antes de empezar el rombo, en la fila 15/23 (según la talla trabajada). Así pasas a tener 3 puntos de derecho entre cada rombo de cada repetición (tal y como tienes en el medio de la repetición, entre los 2 rombos del propio diagrama). Esto debería ayudar a colocar correctamente los rombos, para tener el mismo espacio entre repeticiones que dentro de la repetición y el dibujo coincida.
05.01.2025 - 18:49
![]() Nancy Mitchko wrote:
Nancy Mitchko wrote:
What are the chest measures of L, Xl, and XXL? Thanks in advance.
01.01.2025 - 02:20DROPS Design answered:
Hi Nancy, 108, 118 and 130 cm. Happy knitting!
01.01.2025 - 20:17
![]() Line wrote:
Line wrote:
Comment savoir la mesure pour un Small, médium ou large?
09.12.2024 - 00:33DROPS Design answered:
Bonjour Line, mesurez un vêtement similaire que vous avez et dont vous aimez la forme et comparez ces mesures à celles du schéma en bas de page pour trouver la taille correspondante. Retrouvez plus d'infos ici. Bon tricot!
09.12.2024 - 09:26
![]() Hennie De Vrieze wrote:
Hennie De Vrieze wrote:
Lieve mensen Ik kom er niet uit🫣 In rij 23 van A3 in xl de meerderingen gemaakt en in rij 24 het diamant patroon weer verder gaan breien. Nu heb ik bij elke steek die ik erbij heb gemaakt in het witte gedeelte 4 steken waar er drie moeten zijn . Voor ik het nu weer uit moet halen Wil ik graag weten wat gaat er fout als ik door ga komt het patroon niet uit. Ik hoop dat u mij kunt helpen Xl is de maat
29.11.2024 - 17:22DROPS Design answered:
Dag Hennie,
Als het telpatroon nog klopte in de rij dat je de meerderingen maakte, dus in rij 23, dan ga je als volgt te werk. Nadat je rij 23 klaar hebt met de meerderingen erin, begin je met rij 24. Op het eind van die rij, dus op het einde van elke herhaling in de breedte, brei je 1 steek in naturel, dit is de gelijk de omslag die gedraaid breit. Daarna begint de herhaling in de breedte opnieuw met 2 steken naturel, 1 steek groen, enzovoort.
04.12.2024 - 21:21
|
||||||||||||||||||||||
Perles du Nord#perlesdunordsweater |
||||||||||||||||||||||
 |
 |
|||||||||||||||||||||
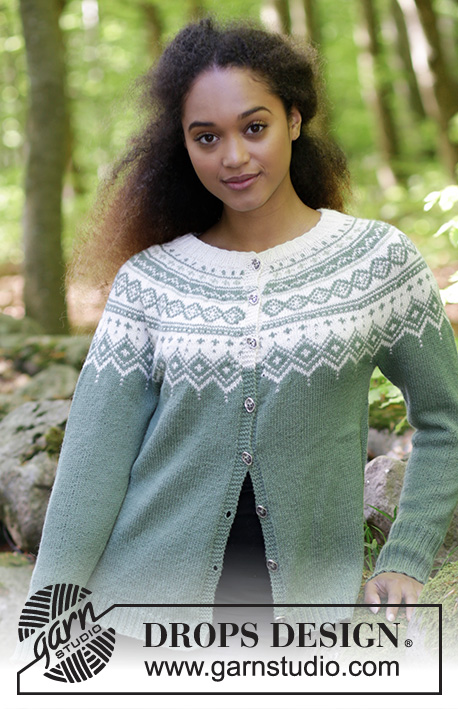
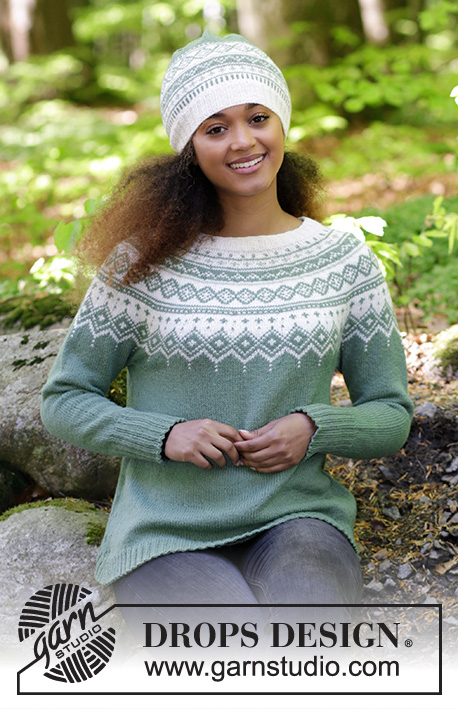
The set consists of: Knitted jumper with round yoke, multi-coloured Norwegian pattern and A-shape, worked top down. Sizes S - XXXL. Hat with multi-coloured Norwegian pattern. The set is worked in DROPS Flora.
DROPS 180-2 |
||||||||||||||||||||||
|
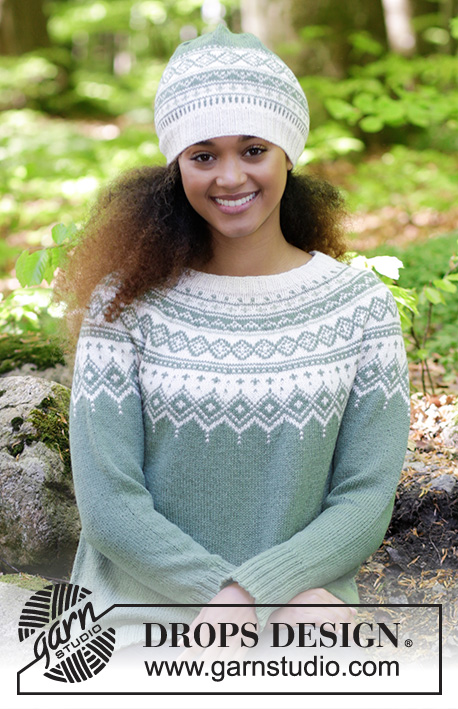
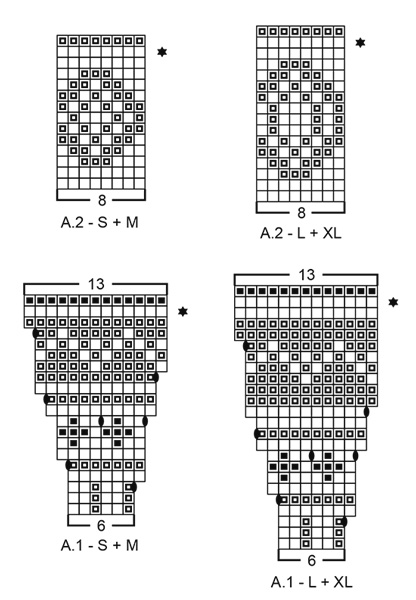
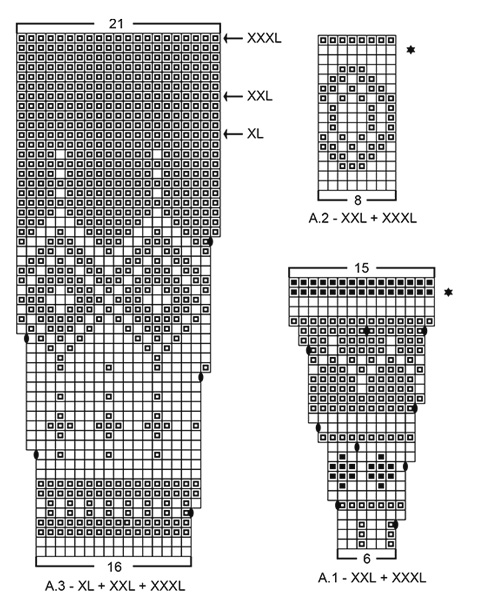
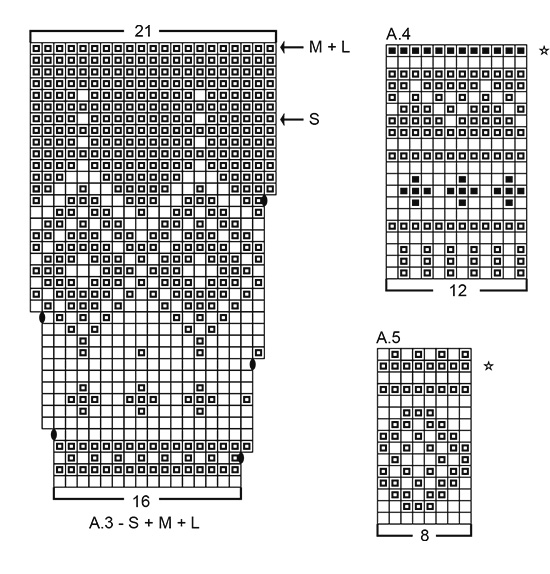
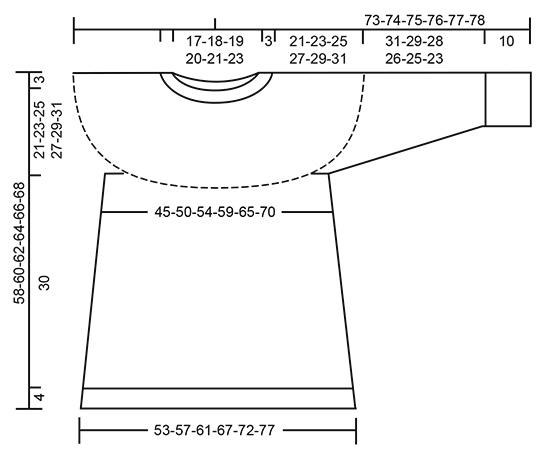
INFORMATION FOR THE PATTERN: DECREASE/INCREASE TIP: To work out how to decrease/increase evenly, count the total number of stitches on the needle (e.g. 120 stitches) and divide by the number of decreases/increases to be made (e.g. 18) = 6.6. In this example, decrease by knitting alternately every 5th and 6th stitch and every 6th and 7th stitch together. If you are increasing, do this after alternately every 6th and 7th stitch (increase 1 stitch by making 1 yarn over, on the next round, knit the yarn overs twisted and into the pattern so that there are no holes). ELEVATION: Insert 1 marker at the beginning of the round = mid back. Start from the right side with off white and knit until you have worked 8-8-9-10-10-11 stitches past the marker, turn, tighten the strand and purl 16-16-18-20-20-22 stitches. Turn, tighten the strand and knit 24-24-27-30-30-33 stitches, turn, tighten the strand and purl 32-32-36-40-40-44 stitches. Turn, tighten the strand and knit 40-40-45-50-50-55 stitches, turn, tighten the strand and purl 48-48-54-60-60-66 stitches. Turn, tighten the strand and knit 56-56-63-70-70-77 stitches, turn, tighten the strand and purl 64-64-72-80-80-88 stitches. Turn, tighten the strand and knit to mid back. PATTERN: Jumper: See diagrams A.1 to A.3. Choose diagram for your size. Hat: See diagrams A.4 and A.5. The diagrams show all the rows in the pattern seen from the right side. The whole of the pattern is worked in stocking stitch. KNITTING TIP (for the multi-coloured pattern): To prevent the knitting tension from becoming tighter when working pattern, it is important that the strands do not tighten at the back of the piece. You can increase the size of your needle when working pattern if you find you are working too tightly. INCREASE TIP (for the sides of the body): Start 2 stitches before the marker thread, make 1 yarn over, knit 4 (the marker thread sits in the middle of these 4 stitches), make 1 yarn over (= 2 stitches increased). On the next round knit the yarn overs twisted so that there are no holes. DECREASE TIP-1 (for mid under the sleeve): Work until there are 4 stitches left before the marker thread, knit 2 together, knit 4 (the marker thread sits in the middle of these 4 stitches), slip 1 stitch as if to knit, knit 1, pass the slipped stitch over the knitted stitch (= 2 stitches decreased). DECREASE TIP-2 (for the hat): Decrease after each marker thread as follows: Slip 1 stitch as if to knit, knit 1, pass the slipped stitch over the knitted stitch (= 1 stitch decreased). ---------------------------------------------------------- JUMPER: The piece is worked in the round with circular needle, top down. The sleeve is worked in the round with short circular needle, top down. Change to double pointed needles when you have decreased enough stitches. NECKLINE: Cast on 120-124-128-132-140-148 stitches with circular needle size 2.5 mm and off white. Knit 1 round. Then work rib (= knit 2 / purl 2). When the rib measures 3 cm, knit 1 round where you decrease 18-16-14-12-14-16 stitches evenly on round – read DECREASE/INCREASE TIP = 102-108-114-120-126-132 stitches. Continue to work the yoke as described below. YOKE: Change to circular needle size 3 mm. Knit 1 round. For a better fit you can now work a small ELEVATION in the back of the neck – see description above. When the elevation is complete, work A.1 in the round (= 17-18-19-20-21-22 repeats of 6 stitches). Continue the pattern in this way and increase as shown in the diagram. Read KNITTING TIP and REMEMBER THE KNITTING TENSION! On the round marked with a star in A.1 (i.e. the next to last round in A.1) there are 221-234-247-260-315-330 stitches on the needle, increase at the same time 11-22-33-36-21-22 stitches evenly on this round – read DECREASE/INCREASE TIP = 232-256-280-296-336-352 stitches. When A.1 is complete, work A.2 in the round (= 29-32-35-37-42-44 repeats of 8 stitches). Continue the pattern in this way, but on the round marked with a star in A.2 (i.e. the next to last round in A.2) increase 8-16-24-24-16-16 stitches evenly on round = 240-272-304-320-352-368 stitches. When A.2 is complete, work A.3 in the round (= 15-17-19-20-22-23 repeats of 16 stitches). Continue the pattern in this way and increase as shown in the diagram. When the last round in A.3 remains (marked with an arrow in each size) there are 315-357-399-420-462-483 stitches on the needle, increase at the same time 11-11-1-12-0-5 stitches evenly on the round = 326-368-400-432-462-488 stitches. The piece now measures approx. 24-26-28-30-32-34 cm from the cast-on edge, measured mid front. NOTE: If the piece measures less than this, continue working stocking stitch with green to the required length. The next round is worked as follows: Knit 50-55-59-65-71-76 stitches (= ½ back piece), place the next 64-75-83-86-90-93 stitches on a thread for sleeve, cast on 10-10-12-12-14-16 new stitches on the needle (= in the side under the sleeve), knit 99-109-117-130-141-151 stitches (= front piece), place the next 64-75-83-86-90-93 stitches on a thread for sleeve, cast on 10-10-12-12-14-16 new stitches on the needle (= in the side under the sleeve) and knit the remaining 49-54-58-65-70-75 stitches (= ½ back piece). Cut the strand. Body and sleeves are finished separately. THE PIECE IS NOW MEASURED FROM HERE! BODY: = 218-238-258-284-310-334 stitches. Insert 1 marker thread in the middle of the 10-10-12-12-14-16 stitches cast on under the sleeve in each side. Start the round by one of the marker threads and work stocking stitch in the round with green. When the piece measures 2 cm from the division, increase 1 stitch on each side of both marker threads – read INCREASE TIP (= 4 stitches increased). Increase in this way every 10th round (approx. every 3 cm) until required length (if the knitting tension is correct in height, there should be approx. 9 increase rows in each side). When the piece measures 30 cm from the division in all sizes, there are approx 254-274-294-320-346-370 stitches on the needle. Knit 1 round where you increase 82-90-98-104-114-122 stitches evenly on round – read DECREASE/INCREASE TIP = 336-364-392-424-460-492 stitches. Change to circular needle size 2.5 mm and work rib in the round (= knit 2 / purl 2) for 4 cm. Then cast off with knit over knit and purl over purl, but to prevent the cast-off edge being tight, you can make 1 yarn over on the needle after every 4th stitch AT THE SAME TIME as you cast off (the yarn overs are cast off as normal stitches). The jumper measures approx. 58-60-62-64-66-68 cm from the shoulder down. SLEEVE: Place the 64-75-83-86-90-93 stitches from the thread on one side of the piece on a short circular needle size 3 mm and in addition, knit up 1 stitch in each of the 10-10-12-12-14-16 stitches cast on under the sleeve = 74-85-95-98-104-109 stitches on the needle. Insert 1 marker thread in the middle of the 10-10-12-12-14-16 stitches under the sleeve. Start the round here and work stocking stitch in the round with green. When the sleeve measures 2 cm from the division, decrease 2 stitches mid under the sleeve – read DECREASE TIP. Decrease a total of 11-15-19-19-21-22 times in S: Every 9th round, in M: Every 6th round, in L and XL: Every 4th round, in XXL: Alternately every 3rd and 4th round and in XXXL: Every 3rd round = 52-55-57-60-62-65 stitches. When the sleeve measures 31-29-28-26-25-23 cm from the division (shorter measurements in the larger sizes due to longer yoke), knit 1 round where you increase 16-17-19-20-18-19 stitches evenly on round = 68-72-76-80-80-84 stitches. Change to double pointed needles size 2.5 mm and work rib in the round (= knit 2 / purl 2). When the rib measures 10 cm (or desired length) cast off with knit over knit and purl over purl, but to prevent the cast-off edge being tight, you can make 1 yarn over after every 4th stitch AT THE SAME TIME as you cast off (the yarn overs are cast off as normal stitches). The sleeve measures approx. 41-39-38-36-35-33 cm from the division. Work the second sleeve in the same way. ---------------------------------------------------------- HAT: The piece is worked in the round with short circular needle, bottom up. Change to double pointed needles as the number of stitches decreases. Cast on 128-136 stitches with circular needle size 2.5 mm and off white. Knit 1 round. Then work rib (= knit 2 / purl 2) for 4 cm. Change to short circular needle size 3 mm and knit 2 rounds – AT THE SAME TIME on the first round, increase 4-8 stitches evenly on round – read DECREASE/INCREASE TIP = 132-144 stitches. Work A.4 in the round (= 11-12 repeats of 12 stitches). On the last round in A.4 (marked with a star in the diagram), decrease 4-8 stitches evenly on round = 128-136 stitches. REMEMBER THE KNITTING TENSION! Now work A.5 in the round (= 16-17 repeats of 8 stitches). On the next to last round in A.5 (marked with a star in the diagram), decrease 8-4 stitches evenly on round = 120-132 stitches. The piece now measures approx. 16 cm in height. Continue working stocking stitch with green until the piece measures 20-23 cm. Insert 10-11 marker threads in the piece with 12 stitches between each marker thread. On the next round, decrease 1 stitch after each marker thread – read DECREASE TIP (= 10-11 stitches decreased). Decrease in this way every 2nd round a total of 8 times and then every round a total of 2 times = 20-22 stitches. On the next round knit all stitches together, 2 and 2 = 10-11 stitches. Cut the strand, pull it through the remaining stitches, tighten the strand and fasten well. The hat measures approx. 25-28 cm top down. |
||||||||||||||||||||||
Diagram explanations |
||||||||||||||||||||||
|
||||||||||||||||||||||
 |
||||||||||||||||||||||
 |
||||||||||||||||||||||
 |
||||||||||||||||||||||
 |
||||||||||||||||||||||
Have you finished this pattern?Tag your pictures with #dropspattern #perlesdunordsweater or submit them to the #dropsfan gallery. Do you need help with this pattern?You'll find 28 tutorial videos, a Comments/Questions area and more by visiting the pattern on garnstudio.com. © 1982-2026 DROPS Design A/S. We reserve all rights. This document, including all its sub-sections, has copyrights. Read more about what you can do with our patterns at the bottom of each pattern on our site. |
||||||||||||||||||||||


With over 40 years in knitting and crochet design, DROPS Design offers one of the most extensive collections of free patterns on the internet - translated to 17 languages. As of today we count 325 catalogues and 12291 patterns translated into English (UK/cm). 12291
We work hard to bring you the best knitting and crochet have to offer, inspiration and advice as well as great quality yarns at incredible prices! Would you like to use our patterns for other than personal use? You can read what you are allowed to do in the Copyright text at the bottom of all our patterns. Happy crafting!
Post a comment to pattern DROPS 180-2
We would love to hear what you have to say about this pattern!
If you want to leave a question, please make sure you select the correct category in the form below, to speed up the answering process. Required fields are marked *.