
Popular categories
Looking for a yarn?


Comments / Questions (44)
![]() Tünde wrote:
Tünde wrote:
Jó napot kívánok.Nem értem a raglán vonal leírását.azt írja hogy az első 3sor után a 2.-3.sorral folytatjuk.De nem tudom melyek ezek a sorok.Az első A1diagram a raglán szaporításra vonatkozik?Még soha nem horgoltam kezeslábast babáknak.Köszönöm szépen!
09.01.2021 - 21:47
![]() Louise wrote:
Louise wrote:
Ich habe jetzt 5x angefangen und komme nicht weiter. M.M. eine sehr schlechte Beschreibung. Zuviele eingeschobene Bemerkungen. Es qäre besser, die Anleitung Reihe für Reihe zu schreiben. Alles Andere ist zu verwirrend. Ich gebe auf und suche was Besseres.
19.08.2020 - 17:22
![]() Dorien wrote:
Dorien wrote:
Als ik het dan goed begrijp, zou je afwisselend per toer moeten meerderen. Maar als je niet meerdert ben je ook je lossenlussen kwijt om daarna wel in te meerderen?
23.07.2020 - 08:57DROPS Design answered:
Dag Dorien,
Je meerdert door 2 steken in dezelfde steek te haken, je haakt geen lussen om in te meerderen. Dus als je bijvoorbeeld meerdert in een toer met stokjes, dan haak je 2 stokjes in 1 steek van de vorige toer. De markeerdraden blijven steeds op dezelfde plek en neem je in de hoogte mee, zodat je steeds weet waar je moet meerderen.
02.08.2020 - 14:13
![]() Dorien wrote:
Dorien wrote:
Ik ben begonnen met de pas te maken. Nu kwam ik op het einde en heb ik maar 5 structuurtoeren terwijl ik er 7 zou moeten hebben. Ik vind niet echt hoe ik aan de 7 toeren zou moeten geraken. Alvast bedankt
21.07.2020 - 09:43DROPS Design answered:
Dag Dorien,
Je haakt de eerste toer waarbij je markeerdraden plaatst (= 1 toer) Als je dan 1 keer op iedere toer meerdert (=1 toer) en daarna 2 keer om de toer (+4 toeren) en daarna nog 1 toer haakt, dan zit je toch in totaal op 7 toeren?
23.07.2020 - 11:53
![]() Gerda wrote:
Gerda wrote:
Hallo, ik ben bezig met de toer stokjes waarin niet gemeerderd hoeft te worden. Ik vraag me af hoe ik in de lossenlus moet haken. Zijn dat ook twee lossen of haak ik twee stokjes in de lossenlus? Ik ben bezig met de pas.
10.01.2020 - 17:20DROPS Design answered:
Dag Gerda,
Als je een toer hebt waarin je niet hoeft te meerderen haak je in elke steek van de vorige toer 1 steek. Een losse staat daarbij voor 1 steek (net als een stokje en evt. een vaste)
14.01.2020 - 20:38
![]() Kimberley wrote:
Kimberley wrote:
Hei! Jeg sliter med første biten jeg. Har kommet til å sette de fire første merkene etter at jeg har laget alle lm. Men, det står at jeg skal hoppe over 12 lm og sette merker 4 ganger, og at jeg da har 12 lm igjen på venstre bakstykke. Dette stemmer jo ikke. Jeg har jo 24 lm igjen på venstre side da? Har prøvd 4 ganger uten å få det til nå.
15.10.2019 - 14:05DROPS Design answered:
Hej Kimberley, Du har 76 fm. 12+1+12ærme+1+12,12forstykke+1+12ærme+1+12 God fornøjelse!
17.10.2019 - 07:58
![]() Megan wrote:
Megan wrote:
I do not understand the instructions for the sleeves. Where do I insert the marker? Do I chain first 28-32-36 (40) stitches, or do I count them somehow in the sleeve hole? I don't understand what to do with the chains in the first row instruction. Is there a diagram? Thanks for any help!
25.09.2019 - 04:39DROPS Design answered:
Dear Megan, marker is inserted in the last row worked on yoke, so that you can measure the length of sleeve from the marker (= from first row on sleeve after dividing piece). Happy crocheting!
25.09.2019 - 08:20
![]() Betty wrote:
Betty wrote:
Wenn bei der Passe nur in jeder 2. Hinreihe bei den Raglanlinien zugenommen werden soll, wie häkele ich in den Reihen bei den Raglanlinien ohne Zunahme? Vielen Dank!
25.07.2019 - 06:30DROPS Design answered:
Liebe Betty, das ist hier beschrieben: "Nun STRUKTURREIHEN häkeln – siehe oben (hin und zurück mit 1 festen Masche/Stäbchen in jede Masche der vorherigen Reihe häkeln, jedoch in jeder Rück-Reihe mit festen Maschen 2 Luftmaschen über die 2 Luftmaschen der vorherigen Reihe in der Raglanlinie häkeln)" - d.h. die Rück-Reihen, in denen Sie keine Zunahmen häkeln, sind feste-Maschen-Reihen und bei den 2 Luft-Maschen, die in der Raglanlinie gehäkelt wurden, häkeln Sie auch wieder 2 Luft-Maschen, so bleibt die Maschenzahl dann in der Rück-Reihe gleich. Viel Spaß beim Weiterhäkeln!
26.07.2019 - 09:14
![]() Henny wrote:
Henny wrote:
Hej igen! Tack för snabbt svar! Jag förstår ändå inte vad ni menar. Ökningarna sker ju bara från rätsidan då man virkar stolpar. Vad är skillnaden mellan att "upprepa ökningen från rätsidan totalt 1-2-3(4) ggr" och att öka på "vartannat varv från rätsidan totalt 2 ggr i alla stl"? Antingen betyder det samma sakeller så betyder det att jag ska öka på vartannat stolpvarv och då blir frågan hur jag virkar stolpvarvet utan att öka?
20.05.2019 - 22:57DROPS Design answered:
Hei igjen Henny. Først øker du på hver 2. omgang = hver omgang fra retten, altså hver rad med staver. Dette gjør du totalt 3 ganger (altså over 6 omganger). Så går du over til å øke hver 4. omgang = annenhver omgang fra retten, altså annenhver omgang med staver. Når du hekler staver uten økning, hekles luftmasker over raglanlinjen, som når du hekler fastmasker. God fornøyelse
21.05.2019 - 14:39
![]() Henny wrote:
Henny wrote:
1. Hur gör man vid raglan (stp) de varv man inte ska öka? Alltså de varv man ökar bara vartannat varv och ska virka stolpar raglan utan ökning. 2. Stl 80/86 har totalt 9 varv. Det måste innebära totalt 4 strukturvarv på momentet när man ökar vartannat varv. Eller?
18.05.2019 - 22:33DROPS Design answered:
Hei Henny. fra vrangen hekler du 1 fastmaske i hver stav, men over luftmaskene i raglanlinjene hekler du 2 luftmasker. I Str 80/86 øker du på hver rad fra retten total 3 ganger = 3 strukturrader. Du har heklet totalt 7 rader (inkludert den første økingen, som er forklart) før du begynner å øke på annenhver rad fra retten. God fornøyelse.
20.05.2019 - 14:58
|
||||||||||||||||||||||
My Sweetie#mysweetieonesie |
||||||||||||||||||||||
|
|
||||||||||||||||||||||
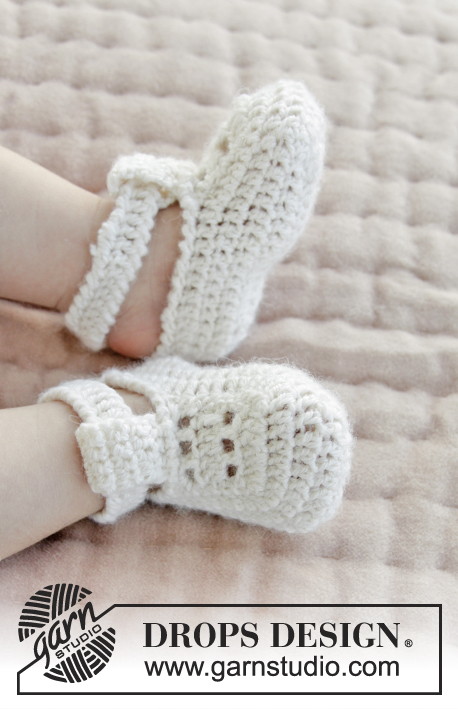
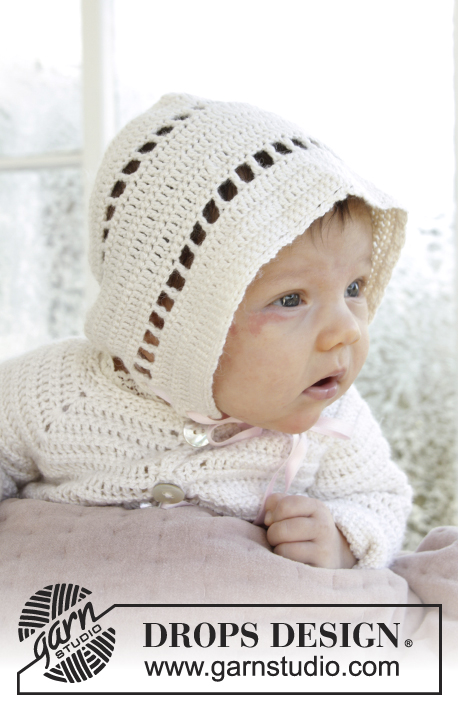
Baby onesie for Christening or special occasions, worked top down with raglan and textured rows crocheted in DROPS BabyAlpaca Silk. Sizes 0 - 2 years.
DROPS Baby 29-5 |
||||||||||||||||||||||
|
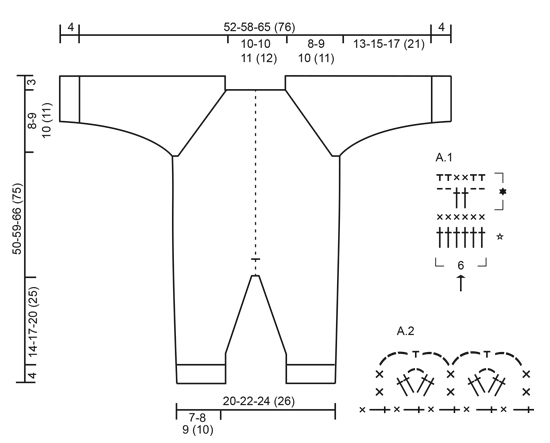
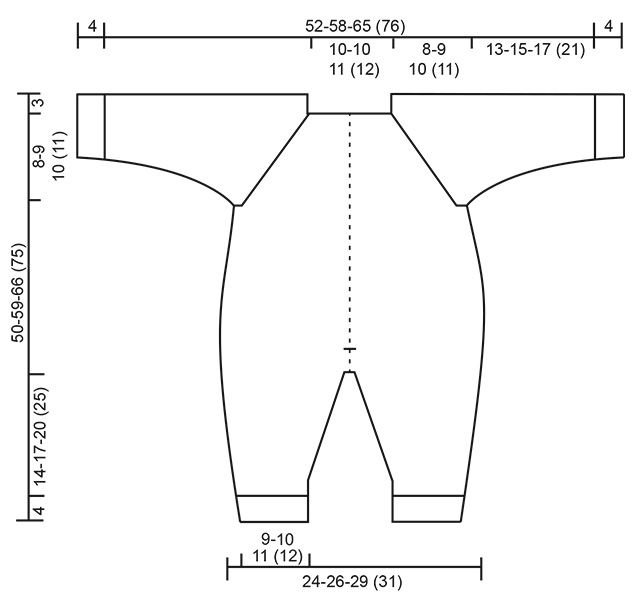
TIP: The onesie in the text is described with the opening and button band at the back and a row of holes for the decorative ribbon mid front, but onesies are the same front and back and can therefore be used both ways, either with the opening at the back or at the front (as shown in the photo). If you choose the opening at the front, you can work a textured row over the middle 6 stitches mid back if you do not want the row of holes. CROCHET INFO: At the beginning of each row with double crochets, replace the first double crochet with 1 chain stitch. The row finishes with 1 double crochet in the 3rd chain stitch from the beginning of the previous row of treble crochets. At the beginning of each row with treble crochets the first treble crochet is replaced with 3 chain stitches. The row finishes with 1 slip stitch in the chain stitch from the beginning of the previous row of double crochets. TEXTURED ROWS: * 1 row double crochets, 1 row treble crochets *, repeat from *-* (1 row double crochets + 1 row treble crochets = 1 textured row). INCREASE TIP: Increase 1 double crochet/treble crochet by working 2 double crochets/treble crochets in the same stitch. PATTERN-1: See diagram A.1. When rows 1-3 have been completed one time in height, you repeat rows 2 and 3 onwards. PATTERN-2: See diagram A.2. DECREASE TIP: Work 1 double crochet/treble crochet, but wait with the last yarn over and pull through (= 2 loops on the hook), then work the next double crochet/treble crochet, but when working the last pull through, pull the strand through all the loops on the hook (1 double crochet/treble crochet decreased). ---------------------------------------------------------- ONESIE: The piece is worked back and forth and top down from mid back – READ TIP. YOKE: Work 77-77-81 (85) chain stitches (including 1 chain stitch to turn) with hook size 3 mm and BabyAlpaca Silk. Work 1 double crochet in the 2nd chain stitch from the hook, then work 1 double crochet in each chain stitch to the end of the row = 76-76-80 (84) double crochets on the row. Now insert 4 marker threads in the piece for the raglan as follows (start at the opening – NOTE: Do NOT work while inserting the marker threads): Skip the first 12-12-13 (14) double crochets (= right back piece when piece is worn), insert 1 marker thread in the next double crochet, skip the next 12 double crochets (= sleeve), insert 1 marker thread in the next double crochet, skip the next 12-12-13 (14) double crochets, insert 1 marker before the next double crochet (= mid front), skip 12-12-13 (14) double crochets (these 24-24-26 (28) double crochets = front piece), insert 1 marker thread in the next double crochet, skip 12 double crochets (= sleeve) and insert the last marker thread in the next double crochet (there are now 12-12-13 (14) double crochets on the left back piece after the last marker thread). READ THE WHOLE OF THE NEXT SECTION BEFORE CONTINUING! READ CROCHET INFO and work the next row from the right side as follows: Work 1 treble crochet in each double crochet, but in each double crochet with a marker thread work 2 treble crochets + 2 chain stitches + 2 treble crochets = 88-88-92 (96) treble crochets on the row. Continue by working TEXTURED ROWS – see description above (work back and forth with 1 double crochet/treble crochet in each stitch from the previous row, but on each row with double crochet from the wrong side, work 2 chain stitches over the 2 chain stitches from the previous row in the raglan lines). In addition, work PATTERN-1 – see description above, over the middle 6 stitches mid front arrow in diagram A.1 marks the marker mid front). REMEMBER THE CROCHET TENSION! AT THE SAME TIME on the next row from the right side (i.e. the row with treble crochets) increase to raglan as follows: Work 2 treble crochets + 2 chain stitches + 2 treble crochets around the chain-space in each raglan line (= 16 treble crochets increased on the row – NOTE: Work around both chain spaces). Repeat the increases on every row from the right side a total of 1-2-3 (4) times and then every other row from the right side a total of 2 times in all sizes = 136-152-172 (192) stitches on the row. After the last increase to raglan work 1 row with double crochets from the wrong side as before. The next row is worked as follows from the right side: Work 1 treble crochet in each of the first 20-22-25 (28) double crochets (= right back piece), skip the next 28-32-36 (40) double crochets (= sleeve), work 8-8-8 (6) chain stitches, work 1 treble crochet in each of the next 40-44-50 (56) double crochets (= front piece), skip the next 28-32-36 (40) double crochet (= sleeve), work 8-8-8 (6) chain stitches and work 1 treble crochet in each of the last 20-22-25 (28) double crochets (= left back piece). You have now worked a total of 7-8-9 (10) textured rows from the cast-on edge, the piece measures approx. 11-12-13 (14) cm from the shoulder and the yoke is finished. Work body and sleeves separately. BODY: THE PIECE IS NOW MEASURED FROM HERE! The first row is worked from the wrong side – work 1 double crochet in each treble crochet from the previous row and 1 double crochet in each of the 8-8-8 (6) chain stitches under each armhole = 96-104-116 (124) double crochets on the row. Continue back and forth with textured rows and A.1 as before – remember CROCHET INFO! SAMTIDIG AT THE SAME TIME increase 4 stitches evenly a total of 5-5-6 (6) times every 2-2½-3 (3) cm = 116-124-140-148 stitches. When the piece measures approx. 24-30-32 (36) cm from the neck (i.e. approx. 27-33-35 (39) cm from the shoulder) – adjust so that the last row is 1 row of treble crochets from the right side, finish both the opening for the band mid back and A.1 mid front. Insert 1 marker in the outermost stitch at the beginning and end of the row to mark the band’s opening. Continue back and forth with textured rows over all stitches. When the piece measures 29-35-39 (43) cm from the neck (and approx. 32-38-42 (46) cm from the shoulder) divide it for the legs and each leg is finished separately. LEG: Insert 1 marker at the beginning of the row – MEASURE THE PIECE FROM HERE! Continue with textured rows, back and forth over the first 58-62-70 (74) stitches on the row (i.e. half of the stitches). When the leg measures 1-1-1 (1) cm from the marker, decrease 1 double crochet/treble crochet in each side – READ DECREASE TIP. Repeat the decrease every 1½-2-2 (2½) cm a total of 7-7-8 (8) times = 44-48-54 (58) stitches. When the leg measures 14-17-20 (25) cm from the marker at the division, work double crochets back and forth over all stitches for 4 cm. Cut and fasten the strand. The leg measures approx. 18-21-24 (29) cm and the whole of the suit measures approx. 50-59-66 (75) cm from the shoulder. Work the other leg in the same way. SLEEVE: = 28-32-36 (40) stitches. Insert 1 marker –THE PIECE IS NOW MEASURED FROM HERE. The first row is worked from the wrong side as follows: Work 4-4-4 (3) chain stitches, work 1 double crochet in each stitch and work 6-6-6 (5) chain stitches. Turn the piece, work 1 treble crochet in the 4th chain stitch from the hook, work 1 treble crochet in each of the next 2-2-2 (1) chain stitches, 1 treble crochet in each double crochet from the previous row and 1 treble crochet in each of the 4-4-4 (3) chain stitches from the beginning of the previous row = 36-40-44 (46) stitches on the row. Continue by working textured rows back and forth as before. AT THE SAME TIME when the sleeve measures 3 cm from the marker in all sizes, decrease 1 stitch in each side – READ DECREASE TIP. Repeat the decreases every 6-4-3½ (4½) cm a total of 2-3-4 (4) times = 32-34-36 (38) stitches. When the sleeve measures 13-15-17 (21) cm from the marker by the armhole, work double crochets back and forth over all stitches for 4 cm. Cut and fasten the strand. The sleeve measures approx. 17-19-21 (25 cm) from the marker. Work the other sleeve in the same way. ASSEMBLY: Sew the sleeve seams edge to edge in the outermost loop of the outermost stitch. Sew the openings under the sleeves. If necessary, turn up the bottoms of the sleeves and legs. Sew the opening mid back from the marker where the band ends and down to the division of the legs – sew in the outermost loop of the outermost stitch. RIGHT BAND: Start from the wrong side at the bottom of the right back piece and work PATTERN-2, i.e. work as follows: 1 double crochet around the outermost treble crochet, * work 2 treble crochets + 2 chain stitches + 2 treble crochets around the next treble crochet, 1 double crochet around the next treble crochet *, repeat from *-* up along the right back piece to the neck and finish with 1 slip stitch in the corner by the neck. Turn the piece and work back as follows from the right side: 1 chain stitch (equivalent to 1 double crochet), continue by working * 3 chain stitches, 1 double crochet in the next double crochet, 3 chain stitches, 1 double crochet around the chain-space in the middle of the treble crochet group *, repeat from *-* and finish with 3 chain stitches and 1 slip stitch in the last double crochet. Cut and fasten the strands. Fasten the band at the bottom by the division. LEFT BAND AND NECKLINE: Work the first row as for the right band, but start from the right side at the bottom of the left back piece and work as for the right band up to the neck, but instead of finishing with 1 slip stitch in the corner, continue the edge around the neck as follows: work 1 double crochet in each stitch along the neck until there are 3 stitches left before the first stitch with marker thread in it (raglan line), skip these 3 stitches and work 4 treble crochets in the stitche with marker thread, skip the next 3 stitches and continue with double crochets in each stitch until there are 3 left before the next stitch with marker thread in it (raglan line), skip these 3 stitches and work 4 treble crochets in the stitche with marker thread. Continue in this way around the neck and finish with 1 slip stitch outermost on the row, turn the piece and work the next row as follows from the wrong side (around the neck): * 1 double crochet in the first/next stitch, 3 chain stitches, skip 2 double crochets *, repeat from *-* as far as the corner before the band, then work down the band as for the right band. Cut and fasten the strands. ASSEMBLY: Sew the buttons onto the right band. NOTE: The buttons are buttoned through the chain-spaces on the left band - start with 1 button in the top chain-space, then there should be 1 button in every other chain-space downwards. Thread the silk ribbon up and down through the row of holes in A.1 along mid front (start and stop by the neck and finish with a bow by the neck). If the suit is to be used with the opening in front, you can thread the silk ribbon between the treble crochets mid front (see photo). |
||||||||||||||||||||||
Diagram explanations |
||||||||||||||||||||||
|
||||||||||||||||||||||
 |
||||||||||||||||||||||
 |
||||||||||||||||||||||
Have you finished this pattern?Tag your pictures with #dropspattern #mysweetieonesie or submit them to the #dropsfan gallery. Do you need help with this pattern?You'll find 11 tutorial videos, a Comments/Questions area and more by visiting the pattern on garnstudio.com. © 1982-2026 DROPS Design A/S. We reserve all rights. This document, including all its sub-sections, has copyrights. Read more about what you can do with our patterns at the bottom of each pattern on our site. |
||||||||||||||||||||||


With over 40 years in knitting and crochet design, DROPS Design offers one of the most extensive collections of free patterns on the internet - translated to 17 languages. As of today we count 324 catalogues and 12245 patterns translated into English (UK/cm). 12245
We work hard to bring you the best knitting and crochet have to offer, inspiration and advice as well as great quality yarns at incredible prices! Would you like to use our patterns for other than personal use? You can read what you are allowed to do in the Copyright text at the bottom of all our patterns. Happy crafting!
Post a comment to pattern DROPS Baby 29-5
We would love to hear what you have to say about this pattern!
If you want to leave a question, please make sure you select the correct category in the form below, to speed up the answering process. Required fields are marked *.