
Popular categories
Looking for a yarn?


|
||||||||||||||||||||||
My Sweetie |
||||||||||||||||||||||
|
|
||||||||||||||||||||||
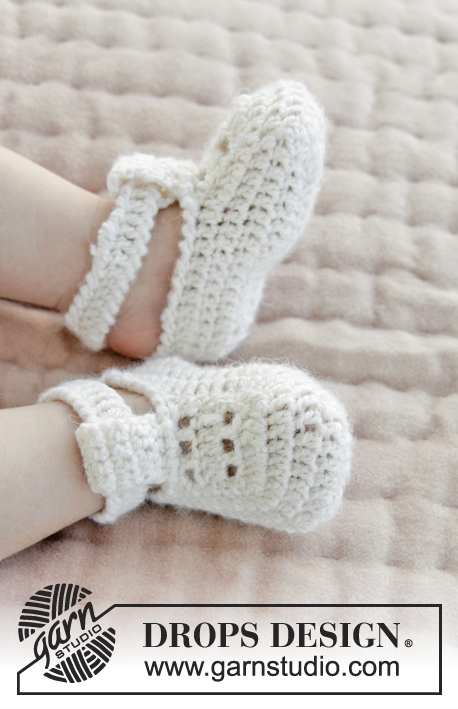
Baby onesie for Christening or special occasions, worked top down with raglan and textured rows crocheted in DROPS BabyAlpaca Silk. Sizes 0 - 2 years.
DROPS Baby 29-5 |
||||||||||||||||||||||
|
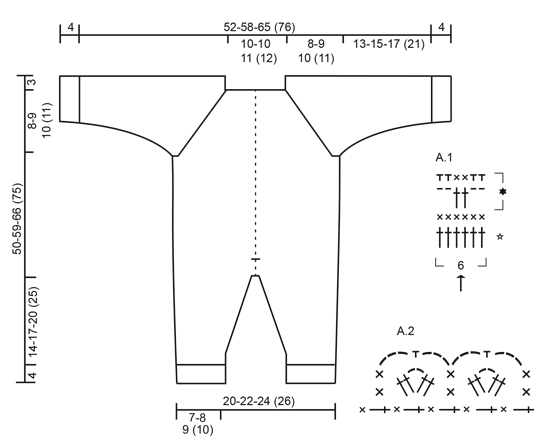
TIP: The onesie in the text is described with the opening and button band at the back and a row of holes for the decorative ribbon mid front, but onesies are the same front and back and can therefore be used both ways, either with the opening at the back or at the front (as shown in the photo). If you choose the opening at the front, you can work a textured row over the middle 6 stitches mid back if you do not want the row of holes. CROCHET INFO: At the beginning of each row with single crochets, replace the first single crochet with 1 chain stitch. The row finishes with 1 single crochet in the 3rd chain stitch from the beginning of the previous row of double crochets. At the beginning of each row with double crochets the first double crochet is replaced with 3 chain stitches. The row finishes with 1 slip stitch in the chain stitch from the beginning of the previous row of single crochets. TEXTURED ROWS: * 1 row single crochets, 1 row double crochets *, repeat from *-* (1 row single crochets + 1 row double crochets = 1 textured row). INCREASE TIP: Increase 1 single crochet/double crochet by working 2 single crochets/double crochets in the same stitch. PATTERN-1: See diagram A.1. When rows 1-3 have been completed one time in height, you repeat rows 2 and 3 onwards. PATTERN-2: See diagram A.2. DECREASE TIP: Work 1 single crochet/double crochet, but wait with the last yarn over and pull through (= 2 loops on the hook), then work the next single crochet/double crochet, but when working the last pull through, pull the strand through all the loops on the hook (1 single crochet/double crochet decreased). ---------------------------------------------------------- ONESIE: The piece is worked back and forth and top down from mid back – READ TIP. YOKE: Work 77-77-81 (85) chain stitches (including 1 chain stitch to turn) with hook size 3 mm / C and BabyAlpaca Silk. Work 1 single crochet in the 2nd chain stitch from the hook, then work 1 single crochet in each chain stitch to the end of the row = 76-76-80 (84) single crochets on the row. Now insert 4 marker threads in the piece for the raglan as follows (start at the opening – NOTE: Do NOT work while inserting the marker threads): Skip the first 12-12-13 (14) single crochets (= right back piece when piece is worn), insert 1 marker thread in the next single crochet, skip the next 12 single crochets (= sleeve), insert 1 marker thread in the next single crochet, skip the next 12-12-13 (14) single crochets, insert 1 marker before the next single crochet (= mid front), skip 12-12-13 (14) single crochets (these 24-24-26 (28) single crochets = front piece), insert 1 marker thread in the next single crochet, skip 12 single crochets (= sleeve) and insert the last marker thread in the next single crochet (there are now 12-12-13 (14) single crochets on the left back piece after the last marker thread). READ THE WHOLE OF THE NEXT SECTION BEFORE CONTINUING! READ CROCHET INFO and work the next row from the right side as follows: Work 1 double crochet in each single crochet, but in each single crochet with a marker thread work 2 double crochets + 2 chain stitches + 2 double crochets = 88-88-92 (96) double crochets on the row. Continue by working TEXTURED ROWS – see description above (work back and forth with 1 single crochet/double crochet in each stitch from the previous row, but on each row with single crochet from the wrong side, work 2 chain stitches over the 2 chain stitches from the previous row in the raglan lines). In addition, work PATTERN-1 – see description above, over the middle 6 stitches mid front arrow in diagram A.1 marks the marker mid front). REMEMBER THE CROCHET GAUGE! AT THE SAME TIME on the next row from the right side (i.e. the row with double crochets) increase to raglan as follows: Work 2 double crochets + 2 chain stitches + 2 double crochets around the chain-space in each raglan line (= 16 double crochets increased on the row – NOTE: Work around both chain spaces). Repeat the increases on every row from the right side a total of 1-2-3 (4) times and then every other row from the right side a total of 2 times in all sizes = 136-152-172 (192) stitches on the row. After the last increase to raglan work 1 row with single crochets from the wrong side as before. The next row is worked as follows from the right side: Work 1 double crochet in each of the first 20-22-25 (28) single crochets (= right back piece), skip the next 28-32-36 (40) single crochets (= sleeve), work 8-8-8 (6) chain stitches, work 1 double crochet in each of the next 40-44-50 (56) single crochets (= front piece), skip the next 28-32-36 (40) single crochet (= sleeve), work 8-8-8 (6) chain stitches and work 1 double crochet in each of the last 20-22-25 (28) single crochets (= left back piece). You have now worked a total of 7-8-9 (10) textured rows from the cast-on edge, the piece measures approx. 11-12-13 (14) cm / 4½"-4¾"-5" (5½") from the shoulder and the yoke is finished. Work body and sleeves separately. BODY: THE PIECE IS NOW MEASURED FROM HERE! The first row is worked from the wrong side – work 1 single crochet in each double crochet from the previous row and 1 single crochet in each of the 8-8-8 (6) chain stitches under each armhole = 96-104-116 (124) single crochets on the row. Continue back and forth with textured rows and A.1 as before – remember CROCHET INFO! When the piece measures approx. 24-30-32 (36) cm / 9½"-11¾"-12½" (14¼") from the neck (i.e. approx. 27-33-35 (39) cm / 10½"-13"-13¾" (15¼") from the shoulder) – adjust so that the last row is 1 row of double crochets from the right side, finish both the opening for the band mid back and A.1 mid front. Insert 1 marker in the outermost stitch at the beginning and end of the row to mark the band’s opening. Continue back and forth with textured rows over all stitches. When the piece measures 29-35-39 (43) cm / 11½"-13¾"-15¼" (17") from the neck (and approx. 32-38-42 (46) cm / 12½"-15"-16½" (18") from the shoulder) divide it for the legs and each leg is finished separately. LEG: Insert 1 marker at the beginning of the row – MEASURE THE PIECE FROM HERE! Continue with textured rows, back and forth over the first 48-52-58 (62) stitches on the row (i.e. half of the stitches). When the leg measures 2-2-3 (3) cm / ¾"-¾"-1" (1") from the marker, decrease 1 single crochet/double crochet in each side – READ DECREASE TIP. Repeat the decrease every 1½-2-2 (2½) cm / ½"-¾"-¾" (7/8") a total of 7-7-8 (8) times = 34-38-42 (46) stitches. When the leg measures 14-17-20 (25) cm / 5½"-6¾"-8" (9¾") from the marker at the division, work single crochets back and forth over all stitches for 4 cm / 1½". Cut and fasten the strand. The leg measures approx. 18-21-24 (29) cm / 7"-8¼"-9½" (11½") and the whole of the suit measures approx. 50-59-66 (75) cm / 19¾"-23¼"-26" (29½") from the shoulder. Work the other leg in the same way. SLEEVE: = 28-32-36 (40) stitches. Insert 1 marker –THE PIECE IS NOW MEASURED FROM HERE. The first row is worked from the wrong side as follows: Work 4-4-4 (3) chain stitches, work 1 single crochet in each stitch and work 6-6-6 (5) chain stitches. Turn the piece, work 1 double crochet in the 4th chain stitch from the hook, work 1 double crochet in each of the next 2-2-2 (1) chain stitches, 1 double crochet in each single crochet from the previous row and 1 double crochet in each of the 4-4-4 (3) chain stitches from the beginning of the previous row = 36-40-44 (46) stitches on the row. Continue by working textured rows back and forth as before. AT THE SAME TIME when the sleeve measures 3 cm / 1" from the marker in all sizes, decrease 1 stitch in each side – READ DECREASE TIP. Repeat the decreases every 6-4-3½ (4½) cm / 2½"-1½"-1¼" (1¾") a total of 2-3-4 (4) times = 32-34-36 (38) stitches. When the sleeve measures 13-15-17 (21) cm / 5"-6"-6¾" (8¼") from the marker by the armhole, work single crochets back and forth over all stitches for 4 cm / 1½". Cut and fasten the strand. The sleeve measures approx. 17-19-21 (25 cm) / 6¾"-7½"-8¼" (9¾") from the marker. Work the other sleeve in the same way. ASSEMBLY: Sew the sleeve seams edge to edge in the outermost loop of the outermost stitch. Sew the openings under the sleeves. If necessary, turn up the bottoms of the sleeves and legs. Sew the opening mid back from the marker where the band ends and down to the division of the legs – sew in the outermost loop of the outermost stitch. RIGHT BAND: Start from the wrong side at the bottom of the right back piece and work PATTERN-2, i.e. work as follows: 1 single crochet around the outermost double crochet, * work 2 double crochets + 2 chain stitches + 2 double crochets around the next double crochet, 1 single crochet around the next double crochet *, repeat from *-* up along the right back piece to the neck and finish with 1 slip stitch in the corner by the neck. Turn the piece and work back as follows from the right side: 1 chain stitch (equivalent to 1 single crochet), continue by working * 3 chain stitches, 1 single crochet in the next single crochet, 3 chain stitches, 1 single crochet around the chain-space in the middle of the double crochet group *, repeat from *-* and finish with 3 chain stitches and 1 slip stitch in the last single crochet. Cut and fasten the strands. Fasten the band at the bottom by the division. LEFT BAND AND NECKLINE: Work the first row as for the right band, but start from the right side at the bottom of the left back piece and work as for the right band up to the neck, but instead of finishing with 1 slip stitch in the corner, continue the edge around the neck as follows: work 1 single crochet in each stitch along the neck until there are 3 stitches left before the first stitch with marker thread in it (raglan line), skip these 3 stitches and work 4 double crochets in the stitche with marker thread, skip the next 3 stitches and continue with single crochets in each stitch until there are 3 left before the next stitch with marker thread in it (raglan line), skip these 3 stitches and work 4 double crochets in the stitche with marker thread. Continue in this way around the neck and finish with 1 slip stitch outermost on the row, turn the piece and work the next row as follows from the wrong side (around the neck): * 1 single crochet in the first/next stitch, 3 chain stitches, skip 2 single crochets *, repeat from *-* as far as the corner before the band, then work down the band as for the right band. Cut and fasten the strands. ASSEMBLY: Sew the buttons onto the right band. NOTE: The buttons are buttoned through the chain-spaces on the left band - start with 1 button in the top chain-space, then there should be 1 button in every other chain-space downwards. Thread the silk ribbon up and down through the row of holes in A.1 along mid front (start and stop by the neck and finish with a bow by the neck). If the suit is to be used with the opening in front, you can thread the silk ribbon between the double crochets mid front (see photo). |
||||||||||||||||||||||
Diagram explanations |
||||||||||||||||||||||
|
||||||||||||||||||||||
|
||||||||||||||||||||||
|
Have you made this or any other of our designs? Tag your pictures in social media with #dropsdesign so we can see them! Do you need help with this pattern?You'll find tutorial videos, a Comments/Questions area and more by visiting the pattern on garnstudio.com. © 1982-2024 DROPS Design A/S. We reserve all rights. This document, including all its sub-sections, has copyrights. Read more about what you can do with our patterns at the bottom of each pattern on our site. |
||||||||||||||||||||||


With over 40 years in knitting and crochet design, DROPS Design offers one of the most extensive collections of free patterns on the internet - translated to 17 languages. As of today we count 304 catalogs and 11422 patterns - 11417 of which are translated into English (US/in).
We work hard to bring you the best knitting and crochet have to offer, inspiration and advice as well as great quality yarns at incredible prices! Would you like to use our patterns for other than personal use? You can read what you are allowed to do in the Copyright text at the bottom of all our patterns. Happy crafting!
Comments / Questions (41)
Ärm; var börjar man med första maskan?
11.08.2023 - 11:56DROPS Design answered:
Hej Pirjo, du börjar ärmen med 4 luftmaskor (under ärmen) sedan virkar du i första maskan under ärmen och fortsätter runt, avslutar med 6 lm, vänd osv :)
16.08.2023 - 10:44Hola estoy tejiendo las mangas y no entiendo ...no las tejo en redondo? Que hago con los puntos que agregue debajo de la manga...les cuento tengo 43 puntos de manga ( agregue 7 puntos de cadeneta cuando termine el canesu) Tejo ida y vuelta las filas en relieve? Que hago con los 7 puntos de cadeneta, los tejo? Como hago las costuras ? Y si tejo en redondo mejor? Cómo sería? Gracias
01.07.2023 - 15:22DROPS Design answered:
Hola Vanesa, no, las mangas se trabajan de ida y vuelta y, para terminar, se hará una costura en la parte inferior de la manga. En el canesú, saltaste los puntos de cada manga. Los puntos montados en el canesú son para la sisa en el cuerpo y no las mangas; en la manga se montan los puntos para la sisa al principio de la manga (los puntos de cadeneta dependen de la talla trabajada).. Los puntos de la sisa en el cuerpo se cosen a los de la sisa en la manga. La manga tiene que trabajarse de ida y vuelta porque el canesú se trabaja de ida y vuelta (debido a la abertura en el delantero). De esta forma, el dibujo queda igual en la manga y el cuerpo.
10.07.2023 - 15:17Hei, i den norske oppskriften under erme mangler det tydelig noe info, da det starter med =28-32-36 (40)m. Hva skal egentlig stå foran der, og hvor er det meningen at man skal begynne med luftmaskene? Ser det er flere som har lurt på dette, men syntes ikke svarene er spesielt gode. Skal man starte i de 8-8-8 (6) lm fra bærestykket?
12.01.2023 - 19:12DROPS Design answered:
Hei Birgit, Masker ble hoppet over på bærestykket da det ble delt for bolen og ermene. Det er disse masker som er beskrevet her. Du begynner omgang på retten og fra bunnen av ermhullet, hekle riktig antall luftmasker, deretter 1 fastmaske i alle masker rundt ermhullet, inkl. luftmaskene fra begynnelse av runden. God fornøyelse!
13.01.2023 - 08:01Hej, ska det virkas 2 lm över föregående varvs lm på sista stolpvarvet i oket, och även mönster A1 på detta varvet? Tacksam för hjälp!
02.08.2022 - 18:05DROPS Design answered:
Hej Camilla, de 2 rækker hækles over hele dressen :)
05.08.2022 - 09:07Hallo, was häkel ich denn in den Hinreihen in die Luftmaschenbögen wo keine Zunahnmen sind?
15.11.2021 - 18:04DROPS Design answered:
Liebe Claudia, dann häkelt man 2 Luftmaschen (wie bei den Rückreihen). Viel Spaß beim häkeln!
16.11.2021 - 08:41Hej! När jag ska göra vartannat varv vid raglanökningen i oket, hur virkar jag över lmb i det ickeökande stolpvarvet?
01.06.2021 - 07:58DROPS Design answered:
Hej Tina, det virkas fram och tillbaka med 1 fastmaska/stolpe i varje maska från föregående varv, men på varje varv med fastmaskor från avigsidan virkas det 2 luftmaskor över de 2 luftmaskorna från föregående varv i raglanlinjerna.
02.06.2021 - 12:03Hello from the United States. I love the pattern but I am not used to following a pattern in narrative form. I am used to having each row written out so that I can cross off the rows as I finish them. This helps me pick up when I have to put my work down to do something. Any chance you could write this pattern out by rows? Thank you.
29.05.2021 - 06:04DROPS Design answered:
Dear Tammy, in short no. The longer version is that this way (with charts and such), you not only see the very next step, but also the bigger picture, in how stitches and rows relate to each other, it is easier to modify patterns. W do have a lesson on how to read diagrams, if that is the problem. Happy Knitting!
29.05.2021 - 11:09Jó napot kívánok.Nem értem a raglán vonal leírását.azt írja hogy az első 3sor után a 2.-3.sorral folytatjuk.De nem tudom melyek ezek a sorok.Az első A1diagram a raglán szaporításra vonatkozik?Még soha nem horgoltam kezeslábast babáknak.Köszönöm szépen!
09.01.2021 - 21:47Ich habe jetzt 5x angefangen und komme nicht weiter. M.M. eine sehr schlechte Beschreibung. Zuviele eingeschobene Bemerkungen. Es qäre besser, die Anleitung Reihe für Reihe zu schreiben. Alles Andere ist zu verwirrend. Ich gebe auf und suche was Besseres.
19.08.2020 - 17:22Als ik het dan goed begrijp, zou je afwisselend per toer moeten meerderen. Maar als je niet meerdert ben je ook je lossenlussen kwijt om daarna wel in te meerderen?
23.07.2020 - 08:57DROPS Design answered:
Dag Dorien,
Je meerdert door 2 steken in dezelfde steek te haken, je haakt geen lussen om in te meerderen. Dus als je bijvoorbeeld meerdert in een toer met stokjes, dan haak je 2 stokjes in 1 steek van de vorige toer. De markeerdraden blijven steeds op dezelfde plek en neem je in de hoogte mee, zodat je steeds weet waar je moet meerderen.
02.08.2020 - 14:13