
Popular categories
Looking for a yarn?


Comments / Questions (52)
![]() Annelies wrote:
Annelies wrote:
Bedankt voor het snelle antwoord, maar ik begrijp het niet zo goed. Dus ik moet geen teruggaande naald breien? Bij A.1 wilt dit dan zeggen dat ik na dat ik 1 rechts gebreidt heb naar de volgende rij op het telpatroon moet gaan? Dus 3 rechts ipv 6 recht (3x teruggaande naald)
13.04.2018 - 10:17DROPS Design answered:
Dag Annelies, Alle naalden die je breit staan in het telpatroon aangegeven, dus je slaat niks over. Nadat je naald 1 (= 3 steken) van telpatroon A.3 hebt gebreid, brei je naald 2 (=3 steken) en zo ga je verder in de hoogte met het telpatroon. Telpatroon A.1 brei je 4 keer in de rondte, dus je herhaalt het patroon in de breedte (3 steken x 4 = de 12 steken die je hebt opgezet) en omdat je in de rondte aan het breien bent, brei je steeds op de goede kant van het werk.
16.04.2018 - 10:08
![]() Annelies wrote:
Annelies wrote:
Hallo, ik ben begonnen met deze trui te breien en als beginster vraag ik me af hoe ik het telpatroon moet lezen. Bij a1 is dit dan 3 rijen rechts zoals het er staat? Of moet ik 6 rijen rechts breien omdat je nog eens terug moet? Mvg Annelies
11.04.2018 - 15:29DROPS Design answered:
Hallo Annelies, In de telpatronen zijn altijd alle naalden aangegeven, dus de zowel de heengaande als de teruggaande naald. (Bij rondbreien heb je geen teruggaande naald :) )
12.04.2018 - 07:11
![]() Phëadra wrote:
Phëadra wrote:
Hallo, ik ben begonnen met deze trui te breien. Het is de eerste keer dat ik met naalden zonder kop brei, mijn vraag is nu ivm het telpatroon A.1 hoe ik de teruggaande naald moet breien? Is dit recht of averecht? Telt de teruggaande naald als 2 rij op het telpatroon of nog steeds in dezelfde? Alvast bedankt!
06.04.2018 - 19:37DROPS Design answered:
Hallo Phëadra, In de telpatronen zijn altijd alle naalden weergegeven. De 'teruuggaande' naald brei je recht op de goede kant en averecht op de verkeerde kant (zodat er tricotsteek ontstaat op de goede kant).
08.04.2018 - 18:32
![]() Ann-Mari Selin wrote:
Ann-Mari Selin wrote:
Jag håller fullständigt med Rebecka som lämnat en kommentar. Är själv jättebesviken på resultatet. För det första stämmer inte mönstret, A5 och A6, (jag fick sticka om flera gånger) och för det andra fungerar det inte att sticka koftan i ett stycke utan axlar eller krage. Den hasar bara ner. Absolut inte ett bra mönster. Tyvärr!
23.10.2017 - 10:32
![]() Inge wrote:
Inge wrote:
Hallo. Dank voor je snelle antwoord. Is het normaal als je dit vest aantrekt dat het werk aan de nek achteraan niet mooi aansluit? Het is een vierkante basis hierdoor zit er op zich weinig model in en als ik het vest aantrek dan blaast het achteraan in de nek. Op de foto kan ik niet precies zien hoe dit op het model uitvalt omdat haar haren erboven hangen. ..
07.10.2017 - 18:10DROPS Design answered:
Hallo Inge, Ja dat klopt, dat het niet goed aansluit is een beetje inherent of karakteristiek aan een dergelijk vierkant model en is eigenlijk bedoeld om losjes over een andere laag heen te dragen.
09.10.2017 - 16:39
![]() Inge wrote:
Inge wrote:
Hallo. Ik werkte dit patroon net af en ben supertevreden met het mooie resultaat. Ik merk op dat de randen van mijn werk opkrullen. Ik las dat je je werk het best kunt "blocken" maar hoe doe je dat precies met een trui van wol?
07.10.2017 - 14:25DROPS Design answered:
Hallo Inge, Wat ik zelf wel eens doe, wanneer het alleen om de randen gaat, is het 'oppersen' met een strijkijzer van de randen. Je legt het werk op de strijkplank en daaroverheen een vochtige theedoek (van katoen dus). Dan met het strijkijzer heel voorzichtig erover heen. (LET OP: absoluut niet te veel druk uitoefenen of lang het strijkijzer er op houden en ook altijde een lagje kantoen er tussen.) Hiermee kun je het opkrullen weg krijgen. Blokken of opspannen doe je met name bij kantachtig werk. In deze link vind je meer informatie daarover.
07.10.2017 - 15:44
![]() Rebecka wrote:
Rebecka wrote:
Jag just stickat färdigt koftan men är jättebesviken över resultatet. Jag stickar mycket men har aldrig misslyckats på det här sättet. Måtten stämmer och formen stämmer med skissen men passformen är usel. Det går inte att ha koftan på sig eftersom den inte har några "axlar" och är så pass bred upptill vid halsen att allt bara glider ned och av. Kan jag ändå ha gjort något fel? Har tyvärr lagt ned mycket möda och ganska många kronor på något som inte går att använda vilket känns tråkigt.
08.09.2017 - 20:43DROPS Design answered:
Hej Rebecka, Men så tråkigt at du inte tycker om modellen. Koftan på bilden är stickat enligt mönstret och ser ut som på måttskissen. Skulle du ha haft en mindre storlek kanske... måttet på ryggen mellan ärmarna är viktiga för at den skall sitta bra.
13.09.2017 - 13:11
![]() Yvonne Hovland wrote:
Yvonne Hovland wrote:
Jeg har nå strikket ferdig jakken, men til min store skuffelse henger de øverste delene på ermene (der hvor jeg syr sammen ermene med bol)veldig langt ned på armene mine. Er det noe jeg kan gjøre med dette? Dette er et typisk problem som går igjen hos mine strikkeprosjekter desverre.
02.08.2017 - 10:43DROPS Design answered:
Hei Yvonne. Har du valgt riktig størrelse til deg/overholdt strikkefastheten? Mulig den er blitt for stor over ryggen, slik at ermene kommer for langt ned. Om du tar en titt på målskissen nederst på oppskriften, så kan du se hvilken mål som blir over ryggen og se hvilket mål som vil passe deg best. God Fornøyelse!
15.08.2017 - 08:16Anna wrote:
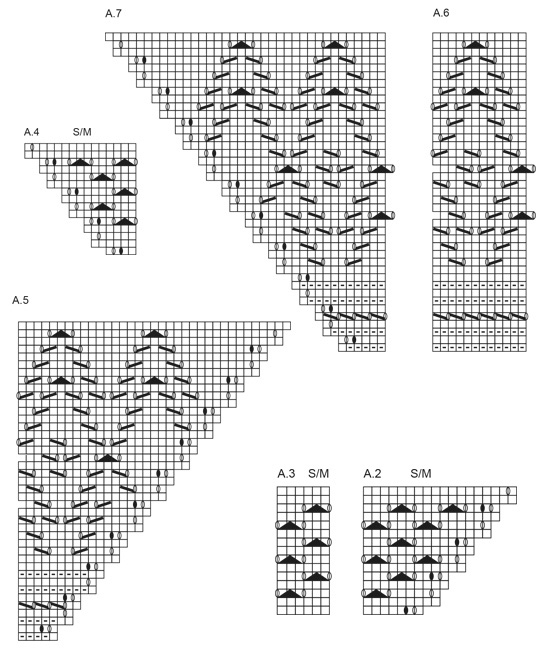
Jag får inte maskantalet att stämma när jag stickar diagrammen A.5, A.6 och A.7, spec på varv 24. Det verkar som om det saknas en maska i A.5 i slutet av varv 24? Om man stickar enligt diagrammet så blir det en maska för litet (130 istället för 131 som är antalet maskor på varv 25).
30.07.2017 - 09:34DROPS Design answered:
Hej Anna, det ser ut som du har rätt, du skall sticka en maska mera i slutet av varv 24 i diagram A.5. Vi lägger ut ett nytt diagram. Tack för info!
29.08.2017 - 12:31
![]() Yvonne Hovland wrote:
Yvonne Hovland wrote:
Hvor mange cm er de forskjellige størrelsene i lengden osv.
29.05.2017 - 15:04DROPS Design answered:
Hej Yvonne, du finder målene på jakken i måleskitsen nederst i opskriften. God fornøjelse!
29.05.2017 - 17:04
|
||||||||||||||||||||||
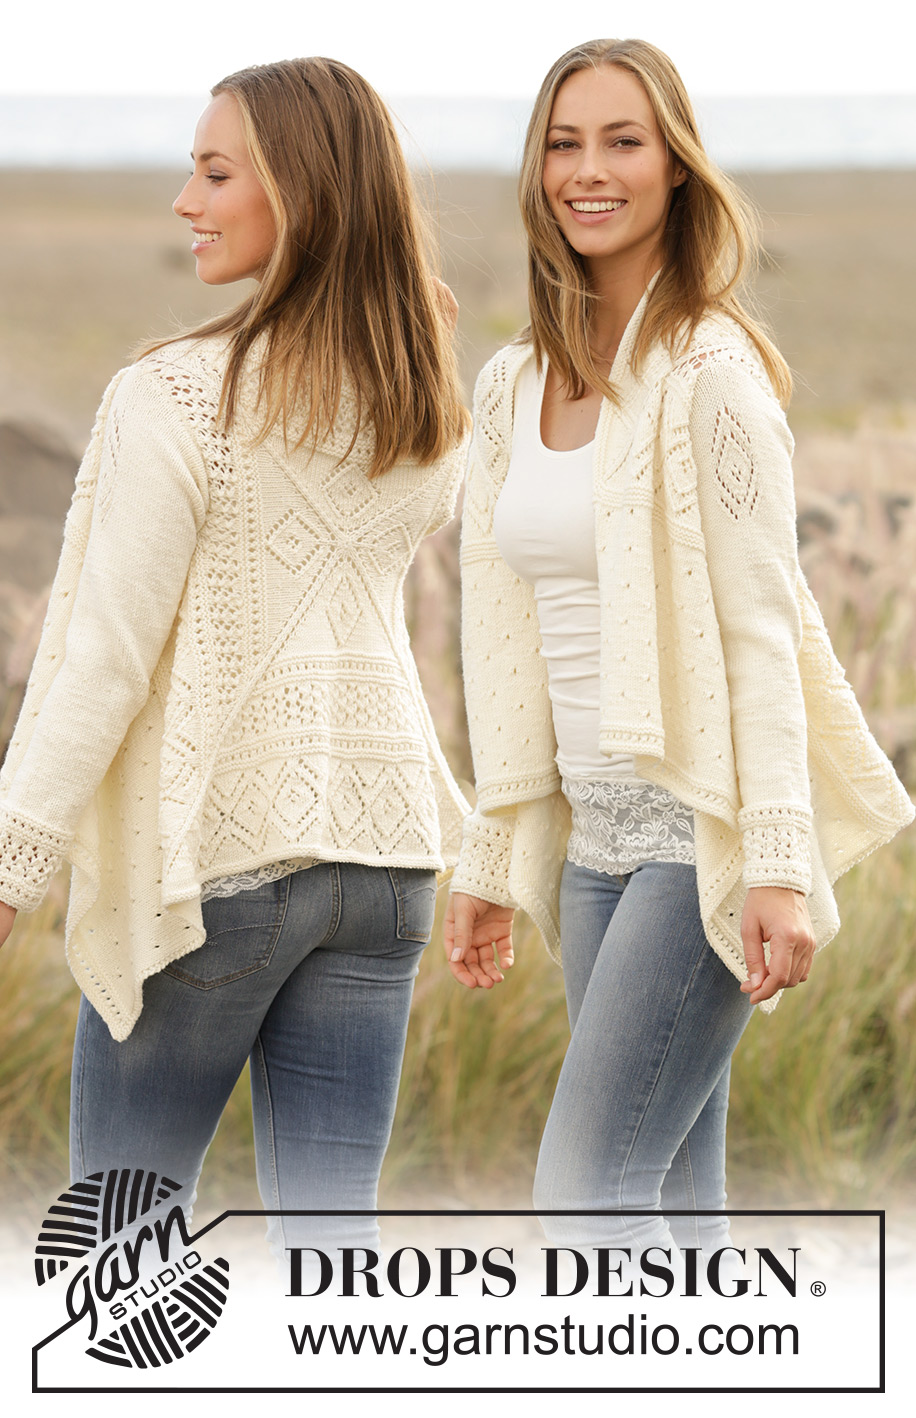
Sunny Date#sunnydatecardigan |
||||||||||||||||||||||
 |
 |
|||||||||||||||||||||
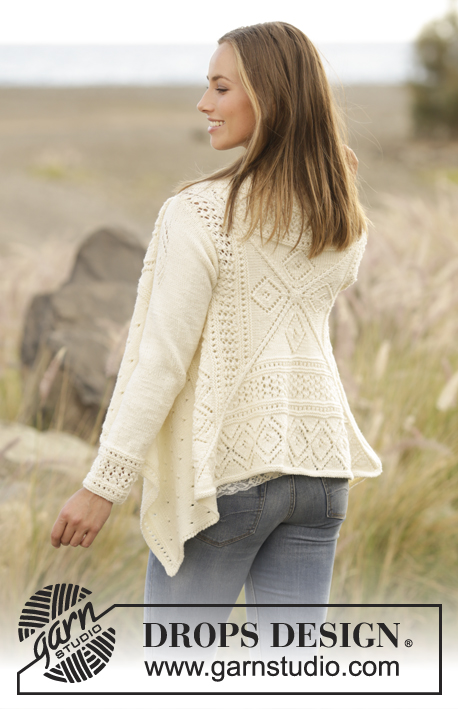
Knitted jacket with lace pattern, worked in square in DROPS Merino Extra Fine. Sizes S - XXXL.
DROPS 176-26 |
||||||||||||||||||||||
|
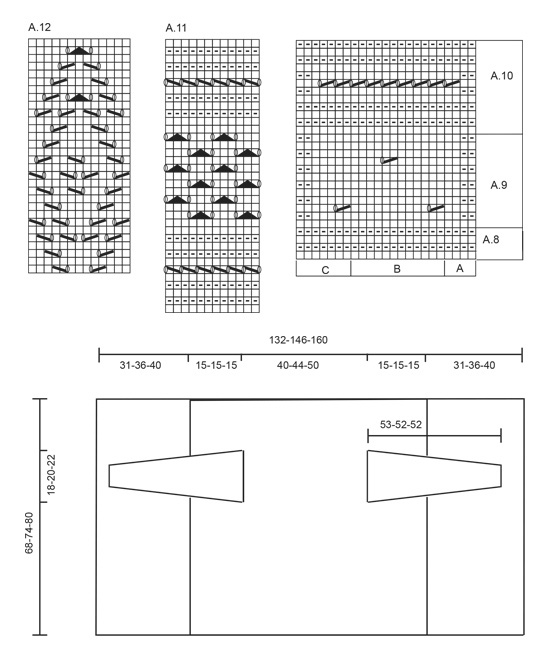
RIDGE/GARTER STITCH (worked in the round): 1 ridge = 2 rounds. Knit 1 round and purl 1 round. PATTERN: See diagrams A.1 to A.12. The diagrams show the pattern seen from the right side. Choose the diagram needed for the right size when you are working according to A.2, A.3 and A.4. INCREASE TIP (for the sleeves): Increase 1 stitch by making 1 yarn over, on the next round knit the yarn overs twisted to prevent holes. Start 1 stitch before the marker thread, make 1 yarn over, knit 3 (the stitch with the marker thread sits in the middle of these 3 stitches), make 1 yarn over. --------------------------------------------------------- JACKET: The piece is worked in square on double pointed needles/circular needle, from the middle of the back and outwards. Then work the front pieces back and forth in each side. BACK PIECE: Cast on 12 stitches in all sizes with double pointed needles size 4 mm and Merino Extra Fine. Work according to A.1 (= 4 repeats on the round) and switch to circular needle when there is increase enough stitches. When A.1 is finished 1 time in height there are 236 stitches on the round. Continue working as follows: * A.2 (= 7 stitches), A.3 over the next 48 stitches (= 8 repeats in width), A.4 over the next 4 stitches *, work from *-* in total 4 times. NOTE! Choose the diagram for the right size. On the next to last round in A.2, A.3 and A.4 (there are now 324-372-420 stitches on the round) work as follows: Work the first 83-95-107 stitches, cast off the next 38-42-46 stitches (= armhole), work the next 163-191-219 stitches, cast off the next 38-42-46 stitches (= armhole) and work the last 2 stitches. On the next round (= the last round in A.2, A.3 and A.4) cast on 38-42-46 new stitches over the cast-off stitches = 332-380-428 stitches. Continue to work as follows: * A.5 (= 5 stitches), A.6 over the next 72-84-96 stitches (= 6-7-8 repeats in width), A.7 (= 6 stitches) *, work from *-* in total 4 times. Continue with A.5, A.6 and A.7 until the diagrams are worked 1 time in height = 572-620-668 stitches on the round. Work 2 RIDGES – see description above, over all the stitches (without increases), then cast off the first 143-155-167 stitches, place the next 143-155-167 stitches on a thread (knit them first), cast off the next 143-155-167 stitches, keep the last 143-155-167 stitches on the needle and continue working back and forth over these stitches (= right front piece). RIGHT FRONT PIECE: The piece is worked back and forth without increases in the side. Work as follows, from the right side: A.8 A (= 4 stitches), A.8 B over the next 132-144-156 stitches (= 11-12-13 repeats in width), A.8 C (= 7 stitches). Work A.8 1 time in height, then work A.9 A-C over A.8 A-C. When A.9 has been worked 6-7-8 times in height, work A.10 A-C over A.9 A-C. Cast off with knit. LEFT FRONT PIECE: Place the stitches from the thread in the other side back on the needle. Work in the same way as the right front piece, but the first row in A.8 has already been worked, start from the wrong side on the 2nd row in the diagram. SLEEVE: The sleeve is worked in the round with double pointed needles. Cast on 48-48-54 stitches with double pointed needles size 4 mm and Merino Extra Fine. Work A.11 over all stitches. When A.11 has been worked 1 time in height continue working stocking stitch, on the first round adjust the number of stitches to 45-49-55 stitches. Insert 1 marker thread in the first stitch on the round = mid under the sleeve. When the piece measures 10 cm increase 1 stitch on each side of the marker thread – READ INCREASE TIP. Increase every 2½-2-2cm in total 16-18-19 times = 77-85-93 stitches. AT THE SAME TIME when the piece measures 41-40-40 cm work A.12 over the middle 13 stitches on the round (= mid on top of the sleeve). Cast off when the sleeve measures 53-52-52 cm. Work 1 more sleeve. ASSEMBLY: Sew in the sleeves. Use a needle to sew and close up the hole mid back (= cast-on edge). |
||||||||||||||||||||||
Diagram explanations |
||||||||||||||||||||||
|
||||||||||||||||||||||
 |
||||||||||||||||||||||
 |
||||||||||||||||||||||
 |
||||||||||||||||||||||
 |
||||||||||||||||||||||
Have you finished this pattern?Tag your pictures with #dropspattern #sunnydatecardigan or submit them to the #dropsfan gallery. Do you need help with this pattern?You'll find 27 tutorial videos, a Comments/Questions area and more by visiting the pattern on garnstudio.com. © 1982-2026 DROPS Design A/S. We reserve all rights. This document, including all its sub-sections, has copyrights. Read more about what you can do with our patterns at the bottom of each pattern on our site. |
||||||||||||||||||||||


With over 40 years in knitting and crochet design, DROPS Design offers one of the most extensive collections of free patterns on the internet - translated to 17 languages. As of today we count 324 catalogues and 12245 patterns translated into English (UK/cm). 12245
We work hard to bring you the best knitting and crochet have to offer, inspiration and advice as well as great quality yarns at incredible prices! Would you like to use our patterns for other than personal use? You can read what you are allowed to do in the Copyright text at the bottom of all our patterns. Happy crafting!
Post a comment to pattern DROPS 176-26
We would love to hear what you have to say about this pattern!
If you want to leave a question, please make sure you select the correct category in the form below, to speed up the answering process. Required fields are marked *.