
Popular categories
Looking for a yarn?


Comments / Questions (23)
![]() Margrethe Svanhede wrote:
Margrethe Svanhede wrote:
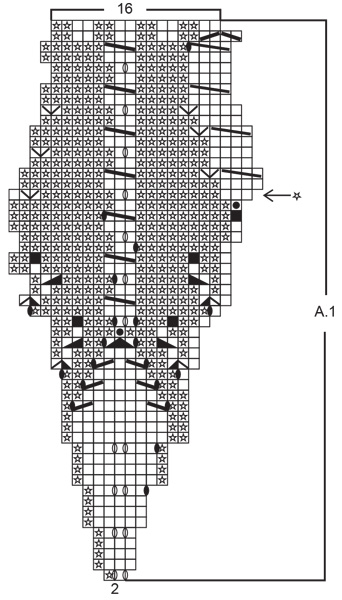
Jeg kan heller ikke få mønstret til at passe. Efter udtagning på række 36 har jeg 24 m i hvert mønster og på række 37 er der kun 23 m. Mvh.
07.03.2019 - 09:08DROPS Design answered:
Hei Margrethe. Det har du helt rett i, her er det en feil i diagrammet. Det er bare 1 økning i hver rapport: den siste økningen skal fjernes. Vi skal få rettet diagrammet med det samme. Beklager det. Takk for beskjed og god fornøyelse videre
12.03.2019 - 14:31
![]() Babouille wrote:
Babouille wrote:
Bonsoir, je vous remercie pour votre réponse rapide, en fait je n'avais pas bien tricoté le rang précèdent. Encore un grand merci
19.02.2019 - 01:58
![]() BABOUILLE wrote:
BABOUILLE wrote:
Bonjour, encore moi merci pour votre réponse mais décidemment sois je ne suis pas douée ou alors mes neurones se ramollissent, j'ai encore un souci avec le rang 2. a la fin du diagramme après les 2 maille il faut glisser une maille envers sur aig auxiliaire puis tricoter le jeté torse, mais à quel moment il faut faire le jeté, je ne sais pas merci de m'aider encore une fois. Merci d'avance
16.02.2019 - 14:00DROPS Design answered:
Bonjour Babouille, si c'est le même rang que la question précédente, le jeté a été fait au tour précédent (juste à la fin du tour, jeté en noir). Vous terminez A.1 par une torsade en glissant la dernière m env de A.1 sur une aiguille aux. derrière l'ouvrage, tricotez le jeté torse à l'end et terminez par la m env de l'aiguille auxiliaire. Bon tricot!
18.02.2019 - 09:27
![]() Babouille wrote:
Babouille wrote:
Bonjour merci pour votre réponse rapide, je rencontre un autre souci au rang 21 du diagramme, il faut commencer par une maille endroit, puis je ne comprends pas comment réaliser le sigle(faire un jeté sur l'aiguille auxiliaire) pouvez vous m'aider merci d'avance
15.02.2019 - 09:54DROPS Design answered:
Bonjour Babouille, traitez ce jeté comme une maille normale, mais tricotez-le torse pour éviter qu'il forme un trou: 1 m end, glissez le jeté sur l'aiguille auxiliaire devant l'ouvrage (comme une torsade classique), tricotez la maille suivante à l'envers, reprenez le jeté sur l'aiguille auxiliaire et tricotez-le torse (= dans le brin arrière au lieu du brin avant). Bon tricot!
15.02.2019 - 15:45
![]() BABOUILLE wrote:
BABOUILLE wrote:
Bonjour, je ne réussis pas à faire le montage pour qu'il n'y ait pas de trou, existe t il une vidéo pour ce montage merci d'avance pour votre réponse
14.02.2019 - 10:48DROPS Design answered:
Bonjoru Babouille, tout à fait, cette vidéo explique comment monter les mailles en rond. Bon tricot!
14.02.2019 - 11:44Doryka wrote:
Hi. You said the pattern was corrected, but row 36 and 37 still wrong. Where can I find the right pattern? Thanks for the answer
18.09.2018 - 10:00DROPS Design answered:
Dear Doryka, row 36 and 37 are correct: at the beg of row 36 you kfb the first and last st on diagram, on row 37 these 4 sts (= last 4 sts from previous repeat + first 4 sts on next repeat) will be the first 4 sts in A.1. Happy knitting!
18.09.2018 - 11:21Doryka wrote:
Hi. You said the pattern is corrected, but I didn't see it. Row 36 and 37 still didn't work. Where can I find the right pattern?
18.09.2018 - 00:21DROPS Design answered:
Dear Doryka, you can find the corrections by clicking on the red text, just below the pattern text. In this case it says : " Correction: Small error corrected in diagram A.1." Happy Knitting!
18.09.2018 - 04:53
![]() Jorun wrote:
Jorun wrote:
Hi! I\'m wondering about the same thing as Sara on round 36/37. It can\'t be right. How could it be eight purl stitches all of a sudden, when the increase is before the purl stitches? I figured out the moving of the last two stitches from the round before, but that doesn\'t make any difference. There are still nine purl stitches after the last increase ... Help!
29.03.2018 - 16:52DROPS Design answered:
Dear Jorun, on round 35 you increase 1 st after the middle lace cable, this st will be then worked P twisted on round 36. On round 36 you inc 4 sts (= 2 sts at the beg of each repeat + 2 sts at the end of each repeat), on round 37 you will work these 4 sts at the beg of each repeat (= last 2 sts from previous repeat + first 2 sts on repeat). Happy knitting!
30.03.2018 - 11:58
![]() Catherine wrote:
Catherine wrote:
La correction que j'ai finalement apporté pour que la transition entre le rang 36 et 37 fonctionne est que je n'ai pas fait l'augmentation à la fin du rang 36 et j'ai reculé mon marqueur d'un maille au début du rang 37. Le diagramme fonctionne très bien en ne faisant pas la dernière augmentation du rang 36. Merci! Bonne journée!
26.03.2018 - 14:13
![]() Catherine wrote:
Catherine wrote:
Je n'arrive pas à faire la jonction entre le rangs 36 et 37. Si je compte bien, le rangs 36 au total avec l'augmentation dans la première et dernière donne un total de 24 mailles pour le motif. Le rangs 37 utilise un motif qui nécessite 23 mailles. Pouvez-vous m'indiquer où est passé la maille qui manque, s'il-vous-plaît? Merci beaucoup! 😁
21.03.2018 - 21:49DROPS Design answered:
Bonjour Catherine, au rang 36, vous augmentez au début + à la fin de A.1, au rang 37, les 2 dernières m du A.1 précédent vont se tricoter avec les 2 premières m du A.1. suivant, on décale ainsi le motif de 2 m pour avoir 4 m end au début de chaque A.1 pour la torsade. Bon tricot!
06.04.2018 - 09:34
|
||||||||||||||||||||||||||||||||||||||||||||||||||||
Little Sunshine#littlesunshinehat |
||||||||||||||||||||||||||||||||||||||||||||||||||||
|
|
||||||||||||||||||||||||||||||||||||||||||||||||||||
Knitted children beret with leaf pattern worked top down in DROPS Karisma.
DROPS Children 27-17 |
||||||||||||||||||||||||||||||||||||||||||||||||||||
|
PATTERN: See diagram A.1. MAGIC CIRCLE: To avoid hole in the middle beg with this technique: Hold yarn end in the left hand and make a loop around left index finger (from left to right). Hold the loop with left thumb and index finger. Insert needle through loop, get yarn from ball (i.e. place yarn 1 time over needle from you), pull yarn back through loop, 1 YO (now place yarn from the back and towards you) and pull YO through sts on needle, * insert needle through loop, 1 YO (place yarn from the back and towards you), pull YO through loop, 1 YO (from the back and towards you) and pull YO through outermost st on right needle (i.e. the last st made) *, repeat from *-* until there are 14 sts on needle. Distribute sts on 4 double pointed needles size 3 or 3.5 mm as explained in pattern. Then work as explained in pattern – AT THE SAME TIME pull yarn end so that loop is tighten tog and the hole disappears. ---------------------------------------------------------- BERET: Work in the round on double pointed needles, switch to circular needle when needed. Start with Karisma and MAGIC CIRCLE - see explanation above = 14 sts. Distribute sts on 4 double pointed needles size 3 or 3.5 mm with 4 sts on each of the first 3 needles and 2 sts on last needle. Work pattern in the round according to diagram A.1 (= 7 repetitions of 2 sts). REMEMBER THE KNITTING TENSION When 1 round remain in A.1, there are 112 sts on needle. Switch to circular needle size 2.5 or 3 mm and continue rib in the round as shown in last round of A.1. When rib measures 4-5 cm, cast off with K over K and P over P (make sure to avoid a tight cast-off edge). |
||||||||||||||||||||||||||||||||||||||||||||||||||||
Diagram explanations |
||||||||||||||||||||||||||||||||||||||||||||||||||||
|
||||||||||||||||||||||||||||||||||||||||||||||||||||
 |
||||||||||||||||||||||||||||||||||||||||||||||||||||
Have you finished this pattern?Tag your pictures with #dropspattern #littlesunshinehat or submit them to the #dropsfan gallery. Do you need help with this pattern?You'll find 22 tutorial videos, a Comments/Questions area and more by visiting the pattern on garnstudio.com. © 1982-2026 DROPS Design A/S. We reserve all rights. This document, including all its sub-sections, has copyrights. Read more about what you can do with our patterns at the bottom of each pattern on our site. |
||||||||||||||||||||||||||||||||||||||||||||||||||||


With over 40 years in knitting and crochet design, DROPS Design offers one of the most extensive collections of free patterns on the internet - translated to 17 languages. As of today we count 324 catalogues and 12267 patterns translated into English (UK/cm). 12267
We work hard to bring you the best knitting and crochet have to offer, inspiration and advice as well as great quality yarns at incredible prices! Would you like to use our patterns for other than personal use? You can read what you are allowed to do in the Copyright text at the bottom of all our patterns. Happy crafting!
Post a comment to pattern DROPS Children 27-17
We would love to hear what you have to say about this pattern!
If you want to leave a question, please make sure you select the correct category in the form below, to speed up the answering process. Required fields are marked *.