
Popular categories
Looking for a yarn?


Comments / Questions (17)
![]() BARTHELEMY wrote:
BARTHELEMY wrote:
Sur le modéle 171-10 il manque le diagramme A1 ou puis je le trouver svp merci
02.07.2025 - 17:41DROPS Design answered:
Bonjour Mme Barthelemy, le diagramme A.1 se trouve à droite du schéma des mesures, juste sous la manche; c'est un petit diagramme de 2 mailles x 4 rangs. Bon tricot!
03.07.2025 - 16:50
![]() Monique wrote:
Monique wrote:
I found the A.1 sorry
21.12.2024 - 14:44
![]() Monique wrote:
Monique wrote:
Where is A.1 because I see only A .2
21.12.2024 - 14:43DROPS Design answered:
Dear Monique, A.1 is right under the sleeve, in the size chart. It's a small 2- stitch pattern. Happy knitting!
22.12.2024 - 19:05
![]() Sara wrote:
Sara wrote:
Buongiorno vorrei far presente allo staff di drops design che lo sprone delle maniche di quasi tutti i maglioni invernali è enorme e le maniche nella parte superiore cioè la parte dello sprone fanno difetto dovreste diminuire i punti perché risultano eccessivi anche nella taglia S, in quanto le misure riportate sui modelli non corrispondono utilizzando filati simili. Grazie
31.12.2021 - 19:40
![]() Sara wrote:
Sara wrote:
Buongiorno sto lavorando questo modello nella taglia M, però mi sono accorta che nello schema A2 , precisamente al ferro n 47 , c è un solo aumento sul lato sinistro ma non c'è simmetricamente sul lato destro , è un errore? Bisogna fare solo un aumento sul lato sinistro e sul destro no? Non capisco...potreste spiegarmi . Grazie
23.12.2021 - 12:45DROPS Design answered:
Buonasera Sara, abbiamo inoltrato la sua richiesta al settore design: se ci dovessero essere delle correzioni le troverà direttamente online. Buon lavoro!
27.12.2021 - 17:55
![]() Agnieszka wrote:
Agnieszka wrote:
Dzień dobry, w opisie karczku pojawia się odniesienie do schematu A1 (=2oczka): * A.1 (= 2 o.). Mam pytanie , jakie to oczka, bo nie ma schematu do tego fragmentu?
25.07.2021 - 17:33DROPS Design answered:
Witaj Agnieszko, schemat A.1 znajduje się po prawej stronie schematycznego rysunku swetra (z wymiarami), pod opisem. Pozdrawiamy!
27.07.2021 - 15:58
![]() Debora wrote:
Debora wrote:
Buonasera, nella spiegazione dell'alzata mi pare ci sia un errore perché se il primo ferro accorciato è a diritto, girando il lavoro si lavora a rovescio e non a diritto come c'è scritto, quindi tutta la sequenza viene sballata...e siccome a campione uguale a me viene uno scollo molto stretto per cui non mi passa la testa, come posso fare per ovviare al problema? Grazie mille e buon lavoro
23.03.2020 - 20:41DROPS Design answered:
Buonasera Debora, grazie per la segnalazione, abbiamo corretto il testo. Buon lavoro!
23.03.2020 - 21:15
![]() Sandra wrote:
Sandra wrote:
Hallo mir kommt die Anzahl der Maschen bei Aufnahme am Hals sehr wenig vor, wird das nicht viel zu eng???
19.01.2020 - 15:42DROPS Design answered:
Liebe Sandra, sollte Ihre Maschenprobe stimmen, dann bekommen Sie die gleichen Maßen wie in der Maßskizze. Viel Spaß beim stricken!
20.01.2020 - 09:45
![]() Irina wrote:
Irina wrote:
Sehr schöner Pullover, super Anleitung. Habe viel Freude beim Tragen, vielen herzlichen Dank!
25.01.2019 - 22:06
![]() Gro wrote:
Gro wrote:
Hei! Jeg strikker i XL. Men jeg får ikke A2 til å stemme. 110 masker er på pinnen. Diagrammet/mønsteret er 9 masker. Antall ganger det skal strikkes er totalt 10. Hva gjør jeg med maskene som er til overs?
26.07.2017 - 11:20DROPS Design answered:
Hei Gro. Du skal også strikke A.1 (=2 masker) før A.2 (=9 masker). A. 1 og A.2 = 11 masker, som strikkes 10 ganger = 110 masker, som du har på pinnen. God Fornøyelse!
07.08.2017 - 12:31
|
||||||||||||||||||||||
Magic Web#magicwebsweater |
||||||||||||||||||||||
|
|
||||||||||||||||||||||
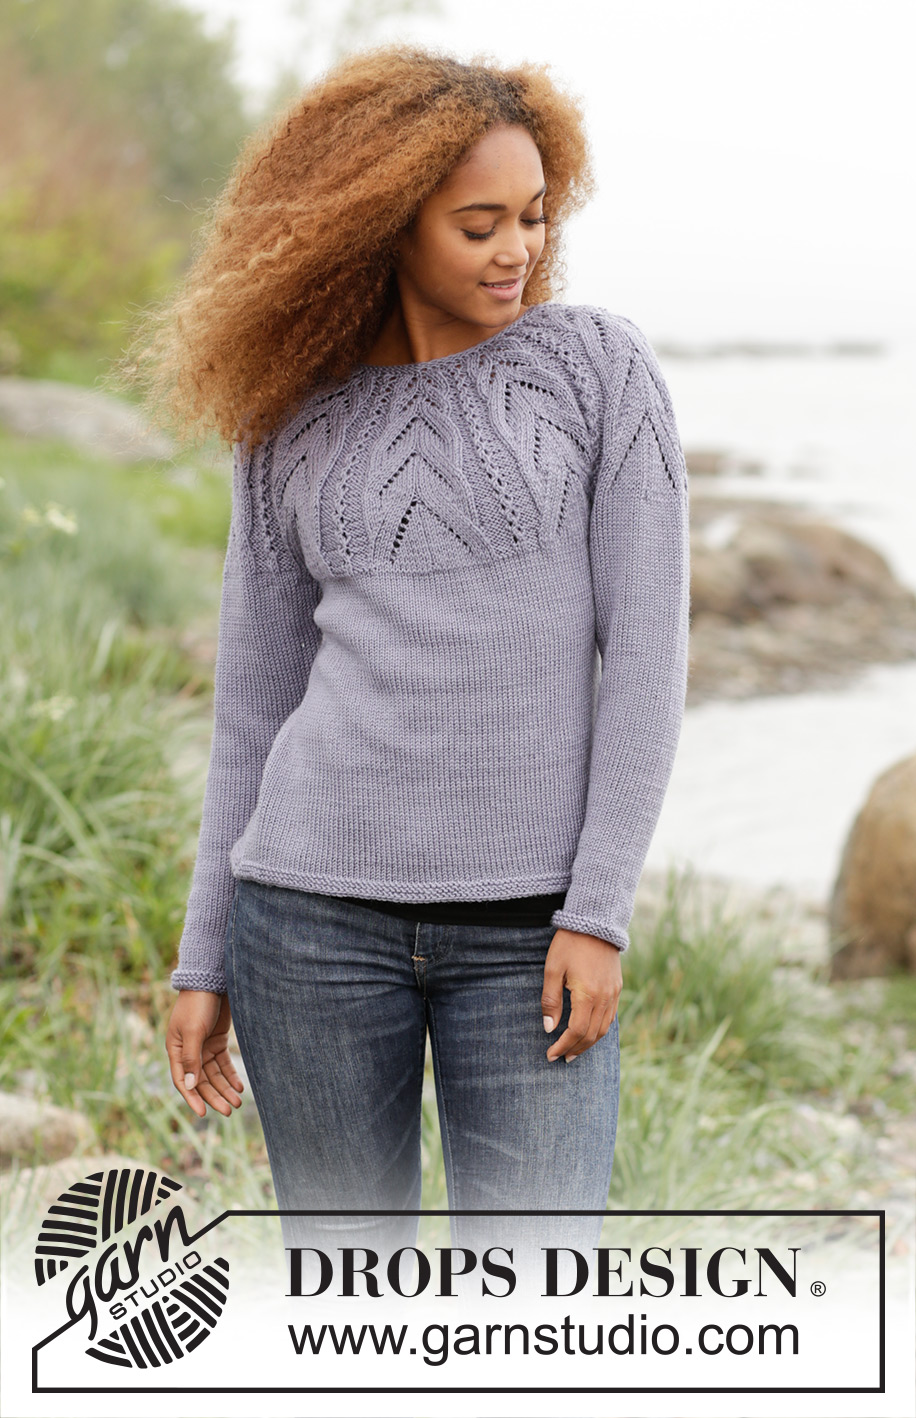
Knitted DROPS jumper with lace pattern on yoke worked top down in ”Karisma”. Size: S - XXXL.
DROPS 171-10 |
||||||||||||||||||||||
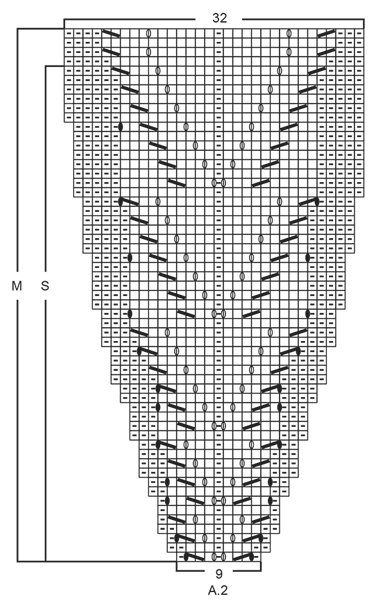
|
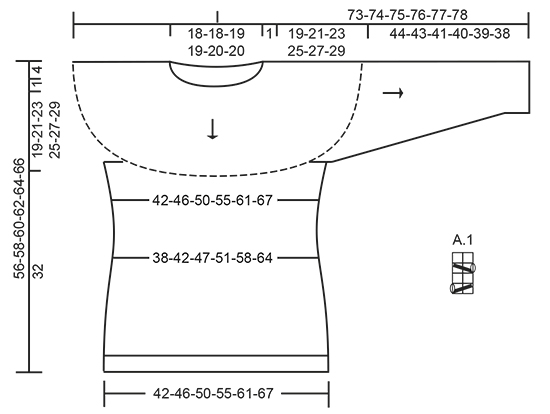
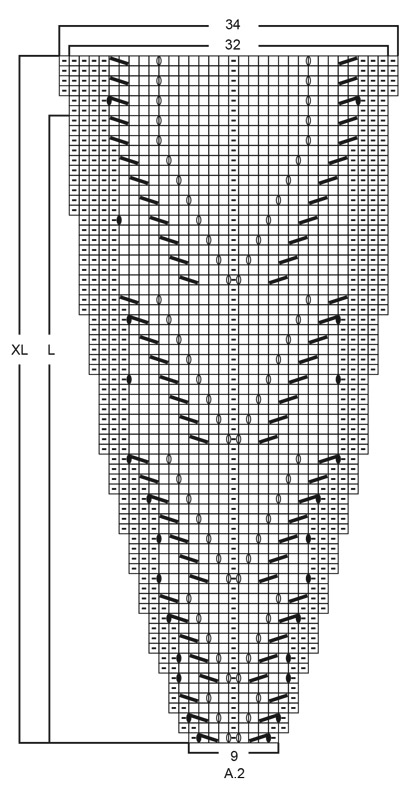
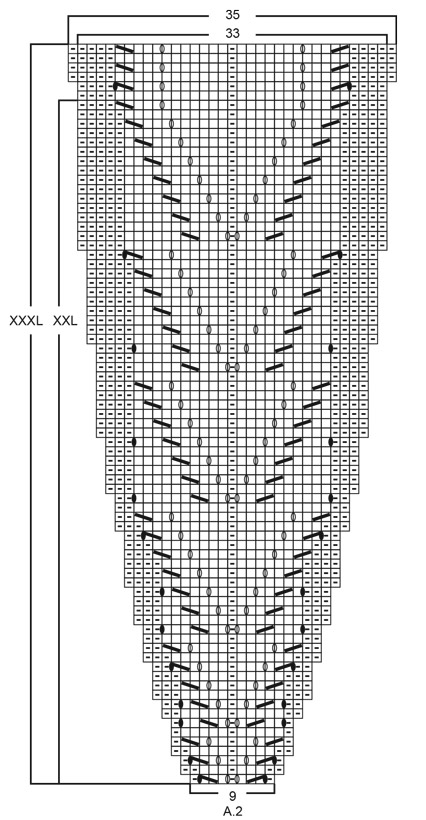
GARTER ST (worked in the round): 1 ridge = 2 rounds. * K 1 round and P 1 round *, repeat from *-*. PATTERN: See diagram A.1 and A.2 (choose diagram for correct size). INCREASE TIP-1: To calculate how often inc should be done, use the total no of sts on row (e.g. 74 sts) and divide by no of inc to be done (e.g. 14) = 5.3. I.e. in this example inc after approx. every 5th st. Inc 1 st by making 1 YO, on next round work YO twisted to avoid holes. INCREASE TIP-2 (applies to sides of body): Work until 2 sts remain before marker: Make 1 YO, K 4 (marker is in the middle of these 4 sts), make 1 YO (= 2 sts inc). On next round K YOs twisted to avoid holes. DECREASE TIP (applies to sides on body and mid under sleeve): Beg 3 sts before marker and K 2 tog, K 2 (marker is between these 2 sts), slip 1 st as if to K, K 1, psso (= 2 sts dec). ---------------------------------------------------------- JUMPER: Worked in the round on a circular needle from top down. Sleeves are worked in the round on a short circular needle/double pointed needles. YOKE: Cast on 74-76-80-80-86-86 sts on a short circular needle size 3 mm with Karisma. Work 2 ridges in GARTER ST - see explanation above. Switch to a short circular needle size 4 mm and K 1 round while inc 14-23-30-30-35-35 sts evenly - READ INCREASE TIP = 88-99-110-110-121-121 sts. For better shape work an elevation in the back of neck as follows: Insert 1 marker mid back. K 11-12-13-13-15-15 sts past marker, turn, tighten yarn and P 22-24-26-26-30-30 sts back. Turn, tighten yarn and K 33-36-39-39-45-45 sts, turn, tighten yarn and P 44-48-52-52-60-60 sts back. Turn, tighten yarn and K 55-60-65-65-75-75 sts, turn, tighten yarn and P 66-72-78-78-90-90 sts back. Turn and K until mid back. Work next round as follows: * Work A.1 (= 2 sts), work A.2 (= 9 sts – choose diagram for correct size) *, repeat from *-* the entire round (= 8-9-10-10-11-11 times in total). Continue pattern like this and inc as shown in A.2. REMEMBER THE KNITTING TENSION When A.2 has been worked, there are 272-306-340-360-385-407 sts on needle. Work 1 round with K over K and P over P and inc AT THE SAME TIME 8-6-2-8-7-9 sts evenly = 280-312-342-368-392-416 sts (inc in P sections). Piece measures now approx. 20-22-24-26-28-30 cm measured mid front (incl neck edge). Work next round as follows: Work 40-44-48-53-58-63 sts in stocking st (= ½ back piece), slip the next 60-68-75-78-80-82 sts on a stitch holder (= sleeve), cast on 8-8-10-10-12-14 new sts (= in the side under sleeve), work 80-88-96-106-116-126 sts in stocking st (= front piece), slip the next 60-68-75-78-80-82 sts on a stitch holder (= sleeve), cast on 8-8-10-10-12-14 sts (= in the side under sleeve), work the remaining 40-44-48-53-58-63 sts in stocking st (= ½ back piece). Finish body and sleeves separately. BODY: = 176-192-212-232-256-280 sts. Insert 1 marker in each side = 88-96-106-116-128-140 sts between markers on front and back piece - NOW MEASURE PIECE FROM HERE. Work in stocking st in the round. When piece measures 3 cm, dec 1 st on each side of both markers - READ DECREASE TIP (= 4 sts dec). Dec like this every 2-2-2-2-3-3 cm a total of 4-4-4-4-3-3 times in each side = 160-176-196-216-244-268 sts. When piece measures 15 cm (jumper measures approx. 39-41-43-45-47-49 cm from shoulder), inc 1 st on each side of both markers - READ INCREASE TIP-2 (= 4 sts inc). Inc like this every 3½ cm 4-4-4-4-3-3 times in total in each side = 176-192-212-232-256-280 sts. When piece measures 30 cm (jumper measures approx. 54-56-58-60-62-64 cm from shoulder), switch to circular needle size 3 mm. Work 3 ridges, switch back to circular needle size 4 mm and cast off with K (this is done to avoid a tight cast-off edge). Jumper measures approx. 56-58-60-62-64-66 cm from shoulder. SLEEVE: Worked in the round on a short circular needle top down, switch to double pointed needles when needed. Slip the 60-68-75-78-80-82 sts from stitch holder in one side of piece on a short circular needle size 4 mm and pick in addition 1 st in each of the 8-8-10-10-12-14 sts cast on under sleeve on body = 68-76-85-88-92-96 sts. Insert 1 marker in the middle of the 8-8-10-10-12-14 sts under sleeve (= beg of round) – NOW MEASURE PIECE FROM HERE. Work in stocking st in the round. When piece measures 3-3-3-3-2-2 cm, dec 2 sts mid under sleeve - READ DECREASE TIP. Dec like this every 2½-2-1½-1½-1½-1½ cm 14-17-20-21-22-23 times in total = 40-42-45-46-48-50 sts. When sleeve measures 42-41-39-38-37-36 cm (or desired length), switch to double pointed needles size 3 mm. Work 3 ridges in GARTER ST in the round - see explanation above. Switch back to double pointed needles size 4 mm and cast off with K. Sleeve measures approx. 44-43-41-40-39-38 cm from marker. Work the other sleeve the same way. |
||||||||||||||||||||||
Diagram explanations |
||||||||||||||||||||||
|
||||||||||||||||||||||
 |
||||||||||||||||||||||
 |
||||||||||||||||||||||
 |
||||||||||||||||||||||
 |
||||||||||||||||||||||
Have you finished this pattern?Tag your pictures with #dropspattern #magicwebsweater or submit them to the #dropsfan gallery. Do you need help with this pattern?You'll find 27 tutorial videos, a Comments/Questions area and more by visiting the pattern on garnstudio.com. © 1982-2026 DROPS Design A/S. We reserve all rights. This document, including all its sub-sections, has copyrights. Read more about what you can do with our patterns at the bottom of each pattern on our site. |
||||||||||||||||||||||


With over 40 years in knitting and crochet design, DROPS Design offers one of the most extensive collections of free patterns on the internet - translated to 17 languages. As of today we count 324 catalogues and 12267 patterns translated into English (UK/cm). 12267
We work hard to bring you the best knitting and crochet have to offer, inspiration and advice as well as great quality yarns at incredible prices! Would you like to use our patterns for other than personal use? You can read what you are allowed to do in the Copyright text at the bottom of all our patterns. Happy crafting!
Post a comment to pattern DROPS 171-10
We would love to hear what you have to say about this pattern!
If you want to leave a question, please make sure you select the correct category in the form below, to speed up the answering process. Required fields are marked *.