
Popular categories
Looking for a yarn?


Comments / Questions (54)
![]() Maria wrote:
Maria wrote:
Jeg synes der er byttet om på instruktionerne, til retstrik , på hhv. rund- og strikkepinde, oppe i toppen af denne side.
18.09.2019 - 17:51
![]() Nicole wrote:
Nicole wrote:
Comme pour la grandeur petit, on fait les augmentations au milieu du devant et au milieu du dos 46 fois, aux deux tours...mais que pour les côtés on fait les augmentations 20 fois aux quatre tours, on arrête les augmentations aux côtés 12 tours avant celles du devant (six autres augmentations du devant et du dos, aux deux tours! C’est bien ça? Confuse parce que le diagramme semble montrer que le poncho continue d’augmenter sur les côtés?!
05.09.2019 - 22:56DROPS Design answered:
Bonjour Nicole, c'est tout à fait exact. Bon tricot!
06.09.2019 - 08:06
![]() Tone wrote:
Tone wrote:
Hei, jeg har strikket denne i de fargene som er oppgitt i oppskriften, men er det mulig å strikke den i en blå kombinasjon?
16.07.2019 - 22:27DROPS Design answered:
Hei Tone. Det kan du fint gjøre, vi har mange flotte farger i Alpaca. Du finner fargeutvalgene under Garn, Alle garn og velg Alpaca og Brushed Alpaca Silk. God Fornøyelse!
26.08.2019 - 14:56
![]() Aud wrote:
Aud wrote:
Har strikka denne i største størrelse, og fekk for lite av begge fargane i Brushed Alpaca Silk. Syster strikka mellomste størrelse, fekk også for lite.
24.01.2019 - 15:31
![]() Lone wrote:
Lone wrote:
Jeg forstår ikke, hvorfor der ikke bruges lige mange gram garn af begge kvaliteter, når man strikker hele ponchoen med en tråd af hver ( henholdsvis 350 g Alpaca og 150 g Brushed Alpaca Silk)
13.01.2019 - 11:27DROPS Design answered:
Hei Lone. Hvor mye garn du trenger avgjøres av løpelengden på garnet. 50 g Brushed Alpaca Silk er ca 280 meter, mens 50 g Alpaca er ca 167 meter. Derfor trenger du ulike mengder i gram av hver kvalitet. Vær obs på at Brushed Alpaca Silk kommer i nøster av 25g. God fornøyelse
16.01.2019 - 12:02
![]() Gitte Jensen wrote:
Gitte Jensen wrote:
Jeg er nået til fjerde stribe i str. L/xl. Er nået halvvejs med denne. I opskriften står der, at når der er taget ud for og bag 50 gange, skal arbejdet deles i to til for og bagstykke. Skal jeg så dele op nu, når jeg kun er halvvejs med fjerde stribe. Mvh
18.12.2018 - 12:52DROPS Design answered:
Hei Gitte. Du skal dele til for- og bakstykke når økingene er ferdige. Du skal øke masker på annenhver omgang 50 ganger, dvs at du har strikket 100 omganger ( fra der stripene starter). Den første stripen er 12 cm = 24 omganger (med den angitte strikkefastheten). De resterende stripene er 13 cm = 26 omganger. Når du har strikket 100 omganger skal du derfor være helt på slutten av 4 stripe. Arbeidet måler nå ca 50 cm (målt fra der stripene begynner). Er du sikker på at du overholder den angitte strikkefastheten? Det er viktig for at målene på plagget skal bli korrekt. God fornøyelse.
18.12.2018 - 14:58
![]() Mary wrote:
Mary wrote:
Hi again, the pattern says to inc mid front and back every other row AND inc the side every 4th row. So row 1=inc f&b; row 2=K; row 3=inc f&b; row 4= k and inc the side. Is this correct?
29.11.2018 - 23:46DROPS Design answered:
Dear Mary, not exactly, you will work that way: Row 1: inc front and back + sides - Row 2 (and every even numbered row: knit = no increase) - Row 3: inc front & back - Row 5: inc front & back + sides. Repeat row 2 to 5. Happy knitting!
30.11.2018 - 08:26
![]() Mary F Bonaventura wrote:
Mary F Bonaventura wrote:
Also do you have a video for the pattern?
24.11.2018 - 18:51DROPS Design answered:
Dear Mary, you can find the tutorial videos related to this pattern at the left of the page, right below the picture. Happy Knitting!
25.11.2018 - 10:25
![]() Mary Bonaventura wrote:
Mary Bonaventura wrote:
I am tryin to do the l/xl Poncho.What does mid st,mid back & mid front mean? How do I work the increases? Can you send them to me round by round to start me off please? I love this pattern for a Xmas gift. Your help would be greatly appreciated.
24.11.2018 - 18:49DROPS Design answered:
Dear Mary, "mid-stitch" means the stitch that is right at the middle of the poncho's front and back. For increases you make a yarn over right before and after these stitches. On next round K the YOs mid front and mid back to make holes and K the YO's on the sides twisted to avoid holes. Happy Knitting!
25.11.2018 - 10:24
![]() Linda Jensen wrote:
Linda Jensen wrote:
Kan man bruge Acryl garn i stedet for? Hvis ja, hvor meget.
04.10.2018 - 12:43DROPS Design answered:
Hei Linda. Det som er viktig når du bytter garn er at strikkefastheten blir overholdt. Vi har ingen garn som er akryl, så vi har ikke mulighet til å komme med spesifikke tips - det kommer an på hvilket garn du vil bruke. Vær obs på at plagget kan få et annet utseenede enn på bildet ved bytte til et garn med annerledes struktur og egenskaper. God fornøyelse.
05.10.2018 - 07:50
|
|
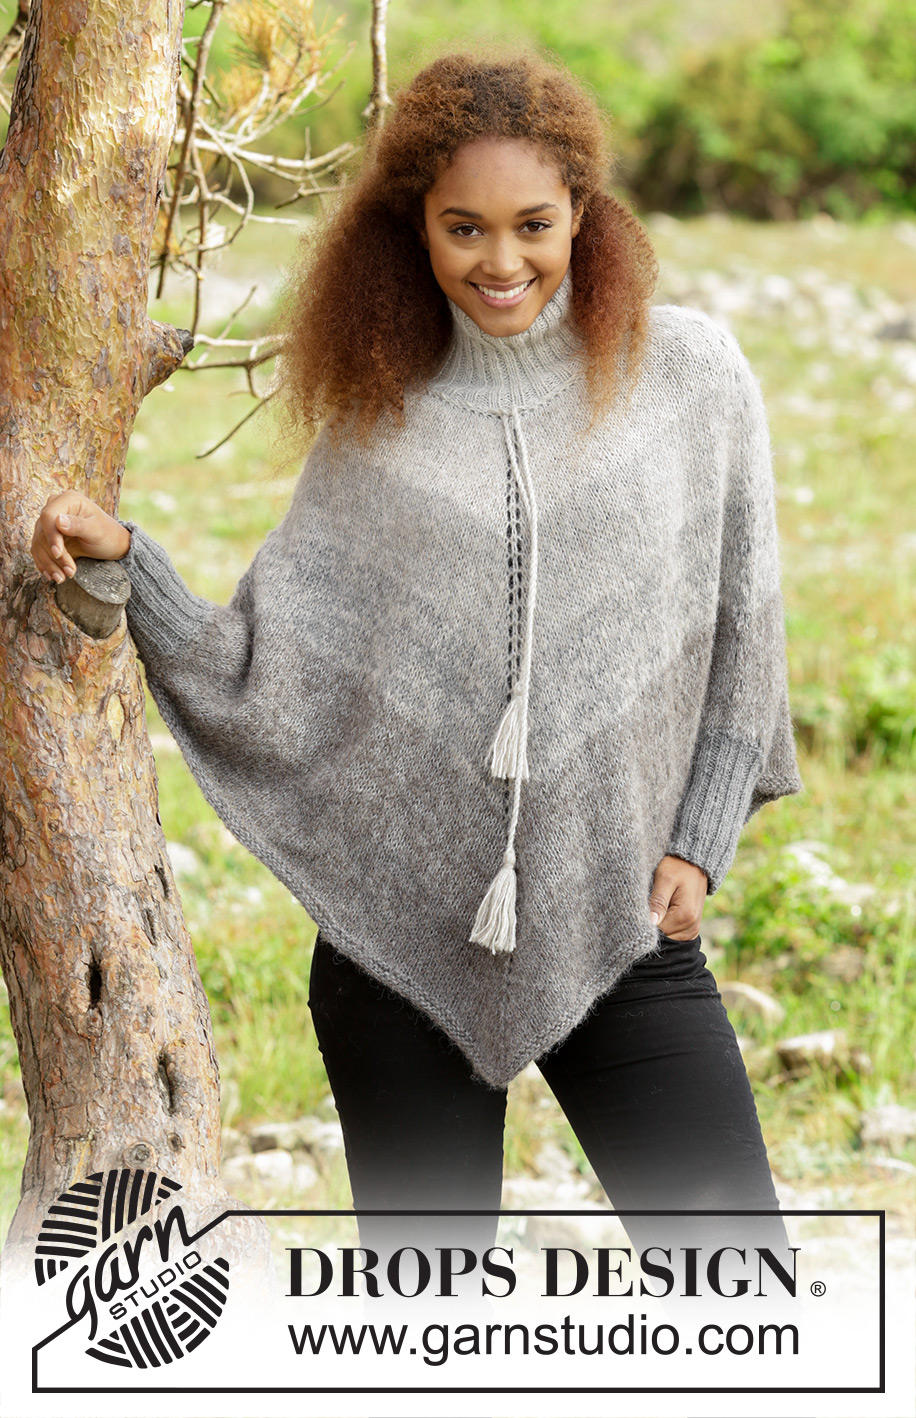
Winter Drizzle#winterdrizzleponcho |
|
|
|
|
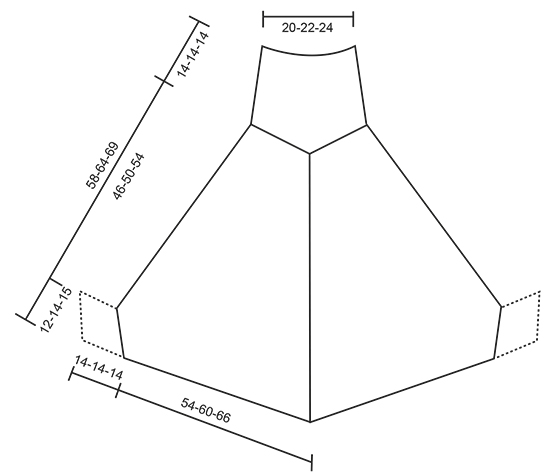
Knitted DROPS poncho with stripes turtle neck in rib and twined string with tassels, worked top down in ”Alpaca” and ”Brushed Alpaca Silk”. Size: S - XXXL.
DROPS 171-33 |
|
|
GARTER ST (worked in the round): 1 ridge = 2 rounds. * K 1 round and P 1 round *, repeat from *-*. GARTER ST (back and forth): K all rows. 1 ridge = 2 rows K. STRIPES: Work all stripes with 2 strands in stocking st as follows: STRIPE 1: Work 11-12-13 cm with Alpaca light pearl grey + Brushed Alpaca Silk light grey. STRIPE 2: Work 11-13-14 cm with Alpaca light grey + Brushed Alpaca Silk light grey. STRIPE 3: Work 12-13-14 cm with Alpaca medium grey + Brushed Alpaca Silk light grey. STRIPE 4: Work 12-13-14 cm with Alpaca light grey + Brushed Alpaca Silk grey. STRIPE 5: Work 12-13-14 cm (i.e. until finished measurements) with Alpaca medium grey + Brushed Alpaca Silk grey. INCREASE TIP-1 (evenly spaced): To calculate how often inc should be done, use the total no of sts on row (e.g. 104 sts) and divide remaining sts by no of inc to be done (e.g. 8) = 13. I.e. in this example make 1 YO for every 13th st. INCREASE TIP-2: Work until marker, 1 YO, K 1 (= mid st), 1 YO. Repeat at each of the remaining markers. On next round K the YOs mid front and mid back to make holes and K the YO's on the sides twisted to avoid holes. ---------------------------------------------------------- PONCHO: The poncho is worked top down. Work in the round down to sleeve edge. Then finish front and back piece back and forth separately. Work neck and sleeve edge with 2 strands Alpaca. Cast on 104-116-120 sts with 2 strand Alpaca light pearl grey on circular needle size 4 mm. K 1 round. * K 2, P 2 *, repeat from *-* the entire round. When piece measures 13 cm, work 1 round as follows: * K 2, P 2 tog, 1 YO *, repeat from *-* the entire round. Now work 1 ridge in GARTER ST - see explanation above, while inc 8-12-16 sts evenly on 1st row in ridge - READ INCREASE TIP-1 (evenly) = 112-128-136 sts. On next round P YOs to create eyelet holes. Switch to circular needle size 6 mm. Now work STRIPES - see explanation above! On first round insert 4 markers as follows: Insert 1st marker at beg of round (= the side), then insert the remaining 3 markers with 28-32-34 sts between each marker: 2nd marker = mid front, 3rd marker = the side and 4th marker = mid back. After 3rd marker there are 28-32-34 sts on round. On next round inc 1 st in each side of each marker - Read INCREASE TIP-2! Inc like this at marker mid front and mid back every other round 46-50-54 times in total and at markers in the side every 4th round 20-23-27 times in total = 376-420-460 sts. REMEMBER THE KNITTING TENSION Now divide into front and back piece and finish each part separately. Slip all sts between 3rd and 1st marker on a stitch holder for back piece = 188-210-230 sts for back piece. FRONT PIECE: There are now 188-210-230 sts for front piece. NOTE: Continue inc mid front on every other row as before until finished measurements. Work as follows from beg of round: Cast off the first 3 sts (= sts between inc in the side and the next 2 sts), continue in stocking st until mid st in the inc in the next side, turn piece and cast off the first 2 sts. Then cast off 2 sts for sleeve edge at beg of every row until cast off has been done 12-14-15 times in each side = 163-181-199 sts. Then work 2 ridges in garter st over all sts on needle. Cast off. BACK PIECE: Slip sts back on needle = 188-210-230 sts for back piece. NOTE: Continue inc on each side of marker mid back on every other row as before. Work and cast off in each side as on front piece = 163-181-199 sts. Work 2 ridges and cast off. SLEEVE EDGE: Sew with 2 strands Alpaca medium grey the 2 ridges at the bottom on back and front piece tog with a couple of sts in each side (sleeve edge has a circumference of approx. 24-28-30 cm). Worked in the round on double pointed needles. Pick up 44-48-52 sts around sleeve edge on double pointed needles size 4 mm with 2 strands Alpaca medium grey. P 1 round. Then work rib * K 2, P 2 *, repeat from *-* the entire round. When rib measures 14 cm in all sizes, cast off with K over K and P over P. Work the other sleeve edge the same way. TWINED STRING WITH TASSELS: Cut 5 lengths Alpaca light pearl grey of 3.5 metres each. Twine the strands tog until they resist, fold the string double so that it twines again. Make a knot at each end. Thread the tie up and down through the eyelet holes on neck. Cut 14 strands Alpaca light pearl grey + 14 strands Brushed Alpaca Silk light grey (= 28 strands in total) of 20 cm. Thread them through end on the twined string and distribute so that they are even. Place a strand around the tassel, tighten and make a knot. Repeat in the other end of string. |
|
 |
|
Have you finished this pattern?Tag your pictures with #dropspattern #winterdrizzleponcho or submit them to the #dropsfan gallery. Do you need help with this pattern?You'll find 22 tutorial videos, a Comments/Questions area and more by visiting the pattern on garnstudio.com. © 1982-2026 DROPS Design A/S. We reserve all rights. This document, including all its sub-sections, has copyrights. Read more about what you can do with our patterns at the bottom of each pattern on our site. |


With over 40 years in knitting and crochet design, DROPS Design offers one of the most extensive collections of free patterns on the internet - translated to 17 languages. As of today we count 324 catalogues and 12267 patterns translated into English (UK/cm). 12267
We work hard to bring you the best knitting and crochet have to offer, inspiration and advice as well as great quality yarns at incredible prices! Would you like to use our patterns for other than personal use? You can read what you are allowed to do in the Copyright text at the bottom of all our patterns. Happy crafting!
Post a comment to pattern DROPS 171-33
We would love to hear what you have to say about this pattern!
If you want to leave a question, please make sure you select the correct category in the form below, to speed up the answering process. Required fields are marked *.