
Popular categories
Looking for a yarn?


Comments / Questions (54)
![]() MARJO wrote:
MARJO wrote:
Neem aan dat de hoeveelheid garen zoals genoemd, niet klopt. Slechts 100 gram per kleur?
24.12.2025 - 15:06DROPS Design answered:
Dag Marjo,
Het lijkt inderdaad een beetje weinig. Ik heb het doorgegeven aan de ontwerpafdeling om te controleren.
27.12.2025 - 11:36
![]() Caroline wrote:
Caroline wrote:
Seeking clarity on the placing of markers and YO increase as per tip 2, if i place the markers as said, on the next row it says work up to the marker then YO k YO but I don't understand where the knit stitch is ? I've searched your video tips and cannot find an explanation for increasing with YO either side of a marker in this way, Thank you
30.09.2024 - 16:22DROPS Design answered:
Dear Caroline, each marker is inserted between 2 stitches, so work until the marker, make 1 yarn over, slip marker, knit the next stitch, make 1 yarn over = you have increased 1 stitch on each side of the marker, repeat at the other markers. On next round knit the yarn overs on each side of 1st and 3rd marker twisted to avoid holes on shoulders and knit the yarn overs on each side of 2nd and 4th marker (mid front and mid back) to make holes. Happy knitting!
01.10.2024 - 08:46
![]() Marielle wrote:
Marielle wrote:
Pour les manches, coudre les 2 côtés mousse, vous voulez dire, 2 -3 points, c’est juste pour partir la manche, avez-vous un vidéo qui pourrait me le montrer. La manche, c’est bien ou on a fait les raccourcis, en escaliers, on reprend des mailles?
29.08.2024 - 23:06DROPS Design answered:
Bonjour Marielle, vous devez coudre la partie point mousse du dos/devant (les 2 côtes mousse = les 4 rangs endroit tricotés en bas du dos et du devant) entre elles pour "fermer" les côtés et ainsi vous pourrez relever les mailles tout autour de l'ouverture de la manche pour tricoter la bordure. Bon tricot!
30.08.2024 - 14:35
![]() Liz wrote:
Liz wrote:
Hi - I am struggling to understand the directions for Front piece once you have split the stitches and have 188 stitches on your needle. Can you explain row by row what we are to do going as far as the cast off row please - thank you
23.06.2024 - 05:42DROPS Design answered:
Dear Liz, in the poncho, you had started this increase: Inc like this at marker mid front and mid back every other round 46-50-54 times in total. So now, increase in the mid front as before every other row (one increase on each side of the 2nd marker). Cast off over 24 rows (12 from the right side and 12 from the wrong side). So, cast off at the beginning of the row, increase in the mid front (on both sides of the marker), work until the end of the row, turn, cast off at the beginning of the row from the wrong side, work back without increases. Continue like this over 24 rows in total. Happy knitting!
23.06.2024 - 19:10
![]() Cynthia wrote:
Cynthia wrote:
Hello I was wondering if I could you use Karisma yarn to make the winter drizzle poncho pattern? I prefer to use 1 strand. Thank you in advance.
19.06.2024 - 16:20DROPS Design answered:
Dear Cynthia, the Karisma itself will give you smaller gauge, than the pattern needs, so most probably you will have to recalculate the stitch and row-count. You should always make a gauge swatch and compare to what is given in the pattern, and recalculate accordingly if necessary. Happy Stitching!
20.06.2024 - 00:23
![]() Yvette wrote:
Yvette wrote:
Bonjour, je suis au niveau de l'augmentation 2 mais même avec la correction le texte est le même. Si les jetés doivent être ajourés devant et au dos, et fermés dans les côtés comment doit-on faire sur le rang suivant si c’est écrit que dans les deux cas les jetés doivent être tricotés à l’endroit ?
29.11.2023 - 03:33DROPS Design answered:
Bonjour Yvette, la correction ne sert que si vous aviez imprimé les explications avant cette date; autrement dit, les jetés des côtés se tricotent torse à l'endroit (on n'a ainsi pas de trou) et ceux du milieu devant et du milieu dos se tricotent à l'endroit pour former des jours. Bon tricot!
29.11.2023 - 08:25
![]() Ewa Ekholm wrote:
Ewa Ekholm wrote:
Jag undrar om avmaskningen på framstycke och bakstycke. Jag har nu 188 m på framstycket. Enligt mönstret ska jag avm först 3m sedan 2 m till ärmkant i början av varje varv till det har maskars av totalt 12 ggr i varje sida. Det borde bli 2m x 12ggr på varje sida=24+24m (minus 1m på första avm)=143 m kvar. Men i mönstret står det 163 m. Vad är det som inte stämmer?
14.03.2023 - 11:15DROPS Design answered:
Hej Ewa. Du har 188 maskor, och du ska maska av 2 maskor i början av varje varv (förutom första gången då du ska maska av 3 maskor). Eftersom det ska minskas i början av varje varv tills det minskats totalt 12 gånger, måste det stickas 24 varv = 49 avmaskade maskor. 188 maskor - 49 minskade maskor = 139 maskor, men sedan ökas 2 maskor i mitten som förut och på 24 varv ökas det 12 ggr/24 maskor. 139 + 24 = 163 maskor. Mvh DROPS Design
16.03.2023 - 11:08
![]() Elisabeth wrote:
Elisabeth wrote:
Jeg er i gang med forstykket og skal til at strikke de sidste 4 pinde retstrik inden jeg skal lukke af: skal jeg stadig lave hulmønster i midten imens jeg laver retstrik eller hvad?
10.03.2023 - 11:20DROPS Design answered:
HEi Elisabeth. Nei, nå strikkes det bare 4 pinner retstrikk (uten hullmønster). mvh DROPS Design
13.03.2023 - 10:50
![]() Gabriele Haas wrote:
Gabriele Haas wrote:
Hallo , bei dem poncho kommt unten am Rücken und Vorderteil 2 rippen kraus rechts in jede Masche. Es werden aber an der mitte wo normal die Zunahmen sind keine Zunahmen angegeben. Es zieht sich aber dann zusammen oder mache ich was falsch ?
15.02.2023 - 16:03DROPS Design answered:
Liebe Frau Haas, ich verstehe leider nicht, was Sie hier meinen, wenn Sie das Vorder- bzw Rückenteil separat in Hin- und Rückreihen stricken, stricken Sie glatt rechts wie zuvor und nehmen Sie in der Mitte wie zuvor zu (Zunahmen werden glatt rechts gestrickt, bei der Rückreihe links) und gleichzeitig ketten Sie am Anfang jeder Reihe (= beidseitig) Maschen für die Ärmel. Kann das Ihnen helfen?
16.02.2023 - 11:44
![]() Marie-France Blanchette wrote:
Marie-France Blanchette wrote:
Je comprend pas augmentation 2 1 jeté 1 end 1 jeté es-ce que je glisse le premier marqueur et je fais les aug après ou j'arrete 1 m avant le marqueur et je fais 1 jeté 1m end glisse le marqueur 1 jeté?????????
13.02.2023 - 12:31DROPS Design answered:
Bonjour Mme Blanchette, votre marqueur est au niveau de la maille centrale du milieu devant/milieu dos et de chaque épaule - ainsi vous ferez 1 jeté juste avant le marqueur, vous tricotez la maille suivante ( glissez le marqueur) et faites 1 jeté juste après la maille centrale. Bon tricot!
13.02.2023 - 15:48
|
|
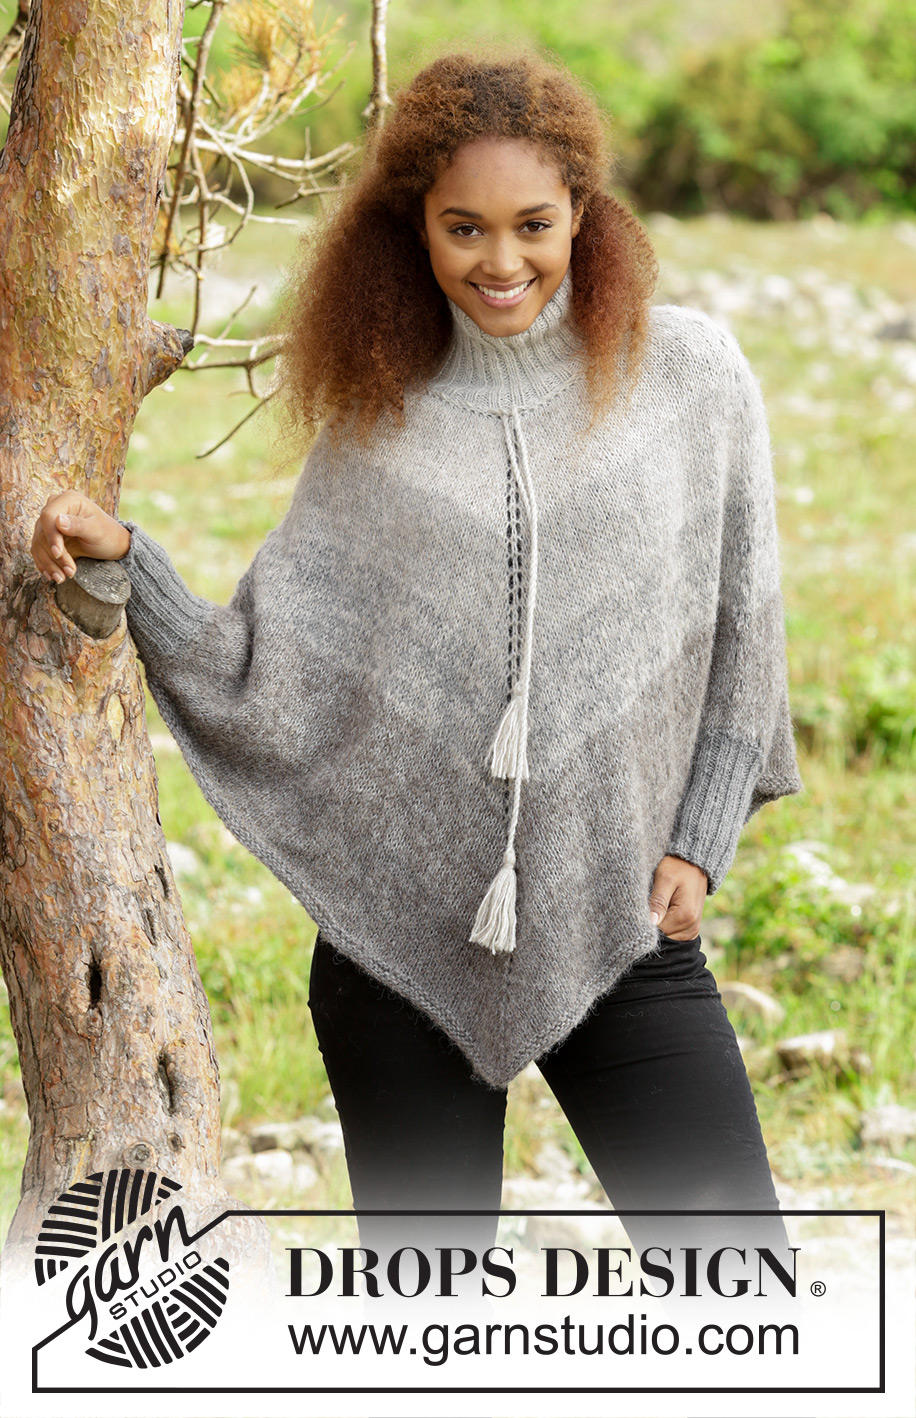
Winter Drizzle#winterdrizzleponcho |
|
|
|
|
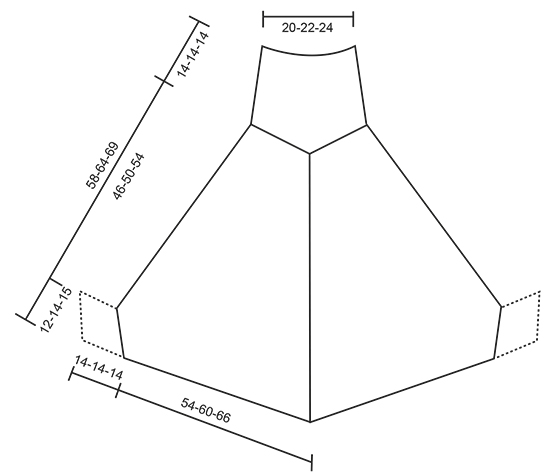
Knitted DROPS poncho with stripes turtle neck in rib and twined string with tassels, worked top down in ”Alpaca” and ”Brushed Alpaca Silk”. Size: S - XXXL.
DROPS 171-33 |
|
|
GARTER ST (worked in the round): 1 ridge = 2 rounds. * K 1 round and P 1 round *, repeat from *-*. GARTER ST (back and forth): K all rows. 1 ridge = 2 rows K. STRIPES: Work all stripes with 2 strands in stocking st as follows: STRIPE 1: Work 11-12-13 cm with Alpaca light pearl grey + Brushed Alpaca Silk light grey. STRIPE 2: Work 11-13-14 cm with Alpaca light grey + Brushed Alpaca Silk light grey. STRIPE 3: Work 12-13-14 cm with Alpaca medium grey + Brushed Alpaca Silk light grey. STRIPE 4: Work 12-13-14 cm with Alpaca light grey + Brushed Alpaca Silk grey. STRIPE 5: Work 12-13-14 cm (i.e. until finished measurements) with Alpaca medium grey + Brushed Alpaca Silk grey. INCREASE TIP-1 (evenly spaced): To calculate how often inc should be done, use the total no of sts on row (e.g. 104 sts) and divide remaining sts by no of inc to be done (e.g. 8) = 13. I.e. in this example make 1 YO for every 13th st. INCREASE TIP-2: Work until marker, 1 YO, K 1 (= mid st), 1 YO. Repeat at each of the remaining markers. On next round K the YOs mid front and mid back to make holes and K the YO's on the sides twisted to avoid holes. ---------------------------------------------------------- PONCHO: The poncho is worked top down. Work in the round down to sleeve edge. Then finish front and back piece back and forth separately. Work neck and sleeve edge with 2 strands Alpaca. Cast on 104-116-120 sts with 2 strand Alpaca light pearl grey on circular needle size 4 mm. K 1 round. * K 2, P 2 *, repeat from *-* the entire round. When piece measures 13 cm, work 1 round as follows: * K 2, P 2 tog, 1 YO *, repeat from *-* the entire round. Now work 1 ridge in GARTER ST - see explanation above, while inc 8-12-16 sts evenly on 1st row in ridge - READ INCREASE TIP-1 (evenly) = 112-128-136 sts. On next round P YOs to create eyelet holes. Switch to circular needle size 6 mm. Now work STRIPES - see explanation above! On first round insert 4 markers as follows: Insert 1st marker at beg of round (= the side), then insert the remaining 3 markers with 28-32-34 sts between each marker: 2nd marker = mid front, 3rd marker = the side and 4th marker = mid back. After 3rd marker there are 28-32-34 sts on round. On next round inc 1 st in each side of each marker - Read INCREASE TIP-2! Inc like this at marker mid front and mid back every other round 46-50-54 times in total and at markers in the side every 4th round 20-23-27 times in total = 376-420-460 sts. REMEMBER THE KNITTING TENSION Now divide into front and back piece and finish each part separately. Slip all sts between 3rd and 1st marker on a stitch holder for back piece = 188-210-230 sts for back piece. FRONT PIECE: There are now 188-210-230 sts for front piece. NOTE: Continue inc mid front on every other row as before until finished measurements. Work as follows from beg of round: Cast off the first 3 sts (= sts between inc in the side and the next 2 sts), continue in stocking st until mid st in the inc in the next side, turn piece and cast off the first 2 sts. Then cast off 2 sts for sleeve edge at beg of every row until cast off has been done 12-14-15 times in each side = 163-181-199 sts. Then work 2 ridges in garter st over all sts on needle. Cast off. BACK PIECE: Slip sts back on needle = 188-210-230 sts for back piece. NOTE: Continue inc on each side of marker mid back on every other row as before. Work and cast off in each side as on front piece = 163-181-199 sts. Work 2 ridges and cast off. SLEEVE EDGE: Sew with 2 strands Alpaca medium grey the 2 ridges at the bottom on back and front piece tog with a couple of sts in each side (sleeve edge has a circumference of approx. 24-28-30 cm). Worked in the round on double pointed needles. Pick up 44-48-52 sts around sleeve edge on double pointed needles size 4 mm with 2 strands Alpaca medium grey. P 1 round. Then work rib * K 2, P 2 *, repeat from *-* the entire round. When rib measures 14 cm in all sizes, cast off with K over K and P over P. Work the other sleeve edge the same way. TWINED STRING WITH TASSELS: Cut 5 lengths Alpaca light pearl grey of 3.5 metres each. Twine the strands tog until they resist, fold the string double so that it twines again. Make a knot at each end. Thread the tie up and down through the eyelet holes on neck. Cut 14 strands Alpaca light pearl grey + 14 strands Brushed Alpaca Silk light grey (= 28 strands in total) of 20 cm. Thread them through end on the twined string and distribute so that they are even. Place a strand around the tassel, tighten and make a knot. Repeat in the other end of string. |
|
 |
|
Have you finished this pattern?Tag your pictures with #dropspattern #winterdrizzleponcho or submit them to the #dropsfan gallery. Do you need help with this pattern?You'll find 22 tutorial videos, a Comments/Questions area and more by visiting the pattern on garnstudio.com. © 1982-2026 DROPS Design A/S. We reserve all rights. This document, including all its sub-sections, has copyrights. Read more about what you can do with our patterns at the bottom of each pattern on our site. |


With over 40 years in knitting and crochet design, DROPS Design offers one of the most extensive collections of free patterns on the internet - translated to 17 languages. As of today we count 324 catalogues and 12267 patterns translated into English (UK/cm). 12267
We work hard to bring you the best knitting and crochet have to offer, inspiration and advice as well as great quality yarns at incredible prices! Would you like to use our patterns for other than personal use? You can read what you are allowed to do in the Copyright text at the bottom of all our patterns. Happy crafting!
Post a comment to pattern DROPS 171-33
We would love to hear what you have to say about this pattern!
If you want to leave a question, please make sure you select the correct category in the form below, to speed up the answering process. Required fields are marked *.