Comments / Questions (31)
![]() Coutarel wrote:
Coutarel wrote:
Comment repartissez vous les augmentations 4 fois 2 mailles, 1 sur chaque devant et 2 dans le dos ?
05.08.2016 - 05:48DROPS Design answered:
Bonjour Mme Coutarel, les augmentations pour le raglan se font avant A.2 (devant gauche), après A.2 et avant A.2 (dos) et après A.2 (devant droit) - vu sur l'endroit - voir aussi comment augmenter sous "RAGLAN" au début des explications. Bon crochet!
05.08.2016 - 09:50
Warm Apricot Cardigan |
|||||||||||||||||||||||||
|
|
|||||||||||||||||||||||||
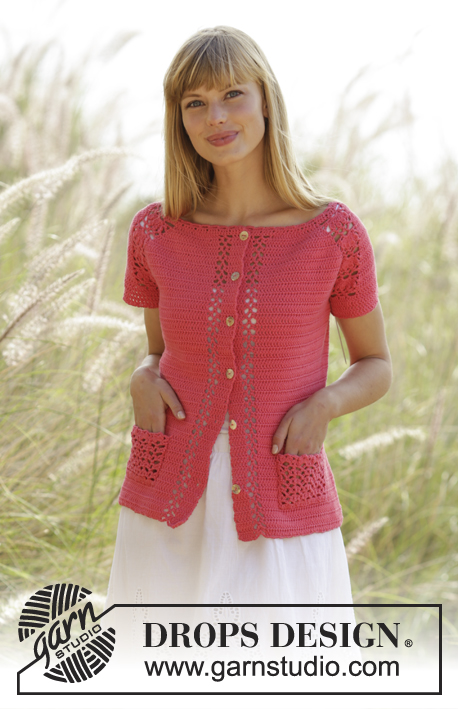
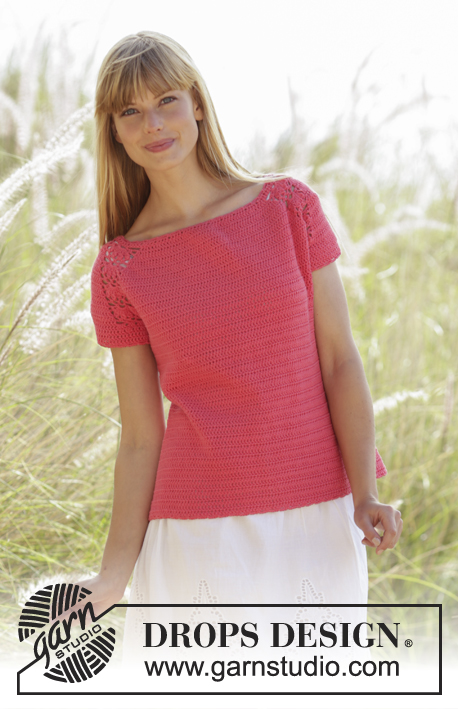
Crochet DROPS jacket with lace pattern and raglan in ”Safran”. The piece is worked top down. Size: S - XXXL.
DROPS Extra 0-1286 |
|||||||||||||||||||||||||
|
PATTERN: See diagrams A.1 to A.3. CROCHET INFO: On every tr row replace first tr with 3 ch. On every dc row replace first dc with 1 ch. Replace first tr at on every tr round with 3 ch, finish the round with 1 sl st in 3rd ch from beg of round. On every dc round, replace first dc with 1 ch and finish round with 1 sl st in 1st ch from beg of round. INCREASE TIP-1: Inc 1 tr by working 2 tr in same tr. INCREASE TIP-2 (applies to sides of body): Work until 3 tr remain before the marker thread, work 2 tr in next tr (= 1 tr inc), work 1 tr in each of the next 4 tr (the marker thread is in the middle of these sts), work 2 tr in next tr (= 1 tr inc). RAGLAN: Inc for raglan on each side of A.2. Inc 2 sts BEFORE A.2 as follows: Work until 2 tr remain before A.2, work 2 tr in each of the next 2 tr (= 2 tr inc). Inc 2 sts AFTER A.2 as follows: Work 2 tr in each of the first 2 tr after A.2 (= 2 tr inc). Inc 1 sts BEFORE A.2 as follows: Work until 1 tr remains before A.2, work 2 tr in next tr (= 1 tr inc). Inc 1 sts AFTER A.2 as follows: Work 2 tr in first tr after A.2 (= 1 tr inc). The inc on body and sleeves are uneven as explained in pattern. DECREASE TIP: Work until 4 tr remain before marker thread, work the next 2 tr tog as follows: Work 1 tr in next tr but wait with last pull through (= 2 sts on hook), work 1 tr in next tr, but on last pull through pull yarn through all sts on hook - 1 tr have been dec, work 1 tr in each of the next 4 tr (marker thread is between these sts), work the next 2 tr tog (= 1 tr dec). ---------------------------------------------------------- YOKE: Worked back and forth, top down. Work 174-179-184-189-194-199 ch on hook size 3.5 mm with Safran. Work next row as follows: Work 1 tr in 4th ch from hook (= 2 tr) - READ CROCHET INFO, * skip 1 ch, 1 tr in each of the next 4 ch *, repeat from *-* = 138-142-146-150-154-158 tr (= incl 5 band tr in each side of piece). Then work next row as follows: Work 1 tr in each of the first 5 tr (= band), A.1 over the next 7 tr, 1 tr in each of the next 11-12-13-14-15-16 tr AT THE SAME TIME inc 4-5-5-6-7-8 tr evenly – READ INCREASE TIP-1 – (= front piece), A.2 over the next 11 tr, 2 tr in next tr, 1 tr in each of the next 4 tr, 2 tr in next tr, A.2 over the next 11 tr (= sleeve), 1 tr in each of the next 36-38-40-42-44-46 tr AT THE SAME TIME inc 8-10-10-12-14-16 tr evenly (= back piece), A.2 over the next 11 tr, 2 tr in next tr, 1 tr in each of the next 4 tr, 2 tr in next tr, A.2 over the next 11 tr (= sleeve), 1 tr in each of the next 11-12-13-14-15-16 tr AT THE SAME TIME inc 4-5-5-6-7-8 tr evenly, A.1 over the next 7 tr (= front piece), 1 tr in each of the last 5 tr (= band). On front piece there are now 5 band sts, A.1 and 15-17-18-20-22-24 tr, on sleeve there is A.2, 8 tr and A.2 and on back piece there are 44-48-50-54-58-62 tr. On next row inc for RAGLAN – see explanation above! INC AS FOLLOWS ON FRONT AND BACK PIECE: Inc 2 tr every row 3-4-7-9-13-16 times in total, then 1 tr every row 12-12-10-9-6-5 times in total. INC AS FOLLOWS ON SLEEVES: Inc 2 tr every row 0-0-1-3-4-4 times in total, then 1 tr every row 15-16-16-15-15-17 times in total. REMEMBER THE CROCHET TENSION! When A.1 and A.2 have been worked 1 time vertically, repeat A.1a over A.1 and A.2a over A.2. After all inc there are now on each front piece 5 band sts, A.1 and 33-37-42-47-54-61 tr, on each sleeve there is A.2, 38-40-44-50-54-58 tr and A.2 and on back piece there are 80-88-98-108-122-136 tr. Piece measures approx. 14-15-16-17-18-19 cm. Work next row as follows: Work 1 tr in each of the first 5 tr, A.1a as before, 1 tr in each of the next 33-37-42-47-54-61 tr, work 8 ch (= under sleeve), insert 1 marker thread in the middle between the new ch, skip: A.2a, 38-40-44-50-54-58 tr and A.2a (= sleeve), work 1 tr in each of the next 80-88-98-108-122-136 tr, 8 ch (= under sleeve), insert 1 marker thread in the middle of the new sts, skip: A.2a, 38-40-44-50-54-58 tr and A.2a (= sleeve), work 1 tr in each of the next 33-37-42-47-54-61 tr, A.1a as before, 1 tr in each of the last 5 tr = 156-172-192-212-240-268 tr (incl 5 band sts in each side), 16 ch and A.1a inside 5 band tr in each side of piece. Insert 1 marker in piece, NOW MEASURE PIECE FROM HERE. Move marker threads when working, leave the marker in piece. BODY: Work 1 tr in every tr, 1 tr in every ch and A.1a as before. There are 88-96-106-116-130-144 tr between marker threads on back piece. When piece measures 3 cm (measured from marker), dec 1 st on each side of each marker threads in the side (= 4 sts dec) - READ DECREASE TIP! Repeat dec every 4-4-3½-4½-4½-4½ cm 3-3-4-3-3-4 more times = 156-172-188-212-240-264 tr in total (incl band sts in each side) and A.1a inside 5 band tr in each side of piece. There are 80-88-96-108-122-134 tr on back piece. When piece measures 17-18-19-20-21-22 cm (measured from marker), inc 1 st on each side of each marker thread (= 4 tr inc) – see INCREASE TIP-2. Repeat inc every 1½ cm 6-6-7-6-6-7 more times = 184-200-220-240-268-296 tr on row (incl 5 band sts in each side) and A.1a inside 5 band tr in each side of piece. Continue with 1 tr in every tr and A.1a until piece measures 32-33-34-35-36-37 cm (measured from marker). Piece measures approx. 46-48-50-52-54-56 cm in total from neck edge. Work 1 edge along the bottom of the jacket as follows: Work * 1 dc in first/next tr, 4 ch, skip approx. 1 cm *, repeat from *-* over tr, work A.1a over A.1a as before. Adjust to finish with 1 dc in last tr. Fasten off. SLEEVE EDGE: Sleeve is worked in the round, top down. Beg by working mid under sleeve as follows: Work 1 dc in 5th ch of the 8 ch worked in armhole on body. Work 3 ch (= 1 tr). Then work with 1 tr in each of the next 3 ch, A.2a as before, 1 tr in each of the next 38-40-44-50-54-58 tr, A.2a as before, 1 tr in each of the last 4 ch under sleeve, finish with 1 sl st in 3rd ch at beg of round. Work 1 tr in every tr and A.2a until 1 whole repetition of A.2a has been worked. Then work 1 tr in every tr, work A.2b over A.2a = 68-70-74-80-84-88 tr. On next round work 1 tr in every tr AT THE SAME TIME dec 12 tr evenly = 56-58-62-68-72-76 tr. Work 1 tr in every tr until sleeve edge measures approx. 4 cm. Work * 1 dc in first/next tr, 4 ch, skip approx. 1 cm *, repeat from *-* around the entire sleeve. Fasten off. Work a sleeve edge around the other sleeve. NECK EDGE: Beg mid front. Work * 1 dc in first/next tr, 4 ch, skip approx. 1 cm *, repeat from *-* around the entire neck, make sure to avoid a tight neck edge. Adjust to finish with 1 dc in last tr. POCKET: Work 34 ch (incl 1 ch to turn with) on hook size 3.5 mm with Safran. Work A.3a 4 times in total in width (NOTE: Work first dc in 2nd ch from hook), finish with first st of A.3a in last ch (so piece is the same in both sides). NOTE: Always work last st as first st in diagram. When A.3a has been worked 1 time vertically, repeat A.3b over A.3a until piece measures 7 cm, adjust so that last row is last row in A.3b, then work A.3c over A.3b. Fasten off. Crochet another pocket. ASSEMBLY: Sew pockets on to jacket, approx. 7 cm from bottom edge and approx. in the middle on front piece. Fasten buttons on left band, fasten the top button approx. 2 cm from neck edge, then fasten them approx. 8 cm apart. Button between 2nd and 3rd tr on right band. |
|||||||||||||||||||||||||
Diagram explanations |
|||||||||||||||||||||||||
|
|||||||||||||||||||||||||
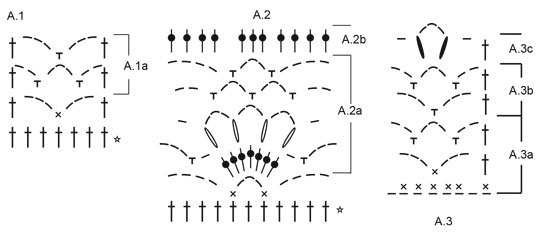 |
|||||||||||||||||||||||||
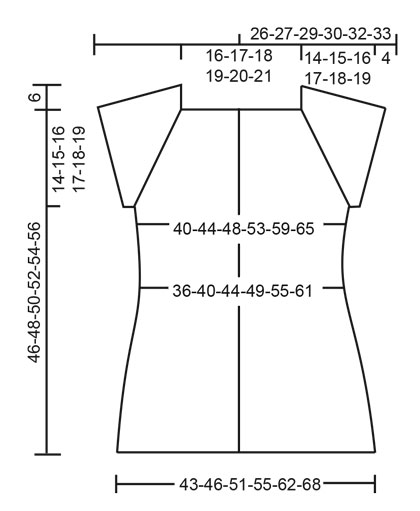 |
|||||||||||||||||||||||||
Have you finished this pattern?Tag your pictures with #dropspattern or submit them to the #dropsfan gallery. Do you need help with this pattern?You'll find 12 tutorial videos, a Comments/Questions area and more by visiting the pattern on garnstudio.com. © 1982-2025 DROPS Design A/S. We reserve all rights. This document, including all its sub-sections, has copyrights. Read more about what you can do with our patterns at the bottom of each pattern on our site. |
|||||||||||||||||||||||||






Post a comment to pattern DROPS Extra 0-1286
We would love to hear what you have to say about this pattern!
If you want to leave a question, please make sure you select the correct category in the form below, to speed up the answering process. Required fields are marked *.