
Popular categories
Looking for a yarn?


Comments / Questions (38)
![]() Anna wrote:
Anna wrote:
Hei. Haluaisin korvata mallissa käytetyn mohairlangan alpacalla. Onnistuuko se, kun molemmat näyttävät olevan samasta lankaryhmästä?
03.02.2017 - 14:39DROPS Design answered:
Hei! Tämä onnistuu hyvin. Ota kuitenkin huomioon, että Alpaca-kerässä on pienempi metrimäärä lankaa kuin Kid-silk -kerässä, joten tarvitset enemmän keriä kuin ohjeessa mainitaan.
07.02.2017 - 13:51
![]() Talitha wrote:
Talitha wrote:
I am confused on how to do the inc in the yoke. The pattern says: Inc differently on body and sleeves: BODY: Inc on every round 0-6-5-12-10-16 times in total, then on every other round 18 times in total in all sizes and finally every 4th round 6-6-7-6-8-8 times in total. SLEEVES: Inc every other round a total of 14-19-27-30-33-32 times, and on every 4th round a total of 8-7-4-3-3-5 time. Where do you do the inc if it is 18 times in total?
29.01.2017 - 21:16DROPS Design answered:
Dear Talitha, it depends on the size you are working, in 1st size for ex, you will inc on BODY: every other round a total of 18 times then every 4th round a total of 6 times (= 24 times in total), and at the same time, inc on SLEEVE every other round a total of 14 times then eveery 4th round a total of 8 times (= 22 times in total). Happy knitting!
30.01.2017 - 12:03
![]() Nefeli wrote:
Nefeli wrote:
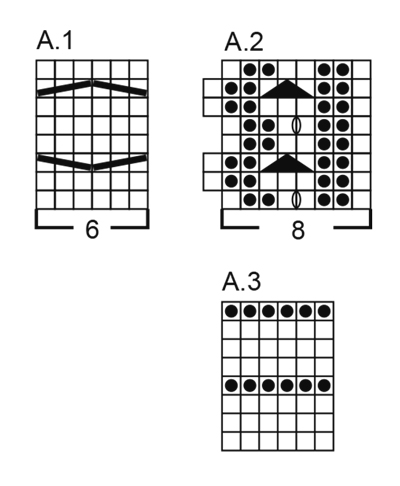
Ma come si passa da A1 a A2?
22.01.2017 - 18:05DROPS Design answered:
Buonasera Nefeli, ci può spiegare meglio il suo problema? I due diagrammi si lavorano in punti diversi dello stesso giro sullo sprone, come indicato nelle spiegazioni, dopo il 1° giro con aumenti si passa ai ferri 3,5 mm e si lavora come segue: ad esempio per la taglia S: A.2 , m rasata sulle 8 m successive (= spalla destra), A.2, A.1 sulle 36 m successive (= 6 ripetizioni delle 6 m sul davanti), A.2, 8 m a m rasata (= manica sinistra), A.2, A.1 sulle ultime 36 m (= 6 ripetizioni di 6 m sul dietro). Ci riscriva se è ancora in difficoltà. Buon lavoro!
22.01.2017 - 18:25
![]() Ingvild Ilebekk wrote:
Ingvild Ilebekk wrote:
Diagrammene A1, A2 og A3, starter man nederst eller øverst på de? Og hvordan blir det når man strikker genseres fra halsen og nedover? Starter jeg da på øverste "linje" i diagrammet?
11.11.2016 - 18:00DROPS Design answered:
Hej Ingvild. Du laeser altid diagrammet fra neden og op og fra höjre mod venstre (naar du strikker rundt). Strikker du frem og tilbage, saa er förste raekke retten og laeses fra höjre mod venstre, og anden raekke vrangen og laeses fra venstre mod höjre, osv. Du kan ogsaa se her hvordan vores diagrammer laeses
14.11.2016 - 16:20
![]() Cmzamperetti wrote:
Cmzamperetti wrote:
Credo che ci sia un errore nella traduzione in italiano della spiegazione degli aumenti: in inglese dice:" To calculate how often inc should be done, use the total no of sts on row (e.g. 74 sts) and divide by no of inc to be done" la traduzione corretta dovrebbe essere:" per calcolare ogni quanto fare gli aumenti,dividere il n totale delle maglie (es 74) per il n di aumenti che devono essere fatti:" Invece da come è stato tradotto non si capisce come farli.
08.10.2016 - 20:07DROPS Design answered:
Buonasera. La ringraziamo per la segnalazione, ma non troviamo il suggerimento per gli aumenti nel modello da lei indicato (171-24). Se ci indica il modello dove le spiegazioni non sono chiare, possiamo controllare ed eventualmente modificare. Grazie. Buon lavoro!
08.10.2016 - 23:36
![]() Cecile wrote:
Cecile wrote:
Merci
05.09.2016 - 11:44
![]() Christin wrote:
Christin wrote:
Det står at det skal benyttes pinner nr 3,5. og nr 3 til kanter. Videre står det at man skal legge opp x-antall masker på pinne nr 3 Skal den strikkes på 3 eller 3,5?
08.08.2016 - 13:09DROPS Design answered:
Hej. Pinne 3 ska användas till kanter. Det har nu lagts till i oppskriften var du byter till pinne 3,5. Lycka till!
19.08.2016 - 07:51Antje Trosien wrote:
I think there is a mistake, at least in the German Translation concerning the yoke and the pattern for the sleeve parts. On the photo it looks like they should be done in A.3 pattern but this is not mentioned in the description.
01.08.2016 - 10:27DROPS Design answered:
Dear Mrs Trosien, thats correct: sleeve sts are worked in A.3 as stated under "RAGLANZUNAHMEN": Die zugenommenen M glatt re str, bis sie in A.1 am Rumpfteil und in A.3 an den Ärmeln aufgehen.. Happy knitting!
01.08.2016 - 14:00
![]() Ewa wrote:
Ewa wrote:
Zrozumiałam, to proste, po prostu pomyliłam przy czytaniu instrukcji dodawanie oczek na raglan z przesunięciem schematu. Przepraszam.
31.07.2016 - 06:22
![]() Ewa wrote:
Ewa wrote:
Nie jest dla mnie jasny opis dodawania oczek na raglan. Mam dodawać oczka, a tymczasem narzuty wokół raglanu nie zwiększają ilości oczek, tylko ulegają przesunięciu, bo równocześnie przerabiam po dwa oczka razem (przed i po schemacie A2). Będę wdzięczna za dodatkowe wyjaśnienie.
30.07.2016 - 18:50DROPS Design answered:
Cieszę się, że się udało Ewo. Koniecznie pochwal się rezultatem na naszym profilu na facebooku. Pozdrawiamy!
31.07.2016 - 09:07
|
||||||||||||||||||||||
Misty Harbor#mistyharborsweater |
||||||||||||||||||||||
 |
 |
|||||||||||||||||||||
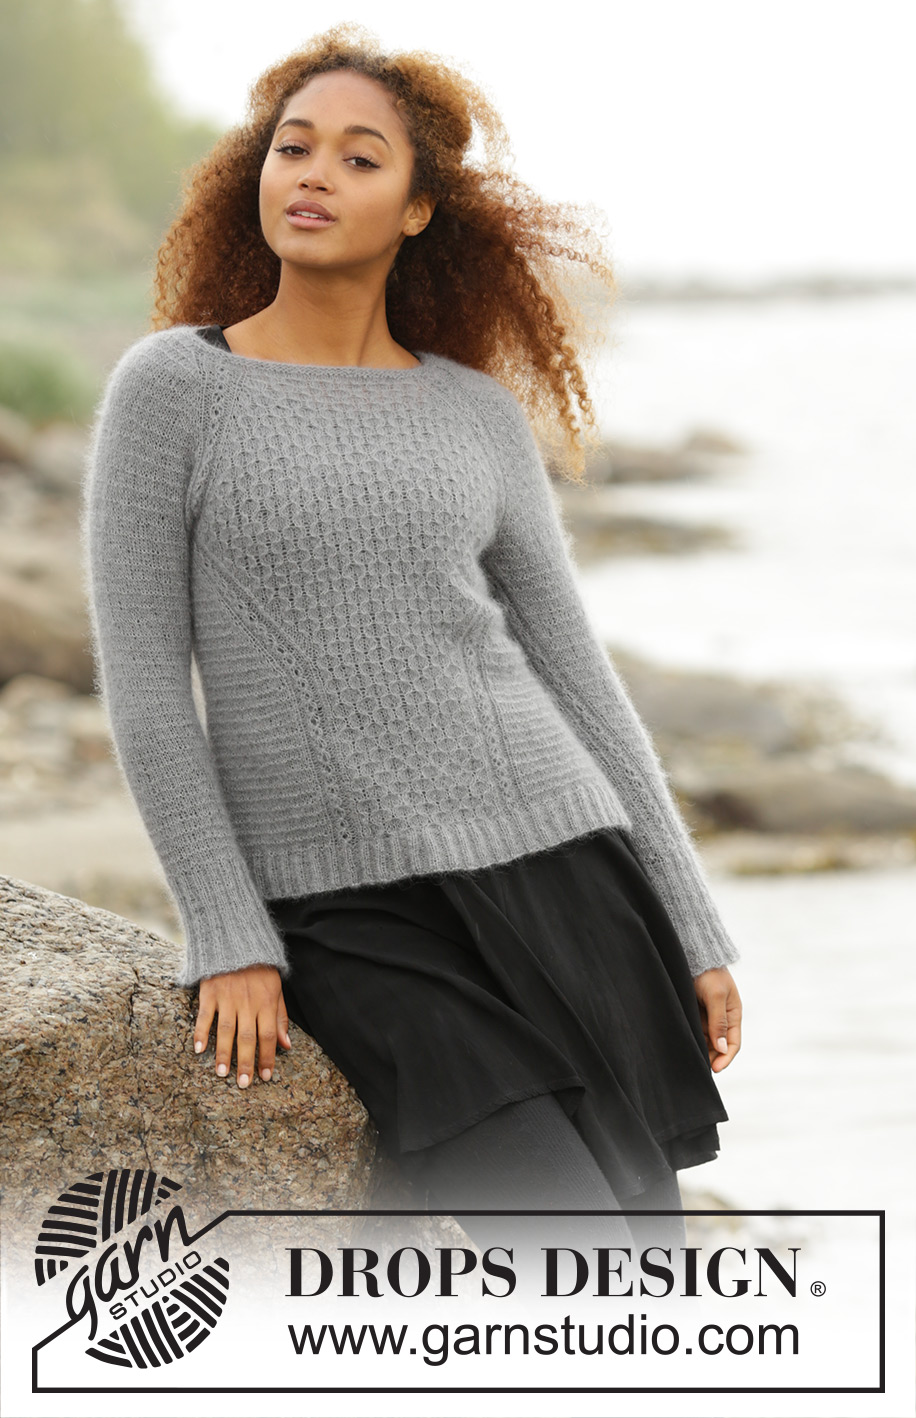
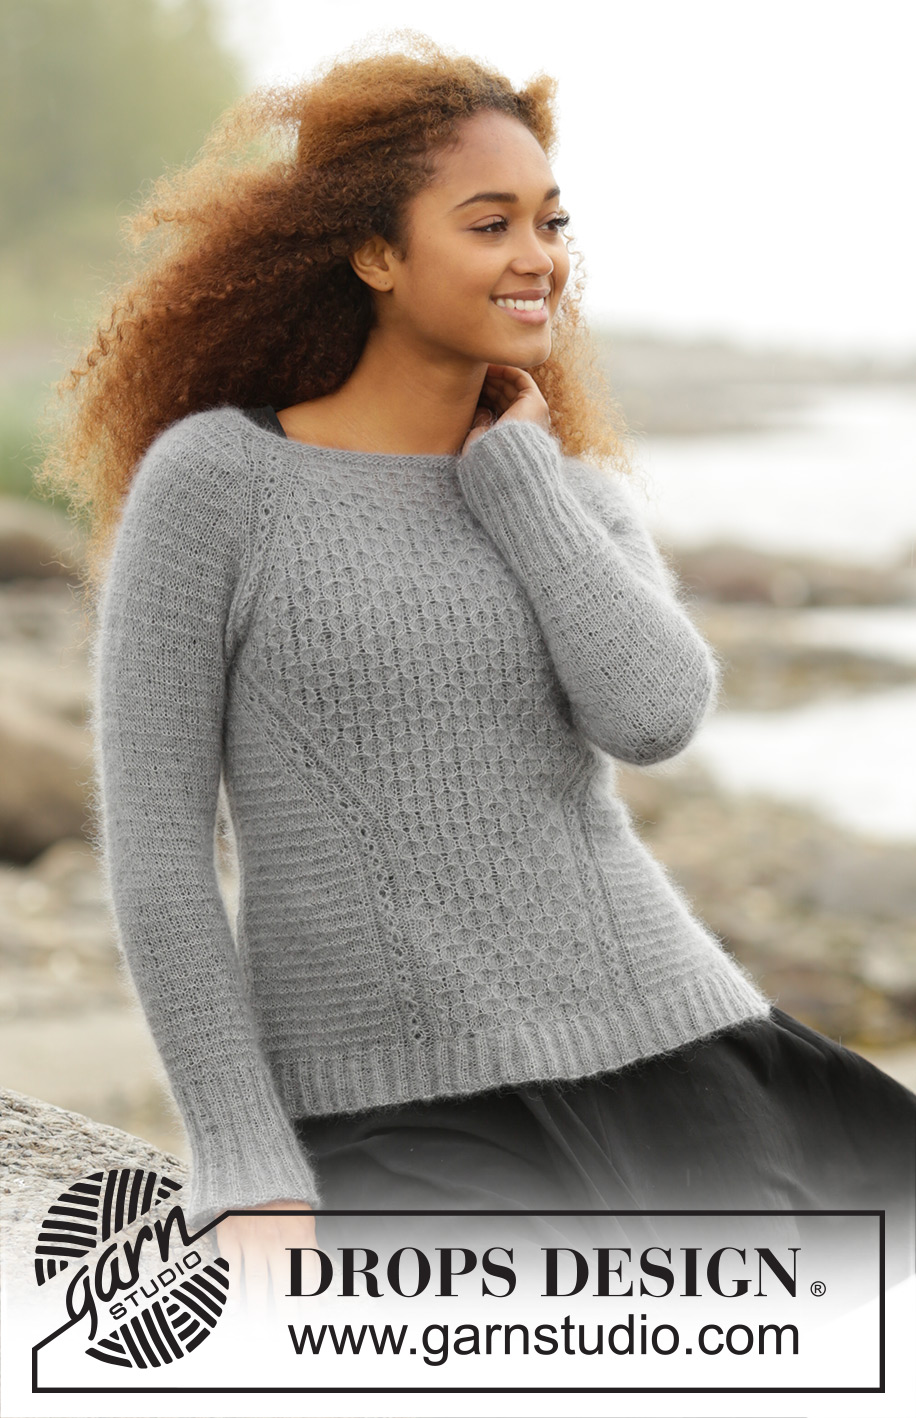
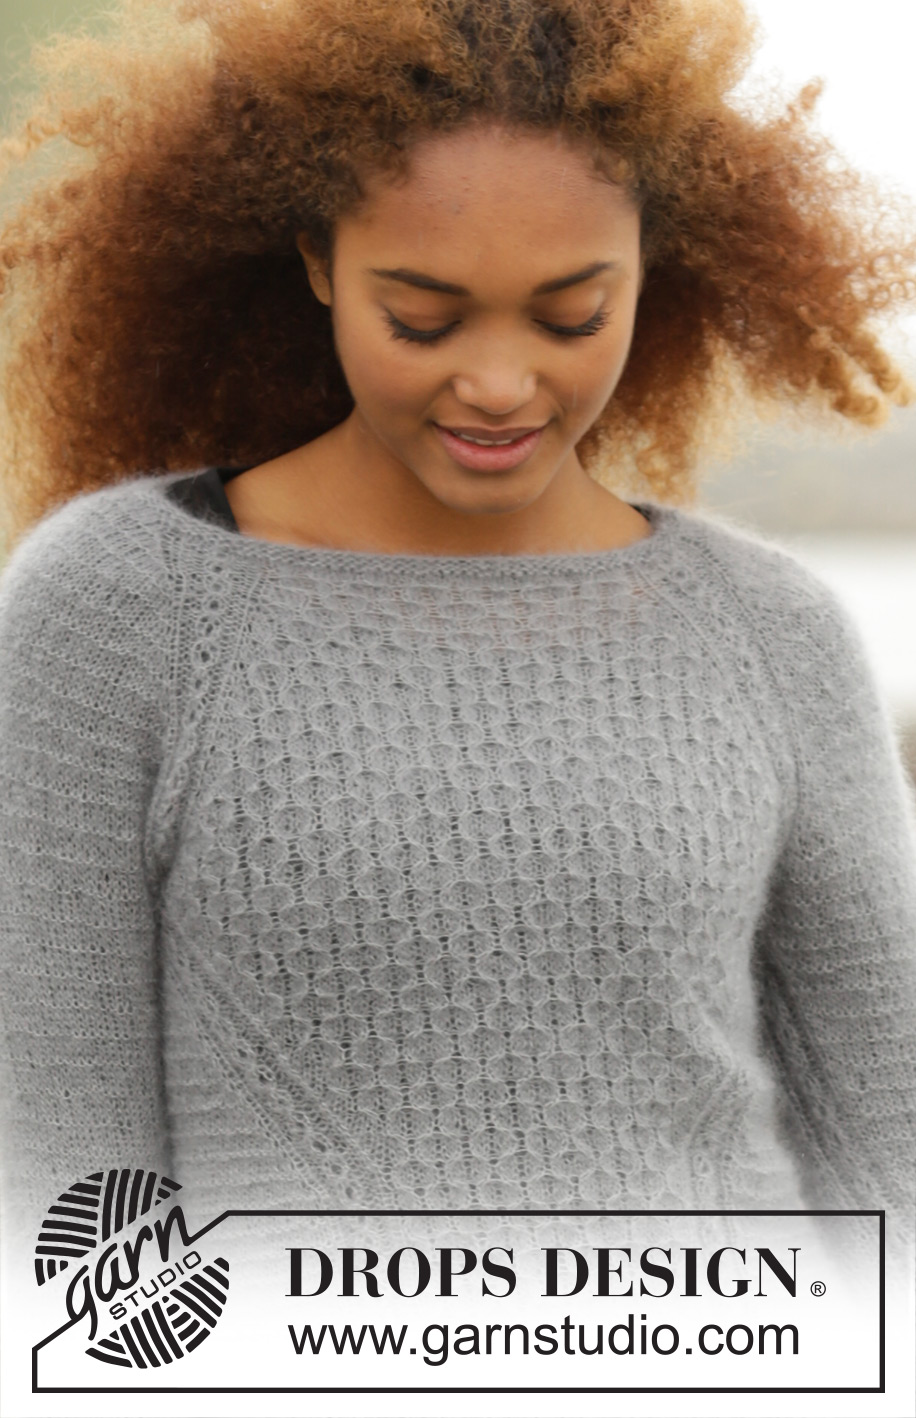
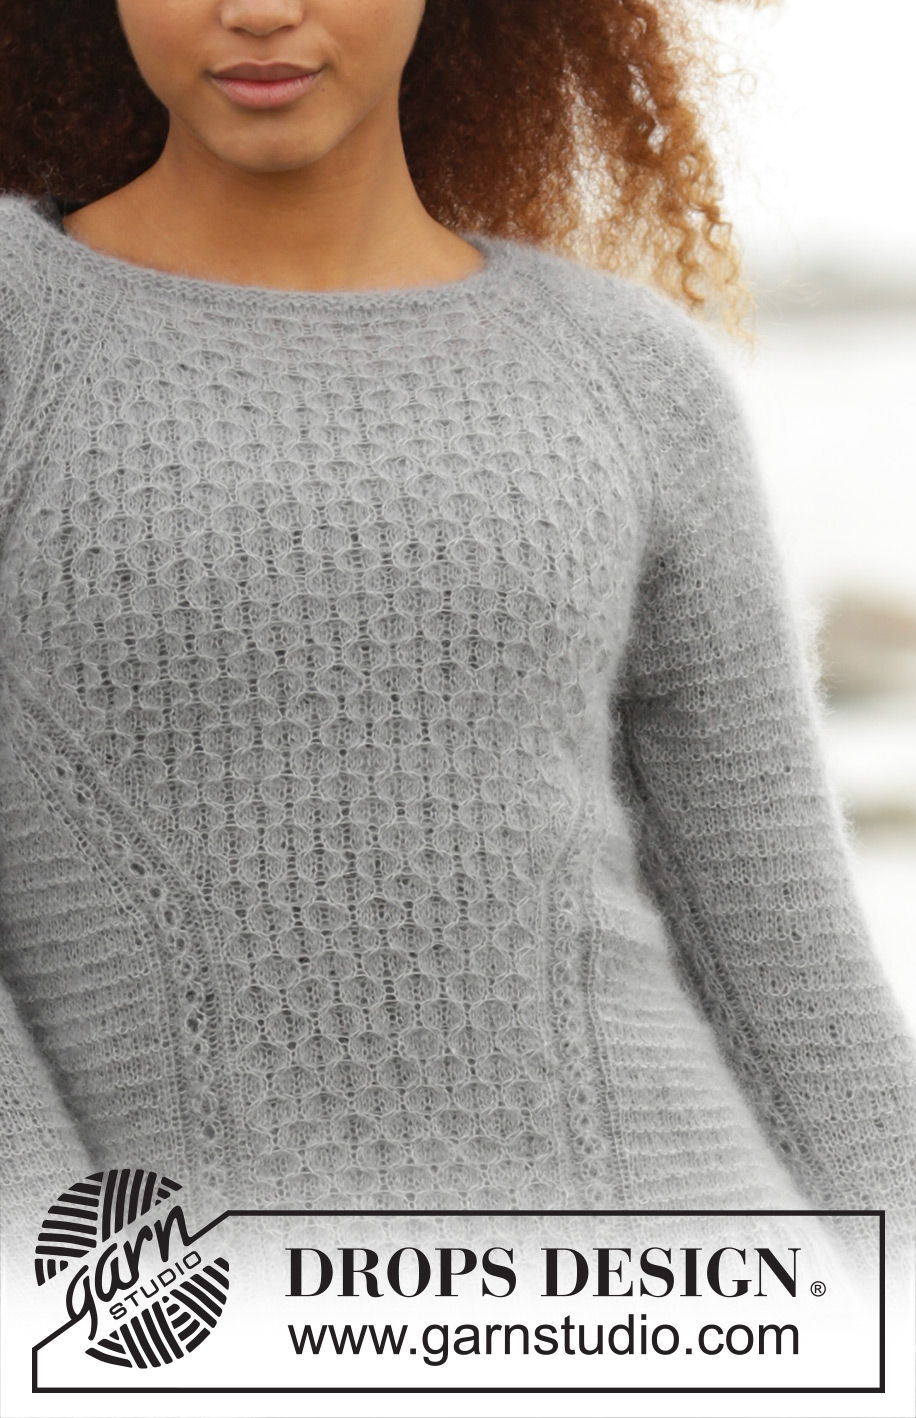
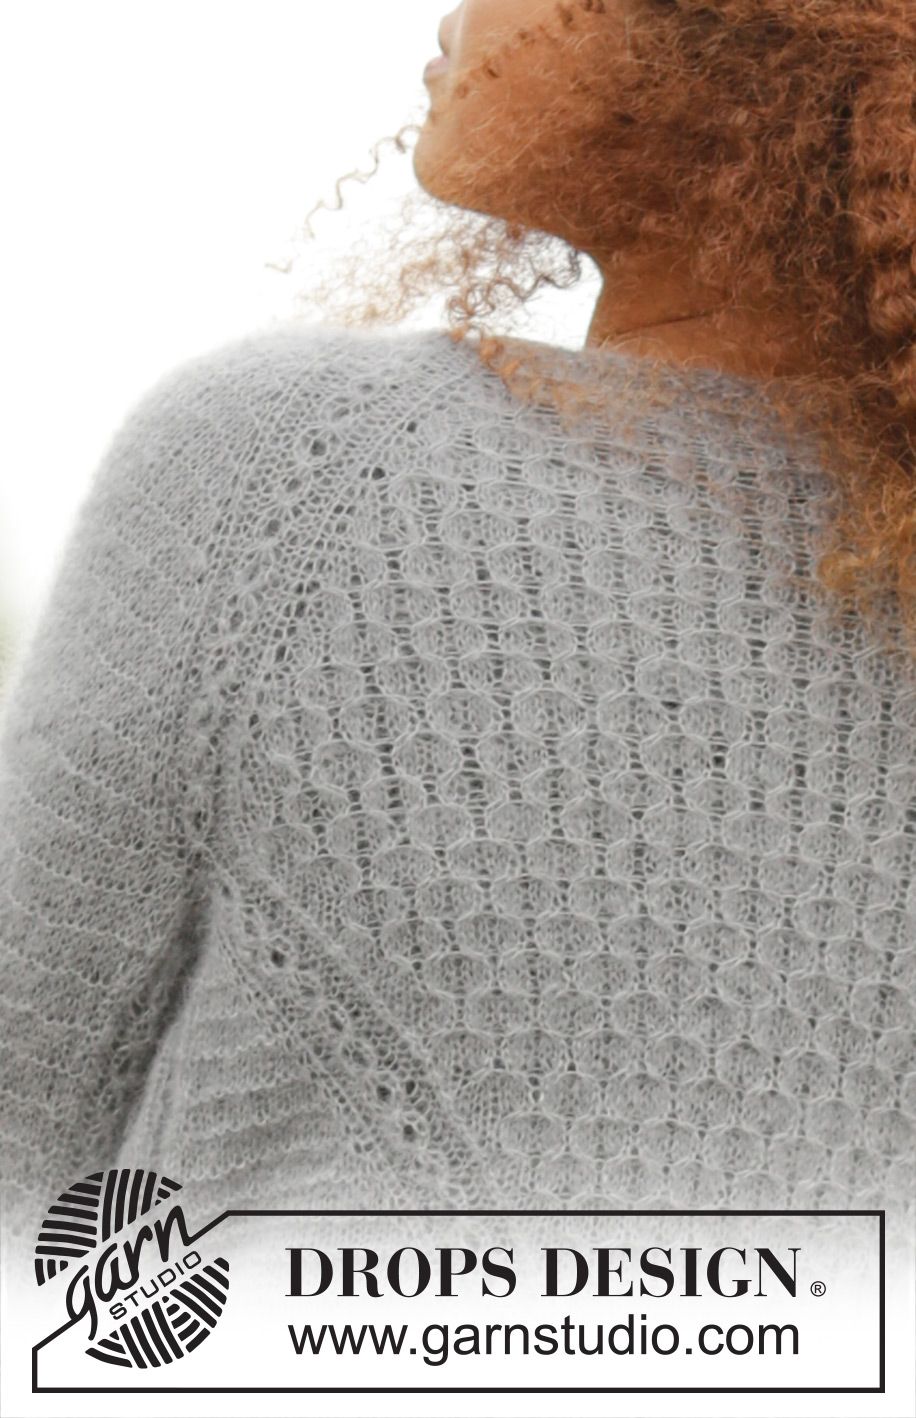
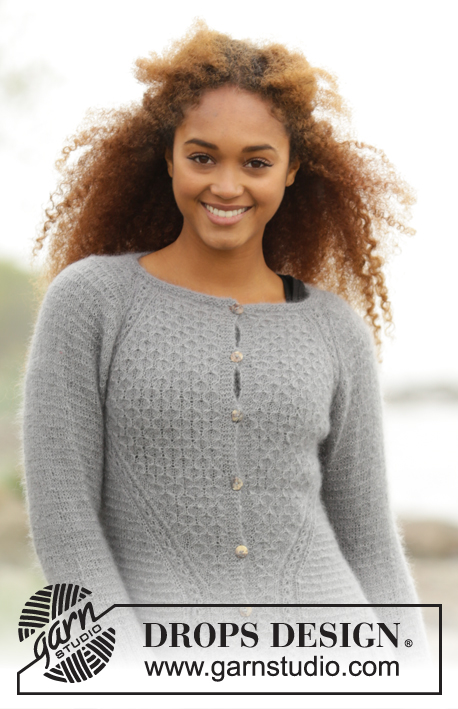
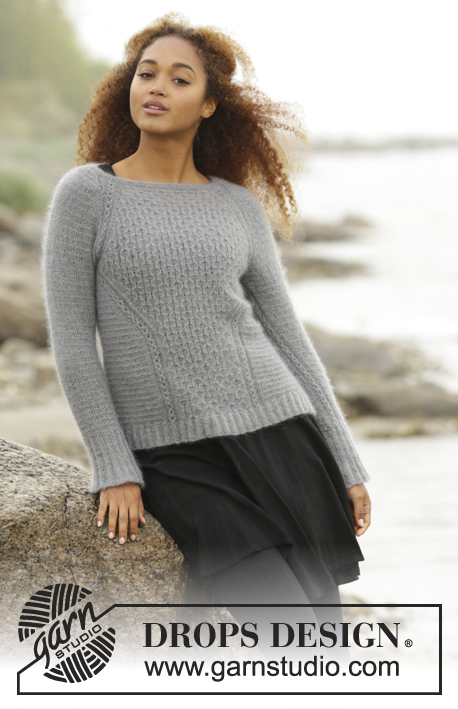
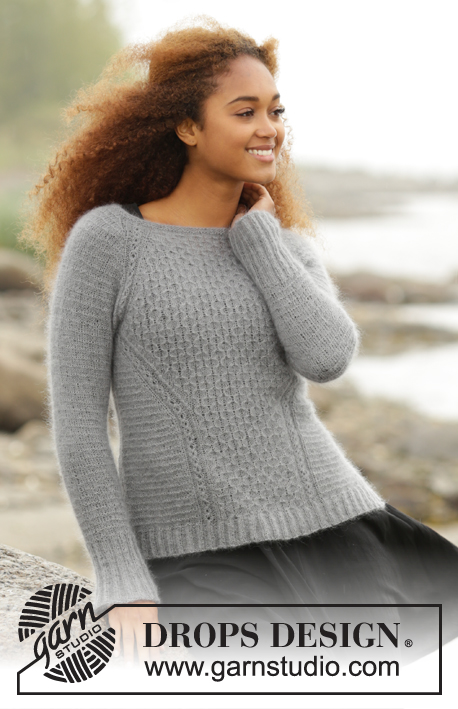
Knitted DROPS jumper, worked top down with raglan and textured pattern in “Kid-Silk”. Size: S - XXXL.
DROPS 171-24 |
||||||||||||||||||||||
|
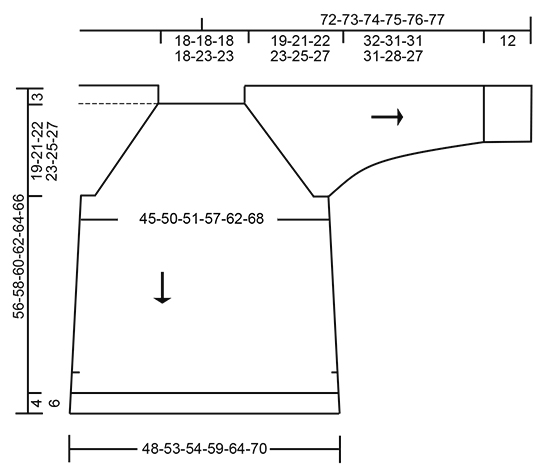
GARTER ST (worked in the round): 1 ridge = 2 rounds. * K 1 round and P 1 round *, repeat from *-*. GARTER ST (back and forth): K all rows. 1 ridge = 2 rows K. PATTERN: See diagrams A.1 to A.3. The diagrams show all rows in pattern seen from RS. RAGLAN: Inc for raglan on each side of A.2 in every transition between sleeve and body. Inc 1 st by making 1 YO, on next row work YO twisted to avoid holes. Work the inc sts in stocking st until the fit A.1 on body and work them in A.3 on sleeves NOTE: Inc differently on body and sleeves as explained in pattern and on some rounds there will only be inc on front and back piece and not on sleeves. DISPLACEMENT IN A.2 (applies to front and back piece after armhole): A.2 should be displaced from the side under sleeve to mid front/mid back. On right front/back piece this is done as follows: Work as before until A.2, make 1 YO, work A.2 as before but when last st in A.2 remains slip this st as if to K, K 1 and psso. Continue pattern as before. On next round work YO twisted to avoid holes - work new sts in A.3. On left front/back piece this is done as follows: Work as before until 1 st remains before A.2, K next st tog with first st in A.2, work A.2 as before, make 1 YO and work the remaining sts as before. On next round work YO twisted to avoid holes - work new sts in A.3. INCREASE TIP (applies to sides of body): Inc 1 st by making 1 YO, on next round work YO twisted to avoid holes. Work the inc sts in A.3. DECREASE TIP (applies to sleeves): Dec 2 sts mid under sleeve as follows: Beg 2 sts before A.2, K 2 tog, work A.2 (= 8 sts), slip next st as if to K, K 1, psso (= 2 sts dec). ---------------------------------------------------------- JUMPER: Worked in the round on circular needle from top down. YOKE: Cast on 100-100-100-100-124-124 sts on circular needle size 3 mm with Kid-Silk. Work 2 ridges in GARTER ST - see explanation above. K 1 round while inc 20 sts evenly in all sizes = 120-120-120-120-144-144 sts. Switch to circular needle size 3,5 mm. Work next round as follows: A.2 (= 8 sts in raglan line), A.3 over the next 8 sts (= right sleeve), A.2 (= 8 sts in raglan line), A.1 over the next 36-36-36-36-48-48 sts (= 6-6-6-6-8-8 repetitions of 6 sts on front piece), A.2 (= 8 sts in raglan line), A.3 over the next 8 sts (= left sleeve), A.2 (= 8 sts in raglan line), A.1 over the last 36-36-36-36-48-48 sts (= 6-6-6-6-8-8 repetitions of 6 sts on back piece). Continue pattern like this. REMEMBER THE KNITTING TENSION AT THE SAME TIME on next round beg inc for RAGLAN – see explanation above! NOTE: Inc differently on body and sleeves: BODY: Inc on every round 0-6-5-12-10-16 times in total, then on every other round 18 times in total in all sizes and finally every 4th round 6-6-7-6-8-8 times in total. SLEEVES: Inc every other round a total of 14-19-27-30-33-32 times, and on every 4th round a total of 8-7-4-3-3-5 time. After all inc are done there are 304-344-364-396-432-460 sts on needle. Work next round as follows: Work 4 sts (= ½ repetition of A.2), slip the next 60-68-78-82-88-90 sts on 1 stitch holder (= right sleeve), cast on 12-12-14-14-14-16 sts under sleeve, work the next 92-104-104-116-128-140 sts (= front piece), slip the next 60-68-78-82-88-90 sts on 1 stitch holder (= left sleeve), cast on 12-12-14-14-14-16 sts under sleeve, work the remaining 88-100-100-112-124-136 sts (= back piece). Cut the yarn. BODY: = 208-232-236-260-284-312 sts on needle (beg of round = in the middle of the 12-12-14-14-14-16 new sts under sleeve in the right side of piece). Insert 1 marker, NOW MEASURE PIECE FROM HERE! Work next round as follows: 2 sts in garter st, 0-0-1-1-1-2 sts pattern according to diagram A.3, continue A.2 over the next 8 sts, continue A.1 over the next 84-96-96-108-120-132 sts at the front of jumper, continue A.2 over the next 8 sts, work 0-0-1-1-1-2 sts pattern according to diagram A.3, 4 sts in garter st (insert 1 marker in the middle of these 4 sts = in the middle of left side), 0-0-1-1-1-2 sts pattern according to diagram A.3, continue A.2 over the next 8 sts, continue A.1 over the next 84-96-96-108-120-132 sts at the back of jumper, continue A.2 over the next 8 sts, work 0-0-1-1-1-2 sts pattern according to diagram A.3 and finish with 2 sts in garter st. Continue pattern like this. AT THE SAME TIME on next round beg DISPLACEMENT IN A.2 – see explanation above. Repeat displacement every other round 24-24-24-24-30-30 times in total - NOTE: When displacing A.2, the total no of sts will be the same but there will be fewer sts in A.1 towards mid front and mid back and more sts in A.3 towards the sides. Sts in A.1 that do not fit in pattern when displacing, is worked in stocking st until they fit pattern again. AT THE SAME TIME when piece measures 6 cm from marker, inc 1 st on each side of the 4 sts in garter st in each side - READ INCREASE TIP. Inc like this every 6 cm a total of 3 times = 220-244-248-272-296-324 sts. After last displacement there will be 6-8-8-10-10-12 repetitions of A.1 mid front/mid back (i.e. 36-48-48-60-60-72 sts with A.1). Now continue pattern without displacements. When piece measures 22-22-23-24-24-24 cm from marker (jumper measures approx. 44-46-48-50-52-54 cm from shoulder) divide the piece in the middle of the 4 sts in garter st in each side and finish front and back piece separately. BACK PIECE: = 110-122-124-136-148-162 sts. Continue pattern as before with 2 edge sts in garter st in each side until piece measures 30-30-31-30-30-30 cm from marker (jumper measures approx. 52-54-56-56-58-60 cm from shoulder). P 1 row from WS while inc 8-8-6-6-6-8 sts evenly = 118-130-130-142-154-170 sts - NOTE: Continue the 2 edge sts in each side in garter st and continue A.2 with K over K and P over P (i.e. do not inc over A.2 or sts in garter st). Switch to circular needle size 3 mm and work next row from RS as follows: 2 edge sts in garter st, * K 2, P 2 *, repeat from *-* until 4 sts remain on needle, finish with K 2 and 2 edge sts in garter st (adjust so that rib fits rib in A.2). Continue rib like this but on next row from RS inc all 2 P sts to 3 P sts (inc 1 st by making 1 YO in transition between K and P, on next row K YO twisted to avoid holes) = 146-161-161-176-191-211 sts. When rib measures 4-4-4-6-6-6 cm, loosely cast of with garter st over garter st, K over K and P over P (to avoid a tight cast-off edge cast off with 2 strands Kid-Silk). Jumper measures approx. 56-58-60-62-64-66 cm from shoulder and down. FRONT PIECE: = 110-122-124-136-148-162 sts. Work as on back piece. SLEEVE: Worked in the round on a short circular needle, switch to double pointed needles when needed. Slip the 60-68-78-82-88-90 sts from stitch holder in one side of piece back on a short circular needle size 3.5 mm and cast in addition on 12-12-14-14-14-16 new sts mid under sleeve = 72-80-92-96-102-106 sts. NOW MEASURE PIECE FROM HERE! Continue A.3 in the round but now work A.2 only over the middle 8 sts under sleeve. When sleeve measures 1½ cm, dec 1 st on each side of A.2 - READ DECREASE TIP (= 2 sts dec). Dec a total of 13-16-21-22-23-24 times in Size S: On every 7th round, in size M: Alternately on every 5th and 6th round, in size L + XL: On every 4th round, in size XXL: Alternately on every 3rd and 4th round and in size XXXL. On every 3rd round = 46-48-50-52-56-58 sts. When sleeve measures 32-31-31-31-28-27 cm, K 1 round while inc 14-16-18-16-16-14 sts evenly = 60-64-68-68-72-72 sts. Switch to double pointed needles size 3 mm and work rib in the round over all sts (= K 2/P 2 but adjust to continue rib over A.2 mid under sleeve). When rib measures 8 cm, inc all P 2 to P 3 = 75-80-85-85-90-90 sts. When rib measures 12 cm (or desired length, sleeve measures now approx. 44-43-43-43-40-39 cm), cast off with K over K and P over P - NOTE: To avoid a tight cast-off edge cast off with 2 strands Kid-Silk. ASSEMBLY: Sew the opening under the sleeves. |
||||||||||||||||||||||
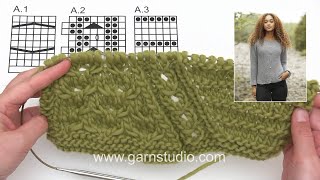
Diagram explanations |
||||||||||||||||||||||
|
||||||||||||||||||||||
 |
||||||||||||||||||||||
 |
||||||||||||||||||||||
Have you finished this pattern?Tag your pictures with #dropspattern #mistyharborsweater or submit them to the #dropsfan gallery. Do you need help with this pattern?You'll find 25 tutorial videos, a Comments/Questions area and more by visiting the pattern on garnstudio.com. © 1982-2026 DROPS Design A/S. We reserve all rights. This document, including all its sub-sections, has copyrights. Read more about what you can do with our patterns at the bottom of each pattern on our site. |
||||||||||||||||||||||


With over 40 years in knitting and crochet design, DROPS Design offers one of the most extensive collections of free patterns on the internet - translated to 17 languages. As of today we count 324 catalogues and 12267 patterns translated into English (UK/cm). 12267
We work hard to bring you the best knitting and crochet have to offer, inspiration and advice as well as great quality yarns at incredible prices! Would you like to use our patterns for other than personal use? You can read what you are allowed to do in the Copyright text at the bottom of all our patterns. Happy crafting!
Post a comment to pattern DROPS 171-24
We would love to hear what you have to say about this pattern!
If you want to leave a question, please make sure you select the correct category in the form below, to speed up the answering process. Required fields are marked *.